background image


5. Software Control - Lightware Device Controller


UMX-HDMI-140 series– User's Manual 

59

Applied firmware package: v1.3.0b5 | LDC software: v2.5.6b2

Linking a Macro (Action)

DIFFERENCE: 

This feature is available only 

in  UMX-HDMI-140-Plus  model  from  FW 

package v1.3.0b5.

Macros stored in the device can be run as 

Actions. Thus, a lot of commands can be run 

by using only one Event. The commands will 

be processed one-by-one after each other.


#macro

Step 1. 

Click on the 

Edit

 button of the desired 

Event; the 

Event editor

 is displayed.

Step 2. 

The wizard mode is the default, press 

the 

Macros

 button in the 

Action

 panel.

Step 3. 

Select the desired 

Macro 

from the list 

then press the 

Apply

 button to store 

settings.

If the 

Use variables 

option is enabled, you can 

link a variable by the 

$

 character. If you do so 

(e.g. $1), the device will handle it as the V1 variable. You can send the value of the variable e.g. as a TCP 

message.
See more information about the Macro settings in the

 Macros 

section. 

 #new

5.10.3. 

Special Tools and Accessories

The Name of the Event

The name of a port can be changed by typing the new name and clicking the 

Set

 button. The following 

characters are allowed when naming:

Letters (A-Z) and (a-z), numbers (0-9), special characters: hyphen ( - ), underscore ( _ ), and space ( ).

Enable or Disable an Event

The set Event can be enabled or disabled in the Event list, or directly in the Event editor window by setting 

the 

tick mark

 beside the name.

Testing the Condition

When the desired Condition is arranged, the setting can be tested. The Event list and the Event editor contains 

a small panel that shows if the set condition is detected and how many times. The 

Counter

 can be reset by 

the button in Event editor. If the Condition is true, the 

detected

 mark turns green for two seconds and the 

Counter

 is increased.

Testing the Action

The method is the same as testing the Condition, but in this case, the Action can be triggered manually by 

pressing the 

Test

 button.

TIPS AND TRICKS: 

The Test button is also placed on the Action panel in the Event list. Thus, you can 

check the Actions without opening the Event editor.

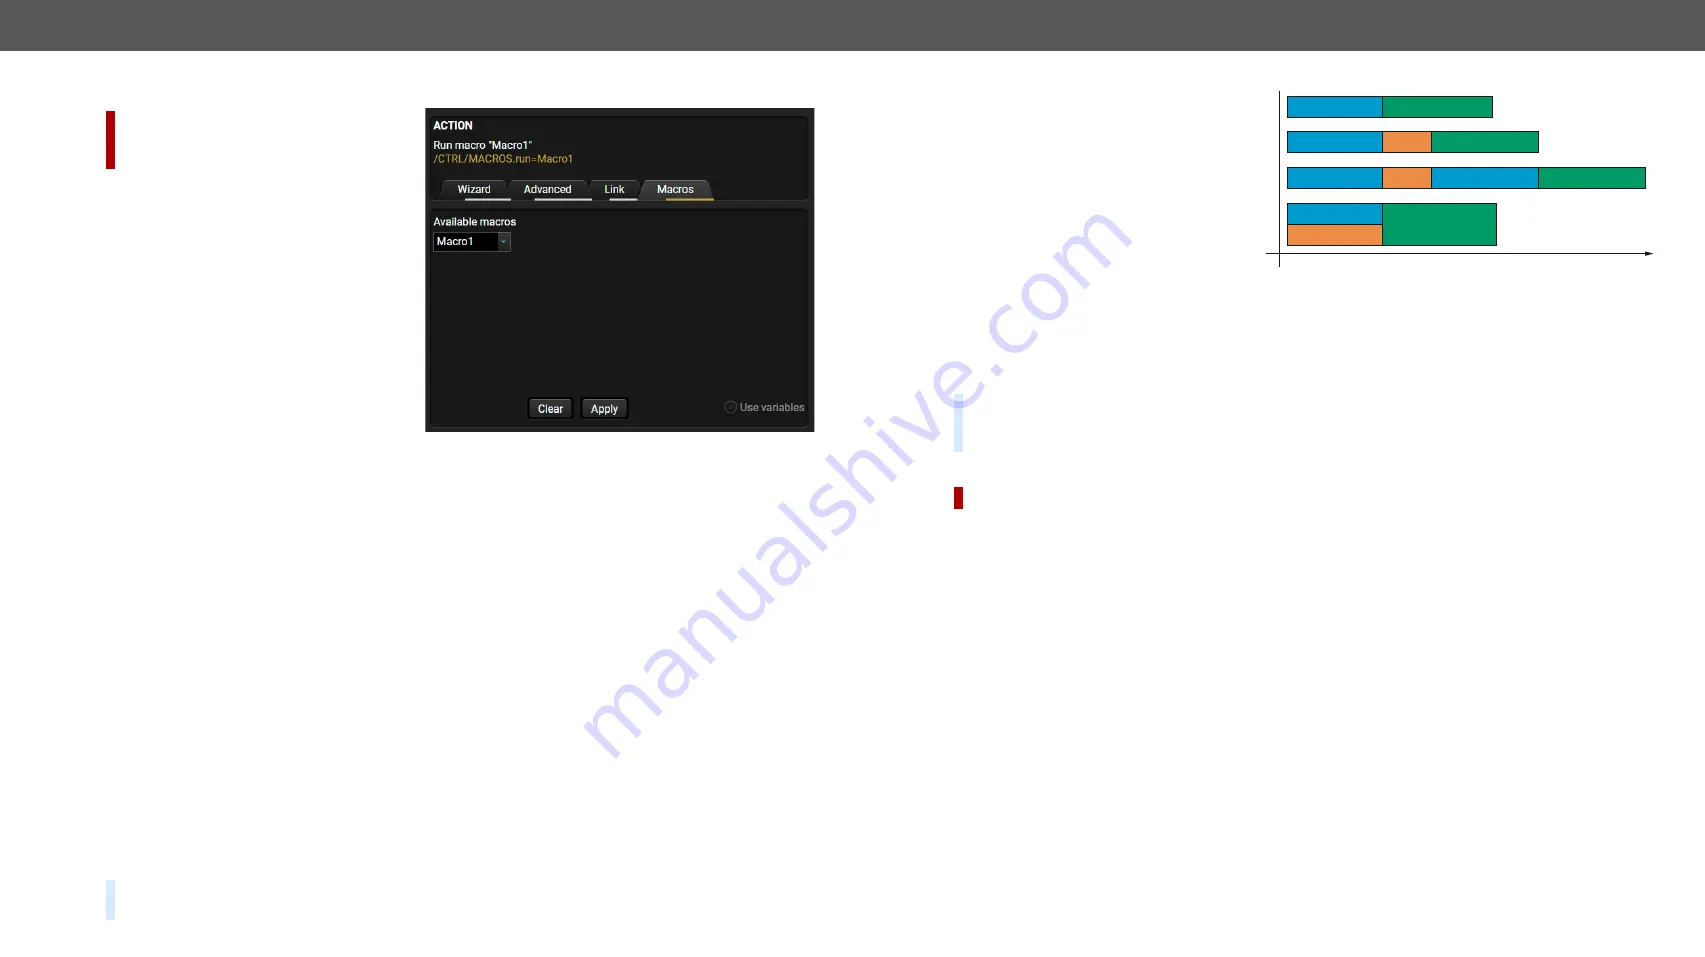
Delay the Action

In most cases the Action is 

performed immediately after 

the Condition is detected. But 

sometimes a delay is necessary 

between the Condition and the 

Action. Therefore, the new Event 

manager contains the Delay panel 

which allows that feature with 

below settings:


No delay

: when the Condition is detected, the Action is launched.


Simple delay

: when the Condition is detected, the Action is launched after the set time interval.


Still true after

: when the Condition is detected, the Action is launched after the set time interval only if 

the Condition still exists.


Continuously true

: when the Condition is detected, the Action is launched after the set time interval only 

if the Condition has been existing continuously.

TIPS AND TRICKS: 

Show advanced expressions

 option is a useful tool when you look for the path or value 

of a property but just the expression is displayed. The option is available in the Event list window or when 

Link tool is used.

Variables

DIFFERENCE: 

This feature is available only in UMX-HDMI-140-Plus model from FW package v1.3.0b5.

The variables and the tools (shown in the Control/Variables tab) can be used in the Event Manager.

Condition Wizard

 #variables  #new

The desired variable can be checked if its value is changed to a specific value.

Action Wizard

The value of a variable can be set/changed by the same methods as in the Control/Variables tab:


Setting the exact value


Increasing the value with/without limits


Converting the value (e.g. interval change)


Scanning and storing, or reformatting a property/parameter

If the 

Use variables 

option is enabled, you can link a variable by the 

$

 character. If you do so (e.g. $1), the 

device will handle it as the V1 variable. You can send the value of the variable e.g. as a TCP message.

Delay

Condition = true

Condition = true

Condition = true

Condition = true

continously

true

still true after

simple delay

no delay

Perform the action

Perform the action

Delay

Delay

Perform the action

Condition = true Perform the action

Time

 

Содержание UMX-HDMI-140

Страница 1: ...UMX HDMI 140 UMX HDMI 140 Plus User s Manual User s Manual Universal Multimedia Switcher v3 1 11 05 2021...

Страница 2: ...or mount in accordance with the installation instructions The apparatus shall not be exposed to dripping or splashing and that no objects filled with liquids such as vases shall be placed on the appa...

Страница 3: ...help you to find the relevant information as quick as possible The format of the keywords is the following keyword The usage of the keywords use the Search function Ctrl F Cmd F of your PDF reader app...

Страница 4: ...29 4 10 GPIO Interface 30 4 11 IR Interface 30 4 12 The Event Manager Feature 31 4 13 Further Built in Features 32 4 13 1 Device Cloning Configuration Backup and Restore 32 4 13 2 Consumer Electronics...

Страница 5: ...ons 87 7 4 9 Disable the Default Function of the Front Panel Buttons 87 7 4 10 Identify the Device 87 7 4 11 Dark Mode 87 7 4 12 Dark Mode Delay 87 7 4 13 Running a Macro 88 7 5 Cleartext Login Protec...

Страница 6: ...7 17 1 Sending a Message ASCII format via RS 232 115 7 17 2 Sending a Text ASCII format via RS 232 115 7 17 3 Sending a Binary Message HEX format via RS 232 115 7 17 4 Using Hexadecimal Codes 115 7 1...

Страница 7: ...el Accurate Reclocking 147 11 APPENDIX 148 11 1 Specification 149 11 2 Content of Backup File 151 11 3 Input Output Port Numbering 152 11 4 Mechanical Drawings 152 11 5 Cable Wiring Guide 153 11 5 1 S...

Страница 8: ...v2 5 6b2 1 Introduction Thank you for choosing Lightware s UMX HDMI 140 series switcher family In the first chapter we would like to introduce the device highlighting the most important features in t...

Страница 9: ...can be mounted on a rack shelf or used standalone UMX HDMI 140 is compatible with HDMI extenders and matrix switchers Model Denomination About the Serial Number Lightware devices contain a label indic...

Страница 10: ...led with both LW2 and LW3 commands Miniweb The Miniweb is able to display an adaptive surface with a virtual crosspoint and buttons for Event manager Actions The miniweb can be displayed in a mobile d...

Страница 11: ...tors as well The device also accepts analog audio signals from two different sources You can see all accepted interfaces of the device in the Electrical Connections section UMX HDMI 140 transmits HDMI...

Страница 12: ...with VGA HDMI DVI DisplayPort or Thunderbolt connectors as well The device also accepts analog audio signals from two different sources You can see all accepted interfaces of the device in the Electri...

Страница 13: ...r device The HDMI Extender does not need local powering because it can be supplied via the HDMI cable The Switcher can be controlled easily via LAN network using our controller software LDC see the de...

Страница 14: ...e package v1 3 0b5 LDC software v2 5 6b2 2 Product Overview The following sections are about the physical structure of the device input output ports and connectors Front View Rear View Status LEDs Fro...

Страница 15: ...g the device with LDC or third party control systems or third party device control Pin assignment can be found in the RS 232 Connector section 3 GPIO 8 pole Phoenix connector for configurable general...

Страница 16: ...put green on Signal is present on output HDCP LED off Output signal is not HDCP encrypted green blinking Non HDCP capable device is connected encrypted signal is replaced with red screen green on Outp...

Страница 17: ...n and operational Step 2 Press and keep pressed the Show Me button for 10 seconds After 5 seconds front panel LEDs start blinking but keep on pressing the button Step 3 After 10 seconds the LEDs start...

Страница 18: ...are package v1 3 0b5 LDC software v2 5 6b2 3 Installation The chapter is about the installation of the device and connecting to other appliances presenting also the mounting options and further assemb...

Страница 19: ...stened on the shelf To order mounting accessories please contact sales lightware com WARNING Always use the supplied screws Using different e g longer ones may cause damage to the device INFO The swit...

Страница 20: ...ical Sync 23 TMDS Clock 9 TMDS Data1 24 TMDS Clock 10 TMDS Data1 C1 Analog Red 11 TMDS Data1 Shield C2 Analog Green 12 not connected C3 Analog Blue 13 not connected C4 Analog Horizontal Sync 14 5V Pow...

Страница 21: ...ollowing for the detector and the emitter Detector 3 pole TRS Emitter 2 pole TS 1 Tip Signal active low 1 Tip 5V 2 Ring GND 2 Ring Signal active low 3 Sleeve 5V 3 Sleeve INFO Ring pole of the emitter...

Страница 22: ...HDMI Connect the sink e g HDTV to the HDMI output port by an HDMI cable RS 232 Optionally for RS 232 control connect a controller controlled device e g HD TV to the RS 232 port IR Optionally for Infra...

Страница 23: ...bes the features of the device with few real life examples The topics that are described Universal Switcher Concept Port Diagram Video Interface Audio Interface The Autoselect Feature Serial Interface...

Страница 24: ...ut ports 3 5mm Jack 5 pole Phoenix The analog signals are converted to digital ones The user can choose which audio signal is transmitted on the HDMI output port one from the analog audio sources or t...

Страница 25: ...eo signal is up to 225 MHz If the output video is 4K the audio embedding function is not available 4 4 2 Audio Options Example The Concept Three audio sources are connected to the switcher a Blu ray p...

Страница 26: ...riority 2 has a valid signal N Port with priority 0 is selected Port with priority 1 is selected Port with priority 2 is selected Port with priority 30 is selected Y Y Y 4 5 1 Automatic Input Selectio...

Страница 27: ...tional converter The TCP IP data is converted to RS 232 data and vice versa For this operation separated TCP IP port number is defined independent of the basic ones which are used for device control o...

Страница 28: ...PING on P1 port of RS 232 to the VC codec For more details see Message Sending via RS 232 Serial Port section E2 Set a condition where Login name is the recognized RS 232 message Action is sending se...

Страница 29: ...ted TCP IP ports individually to enable or disable The IP Port Block feature is an additional protection for the Cleartext login There are TCP IP ports in Lightware devices which are not protected by...

Страница 30: ...lay 2 to close and the projection screen is rolled down When the presentation is ended signal ceases on the VGA input so GPIO pins send signal to Relay 1 to close which results turning on the lights a...

Страница 31: ...n the Event Manager section Event Manager The AND Operator DIFFERENCE This feature is available from FW package v1 3 0b5 The practical experience has shown that there is a need to examine more conditi...

Страница 32: ...ommands on HDMI IN I2 port towards the source on HDMI OUT O1 port towards the sink CEC has a dedicated pin in the HDMI connector DVI connector does not contain this pin so the CEC transmission brakes...

Страница 33: ...t and RS 232 port using Lightware Device Controller LDC The software can be installed on a Windows PC or macOS The application and the User s manual can be downloaded from www lightware com Install an...

Страница 34: ...rent and the update version number can be seen at the top of the window and they are shown in this window even with the snapshot install The Update window can also be opened by clicking the About icon...

Страница 35: ...ces that was exported previously Add New Favorite Device Press the Add button in the appearing window you can enter the IP address The hostname of the desired device can be used instead if it is suppo...

Страница 36: ...he desired serial port to display the device s name and serial number Double click on the device or select it and click on the green Connect button ATTENTION Before the device is connected via the loc...

Страница 37: ...the IP address will appear as a tooltip text 3 Video input ports Each tile represents a video input port The tile below the port shows the current crosspoint setting if the port is switched to the ou...

Страница 38: ...port signal Icon Icon is grey Icon is black Icon is green A Signal is not encrypted with HDCP Signal is encrypted with HDCP A Port is unmuted Port is muted A Port is unlocked Port is locked A Autosele...

Страница 39: ...justed here if needed Timing presets can be saved for each resolution separately User has 32 user presets to store different timing data Analog options and Presets windows in LDC 5 5 2 Digital Video I...

Страница 40: ...rtstatus Mute unmute the port Lock unlock the port Volume from 0 dB to 52 dB step 0 25 dB from 54 dB to 66 dB step 2 dB 69 dB 72 dB 78 dB default is 0 dB Balance from 0 to 100 step 1 default is 50 cen...

Страница 41: ...eature in the The Autoselect Feature section Signal type Auto DVI HDMI 24 bit HDMI 30 bit HDMI 36 bit The outgoing signal format can be selected by a drop down menu HDCP mode Auto Always The switcher...

Страница 42: ...is a good troubleshooter if compatibility problems occur during system installation To access this function open the port properties window and click on Frame detector button diagnostic framedetector...

Страница 43: ...ern Configuration on Testpattern Port I6 Resolution Set the desired image resolution from the drop down menu Color Click on the desired color or use the sliders and press the Set color button to store...

Страница 44: ...ce The maximum length of the message could be 30 characters 15 bytes Click on the Send button to execute sending the command 3 OSD string textbox A max 14 character long text can be shown on the sink...

Страница 45: ...The process is the same as changing the emulated EDID the only difference is the Destination panel press the User button Thus one or more EDIDs can be copied into the user memory either from the fact...

Страница 46: ...D Editor window The editor can read and write all descriptors which are defined in the standards including the additional CEA extensions Any EDID from the device s memory or a saved EDID file can be l...

Страница 47: ...ew window EDID Creator Window 5 9 Control Menu 5 9 1 RS 232 RS 232 tab in the Control menu The following settings and functions are available on the local RS 232 port serial rs232 rs 232 protocol Oper...

Страница 48: ...izer in RS 232 Recognizer Example When the UMX HDMI 140 Plus has an active video signal the switcher login the VC codec automatically The signal presence triggers a bi directional communication with t...

Страница 49: ...ack highlight means the current setting INFO Output level can be set only in case of setting the pin direction to Output In case of input direction the output level setting and the Toggle button is no...

Страница 50: ...UMX HDMI 140 Plus model from FW package v1 3 0b5 This tab is for the preparation and monitoring interface for the TCP recognizer which may trigger Event Manager Actions A simple example can be seen in...

Страница 51: ...batch of commands can be sent over HTTP to the Lightware device for processing Post the commands to the IP_address protocol lw3 address and the commands are processed immediately and sequentially htt...

Страница 52: ...tected currently Repeat timeout ms You can set a timeout to avoid the involuntary code recurrence Actions Action buttons for the desired IR code Save saving the fingerprint Cancel canceling the finger...

Страница 53: ...o the Send Pronto Hex entry field and click the Send button The maximum length of the code can be 765 characters 765 bytes For more details about the accepted IR code formats see Infrared Message Send...

Страница 54: ...file and press Open ATTENTION The preset and the macros of the selected slot will be erased If there is a macro with the same name already in the device it will be removed and the new one will be ava...

Страница 55: ...if the result would be lower than the min setting the min will be valid Cycle button the operand will be added to the current value If the result would be beyond the limit min max the value will be s...

Страница 56: ...haracter set specified between brackets characters Negated character set specified between brackets which will be skipped Ignored part custom_text User defined text Examples Node Path 1 Property Value...

Страница 57: ...be opened by pressing the Edit button at each Event There is a grey bar on the left of the Event panel in each line If a condition and an action are set and the Event is enabled the bar is displayed...

Страница 58: ...e Step 4 Set the desired value and operator then press the Apply button to store settings INFO This mode is also available for setting the Action The Link Tool The new interface allows creating more a...

Страница 59: ...TIPS AND TRICKS The Test button is also placed on the Action panel in the Event list Thus you can check the Actions without opening the Event editor Delay the Action In most cases the Action is perfo...

Страница 60: ...how to set up an Event The Concept The UMX HDMI 140 Plus switcher is connected to a projector by the HDMI output port The switcher is also connected to the projector by the RS 232 port and can send c...

Страница 61: ...Identify me button results the blinking of the status in green for 10 seconds The feature helps identifying the device itself in the rack shelf identifyme 5 11 2 Network Network tab in the Settings m...

Страница 62: ...after enabling the dark mode darkmode Enable default function for Video Select Audio Select Function Show me button when this property is disabled it means that pushing the button will not perform th...

Страница 63: ...trol page allows the followings Source selection This block can be used to select an input or enable disable the Autoselect remotely e g from a mobile device Action triggers The action trigger buttons...

Страница 64: ...in its name will not be displayed as a trigger button The displayed trigger buttons will get a text label with the event name except the suffix To add the desired Action as a button append the name of...

Страница 65: ...ot used Step 4 Connect to the other device which has to be configured and upload restore your configuration file Step 5 Done You can have as many totally identical customized devices as you like ATTEN...

Страница 66: ...elect the desired MAC filter settings to be applied in the device See more information about this feature in the MAC Filter Allowlist section Step 6 Press the Start restore process button and click on...

Страница 67: ...sponse starts with character The color of each item depends on the type of the command and response The content of the window can be emptied by the Clear button If the Autoscroll option is ticked the...

Страница 68: ...led through a reduced command set of LW2 protocol commands to ensure the compatibility with other Lightware products The supported LW2 commands are described in this chapter Protocol Description Instr...

Страница 69: ...SCII format loc Location number in 1 2 or 3 digit ASCII format id id number in 1 or 2 digit ASCII format id2 id number in 2 digit ASCII format CrLf Carriage return Line feed 0x0D 0x0A Space character...

Страница 70: ...ls This command queries the active protocol of the currently used control interface protocol Command and Response p_ CURRENT PROTOCOL protocol CrLf Example p_ CURRENT PROTOCOL 1 Explanation The device...

Страница 71: ...ed controllers firmwareversion Command and Response fc CF device firmware_version CrLf CF END CrLf Example fc CF UMX HDMI 140 1 2 0b8 r45 CF END 6 3 11 Restarting of the Device The device can be resta...

Страница 72: ...N Analog video inputs does not contain embedded audio If you use the AV option in case of VGA input 01 the audio will be switched to the analog audio input 1 01 and in case of DVI A input 05 the audio...

Страница 73: ...I signal A Audio layer V Video layer AV Audio and video layers together Example 1 0LO01 Explanation The audio and video signals of the HDMI out 1 01 is unlocked INFO The device issues the above respon...

Страница 74: ...t 6 4 8 Autoselect Mode Query The autoselect mode of the audio or video outputs can be changed Command and Response autoselect AS_ layer out AS_ layer out state mode CrLf Parameters Parameter Paramete...

Страница 75: ...udio layer V Video layer in_prio Priority number of the input ports 0 1 2 5 Priority numbers from 0 to 5 the highest priority is 0 the lowest is 5 Example prio_a1 1 0 2 3 4 5 PRIO_A1 1 0 2 3 4 5 ATTEN...

Страница 76: ...Value Parameter value mode Static IP address setting or DHCP dynamic IP address 0 Static IP address 1 DHCP ip_address IP address of the device IP address four decimal octets separated by dots Example...

Страница 77: ...TEWAY 192 168 0 1 6 5 8 Enable disable the Ethernet Port Command and Response ETH_ENABLE switch ETH_ENABLE switch CrLf Parameters If the switch parameter is 0 the port is disabled If its value is 1 th...

Страница 78: ...dd StopBit Stop Bit X No change 1 1 1 5 1 5 2 2 Example rs232_local_format 9600 8 O X RS232_LOCAL_FORMAT 9600 8 O X Explanation RS 232 port is set as the following the baud rate to 9600 data bit to 8...

Страница 79: ...8 direction Direction of the communication I Input O Output level Level of the pin L Low H High Example gpio1 GPIO1 O L Explanation GPIO pin 1 is an input with low level 6 7 2 Setting of Level and Dir...

Страница 80: ...oard is View Firmware for All Controllers fc Restarting of the Device rst Health Status Query st Recalling Factory Default Settings factory all Crosspoint and Port Settings Switch an Input to the Outp...

Страница 81: ...sk Gateway Address Query IP_GATEWAY Gateway Mask Setting IP_GATEWAY gateway_address Enable disable the Ethernet Port ETH_ENABLE switch Apply Network Settings IP_APPLY RS 232 Settings RS 232 Mode Setti...

Страница 82: ...view Instructions for the Terminal Application Usage Protocol Rules System Commands Cleartext Login Protection Video Port Settings Audio Port Settings Event Manager Basics Event Manager Tool Kit Varia...

Страница 83: ...address of the device default 192 168 0 100 and the port number 6107 Step 4 Select the Raw connection type and open the connection Once the terminal window is opened you can enter the LW3 protocol co...

Страница 84: ...DEO O1 Pwr5vMode pm MEDIA VIDEO O1 Pwr5vMode 0 1 2 0 Auto 1 Always On 2 Always Off 7 3 4 Prefix Summary DEFINITION The prefix is a 2 character long code that describes the type of the response The fol...

Страница 85: ...er to get the notifications of the changes on that connection Subscribe to a Node OPEN MEDIA VIDEO o MEDIA VIDEO Get the Active Subscriptions OPEN o MEDIA VIDEO o EDID o DISCOVERY Subscribe to Multipl...

Страница 86: ...se serialnumber GET SerialNumber pr SerialNumber serial_numberr Example GET SerialNumber pr SerialNumber 87654321 7 4 4 Query the Firmware Version Command and Response firmwareversion GET SYS MB Firmw...

Страница 87: ..._id Locking status B1 Video Select button B2 Audio Select button B3 Show Me button button_status true Enabled false Disabled Example SET MANAGEMENT UI BUTTONS B1 DefaultFunctionEnable false pw MANAGEM...

Страница 88: ...able INFO The login password is erased and the login is disabled when restoring the factory default values The following can be queried without login ProductName PartNumber SerialNumber FirmwareVersio...

Страница 89: ...DCP status Signal present status Connection status 0 0 Reserved Reserved Reserved Reserved Unknown 0 1 Reserved 1 0 Noembeddedaudio Not encrypted No signal Not connected 1 1 Embeddedaudiopresents Encr...

Страница 90: ...ect Settings Command and Response autoselect GET MEDIA VIDEO XP DestinationPortAutoselect pr MEDIA VIDEO XP DestinationPortAutoselect out1_set out2_set out _set The response shows the settings of each...

Страница 91: ...qual numbers are allowed 31 means that the port will be skipped from the priority list An input port priority can be set on an output port Many settings can be executed by separating a semicolon no sp...

Страница 92: ...tination 7 6 16 Lock Output Command and Response lock CALL MEDIA VIDEO XP lockDestination out mO MEDIA VIDEO XP lockDestination Example CALL MEDIA VIDEO XP lockDestination O1 mO MEDIA VIDEO XP lockDes...

Страница 93: ...Value Parameter value mode Test pattern generator mode 0 Always off the test pattern is not displayed on the output 1 Always on the test pattern is displayed on the output 2 Auto the test pattern is d...

Страница 94: ...MI mode 0 Auto 1 DVI 2 HDMI 24bit 3 HDMI 30bit 4 HDMI 36bit Example SET MEDIA VIDEO O1 HdmiModeSetting 2 pw MEDIA VIDEO O1 HdmiModeSetting 2 7 6 24 Color Space Setting Output Port Command and Response...

Страница 95: ...character always 0 Signal present Connection status Letter Byte 1 Byte 2 Byte 1 Byte 2 Character 2 Character 3 Character 4 Character 5 BIT 7 6 BIT 5 4 BIT 3 2 BIT 1 0 BIT 7 6 BIT 5 4 BIT 3 2 BIT 1 0 R...

Страница 96: ...MEDIA AUDIO XP switch I2 O1 mO MEDIA AUDIO XP switch I2 port is connected to O1 port 7 7 5 Query the Audio Autoselect Settings Command and Response autoselect GET MEDIA AUDIO XP DestinationPortAutosel...

Страница 97: ...31 means that the port will be skipped from the priority list An input port priority can be set on an output port Many settings can be executed by separating a semicolon no space see the example below...

Страница 98: ...ck Audio Output Command and Response unlock CALL MEDIA AUDIO XP unlockDestination out mO MEDIA AUDIO XP unlockDestination Example CALL MEDIA AUDIO XP unmuteDestination O1 mO MEDIA AUDIO XP unmuteDesti...

Страница 99: ...feature is available from FW package v1 3 0b5 When not the property value matters but the change of the property value the change can be set as a condition In this case put a character to the end of t...

Страница 100: ...ET EVENTS E1 Action Macro1 pw EVENTS E2 Action Macro1 7 9 Event Manager Tool Kit 7 9 1 Setting the Delay In most cases the Action is performed immediately after the Condition is detected But sometimes...

Страница 101: ...ng pw EVENTS E loc Name string Parameters The string may contain letters A Z and a z numbers 0 9 special characters hyphen underscore _ and space up to 20 characters Longer string results an error una...

Страница 102: ...he type of the variable text or string is determined automatically based on the value If an operation cannot be performed e g adding number value to a string type variable error will be the response v...

Страница 103: ...alue of a numeric variable can be increased by adding a positive value or it can be decreased by adding a negative value Minimum and maximum values can be defined as limits This method has the feature...

Страница 104: ...30 Case 4 76 100 40 Case 5 101 125 50 Case 6 126 150 60 Case 7 151 175 70 Case 8 176 200 80 Case 9 201 225 90 Case 10 226 255 100 7 10 5 Scan and Store This command can be used to get the value or a p...

Страница 105: ...RL VARS V1 Value PWR01 The PWR string has been inserted before the original value 7 11 Ethernet Port Configuration 7 11 1 Set the DHCP State ATTENTION When you change a network property the new value...

Страница 106: ...AC address which are allowed controlling the device or querying parameters to from the Lightware device macfilter new ATTENTION If the device is installed in a network where it gets IP address from a...

Страница 107: ...pw MANAGEMENT SERVICEFILTER HttpEnabled port_mode Example SET MANAGEMENT SERVICEFILTER HttpEnabled true pw MANAGEMENT SERVICEFILTER HttpEnabled true 7 12 5 Powering on a Computer over Ethernet Wake on...

Страница 108: ...xt mO MEDIA ETHERNET tcpText Example CALL MEDIA ETHERNET tcpText 192 168 0 103 6107 pwr_on mO MEDIA ETHERNET tcpText The pwr_on text is sent to the indicated IP port address 7 13 3 Sending a TCP Binar...

Страница 109: ...ted IP port address INFO There is no need to insert a space or other separator character between the binary messages 7 14 HTTP Messaging DIFFERENCE The features and commands below available only for U...

Страница 110: ...t a TCP client in the Lightware device three TCP clients can be run at the same time set the properties of the target TCP server Step 2 Set the DelimiterHex and the TimeOut settings for the proper mes...

Страница 111: ...00 Delimiter Delimiter Stored string 7 15 6 Setting the Timeout When the set time is elapsed after the last received message and delimiter was not detected the device saves the data into the Rx RxHex...

Страница 112: ...parameter is a max 12 byte long recognized data string Example GET CTRL TCP C1 ActiveRx pr CTRL TCP C1 ActiveRx AudOut INFO Please note that the property contains the string until the ActivePropertyTi...

Страница 113: ...P1 Rs232Mode mode Parameters Identifier Parameter description Value Parameter value mode Stopbits value 0 Event Manager mode 1 Control mode 2 Command injection mode Example SET MEDIA UART P1 Rs232Mod...

Страница 114: ...eter Parameter description Value Parameter value parity Parity setting 0 None 1 Odd 2 Even Example SET MEDIA UART P1 Parity 0 pw MEDIA UART P1 Parity 0 7 16 7 Command Injection Mode Command and Respon...

Страница 115: ...DIA UART P1 sendText message mO MEDIA UART P1 sendText Example CALL MEDIA UART P1 sendText open mO MEDIA UART P1 sendText The open text is sent out via the P1 serial port 7 17 3 Sending a Binary Messa...

Страница 116: ...zer rs232recognizer rs 232recognizer MESSAGE saved in Rx property MESSAGE MESSAGE saved in ActiveRx property ActiveRx property is cleared ActiveProperty Timeout MESSAGE saved in Rx property MESSAGE sa...

Страница 117: ...This method deletes all the stored received serial messages Command and Response CALL MEDIA UART RECOGNIZER clear mO MEDIA UART RECOGNIZER clear Example CALL MEDIA UART RECOGNIZER clear mO MEDIA UART...

Страница 118: ...r remote controlling the source or sink device CEC is a bi directional communication via HDMI cable INFO The hidden first 2 bytes of the CEC command is static it refers to the logical address of the s...

Страница 119: ...Video output text The desired OSD string Letters A Z and a z hyphen underscore _ numbers 0 9 and dot Max length 14 characters Example SET MEDIA CEC I2 OsdString Lightware pw MEDIA CEC I2 OsdString Lig...

Страница 120: ...w MEDIA IR D1 EnableModulation false Signal modulation is turned off on IR output D1 INFO The default setting value is true enabled 7 21 Infrared Message Sending DIFFERENCE This feature is available o...

Страница 121: ...ndProntoHexBigEndian TIPS AND TRICKS Learning raw IR code with a terminal program Step 1 Connect to the UMX HDMI 140 Plus device with a terminal program see the details in the Instructions for the Ter...

Страница 122: ...nd Response GET EDID D dynamic Validity pr EDID D dynamic Validity logical_value Parameters The logical_value can be true or false Example GET EDID D D1 Validity pr EDID D D1 Validity true 7 23 3 Quer...

Страница 123: ...ry Command and Response CALL EDID delete user mO EDID delete Example CALL EDID delete U1 U2 U6 mO EDID delete 7 23 8 Resetting the Emulated EDIDs Command and Response CALL EDID reset mO EDID reset Exa...

Страница 124: ...n Protection Setting the Login Password CALL LOGIN setPassword password Login the Device CALL LOGIN login password Logout from the Device CALL LOGIN logout password Enable the Cleartext Login Function...

Страница 125: ...IA AUDIO XP SourcePortStatus Query the Status of Destination Port GET MEDIA AUDIO XP DestinationPortStatus Query the Audio Crosspoint Setting GET MEDIA AUDIO XP DestinationConnectionList Switching Aud...

Страница 126: ...ount Querying the Condition Trigger Counter GET EVENTS E loc ExternalConditionTriggerCount Testing an Action CALL EVENTS E loc ActionTest 1 Variable Management Value Assignment SET CTRL VARS V loc Val...

Страница 127: ...Setting the TCP Port SET CTRL HTTP C1 ServerPort port_no Setting the Target Path SET CTRL HTTP C1 File path Setting the Message Header SET CTRL HTTP C1 Header header_text Sending a Post Message CALL C...

Страница 128: ...DelimiterHex delimiter Set the Timeout SET MEDIA UART RECOGNIZER TimeOut timeout Querying the Last Recognized Message String GET MEDIA UART RECOGNIZER Rx Querying the Last Recognized Message Hex GET M...

Страница 129: ...IA GPIO port Direction dir Setting the Output Level of a GPIO Pin SET MEDIA GPIO port Output value Toggling the Level of a GPIO Pin CALL MEDIA GPIO port toggle EDID Management Query the Emulated EDIDs...

Страница 130: ...orm firmware updates on our products by giving a few tips on how to start and by explaining the features of the Lightware Device Updater v2 LDU2 software To get the latest software and firmware pack c...

Страница 131: ...ed in the window where you select the firmware package file in LDU2 8 2 2 LDU2 Installation ATTENTION Minimum system requirement 2 GB RAM The minimum screen resolution is 1600x900 ATTENTION Certain po...

Страница 132: ...are checks if a newer version is available on the web Main Screen When the software is started by the shortcut the device discovery screen appears Press the Search for devices button to start finding...

Страница 133: ...is switched to bootload mode Signal processing is not performed Do not interrupt the firmware update If any problem occurs reboot the unit and restart the process Keeping the Configuration Settings By...

Страница 134: ...e will be highlighted in green If you are not sure which device to select press the Identify me button It makes the front panel LEDs blink for 10 seconds The feature helps to find the device physicall...

Страница 135: ...oftware is a simple tool for creating scriptable device updates without the need of human interactions It allows batch updating with the same features which are available in case of GUI usage 8 5 1 Ho...

Страница 136: ...erV2_CLI cmd help C Program Files x86 Lightware Lightware Device Updater V2 lib jre bin java exe jar lib ldu2 jar help Command line usage Win LightwareDeviceUpdaterV2_CLI cmd command options Linux Lig...

Страница 137: ...ce configuration backup at Default USER_HOME ldu2 backup optional f or factoryDefault Apply factory reset during device update Default false optional r or reportProgress Report update progress in perc...

Страница 138: ...pplied to avoid incompatibility problems between the firmware versions In that case two backup files are created the original and a new one with _converted suffix Using the last one for restoring is r...

Страница 139: ...restored C Program Files x86 Lightware Lightware Device Updater V2 LightwareDeviceUpdaterV2_CLI cmd update ip 192 168 1 7 package c Firmwares UMX HDMI 140_v1 3 0b5 lfp2 backupFolder c My_backup clearT...

Страница 140: ...d it is 0 the update performed successfully 8 7 If the Update is not successful Restart the process and try the update again If the device cannot be switched to bootload firmware update mode you can d...

Страница 141: ...hooting is to check signal integrity through the whole signal chain starting from source side and moving forward to switcher end Link to connections cabling section Link to front panel operation secti...

Страница 142: ...e crosspoint settings 5 4 LW2 6 4 6 LW3 7 6 2 Video output is set to test pattern no sync screen as there is no picture on video source Check video settings of the source Symptom Root cause Action Ref...

Страница 143: ...e troubleshooting process can be even faster with your help There are certain pieces of information that push us in the right direction to finding the root cause of the problem If we receive most of t...

Страница 144: ...ogies Thefollowingsectionscontaindescriptionsandusefultechnicalinformationhowthedevicesworkinthebackground The content is based on experiences and cases we met in the practice These sections help to u...

Страница 145: ...and later they do not sense that EDID has been changed You need to restart your source to make it read out the EDID again 10 1 2 Advanced EDID Management Each DVI sink e g monitors projectors plasma...

Страница 146: ...tware introduced the HDCP enabling disabling function the HDCP capability can be disabled in the Lightware device If HDCP is disabled the connected source will detect that the sink is not HDCP capable...

Страница 147: ...circuit eliminates the following errors Intra pair skew Skew between the and wires within a differential wire pair e g Data2 and Data2 It s caused by different wire lengths or slightly different wire...

Страница 148: ...rawings guides hashtag keyword list and technical details as follows Specification Content of Backup File Input Output Port Numbering Mechanical Drawings Cable Wiring Guide Factory Default Settings Fa...

Страница 149: ...1600x1200 60 Hz HDMI Input HDMI port connector type 19 pole HDMI Type A receptacle Standard DVI 1 0 HDMI 1 4 Color depth Deep color support up to 36 bits 12 bit color Color space RGB YCbCr 4 4 4 YcbC...

Страница 150: ...Cr 4 4 4 YcbCr 4 2 2 Video delay 0 frame Supported resolutions at 8 bits color up to 4096x2048 30Hz 4 4 4 or 4096x2048 60Hz 4 2 0 up to 3840x2160 30Hz 4 4 4 or 3840x2160 60Hz 4 2 0 1920x1080 60Hz 4 4...

Страница 151: ...will be overwritten Analog video input ports VGA DVI A Horizontal position Vertical position Active horizontal size Active vertical size Total horizontal size Pixel phase Test pattern mode Test patter...

Страница 152: ...Audio2 DVI D DP DVI D DP SHOW ME AUDIO SELECT INPUT STATUS VIDEO SELECT HDMI HDMI VGA Audio1 RESET AUDIO1 IN HDMI IN 2 DP IN 3 VGA IN LIVE 100 4 UMX HDMI 140 Universal Switcher with VGA HDMI DP DVI I...

Страница 153: ...e sure that a connector or cable fits your system before use ATTENTION Never join the phase inverted negative cold or poles either right and left to the ground or to each other on the output side as t...

Страница 154: ...ut I6 108020 green Output HDMI mode Auto Output HDCP mode Auto Power 5V mode Always on Color space Auto Analog audio port settings I1 and I5 Volume 0 00 dB 100 Balance 50 center Network settings IP ad...

Страница 155: ...80p 30 00 Hz H 2chLPCM F44 1920 x 1080p 50 00 Hz H 2chLPCM F45 1920 x 1080p 59 94 Hz H 2chLPCM F46 1920 x 1080p 60 00 Hz H 2chLPCM F47 1920 x 1080p 60 00 Hz U 2chLPCM F48 1920 x 1080p 60 00 Hz U 2chLP...

Страница 156: ...EDID for DVI signals no audio support F47 HDMI EDID supporting PCM audio F48 HDMI EDID supporting all type of audio F49 HDMI EDID supporting all type of audio and deep color F89 Universal EDID for an...

Страница 157: ...y Added method to send Wake On LAN packet Advanced Control pack v3 Added cleartext login function disabled by default Advanced Control pack v3 for UMX HDMI 140 Plus only Added MAC filtering Advanced C...

Страница 158: ...t values changed Autoselect enabled Autoselect mode Last detect 40 event can be saved in Event Manager Bugfix Message sending via an RS 232 Port is available in all RS 232 modes Control mode Command i...

Страница 159: ...panel button lock setting cec CEC related settings colorspace Color space converter related settings commandinjection RS 232 command injection settings configurationcloning Configuration cloning back...

Страница 160: ...ed settings rs232recognizer RS 232 recognizer related settings rs 232recognizer RS 232 recognizer related settings serial RS 232 related settings serialnumber Serial number query signaltype HDMI DVI s...

Страница 161: ...nd 2 2 Used in any application other than that for which it was intended 2 3 Subjected to any mechanical or electrical abuse or accidental damage 2 4 Any costs incurred for repair replacement of goods...

Отзывы: