


4. Operation of MX2-8x8-HDMI20-Audio
MX2-8x8-HDMI20 series – User's Manual
18
View Submenu
Select the desired EDID memory block:
Factory EDIDs, Last Attached
EDIDs, User EDIDs,
or
Emulated EDIDs
. Select the
Name
item and press
the knob. Use the jog dial to step between the EDIDs. The following
information can be checked:
▪
Preferred Resolution
▪
Monitor Name
▪
Audio Info
Switch Submenu
The submenu looks similar as the View submenu but in this case, the
Destination is also listed. To change an EDID do the followings:
Step 1.
Navigate to the
EDID/Switch
submenu.
Step 2.
Select the
Name
item and press the knob. Use the jog dial to
select the desired
EDID
(F1-F144, U1-U100, or D1-D8) and press
the knob.
Step 3.
Select the
Destination
item and press the knob. Use the jog dial
to select the desired
EDID memory
(E1-E8, All) and press the
knob.
Step 4.
Navigate to the
Switch
option and press the knob.
Save Submenu
The EDID of a connected sink can be saved to the User EDID memory
as follows:
Step 1.
Navigate to the EDID/Save submenu.
Step 2.
Select the
Name
item and press the knob. Use the jog dial to
select the desired
EDID
(D1-D8) and press the knob.
Step 3.
Select the
Destination
item and press the knob. Use the jog dial
to select the desired
EDID memory
(U1-U100) and press the
knob.
Step 4.
Navigate to the
Save
option and press the knob.
4.3.5.
Health Menu
The following information is displayed
about the matrix in this menu:
▪
Uptime
: the elapsed time since
the last booting.
▪
Control Panel
: Internal Voltage
and temperature values about
the front panel board.
▪
Motherboard
: Internal Voltage
CONTROL PANEL
5V
1.8V
Temp°C
5.18
1.82
31.18
«
Back
Scrambling
HDMI 2.0 standard introduced the
Scrambling
to the TMDS encoding
which helps to decrease the energy peaks and hence the Electro
Magnetic Interference (EMI). To maintain backward compatibility,
HDMI 2.0 only requires the use of scrambling with data rates of above
3.4 Gbps per lane. The feature can be set on the output ports to
Auto
/
Forced On
/
Forced Off
.
INFO: The
Auto
setting (recommended) allows the pseudo-random
conversion at frequencies above the threshold.
Forced on
and
Forced off
settings override this operation.
TMDS Clock Rate
However, the clock rate can be set to
1/10
or
1/40
if necessary, using the
Auto
setting is recommended.
Audio Submenu
Information about the Analog and the Embedded Audio signal are
displayed in this submenu.
▪
Audio Present
and
Audio Type
(signal info),
▪
Audio Mode
:
Off / HDMI Only / Analog Only / HDMI and Analog
.
▪
Analog Mute
▪
Analog Volume
: adjustable from 0 to 100%,
▪
Analog Balance
: adjustable from -100% to + 100% (0 = center).
4.3.4.
EDID Menu
Advanced EDID Management is available in the front panel LCD menu
which allows to view an EDID, switch, or save it to the User EDID memory.
See more information about EDID technology in
The EDID memory structure of the device can be found in
chapter.
ANALOG VOLUME
90 %
0 10 20 30 40 50 60 70 80 90 100
and temperature values about the motherboard.
▪
IO ports
: Internal Voltage and temperature values about the
Input/Output ports.
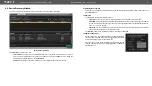
4.3.6. Presets Menu
The router can store presets and the followings are stored in each
slot: Input/output crosspoint state, muted/unmuted states.
ATTENTION!
When factory default settings are restored, presets
are deleted.
Save a Preset
Step 1.
Create the desired I/O layout.
Step 2.
Navigate to the
Presets / Save
Preset
submenu and press the
knob
.
Step 3.
Select the desired
memory slot
(Button1..Button8 mean the
eight
Source
buttons
) and press
the
knob
. If any other preset
had been saved previously they
would be also listed. See the
corresponding
section.
Step 4.
Confirm your selection by pressing the
Yes
.
Load a Preset
ATTENTION!
The Preset loading has an effect on all ports, except
the locked ones.
Step 1.
Navigate to the
Presets / Load Preset
submenu and press the
knob
.
Step 2.
The previously save presets are listed. Button1..8 mean the
presets which are also available by the front panel
Source
buttons
. Select the desired
memory slot
and press the
knob
. If
any other preset had been saved previously they would be also
listed.
Step 3.
Confirm your selection by pressing the
Yes
.
INFO: Eight memory slots are available by the front panel buttons,
see
section.
SAVE PRESET
Button5
Button6
Button7
Button8
My_pres
5
6
7
8
«
Back
Button4
4


