Description
1
Pilot Status — Current pilot mode.
2
Current Heading.
3
No (Standby)
— Disengages the autopilot and returns
to manual vessel control.
4
Rudder bar — Indicates the position of the rudder.
5
Turn angle — The turn angle is only available for
SeaTalk
ng
autopilots. This indicates the direction and
severity of turn.
6
Yes (Track)
— Engages the autopilot in
Track
mode
and automatically steers your vessel to a target
waypoint or along a route plotted on your
MFD
.
7
Distance to next waypoint (DTW) and Bearing to next
waypoint (BTW).
8
Next Waypoint name.
9
Close
— Closes the
Pilot Control
dialog.
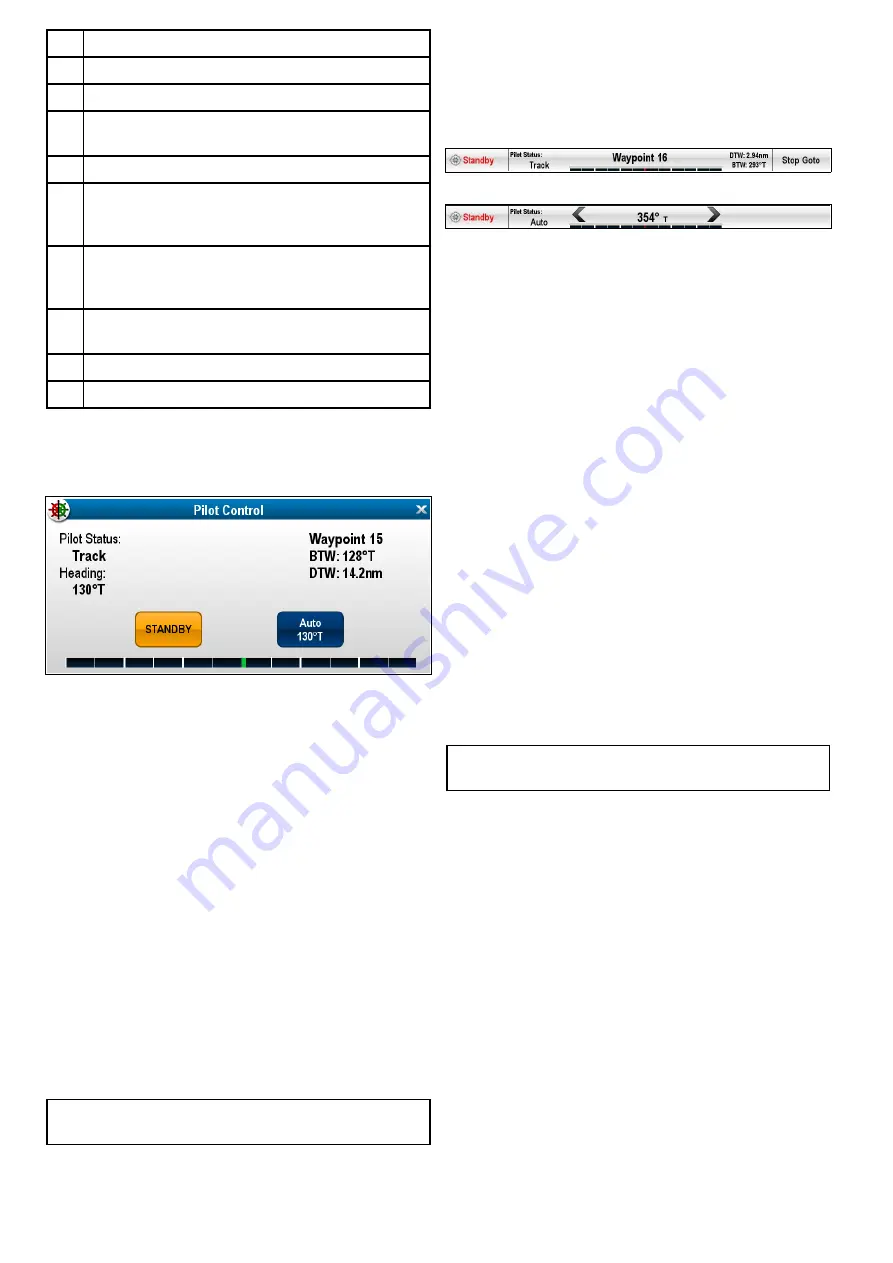
Pilot Control dialog (Track)
The example below shows the
Pilot Control
dialog
options when in track mode.
Displaying the Pilot Control dialog
The Pilot Control dialog is displayed under the
following conditions:
1. When the physical
Pilot
button is pressed.
2. When
Pilot Controls
selected from the shortcuts
page.
3. When you select
Menu > Navigate > Goto
Waypoint
,
Goto Cursor
or
Follow Route
option
in the Chart application.
4. When you select
Goto Waypoint
or
Goto Cursor
using the Chart context menu.
5. When you place the cursor over an active route
or waypoint in the Chart application and select
Stop Goto
,
Stop Follow
or
Advance Waypoint
from the context menu.
6. When you are following a route or going to a
waypoint or cursor position, and select
Menu
> Navigate > Stop Goto
,
Stop Follow
, or
Advance Waypoint
.
7. When you arrive at a target waypoint.
Note:
When arriving at a waypoint, the dialog title
bar turns red to indicate waypoint arrival.
11.8 Pilot Bar
The Pilot Bar provides autopilot status information.
For touchscreen displays you can disengage the
autopilot using the Pilot Bar.
Pilot Bar — Track mode
Pilot Bar — Auto mode
The Pilot Bar is displayed when autopilot control
is enabled, the Pilot Bar is switched on and the
autopilot is engaged.
When the autopilot is disengaged the Pilot Bar is
hidden.
On a system containing multiple displays the Pilot
Bar can be disabled or enabled on each display.
Enabling the Pilot Bar
When connected to a SeaTalk or SeaTalk
ng
SPX
autopilot the Pilot Bar can be enabled by following
the steps below.
From the Homescreen, with autopilots controls
enabled:
1. Select
Customize
.
2. Select
Display Preferences
.
3. Select
Pilot Control Bar
so that Shown is
highlighted.
Selecting Pilot Control Bar will switch the Pilot
Bar between Shown and Hidden.
4. Engage the autopilot.
The Pilot Bar is now displayed at the bottom of
the screen in all applications whilst the autopilot is
engaged.
Note:
When connected to an Evolution autopilot
the Pilot Bar is enabled from the Pilot Set-up page.
168
a Series / c Series / e Series
Содержание a125
Страница 2: ......
Страница 6: ......
Страница 16: ...16 a Series c Series e Series ...
Страница 43: ...13 GPS receiver 14 Thermal camera 15 Wireless connection Planning the installation 43 ...
Страница 50: ...50 a Series c Series e Series ...
Страница 82: ...82 a Series c Series e Series ...
Страница 114: ...114 a Series c Series e Series ...
Страница 120: ...120 a Series c Series e Series ...
Страница 186: ...186 a Series c Series e Series ...
Страница 187: ...Chapter 13 Man Overboard MOB Chapter contents 13 1 Man overboard on page 188 Man Overboard MOB 187 ...
Страница 190: ...190 a Series c Series e Series ...
Страница 193: ...Chapter 15 Fuel manager Chapter contents 15 1 Fuel manager overview on page 194 Fuel manager 193 ...
Страница 208: ...208 a Series c Series e Series ...
Страница 230: ...230 a Series c Series e Series ...
Страница 320: ...320 a Series c Series e Series ...
Страница 340: ...340 a Series c Series e Series ...
Страница 364: ...364 a Series c Series e Series ...
Страница 420: ...420 a Series c Series e Series ...
Страница 424: ...424 a Series c Series e Series ...
Страница 434: ...434 a Series c Series e Series ...
Страница 459: ......
Страница 460: ...www raymarine com ...


