background image

a fuse of the same type and electrical specifications! 

l


Due to safety reasons, it is prohibited to make unauthorized modifications to the 
unit. 
 

Important:  Never  look  directly  into  the  light  source!  Don

t  use  the  effect  in  the 

presence of persons suffering from epilepsy.


Mounting and Installation 

Important: Fixtures must be installed by a Qualified electrician in accordance with 
all national and local electrical and construction codes and regulations.


Overhead Rigging 

l


For overhead installation, the fixture must be always secured with a safety wire 
that can bear at least 10 times the weight of the fixture. 

l


Make sure the area below the installation is free from unwanted persons during 
rigging, de-rigging and servicing. 

l


Locate the fixture in a well ventilated spot, far away from any flammable materials 
and/or liquids. The fixture must be fixed at least 50cm from surrounding walls. 

l


The device must be installed out of reach of people where persons may walk by 
or be seated. 

l


Fixture installation must always be secured with a secondary safety attachment, 
such as an appropriate safety cable. 

l


Always use and install the supplied safety cable as a safe cable as safety measure 
to prevent accidental damage and /or injury in the event the clamp fails. 

l


The fixture should be well fixed, a free-swinging mounting is dangerous and may 
not be considered! 


Clamp Mounting: 

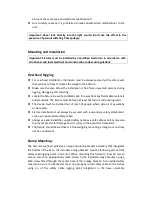
The LED moving head provides a unique mounting bracket assembly that integrates 
the bottom of the base, the included ‘omega bracket’ (see the following pic) and the 
safety cable rigging point in one unit. When mounting this fixture to truss be sure to 
sere to secure an appropriately rated clamp to the included omega bracket using a 
M10 screw fitted through the center hole of the ‘omega bracket’. As an added safety 
measure be sure to attached at least one properly rated safety cable to the fixture 
using  on  of  the  safety  cable  rigging  point  integrated  in  the  base  assembly.

Содержание MH-120

Страница 1: ...LIGHT INC MH 120 LED WASH User Manual Version 1 0 ...

Страница 2: ...ion it is absolutely necessary for the user to follow the safety instructions and warning notes written in this manual l The manufacturer will not accept liability for any resulting damages caused by the non observance of this manual or any unauthorized modification to the device l Please consider that damages caused by manual modifications to the device are not subject to warranty SAFETY INSTRUCT...

Страница 3: ...safe ambient temperature is 40 Don t use this unit at higher ambient temperatures l Make sure the area below the installation place is free from unwanted persons during rigging de rigging and servicing l Allow the device about 10 minutes to cool down before servicing l The electrical installation should be carried out by qualified person only according to the regulations for electric and mechanica...

Страница 4: ...surrounding walls l The device must be installed out of reach of people where persons may walk by or be seated l Fixture installation must always be secured with a secondary safety attachment such as an appropriate safety cable l Always use and install the supplied safety cable as a safe cable as safety measure to prevent accidental damage and or injury in the event the clamp fails l The fixture s...

Страница 5: ...se refer to the diagram below DMX 512 Connection with DMX Terminator For installations where the DMX cable has to run a long distance or is in an electrically noisy environment such as in a discotheque it is recommended to use a DMX terminator This helps in preventing corruption of the digital control signal by electrical noise The DMX terminator is simply an XLR plug with a 120 resistor connected...

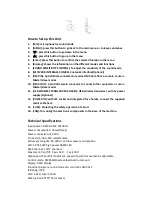
Страница 6: ...es 11 USB WIRELESS TRANSCEIVER SOCKET USB wireless transceiver with 5v power supply Optional 12 POWER IN with IEC socket and integrated fuse holder connect the supplied mains cable here 13 FUSE Protecting the safety operation of circuit 14 FAN for cooling the electronic components in the base of the machine Technical Specifications Input power AC100 240V 50 60 Hz Power consumption 95 watt max Powe...

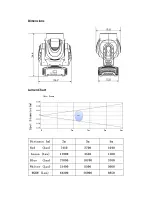
Страница 7: ...Dimensions Lumen Chart ...

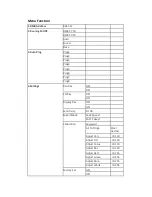
Страница 8: ...6 Prog7 Prog8 4 Settings Pan Rev OFF ON Tilt Rev OFF ON Display Rev OFF ON Sensitivity 0 100 Speed Mode Fade Speed FAST Speed Calibration Password All To Origin Clear ALL 3s Adjust Pan 0 120 Adjust Tilt 0 120 Adjust Focus 0 120 Adjust Rot 0 120 Adjust Red 0 255 Adjust Green 0 255 Adjust Blue 0 255 Adjust White 0 255 Factory Set ON OFF ...

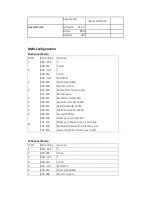
Страница 9: ...st 251 255 Shutter open 5 000 255 Red Dimmer 0 100 6 000 255 Green Dimmer 0 100 7 000 255 Blue Dimmer 0 100 8 000 255 White Dimmer 0 100 9 000 255 Focus 0 100 10 000 100 Effect Lens linear 0 90 101 133 Effect Lens Shake from small to big 134 194 Backward rotation from fast to slow 195 255 Forward rotation from slow to fast 17 Channel Mode 17CH DMX Value Function 1 000 255 X 2 000 255 X Fine 3 000 ...

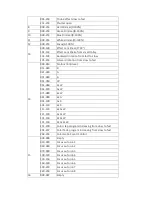
Страница 10: ...10 No function close 011 020 R 021 030 G 031 040 B 041 050 W 051 060 R W 061 070 G W 071 080 B W 081 090 R G 091 100 G B 101 110 R B 111 120 R G W 121 130 G B W 131 140 R B W 141 150 R G B W 151 200 Color step program increasing from slow to fast 201 247 Color fade program increasing from slow to fast 248 255 Color Gobo Sound Control 15 000 009 Empty 010 039 Focus auto run 1 040 069 Focus auto run...

Страница 11: ...9 084 X Y auto run 3 085 110 X Y auto run 4 111 136 X Y auto run 5 137 162 X Y auto run 6 163 188 X Y auto run 7 189 214 X Y auto run 8 215 240 X Y auto run 9 241 255 X Y Sound Control 17 51 100 Fast Speed 10S 151 200 Fade Speed 10S 251 255 RESET 10S ...

Отзывы: