LifeFitness S180P Скачать руководство пользователя страница 1

Synrgy 180 Personal

S180P

Owner's Manual/Assembly Instructions

1013910-0001 REV AA

Содержание S180P

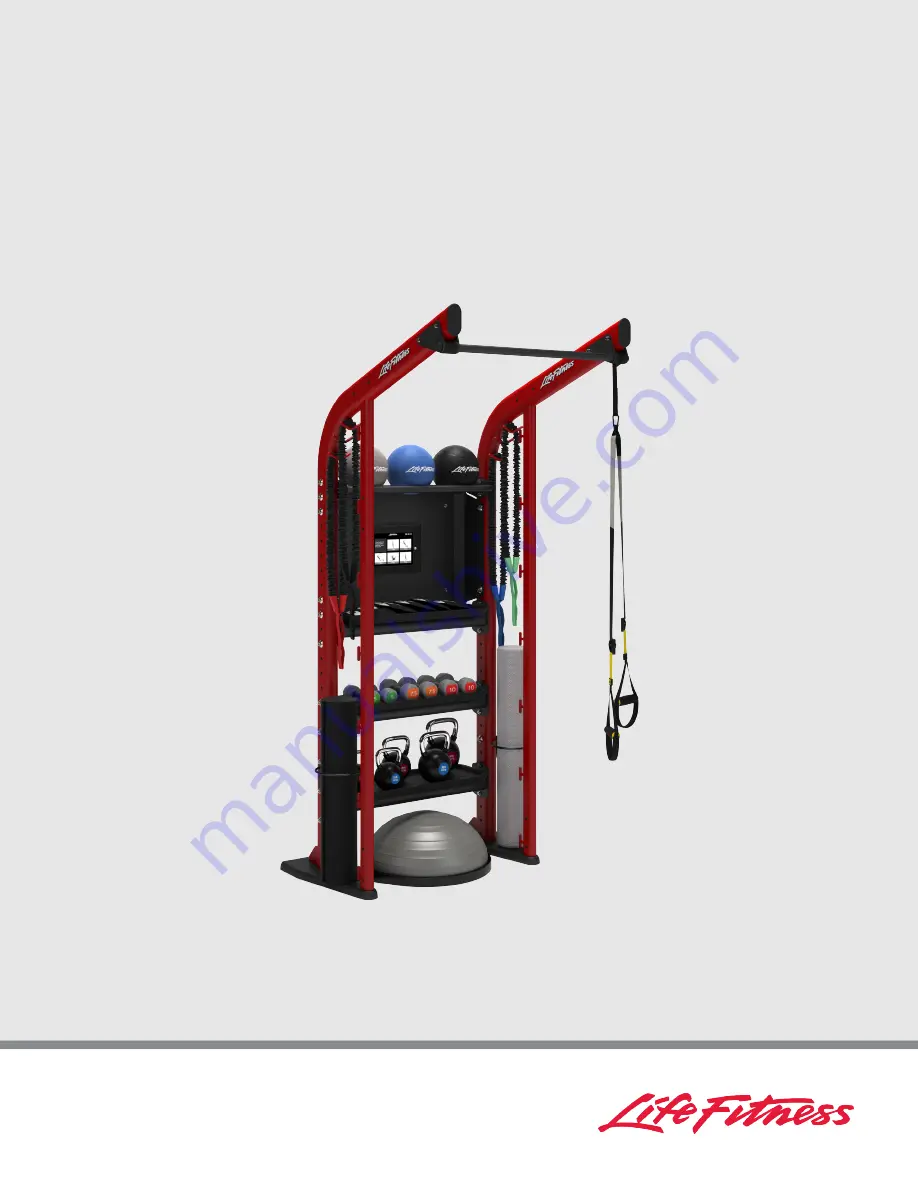
Страница 1: ...Synrgy 180 Personal S180P Owner s Manual Assembly Instructions 1013910 0001 REV AA...

Страница 2: ......

Страница 3: ...Minato ku Tokyo 107 0062 Japan Telephone 81 0120 114 482 Fax 81 03 5770 5059 Service Email service lfj lifefitness com Sales Marketing Email sales lifefitnessjapan com Latin America and Caribbean Lif...

Страница 4: ...lant y kullanabilirsiniz Informazio osagarria eskuragarri dago goiko estekaren bidez Mitjan ant l enlla anterior podreu accedir a informaci addicional en l nia Dodatne informacije mo ete prona i na i...

Страница 5: ...arranty 26 Changes in Warranty Not Authorized 26 Effects of State Laws 26 Warranty Coverage 27 Bolt to Floor Guide Introduction 28 Delivery and Installation Tips 28 Anchor Types 29 Anchor Specificatio...

Страница 6: ...ded that all individuals consult a physician prior to commencing an exercise program If at any time during exercise you feel faint dizzy or experience pain STOP EXERCISING and consult your physician K...

Страница 7: ...ons are not observed Caution labels indicate a potentially hazardous situation that could result in serious injury or damage to machine if the precautions are not observed Contact Customer Support Ser...

Страница 8: ...em Description Qty 1 1 2 Wrench 1 3 4 Wrench 1 6mm Wrench 1 17mm Wrench 1 2 3mm Hex Wrench 1 7mm Hex Wrench 2 3 2 Phillips Screwdriver 1 4 Rubber Mallet 1 See Bolt to Floor Guide section for required...

Страница 9: ...Option Categories Item Description 1 Shelf Option Shelf Options Item Description 1 1 Dual Rail Shelf 1 2 Accessory Shelf 1 3 Digital Coach Mounting Shelf Page 7 of 33...

Страница 10: ...ility Shaded sections signify the occupied positions of the shelf option with its accessories Digital Coach Mounting Shelf must be moved down one hole if Accessory Shelf is to be used in the 5th shelf...

Страница 11: ...quirements shown in table above by counting bolt holes between the top bolt of the lower shelf and the bottom bolt of the shelf above it Above bolt hole spacing table are recommended positions S180P a...

Страница 12: ...2 Left Chin End Plate Suspension Anchor 1 3 Right Chin End Plate Suspension Anchor 1 4 Left Foot Cover 2 5 Right Foot Cover 2 6 End Cap 2 7 Suspension Anchor 1 8 Chin Option Cover 1 9 Foam Roller Mat...

Страница 13: ...acer 4 3 Retainer 8 4 M10 X 80mm Screw 8 5 7 16 Hole Plug 116 6 8 x 3 4 Screw 12 7 Grommet 12 8 Floor Anchor 6 Shelf Hardware Accessory and Dual Rail Item Description Qty 1 Socket Nut 4 2 1 4 Spacer 4...

Страница 14: ...ounting Shelf Item Description Qty 1 Retainer 4 2 Socket Nut 4 3 1 4 Spacer 8 4 Tie Wrap 3 5 3 8 Washer 4 6 M10 X 1 5 X 80 Screw 4 7 M10 X 1 5 X 25 Screw 4 8 M3 5 X 12 Phillips Screw 4 9 M3 5 Washer 4...

Страница 15: ...nsion Anchor left and right 1 5 Retainer 4 6 M10 X 80mm Screw 4 2 Chin End Plate Suspension Anchor on the left or right side Ensure tab is orientated as shown below Item Description Qty 1 Suspension A...

Страница 16: ...al Rail With Digital Coach Mounting Shelf Loosely install Shelf B and C using holes 13 and 11 for Shelf B holes 13 and 12 for Dual Rail and holes 20 and 18 for Shelf C holes 20 and 19 for Dual Rail Wi...

Страница 17: ...Item Description Qty 1 Upright 2 2 Socket Nut 8 3 1 4 Spacer 8 4 Retainer 8 5 M10 X 80mm Screw 8 Page 15 of 33...

Страница 18: ...above Digital Coach Item Description Qty 1 Upright 2 2 Media Bracket 2 3 Socket Nut 4 4 1 4 Spacer 8 5 Retainer 4 6 M10 X 80mm Screw 4 2 Install Bracket for Monitor or iPad not supplied to the Media M...

Страница 19: ...nstructions for installation details Item Description Qty 1 Monitor iPad not supplied 1 2 Bracket Media Mount 1 4 For Monitor use Fasten Electrical Power Block not supplied to Media Mount Tabs Item De...

Страница 20: ...use For iPad use Item Description Qty 1 Media Mount 1 2 Electrical Cord not supplied 1 3 Tie Wrap 1 6 Slide Media Mount onto Media Center Brackets For Monitor use For iPad use Item Description Qty 1 M...

Страница 21: ...y install hardware affixing the Media Mount For Monitor use For iPad use Item Description Qty 1 M10 X 1 5 X 25 Screw 4 2 3 8 Washer 4 3 Media Mount 1 iPad is a registered trademark of Apple Inc Page 1...

Страница 22: ...ting Shelf Loosely install Shelf D and hardware using holes 26 and 25 holes 27 and 25 for Accessory Shelf Shown with Digital Coach Mounting Shelf Shown without Digital Coach Mounting Shelf NOTE Tighte...

Страница 23: ...bly 1 Tighten all loosely assembled hardware Torque hardware to 18 20 FT LBS 24 4 27 1 Nm 2 Anchor unit to floor Refer to Bolt to Floor Guide in this manual for further details Item Description Qty 1...

Страница 24: ...er 1 3 8 X 3 4 Screw 6 4 Grommet 6 NOTE Left Foot Cover must be installed first NOTE Tighten hardware to 30 39 IN LBS 3 9 4 4 Nm 4 Attach End Caps and Hole Plugs where applicable Fill all holes with E...

Страница 25: ...3 Variations S180P Example Packages Item Description 1 S180P Digital Coach 2 S180P Storage Each package comes standard with the options shown in the respective images Page 23 of 33...

Страница 26: ...366cm x 212cm x 268 5cm Accessory Shelf 41 5 lbs 135 lbs n a n a 18 8 kg 61 2 kg n a n a Dual Rail Shelf 12 lbs 120 lbs n a n a 5 4 kg 54 4 kg n a n a Digital Coach Mounting Shelf 37 lbs n a n a n a...

Страница 27: ...onvenient for gym staff to use Apply the spray to a microfiber cloth and wipe down the equipment Use PureGreen 24 on the equipment for at least 2 minutes for general disinfection purposes and at least...

Страница 28: ...wner s Manual It is VERY IMPORTANT THAT YOU READ THIS MANUAL before operating the Product Remember to perform the periodic maintenance requirements specified in the Manual to assure proper operation a...

Страница 29: ...Warranty Coverage NOTE There is no warranty coverage for labor on Strength Products Item 10 Years 5 Years 1 Year 90 Days Frame X Hardware Mechanical X Items Not Specified X Page 27 of 33...

Страница 30: ...mm2 Anchoring All anchors must have a minimum embedment into concrete regardless of wood tile rubber screed over sub floor Dynamic anchors must have a minimum embedment depth in concrete to ensure max...

Страница 31: ...fety Stud Anchor EMEA 2 8 70mm Anchor Specifications Static Anchor Minimum Concrete Thickness Minimum Drill Depth in Concrete Minimum Concrete Embedment Minimum concrete compressive strength HSL 3 M8...

Страница 32: ...xtracted from the Hilti Anchor Fastening Technology Manual issued September 2014 Tools Required WARNING Adhere to manufacturer s equipment warnings and guidelines Follow manufacturer s instructions fo...

Страница 33: ...ness is being accounted for refer to Anchor Selection and Foot Dimensions Section 3 Clear out the debris from hole insert fastener and hammer into hole until flush against frame plate 4 Tighten to 18...

Страница 34: ...s 60Nm 3 Wearing protective glasses drill down into flooring perpendicularly to the required depth ensuring that the foot thickness is being accounted for refer to Anchor Selection and Foot Dimensions...

Страница 35: ...Foot Dimensions Use below image to determine foot specifications Page 33 of 33...

Страница 36: ......

Отзывы: