Life Fitness Signature Signature Olympic Decline Bench Скачать руководство пользователя страница 8

Signature Olympic Decline Bench

©

2007 Life Fitness, a division of Brunswick Corporation. All rights reserved. 

Life Fitness is a registered trademark of Brunswick Corporation.

SODB 1/012/07

8183601 RevA-1

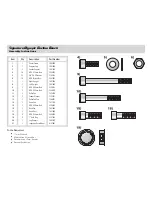
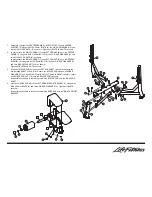
5. Attach the KNEE SUPPORT ASSEMBLY (D) to the PIVOT HUB (E) using

two M10 X 25mm BOLTS (4) and two 3/8" SAE WASHERS (5) as shown.
Tighten all BOLTS securely.

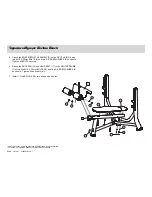
6. Attach the BACK PAD (16) and HEAD REST (17) to the CENTER FRAME

(1) using five M10 X 35mm BOLTS (18) and five 3/8" SAE WASHERS (5),
as shown.  Tighten all bolts securely.

7. Install 1" HOLE PLUGS (19) into all open bolt holes.

Содержание Signature Signature Olympic Decline Bench

Страница 1: ...Signature Olympic Decline Bench Owners Manual...

Страница 2: ...MAINTAIN ALL EQUIPMENT Preventative maintenance is the key to smooth operating equipment as well as keeping your liability to a mini mum Equipment needs to be inspected at regular intervals 5 Ensure...

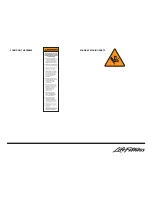
Страница 3: ...FOUND ON THE FRAME FOUND AT MOVING PARTS...

Страница 4: ...the right to replace any or all of the Product at our option within the stated warranty period WHAT IS NOT COVERED Any failures or damage caused by unauthorized service misuse accident negligence impr...

Страница 5: ...ES OF MERCHANTABILITY AND FITNESS FOR A PARTICULAR PURPOSE AND ALL OTHER OBLIGATIONS OR LIABILITIES ON OUR PART We neither assume nor authorize any person to assure for us any other obligation or liab...

Страница 6: ...Bolt 3 8 SAE Washer M10 Nylock Nut Right Upright Left Upright M10 X 85mm Bolt M10 X 65mm Bolt Roller Pad Fender Washer Roller Pad Cap Knee Pad M10 X 30mm Bolt Back Pad Head Rest M10 X 35mm Bolt 1 Hole...

Страница 7: ...four 3 8 SAE WASHERS 5 and two M10 NYLOCK NUTS 6 as shown Tighten all BOLTS and NUTS securely 3 Slide one ROLLER PAD 11 onto the LEFT PAD SHAFT A until it contacts the pre installed SHAFT COLLAR B Se...

Страница 8: ...012 07 8183601 RevA 1 5 Attach the KNEE SUPPORT ASSEMBLY D to the PIVOT HUB E using two M10 X 25mm BOLTS 4 and two 3 8 SAE WASHERS 5 as shown Tighten all BOLTS securely 6 Attach the BACK PAD 16 and HE...

Отзывы: