background image

DL-PSU8 Installation Guide

5

Front and Rear Panel

1

2

3

5

4

6

7

8

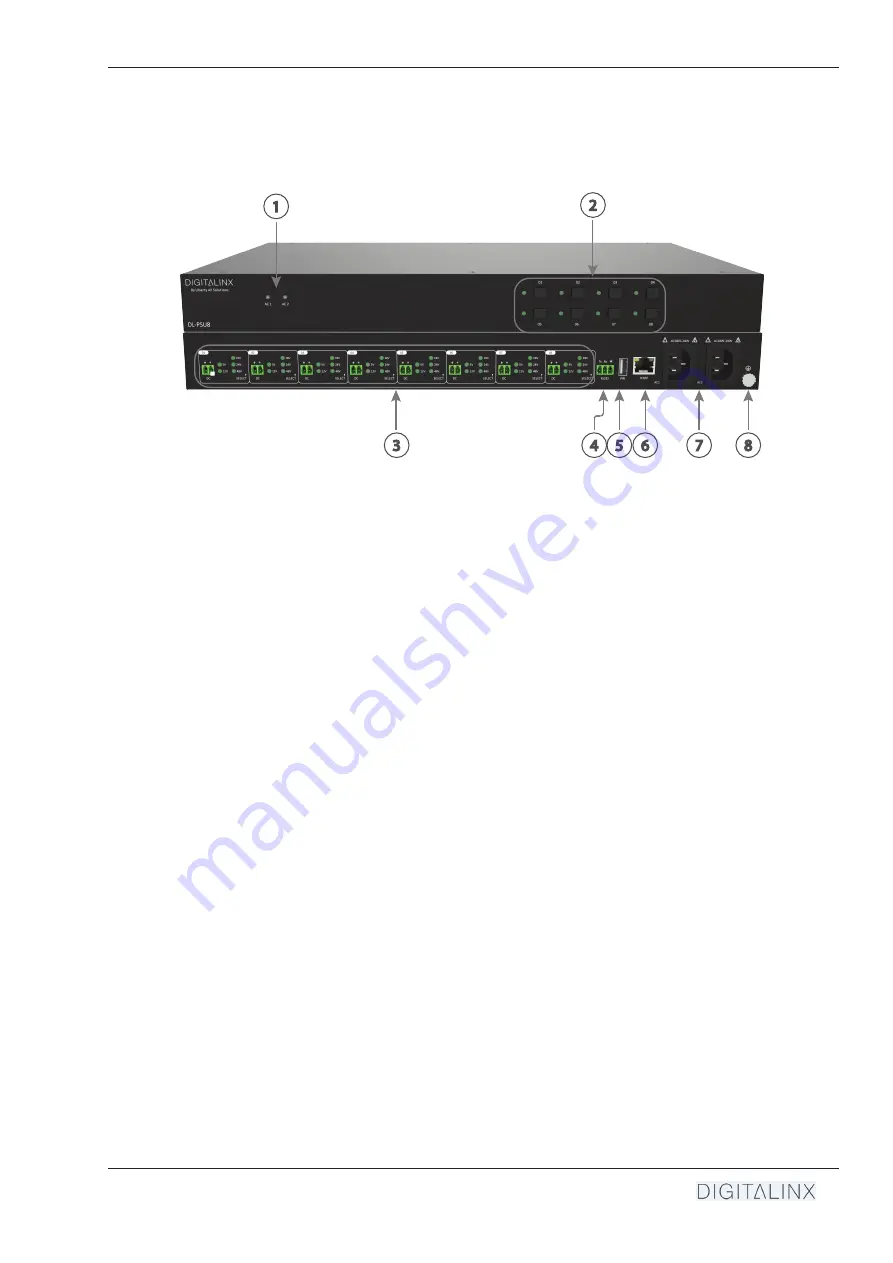
1.  AC1 AC2 

 - Input AC Source Indicators

• 

When GREEN; AC input is powered on with normal output

• 

When RED; AC input is not powered

• 

When ORANGE - Input voltage is too low or too high

2.  01-08 (Front) 

 - Output Selection Buttons; Press once to activate / deactivate output, long 

press for 3 seconds to lock/unlock the selection

3. 

01-08 (Back)  

- DC Output Channels / Voltage Selector

•  DC

: 2 pin DC Phoenix power connector

•  SELECT

: Press switch to toggle output voltage selection

•  5/12/18/24/48V

: Voltage selection LEDs

When Solid; Selected voltage is working normally

When Blinking Slowly; The channel is off or closed

When Blinking Fast; Channel is short circuiting or over voltage

4.  RS232

 - 3 pin Phoenix connector for RS232 system control

5.  FW

 - USB A firmware update port

6.  TCP/IP

  - RJ45 connector for Ethernet / GUI system control

7.  AC1 AC2 

 - 2 AC input channels. Input voltage is AC100~240V.

8. 

Ground Pin 

 - Ground device to earth

How to Reset Device to Factory Default: 

On rear panel, simultaneously long-press SELECT on channel 

01 and channel 02 for 3 seconds or more, the device will be restored to factory setting.

Содержание DIGITALINX DL-PSU8

Страница 1: ...Rev 200422 Phone 719 260 0061 Toll Free 800 530 8998 Fax 719 260 0075 DL PSU8 Owners Manual 11675 Ridgeline Drive Colorado Springs CO 80921 ...

Страница 2: ...TUS Use the mains plug to disconnect the apparatus from the mains THE MAINS PLUG OF THE POWER CORD MUST REMAIN READILY ACCESSIBLE Do not defeat the safety purpose polarized or grounding type plug A polarized plug has two blades with one wider than the other A grounding type plug has two blades and a third grounding prong The wide blade or the third prong is provided for your safety If the provided...

Страница 3: ...6 System Control 7 Connect Ethernet Control 7 Connecting RS232 Control 7 RS232 Port Wiring 7 Web GUI Settings 8 Switcher Control 8 Connecting to Web GUI Control 8 Port ON and OFF Control 9 Port Voltage Settings 10 Locking Ports 10 Network Settings 11 Security Settings 12 Locking Front Panel Buttons 12 Control Commands 13 DC Channel Port Control 13 Voltage locking Front panel control 14 System Comm...

Страница 4: ... settings Voltage for each output channel can be adjusted and switched on off via the front panel buttons RS232 IP commands or using the built in web GUI The DL PSU8 can replace bulky power AC DC power adapters and power strips with a universal power solution for DC powered AV networking security and IOT devices located in a rack system Product Overview Product Contents DL PSU8 8 Port DC Power Hub...

Страница 5: ...ess switch to toggle output voltage selection 5 12 18 24 48V Voltage selection LEDs When Solid Selected voltage is working normally When Blinking Slowly The channel is off or closed When Blinking Fast Channel is short circuiting or over voltage 4 RS232 3 pin Phoenix connector for RS232 system control 5 FW USB A firmware update port 6 TCP IP RJ45 connector for Ethernet GUI system control 7 AC1 AC2 ...

Страница 6: ...ices Apply Power Connect powered devices to the the positive and ground pin of the DL PSU8 DC channel be sure to select the correct voltage for each DC power circuit Connect one IEC power cable to the AC1 power input on the DL PSU8 Using both AC1 and AC2 is not necessary AC2 is a backup supply input WARNING DO NOT EXCEED MAXIMUM RATINGS VOLTAGE POWER WATTS MAX MAX CURRENT PER OUTPUT 5V DC 12W 2 4A...

Страница 7: ... RX G RX TX G RS232 Port Wiring Connect Ethernet Control The DL PSU8 can be controlled via Ethernet through a web browser interface or can be controlled using Telnet commands The TCP IP port requires a standard straight through Category 5 or greater cable with the TIA EIA 568B crimp pattern for optimal operation The default settings for the TCP IP port are IP address 192 168 0 178 Telnet Port 4001...

Страница 8: ... type in IP address of the DL PSU8 The default IP address is 192 168 0 178 so be sure the computer you are using to connect to the DL PSU8 is in the same Network ID to access the internal web GUI server The login screen will appear The default user name and password is admin Switcher Control Connecting to Web GUI Control ...

Страница 9: ... 9 The CONTROL menu allows you to power ON and OFF DC power ports 1 8 on the DL PSU8 Click On Off on the DC power port you would like to turn on or off Click All On or All Off to turn ALL ports on or off Port ON and OFF Control ...

Страница 10: ...Voltage Settings Locking Ports In the Voltage Settings menu you can lock or unlock the DC port voltage selection so the voltage cannot be changed accidentally It is best practice to lock the voltage selection once an appropriate voltage has been selected for the DC power circuit Click the Unlocked Locked button on a DC port to unlock or lock the current selected voltage selection ...

Страница 11: ... sure the DL PSU8 is connected to a router network switch with a DHCP server support When choosing the STATIC IP option manually enter in the desired IP ADDRESS SUBNET MASK and GATEWAY information then click CONFIRM for changes to take place Depending on the newly given IP address range you may need to adjust your computers IP address settings to log back into the web GUI for the DL PSU8 Network S...

Страница 12: ...ned password in the password field then click CONFIRM Security Settings Locking Front Panel Buttons The Password menu above will also allow you to lock or unlock the ON and OFF front panels buttons so they won t be accidentally turned off physically by mistake Click the Front Panel Cock ON OFF button to lock the front panel buttons ...

Страница 13: ...osed Set all DC ports OPEN on SetChannelAllOpen Command SetChannelAllOpen Response All Open Set all DC ports CLOSED off SetChannelAllClosed Command SetChannelAllClosed Response All Closed Set voltage selection on a port SetOutput v V c v 5 12 18 24 48 c 1 8 when left empty the command will set voltage for ALL channels Command SetOutput 5V1 Response 01 Output 5V Query open closed status for ports G...

Страница 14: ...locks voltage selection on a port SetUnlock 1 8 1 8 when left empty the command will unlock ALL channels Command SetUnlock 1 Response UnLocking 01 channel Locks front panel button control SetLockKeyboard L L 0 unlock 1 lock Command SetLockKeyboard 1 Response Locking keyboard Query status of front button lock GetKeyLockSta Command GetKeyLockSta Response Keyboard is locked Voltage locking Front pane...

Страница 15: ...ver N N N N N N N N Out out channel State O Open S Shut Vm voltage Over overload N NO Y Yes Query firmware version GetVersion Command GetVersion Response V1 0 1 Query IP address GetIP Command GetVersion Response IP 192 168 0 178 Factory Reset SetFactorySettings Command SetFactorySettings Response Baud 9600 Please make changes Factory Default 12V default and all channels are closed System Commands ...

Страница 16: ...ping Weight 5 2Kg 11 5lb Operating Temperature 0 to 50 C 32 to 122 F Operating Humidity 10 to 90 Non condensing Storage Temperature 20 to 70 C 4 to 140 F Storage Humidity 10 to 90 Non condensing Power ESD and Regulatory Power Supply 100V 240VAC 50 60 Hz Power Consumption 178W Max Total DC Output Current 19 2A Total DC Output Power 120W Fully Loaded ESD Protection 8kV air 4kV contact Product Regula...

Страница 17: ...Thank you for your purchase For Technical Support please call our toll free number at 800 530 8998 or email us at supportlibav libav com www libav com Digitalinx is a brand of ...

Отзывы: