background image


12 

OPERATION 


PREPARATION 


1.


Examine the planned operating area carefully and remove doormats, foreign objects, etc. 

2.


Never use the accessory unless you are wearing proper winter overalls. Avoid loose clothing that might 
become entangled with moving parts. Wear appropriate footwear that helps to avoid slipping.


3.


Handle fuel with caution as this is highly flammable. 

a.


Use an appropriate fuel container. 

b.


Never fill the equipment when the engine is running or is hot. 

c.


Fill the fuel tank outdoors and ensure that  you are extremely careful. Never fill  the  fuel  tank 
indoors.


d.


Never fill plastic-lined containers while they are in the vehicle or on a carrier or trailer. Always 
place the container on the ground away from the vehicle before filling.


e.


If possible, remove any equipment which has a petrol engine from the carrier or trailer and fill 
it up while it is on the ground. If this is not possible, then fill such equipment from a mobile 
container, and not from the nozzle of a petrol pump.


f.


Always press the nozzle against the edge of the fuel tank or container until filling is complete. 
Never use nozzle-opening equipment.


g.


Replace the fuel cap firmly and clean off any fuel that may have been spilled. 

h.


Change your clothing if any fuel has been spilled on it. 

4.


Never attempt to carry out any adjustments  when the engine is running (unless directly recommended 
by the manufacturer). 

5.


Allow the vehicle and snow blower to acclimatise to the ambient temperature before use. 

6.


Never  use  the  snow  blower  unless  the  covers,  plates  or  any  other  required  safety  equipment  has  been 
installed. 

7.


Always  use  the  protective  equipment  that  has  been  designed  for  each  type  of  product  (goggles, 
earmuffs, mask, and so on). 

8.


The safe road-steadiness of the vehicle should always be ensured by using the appropriate accessories 
(chains, counterbalances, etc). 

9.


Always  make  sure  that  every  component  is  correctly  installed  (including  that  the  driving  system  is 
firmly in place and fastened at both ends, and that belts have been correctly installed). 

10.


Always wear thick leather gloves when handling the winch rope. 

11.


Never modify the accessories or any other parts without the written approval of the manufacturer. 


OPERATION 


1.


Never place your hands or feet near, under, or in the rotating parts. 

2.


When  working  on  gravel  roads,  walkways  or  carriageways,  or  when  crossing  them,  be  extremely 
careful. Consider possible traffic hazards. Never give a ride to passengers.


3.


Following a collision with a foreign object, stop the engine, disconnect the wires and make sure that 
an accidental start is impossible. Examine the snow blower thoroughly to locate any possible damage 
and repair that damage before any restart.


4.


If the equipment starts vibrating in an excessive manner, stop the engine  and immediately locate the 
cause. As a rule, the presence of vibration is a general indicator that there is a problem.


5.


When leaving the vehicle, apply every safety measure possible. Stop the snow blower’s engine and 
lower it to the operating position, set the gears to the neutral position, set the parking brake, stop the 
ATV’s engine, and remove the ignition key.


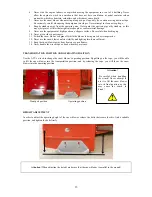
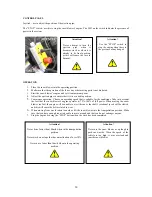
Attention! 


Ensure  that  the  user’s  manual  for  the  vehicle 
(ATV)  is  thoroughly  read  before  using  the 
snow blower! 


Attention! 

 
 Ensure  that  the  user’s  manual  for  the  engine 
is  thoroughly  read  before  using  the  snow 
blower!


Содержание 30.1000

Страница 1: ...USER S MANUAL ATV SNOW BLOWER 13 HP MODEL 30 1000 ATTENTION READ AND FOLLOW ALL SAFETY AND OPERATING INSTRUCTIONS...

Страница 2: ...___ 12 14 Preparation Operation Transportation position and operating position Height adjustment Using the control panel Operating the snow blower 5 MAINTENANCE _______________________________________...

Страница 3: ...me of publication This symbol is used throughout the manual and on warning signs in order to warn users of the possibility of serious injury Before using the vehicle and snow blower carefully read the...

Страница 4: ...ended by the manufacturer Never stop the engine right after prolonged use see Clause 4 6 Never use the snow blower without wearing the proper protective clothing earmuffs protective goggles or anti sl...

Страница 5: ...r the task in hand chains counterbalances etc Always make sure that every component is correctly installed ensuring that the drive system is firmly in place and fastened at both ends and that belts ar...

Страница 6: ...rotor has stopped rotating Keep your hands feet and clothing away from rotating parts while the engine is running Never attempt to install or remove the driving belt without reading the user s manual...

Страница 7: ...ity 1 30 2 00 00 Snow blower 1 2 30 1 01 00 Support wheels 1 3 30 1 02 00 External pipe 1 4 30 1 00 01 Internal pipe 1 5 30 1 03 00 Rear pipe 1 6 30 1 04 00 Adapter 1 7 30 1 08 00 Driving head assembl...

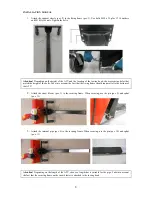
Страница 8: ...ake into account the fact that the fixing frame should run parallel to the bottom of the ATV 2 Attach the snow blower pos 1 to the securing frame When securing use the pin pos 9 and splint pos 13 3 At...

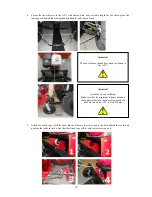
Страница 9: ...the ATV 4 Install the rear pipe pos 5 and secure it with the pin pos 10 and splint pos 13 5 Install the interim adapter pos 6 and secure with the pin pos 11 and splint pos 13 6 Install the driving he...

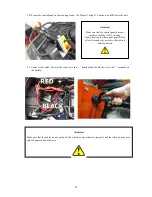
Страница 10: ...ft the snow blower Remove the roller secure the hook behind the eyelet and position the roller in such a way that the winch rope will be able to start moving on it Attention Avoid the wheels colliding...

Страница 11: ...wire to the terminal on the battery Attention Make sure that the control panel does not interfere with the ATV s steering Find a location for the control panel which allows free and easy access to the...

Страница 12: ...nt has been installed 7 Always use the protective equipment that has been designed for each type of product goggles earmuffs mask and so on 8 The safe road steadiness of the vehicle should always be e...

Страница 13: ...e the blower is being moved or is inoperative 12 Never use the snow blower unless visibility and lighting levels are sufficient 13 Keep the snow blower away from heaters or open flames 14 Never handle...

Страница 14: ...s rotational speed will be slowed and this will cause the belt or clutch to wear 6 When moving from one location to another lift the snow blower into the transportation position Make sure that you ha...

Страница 15: ...CHECKING THE SECURING BOLTS Regularly check the tightness of the securing bolts in order to avoid costly repairs Make sure that the snow blower is in a safe operating condition TYRE PRESSURE Check ty...

Страница 16: ...earbox or it should be filled up to the rim of the bolt hole when mounted on the snow blower PROTECTIVE BOLTS Regularly check the condition of the protective bolts and replace the bolts with new ones...

Страница 17: ...securing bolt 6 Replace the hood and tighten it with the bolts ELECTRIC FUSE The electric fuse is designed to protect the electrical system Only use the correct fuse for the power output available Usi...

Страница 18: ...winch rope 5 Unhook the tension adjusters at the front of the vehicle and the hooking equipment at the rear of the vehicle 6 Remove the vehicle STORAGE 1 Clean the snow blower and base frame thorough...

Страница 19: ...app Spindle for subframe d12 30 1 06 00 2 8 Kinnitusraami toru tapp Spindle for subframe d12 30 1 07 00 1 9 Veopea kinnitusplaadi koost Assembly for drive head plate 30 1 08 00 1 10 Kett Chain 6 mm 2...

Страница 20: ...bly for turning gear 30 2 04 00 1 7 Rihma katte koost Assembly for belt cover 30 2 05 00 1 8 Peaajami koost Assembly for main gear 30 2a 00 00 1 9 V ljavisketoru Outlet pipe 30 2b 00 00 1 10 Nylock mu...

Страница 21: ...aat parem Plate for right side subframe 30 2 15 02P 1 16 Vaheraami plaat vasak Plate for left side subframe 30 2 15 02V 1 17 Kiilrihm V belt B 1430 1 18 Kuulliigend Ball joint RM 10 1 19 Laagripukk Be...

Страница 22: ...47 Seib Washer 10 DIN 125 45 48 Seib Washer 12 DIN 125 6 49 Seib Washer 12 DIN 9021 1 50 Seib Washer 6 DIN 9021 19 51 Seib Washer 8 DIN 9021 8 52 Taperlock puks Bush 2012 D25 1 53 Teo toru plastikpuk...

Страница 23: ...00 1 4 Suunaja koost Assembly for deflector 30 2 10 00 1 5 Toru koost Assembly for chute 30 2 13 00 1 6 Puks Bush 10 7 13 30 2 14 05 4 7 Nylock mutter Nylock nut M6 DIN 985 10 8 Nylock mutter Nylock n...

Страница 24: ...1 Mootorreduktor Motor reducer 1 2 Puks Bush 10 7 10 30 2 04 01 3 3 Alumine p ramiskoostu tald Shoe for lowest inversion 30 2 04 03 1 4 lemine p ramiskoostu tald Shoe for upper inversion 30 2 04 02 1...

Страница 25: ...rive 30 2 09 02 1 3 Puks Bush 10 7 10 30 2 04 01 3 4 V nda koost Assembly for crank 30 2 09 04 K 1 5 Suunaja hoob Lever for cascade drive 30 2 09 03 1 6 Kolmnurk Triangle 30 2 09 01 1 7 Mootorreduktor...

Отзывы: