background image

9

IMPORTANT SAFETY INSTRUCTIONS

ENGLISH

IMPORTANT SAFETY INSTRUCTIONS 

READ ALL INSTRUCTIONS BEFORE USE 

WARNING


For your safety, the information in this manual must be followed to minimize the risk of fire or explosion, 

electric shock, or to prevent property damage, injury to persons, or death.

SAFETY INSTRUCTIONS FOR CONNECTING ELECTRICITY

WARNING


To reduce the risk of fire, electric shock, or injury to persons when using this appliance, follow basic precautions, 

including the following:

•  

do not, under any circumstances, cut or remove 

the ground prong from the power cord.

 To prevent 

injury to persons or damage to the dryer, the electrical 

power cord must be plugged into a properly grounded 

outlet.

•  

For personal safety, this dryer must be properly 

grounded.

 Failure to do so can result in electric shock 

or injury.

•  

Refer to the installation instructions in this manual 

for specific electrical requirements for your model.


Failure to follow these instructions can create an 

electric shock hazard and/or a fire hazard.

•  

This dryer must be plugged into a properly 

grounded outlet. Electric shock can result if the 

dryer is not properly grounded. have the wall 

outlet and circuit checked by a qualified electrician 

to make sure the outlet is properly grounded.


Failure to follow these instructions can create an 

electric shock hazard and/or a fire hazard.

•  

The dryer should always be plugged into its own 

individual electrical outlet which has a voltage 

rating that matches the rating plate.

 This provides 

the best performance and also prevents overloading 

house wiring circuits which could cause a fire hazard 

from overheated wires.

•  

Never unplug your dryer by pulling on the power 

cord. Always grip plug firmly and pull straight out 

from the outlet.

 The power cord can be damaged, 

resulting in a risk of fire and electric shock.

•  

Repair or replace immediately all power cords that 

have become frayed or otherwise damaged. do not 

use a cord that shows cracks or abrasion damage 

along its length or at either end.

 The power cord can 

melt, creating electric shock and/or fire hazard.

•  

When installing or moving the dryer, be careful not 

to pinch, crush, or damage the power cord.

 This will 

prevent injury and prevent damage to the dryer from 

fire and electric shock.

•  

To reduce the risk of injury to persons, adhere 

to all industry recommended safety procedures 

including the use of long sleeved gloves and safety 

glasses.

 Failure to follow all of the safety warnings in 

this manual could result in property damage, injury to 

persons or death.

•  The final part of the tumble dryer cycle occurs without 

heat (cool down cycle) to ensure that the items are left 

at a temperature that ensures that the items will not 

be damaged.

SAvE ThESE INSTRUCTIONS

Содержание RP1329A7S

Страница 1: ... Inc All Rights Reserved MFL67863730 Rev 01_050919 ENGLISH INDONESIAN Before beginning installation read these instructions carefully this will simplify installation and ensure that the dryer is installed correctly and safely leave these instructions near the dryer after installation for future reference ...

Страница 2: ... Special price ending time setup 28 7 Regular priced dryer cycle time 29 8 Special priced dryer cycle time 30 9 Value of coin 1 31 10 Value of coin 2 Set up for top off price and e suds coin pulse 32 11 Top off time 33 12 Beep volume 34 13 Time to keep the coin Use only for coin type 35 14 Product type setup coin card type or OPL setup 36 Programming Mode Test Mode 36 1 Lqc1 37 2 Factory reset EEP...

Страница 3: ...quiet operation and an energy saving system ARTISTIC DESIGN Modern front panel look and big clear glass door make your dryer look stylish EASY OF USE An entire selection of user friendly functions makes operating the dryer easy ULTRA CAPACITY The larger drum enables better tumbling and less tangling and wrinkling of the laundry ...

Страница 4: ... words mean DANGER You will be killed or seriously injured if you don t immediately follow instructions Warning You can be killed or seriously injured if you don t follow instructions caution You may be slightly injured or cause damage to the product if you do not follow instructions All safety messages will tell you what the potential hazard is tell you how to reduce the chance of injury and tell...

Страница 5: ...il acetone alcohol petrol kerosene spot removers turpentine waxes and wax removers should be washed in hot water with an extra amount of detergent before being dried in the tumble dryer Items such as foam rubber latex foam shower caps waterproof textiles rubber backed articles and clothes or pillows fitted with foam rubber pads should not be dried in the tumble dryer Fabric softeners or similar pr...

Страница 6: ...Incidental or consequential damage to personal property caused by possible defects with this appliance If the product is installed outside the normal service area any cost of transportation involved in the repair of the products or the replacement of a defective part shall be borne by the owner READ ALL INSTRUCTIONS BEFORE USE Warning For your safety the information in this manual must be followed...

Страница 7: ...hock or injury to persons when using this appliance follow basic precautions including the following Properly ground dryer to conform with all governing codes and ordinances Follow details in the installation instructions Electric shock can result if the dryer is not properly grounded Before use the dryer must be properly installed as described in this manual Electric shock can result if the dryer...

Страница 8: ... ductwork inside the dryer cabinet or for exhausting to the outside Use of plastic or other combustible ductwork can cause a fire Punctured ductwork can cause a fire if it collapses or becomes otherwise restricted in use or during installation Ductwork is not provided with the dryer and you should obtain the necessary ductwork locally The end cap should have hinged dampers to prevent backdraft whe...

Страница 9: ...to follow these instructions can create an electric shock hazard and or a fire hazard The dryer should always be plugged into its own individual electrical outlet which has a voltage rating that matches the rating plate This provides the best performance and also prevents overloading house wiring circuits which could cause a fire hazard from overheated wires Never unplug your dryer by pulling on t...

Страница 10: ...he country Before installation check that the local distribution conditions nature of gas and pressure and the adjustment of the appliance are compatible the method of connection and the installation regulations in the country where the appliance is to be installed if such regulations exist also the ventilation dimensions shall be given for the purposes of installation in those countries where the...

Страница 11: ...ryer Specification Please refer to the rating label regarding detailed information Rating 220 240V 50Hz Size 686 mm P x 764 mm L x 983 mm T Single Dryer 686 mm P x 764 mm L x 1954 mm T Stack Dryer Capacity 10 2 kg Weight 59 4 kg BTU 21 000 BTU hr Specifications subject to change by manufacturer NOTE ...

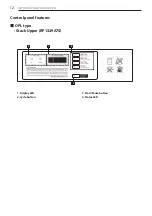
Страница 12: ...12 INTRODUCING YOUR DRYER Control panel features OPL type Stack Upper RP1329A7S 1 Display LED 2 Cycle button 3 Start Pause button 4 Status LED 3 1 2 4 3 1 2 4 3 ...

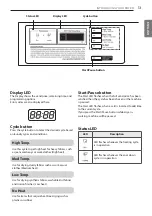
Страница 13: ...brics such as work casual clothes Medium heat Low Temp Use for drying synthetic fabrics washable knit fabrics and noiron finishes Low heat No Heat Use for items that require heat free drying such as plastics or rubber Start Pause button The Start LED flashes when the full vend price has been satisfied then the cycle has been chosen or the machine is paused The Start LED flashes when a card is inse...

Страница 14: ...the selected cycle starts The last 2 minutes of the remaining time are always for the cool down portion NOTE 4 Top off To add more time After a debit card is inserted the operating time can be increased to 10 minutes 10p default when the Start button or the chosen course button has been pressed The card should have enough balance to satisfy increasing time The operating time can be increased to 10...

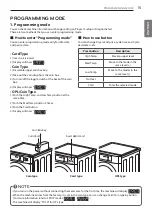
Страница 15: ...p and Low Temp button at the same time 2 Push the Med Temp button 3 times 3 Push the Start button 4 Display will show How to use button You can change Dryer vend price cycle time and Cycle parameters etc Press button Description High Temp Move to upper level Med Temp Move to the mode in the same level Low Temp Move to the modes in the same level No Heat Start Enter the selected mode If you turn on...

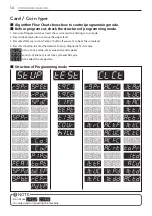
Страница 16: ... up mode 2 Press High Temp button to move the upper level 3 Press Med Temp or Low Temp button if you want to be at the same level 4 Press Start button to enter the details of Set up Diagnostic Tests mode is to set price value time value and vend type etc consists of line test reset free cycle and kill cycle Is to collect the usage data Structure of Programming mode Do not use It is only used in in...

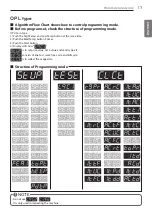
Страница 17: ... Type 1 Push the High Temp and Low Temp button at the same time 2 Push the Med Temp button 3 times 3 Push the Start button 4 Display will show is to set price value time value and vend type etc consists of line test reset free cycle and kill cycle Is to collect the usage data Structure of Programming mode Do not use It is only used in inspecting the machine NOTE ...

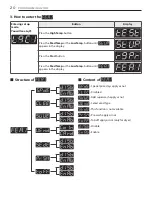
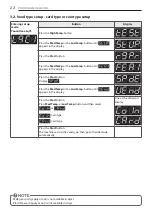
Страница 18: ...le in dryer NOTE Entering set up mode You will see LqC1 Button Display Press the High Temp button Press the Med Temp or the Low Temp button until appears in the display Press the Start button Press the Start button Display previous regular price Press Med Temp or Low Temp button to set regular price The vend price can be set from 0 to 9 90 in 0 1 increments Press the Start button The machine sets ...

Страница 19: ...ears in the display Press the Start button Press the Med Temp or the Low Temp button until appears in the display Press the Start button Display previous special price Press Med Temp or Low Temp button to set special price The vend price can be set from 0 to 9 90 in 0 1 increments Press the Start button The machine sets up the regular price then advances to the next process automatically 1 Continu...

Страница 20: ...s the Med Temp or the Low Temp button until appears in the display Press the Start button Press the Med Temp or the Low Temp button until appears in the display Special price days apply or not Disabled Add super wash apply or not Select vend type This function is not available Pre wash apply or not Top off apply or not only for dryer Disable Enable ...

Страница 21: ...r the Low Temp button until appears in the display Press the Start button Display Press the Start button Press Med Temp or Low Temp button and then select or Coin type Card type One or the other will display Press the Start button The machine sets up the special price then advances to the next process automatically 1 Continue to set up the next mode 2 Stop the change of setup value and go back to ...

Страница 22: ...d Temp or the Low Temp button until appears in the display Press the Start button Press the Med Temp or the Low Temp button until appears in the display Press the Start button Display Press the Med Temp or the Low Temp button until appears in the display Press the Start button Press Med Temp or Low Temp button and then select or Coin type Card type One or the other will display Press the Start but...

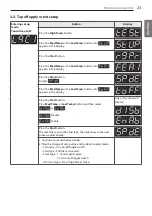
Страница 23: ...e Med Temp or the Low Temp button until appears in the display Press the Start button Press Med Temp or Low Temp button and then select or Disable Enable One or the other will display Press the Start button The machine sets up the Vend type then advances to the next process automatically 1 Continue to set up the next mode 2 Stop the change of setup value and go back to ready mode Coin type Turn on...

Страница 24: ...tton Display Press the High Temp button Press the Med Temp or the Low Temp button until appears in the display Press the Start button Press the Med Temp or the Low Temp button until appears in the display Press the Start button Display Structure of Sunday Monday Tuesday Wednesday Thursday Friday Saturday ...

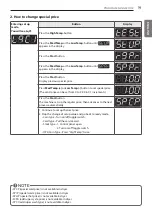
Страница 25: ...til appears in the display Press the Start button Display Press the Start button Press Med Temp or Low Temp button and then select or Disable Enable One or the other will display Press the Start button The machine sets up the special price day Sunday then advances to the next process automatically 1 Continue to set up the next mode 2 Stop the change of setup value and go back to ready mode Coin ty...

Страница 26: ...the Start button Display previous special price beginning time Press Med Temp or Low Temp button to select time between 0 and 23 Press the Start button The machine sets up the special price beginning time then advances to the next process automatically 1 Continue to set up the next mode 2 Stop the change of setup value and go back to ready mode Coin type Turn on off toggle switch Card type Pull th...

Страница 27: ...rice ending time Press Med Temp or Low Temp button to select time between 1 and 24 Press the Start button The machine sets up the special price ending time then advances to the next process automatically 1 Continue to set up the next mode 2 Stop the change of setup value and go back to ready mode Coin type Turn on off toggle switch Card type Pull the service card Stack type 1 Control panel open 2 ...

Страница 28: ...tart button Display previous regular priced dryer cycle time Press Med Temp or Low Temp button to select time between 10 and 99 Press the Start button The machine sets up the regular priced dryer cycle time then advances to the next process automatically 1 Continue to set up the next mode 2 Stop the change of setup value and go back to ready mode Coin type Turn on off toggle switch Card type Pull ...

Страница 29: ...to select time between 10 and 99 Press the Start button The machine sets up the special priced dryer cycle time then advances to the next process automatically 1 Continue to set up the next mode 2 Stop the change of setup value and go back to ready mode Coin type Turn on off toggle switch Card type Pull the service card Stack type 1 Control panel open 2 Turn on off toggle switch OPL Coin Type Pres...

Страница 30: ...splay previous coin 1 value Press Med Temp or Low Temp button to select value of coin 1 The value can be set fronm 0 to 9 90 in 0 1 increments Press the Start button The machine sets up the value of coin 1 then advances to the next process automatically 1 Continue to set up the next mode 2 Stop the change of setup value and go back to ready mode Coin type Turn on off toggle switch Card type Pull t...

Страница 31: ...e value can be set fronm 0 to 9 90 in 0 1 increments Press the Start button The machine sets up the value of coin 2 then advances to the next process automatically 1 Continue to set up the next mode 2 Stop the change of setup value and go back to ready mode Coin type Turn on off toggle switch Card type Pull the service card Stack type 1 Control panel open 2 Turn on off toggle switch OPL Coin Type ...

Страница 32: ...Press the Start button Display previous top off time Press Med Temp or Low Temp button to select time between 1 and 30 Press the Start button The machine sets up the top off time then advances to the next process automatically 1 Continue to set up the next mode 2 Stop the change of setup value and go back to ready mode Coin type Turn on off toggle switch Card type Pull the service card Stack type ...

Страница 33: ... display Press the Start button Display previous value Press Med Temp or Low Temp button to select High or Low or Off Press the Start button The machine sets up the beep volume then advances to the next process automatically 1 Continue to set up the next mode 2 Stop the change of setup value and go back to ready mode Coin type Turn on off toggle switch Card type Pull the service card Stack type 1 ...

Страница 34: ...he display Press the Start button Display previous value Press Med Temp or Low Temp button to select time between 1 180 or Disable Press the Start button The machine sets up the time to keep the coin then advances to the next process automatically 1 Continue to set up the next mode 2 Stop the change of setup value and go back to ready mode Coin type Turn on off toggle switch Card type Pull the ser...

Страница 35: ... Start button Display previous value Press Med Temp or Low Temp button and then select or Coin Card type setting OPL type setting One or the other will display Press the Start button The machine sets up the time to keep the coin then advances to the next process automatically 1 Continue to set up the next mode 2 Stop the change of setup value and go back to ready mode Coin type Turn on off toggle ...

Страница 36: ... Temp button Press Low Temp button Press No Heat button Version and code of machine 7 time Test ends LqC1 During check if the door is open Door switch Motor Heater Off Buzzer beeps seven times dE The door is open Please close the door completely During check if the door is closed Test goes back at step 2 Motor on Heater Off Measured moisture value 70 239 During LqC1 test if no buttons are pressed ...

Страница 37: ...Press the Start button then factory reset is done is displayed 1 Continue to set up the next mode 2 Stop the change of setup value and go back to ready mode Coin type Turn on off toggle switch Card type Pull the service card Stack type 1 Control panel open 2 Turn on off toggle switch OPL Coin Type Push High Temp Low Temp and the 3 Dryer default value for CARD COIN machine Drying time 50 Minute Top...

Страница 38: ...ances to the next process automatically Press Med Temp or Low Temp button to select day between 01 and 31 Press the Start button The machine sets up the day then advances to the next process automatically Press Med Temp or Low Temp button to select hour between 00 and 23 Press the Start button The machine sets up the hour then advances to the next process automatically Press Med Temp or Low Temp b...

Страница 39: ... appears in the display Press the Start button Press the Med Temp button until appears in the display Press the Start button Display will show Select the course you desire In case of dryer card type it has to insert the cash card after removing the service card Then press the cycle course and the start button It is only applicable to the dryer s card type specially and there is no subtraction in c...

Страница 40: ... appears in the display Press the Start button Press the Med Temp button until appears in the display Press the Start button Display with beeping Go back to ready mode Insert cycle kill card Descriptions Display Display the current time and Display with beeping Go back to ready mode OPL type Dryer machine will end the cycle by opening the door NOTE ...

Страница 41: ...ilable in dryer It can t enter 5 dELC Dryer Moisture Sense dELC is not available in dryer It can t enter 6 ItrC Interval Regular Cycles Number of Regular cycles 0 65535 7 ItCC Interval Regular Cold Cycles ItCC is not available in dryer It can t enter 8 ItAC Interval Regular Warm Cycles ItAC is not available in dryer It can t enter 9 ItHC Interval Regular Hot Cycles ItHC is not available in dryer I...

Страница 42: ...Actl Accumulated Total Income Amount of money for Total Income 0 00 65535 32 IttC Interval Total Cycles Number of Total cycles 0 65535 33 ACtC Accumulated Total Cycles Number of Total cycles 0 65535 34 SCPr Super Cycle Price Scpr is not available in dryer It can t enter 35 toPr Top Off Price 0 00 9 90 36 Itd Interval Money Amount of money for regular cycle 0 65535 37 ACd Accumulated Money Amount o...

Страница 43: ...entional stainless steel cleaner used according to the manufacturer s specifications Never use steel wool or abrasive cleansers they can scratch or damage the surface Cleaning Around and Under the Dryer Vacuum lint and dust from around the dryer and underneath it regularly Vent ductwork should be checked for lint buildup and cleaned at least once per year If any noticeable reduction in airflow or ...

Страница 44: ...s the slide bracket 2 sliding pad 4 screw 10 machine screw 8 1 Sliding bracket 3 Stacking kit Stacking kit is provided in the upper dryer Stacking kit includes the stacking bracket 1 security bracket 3 bolt 1 screw 6 2 Sliding pad 3 Screw 4 Machine screw The machine can be stacked only on the model designated as suitable by LGE Do not stack the washer on the top You can order the parts for stackin...

Страница 45: ...yer and the rear of the lower washer in the same position Push the upper dryer matching the slide stacking bracket to make upper and lower front parallel Install the stacking bracket at the rear of the stacked dryer and washer Assemble the six 6 screw to fix the lower washer and upper dryer Please refer to Service Manual for detail to explain the how to stack and fix the machine NOTE ...

Страница 46: ...ccurrence or problem Dryer error code POWER FAIL RECOVERY In case of power failure the machine stops running but the time display remains on showing the time just before power failure Press the Start button after the power is restored then the machine will restart DEFAULT DRYER SETTINGS Default Settings Default Cycle Time Minutes 50 Minutes Cool Down Time Cycle 2 Minutes High Temperature 154 4 F 6...

Страница 47: ...ailure of the Product to perform during power failures and interruptions or inadequate electrical service 3 Damage or failure caused by leaky or broken water pipes frozen water pipes restricted drain lines inadequate or interrupted water supply or inadequate supply of air 4 Damage or failure resulting from running the Product in a corrosive atmosphere or contrary to the instructions outlined in th...

Страница 48: ......
Страница 49: ...nik Semua hak cipta di lindungi INDONESIAN Sebelum memulai pemasangan baca petunjuk ini dengan saksama Petunjuk ini akan mempermudah pemasangan dan memastikan bahwa mesin pengering terpasang dengan benar dan aman Simpan petunjuk ini di dekat mesin pengering setelah pemasangan sebagai referensi di kemudian hari ...

Страница 50: ...l 25 4 1 Cara mengubahnya menjadi hari Minggu 26 5 Penyiapan waktu awal harga spesial 27 6 Penyiapan waktu akhir harga spesial 28 7 Waktu siklus mesin pengering dengan harga reguler 29 8 Waktu siklus mesin pengering dengan harga reguler 30 9 Nilai koin 1 31 10 Nilai koin 2 Mempersiapkan untuk top off harga dan e suds koin nadi 32 11 Waktu pengisian penuh 33 12 Volume bunyi alarm 34 13 Waktu untuk ...

Страница 51: ...bih hemat energi DESAIN YANG ARTISTIK Tampilan panel depan yang modern dan pintu kaca bening yang jernih membuat mesin pengering Anda terlihat bergaya MUDAH DIGUNAKAN Seluruh pilihan fungsi yang mudah digunakan memudahkan pengoperasian pengering KAPASITAS ULTRA Drum yang lebih besar memungkinkan penggulingan lebih baik dan meminimalkan kusut dan keriput pada cucian ...

Страница 52: ...AN Kata kata tersebut berarti BAHAYA Anda akan kehilangan nyawa atau mengalami cedera parah jika Anda tidak segera mengikuti petunjuk Peringatan Anda dapat kehilangan nyawa atau mengalami cedera parah jika Anda tidak mengikuti petunjuk PERHATIAN Anda mungkin akan mengalami cedera ringan atau menyebabkan kerusakan pada produk jika Anda tidak mengikuti petunjuk Semua pesan keselamatan akan memberi t...

Страница 53: ...ugasservisberpengalaman Janganmemasangataumenyimpanmesinpengeringditempatyang terkenacuaca Selaluperiksabagiandalammesinpengeringapakahadabendaasing Bersihkansaringantirassebelumatausesudahpengeringan Janganmengeringkanbarangyang belumdicucidalammesinpengering Barangyangkotorolehzatseperti minyakgoreng aseton alkohol bensin minyaktanah penghilangnoda terpentin lilin danpenghilanglilinharus dicucim...

Страница 54: ...tidak resmi Kerusakan yang tidak disengaja atau konsekuensial terhadap barang pribadi yang disebabkan oleh kemungkinan cacat pada mesin ini Jika produk dipasang di luar area layanan normal biaya transportasi yang diperlukan untuk memperbaiki produk atau mengganti bagian yang rusak harus ditanggung oleh pemilik BACA SEMUA PETUNJUK SEBELUM PENGGUNAAN Peringatan Demi keselamatan Anda informasi dalam ...

Страница 55: ...ada mesin pengering dengan benar agar sesuai dengan semua aturan peraturan dan tata cara yang berlaku Ikuti perincian dalam petunjuk pemasangan Sengatan listrik dapat terjadi jika mesin pengering tidak dipasangi arde dengan benar Sebelum digunakan mesin pengering harus dipasang dengan benar seperti yang dijelaskan dalam buku panduan ini Sengatan listrik dapat terjadi jika mesin pengering tidak dip...

Страница 56: ... atau untuk saluran pembuangan ke luar Penggunaan pipa berbahan plastik atau bahan yang mudah terbakar lainnya dapat menyebabkan kebakaran Pipa yang bolong dapat menyebabkan kebakaran jika runtuh atau terbatas saat digunakan atau saat pemasangan Pipa tidak disediakan bersama mesin pengering dan Anda harus memperoleh pipa yang diperlukan dari lokasi setempat Tutup ujung harus memiliki peredam beren...

Страница 57: ...Kelalaian dalam mengikuti petunjuk ini dapat menimbulkan bahaya sengatan listrik dan atau bahaya kebakaran Mesin pengering harus selalu disambungkan ke stopkontak listrik masing masing yang memiliki nilai voltase yang sesuai dengan label spesifikasi Ini akan memberikan kinerja terbaik dan juga agar tidak terjadi kelebihan beban pada rangkaian kabel rumah yang dapat menyebabkan bahaya kebakaran aki...

Страница 58: ...egara tersebut Sebelum pemasangan periksa apakah kondisi distribusi setempat sifat gas dan tekanan dan penyetelan sudah kompatibel Metode sambungan dan peraturan pemasangan di negara tempat mesin dipasang jika ada peraturan semacam itu juga dimensi ventilasi harus diberikan untuk keperluan pemasangan di negara negara yang tidak memiliki peraturan yang sesuai Peringatan Jangan sekali kali menghenti...

Страница 59: ...engering Gas Spesifikasi Silakan lihat label spesifikasi mengenai informasi terperinci Catu Daya 220 240V 50Hz Ukuran 686 mm P x 764 mm L x 983 mm T mesin pengering tunggal 686 mm P x 764 mm L x 1954 mm T mesin pengering susun Kapasitas Maks 10 2 kg Berat 59 4 kg BTU 21 000 BTU hr Spesifikasi dapat diubah oleh produsen CATATAN ...

Страница 60: ...12 MEMPERKENALKAN MESIN PENGERING ANDA Fitur panel kontrol Tipe OPL Susun atas RP1329A7S 3 1 2 4 3 1 2 4 3 1 Tampilan LED 2 Tombol Siklus 3 Tombol Start Pause 4 LED Status ...

Страница 61: ...h seperti pakaian kerja yang santai Panas sedang Low Temp Gunakan untuk mengeringkan kain sintetis kain rajutan yang dapat dicuci dan permukaan yang tidak boleh disetrika Panas rendah No Heat Gunakan untuk barang yang membutuhkan pengeringan bebas panas seperti plastik atau karet Tombol Start Pause LED Start berkedip saat harga vending penuh sudah dilunasi kemudian siklus telah dipilih atau mesin ...

Страница 62: ... dari sisa waktu selalu untuk bagian pendinginan CATATAN 4 Pengisian penuh Untuk menambahkan lebih banyak waktu Setelah kartu debit dimasukkan waktu pengoperasian dapat dinaikkan menjadi 10 menit 10p standar bila tombol Start atau tombol siklus yang dipilih telah ditekan Kartu harus memiliki saldo yang cukup untuk memenuhi waktu yang ditambahkan Waktu pengoperasian dapat ditingkatkan menjadi 10 me...

Страница 63: ...ecara bersamaan 2 Tekan tombol Med Temp 3 kali 3 Tekan tombol Start 4 Tampilan akan menampilkan Cara menggunakan tombol Anda dapat mengubah harga vending Mesin pengering waktu siklus dan parameter Siklus dsb Tekan tombol Deskripsi High Temp Pindah ke tingkat atas Med Temp Pindah ke mode pada tingkat yang sama Low Temp Pindah ke mode pada tingkat yang sama No Heat Start Masukkan mode yang dipilih J...

Страница 64: ...n tombol High Temp untuk pindah ke tingkat yang lebih tinggi 3 Tekan tombol Med Temp atau Low Temp jika Anda ingin berada pada tingkat yang sama 4 Tekan tombol Start untuk memasukkan detail Penyiapan atau Uji Diagnostik adalah untuk menetapkan nilai harga nilai waktu tipe vending dsb terdiri atas uji saluran pengaturan ulang siklus gratis dan penghentian siklus adalah mengumpulkan data pemakaian S...

Страница 65: ...ekan tombol High Temp and Low Temp secara bersamaan 2 Tekan tombol Med Temp 3 kali 3 Tekan tombol Start 4 Tampilan akan menampilkan adalah untuk menetapkan nilai harga nilai waktu tipe vending dsb erdiri atas uji saluran pengaturan ulang siklus gratis dan penghentian siklus adalah mengumpulkan data pemakaian Struktur mode pemrograman Jangan menggunakan Hanya digunakan dalam memeriksa mesin Low Tem...

Страница 66: ...g rgHP harga panas biasa tidak tersedia di pengering CATATAN Masuk ke mode pe nyiapan Anda akan melihat LqC1 Tombol Tampilan Tekan tombol High Temp Tekan tombol Med Temp atau Low Temp sampai muncul di layar Tekan tombol Start Tekan tombol Start Menampilkan harga reguler sebelumnya Tekan tombol Med Temp atau Low Temp untuk mengatur harga reguler Harga vending dapat diatur mulai 0 9 90 dalam pertamb...

Страница 67: ...Temp sampai muncul di layar Tekan tombol Start Tekan tombol Med Temp atau Low Temp sampai muncul di layar Tekan tombol Start Menampilkan harga spesial sebelumnya Tekan tombol Med Temp atau Low Temp untuk mengatur harga spesial Harga vending dapat diatur mulai 0 9 90 dalam pertambahan 0 1 Tekan tombol Start Mesin akan menyiapkan harga spesial lalu maju ke proses berikutnya secara otomatis 1 Lanjutk...

Страница 68: ... tombol Med Temp atau Low Temp sampai muncul di layar Tekan tombol Start Tekan tombol Med Temp atau Low Temp sampai muncul di layar Hari harga spesial berlaku atau tidak tidak tersedia Add super wash berlaku atau tidak Pilih tipe vending Tidak tersedia Pra cuci berlaku atau tidak Pengisian penuh berlaku atau tidak hanya untuk pengering Nonaktifkan Aktifkan ...

Страница 69: ...ed Temp atau Low Temp sampai muncul di layar Tekan tombol Start Menampilkan Tekan tombol Start Tekan tombol Med Temp atau Low Temp lalu pipih atau Nonaktifkan Aktifkan Satu atau yang lain akan ditampilkan Tekan tombol Start Mesin memasang harga spesial lalu maju ke proses berikutnya secara otomatis 1 Lanjutkan untuk menyiapkan mode berikutnya 2 Hentikan perubahan nilai penyiapan dan kembali ke mod...

Страница 70: ...ekan tombol High Temp Tekan tombol Med Temp atau Low Temp sampai muncul di layar Tekan tombol Start Tekan tombol Med Temp atau Low Temp sampai muncul di layar Tekan tombol Start Menampilkan Tekan tombol Med Temp atau Low Temp sampai muncul di layar Tekan tombol Start Tekan tombol Med Temp atau Low Temp lalu pilih atau Tipe koin Tipe Kartu Satu atau yang lain akan ditampilkan Tekan tombol Start mak...

Страница 71: ...p atau Low Temp sampai muncul di layar Tekan tombol Start Tekan tombol Med Temp atau Low Temp lalu pilih atau Nonaktifkan Aktifkan Satu atau yang lain akan ditampilkan Tekan tombol Start Mesin akan menyiapkan tipe Vending lalu maju ke proses berikutnya secara otomatis 1 Lanjutkan untuk menyiapkan mode berikutnya 2 Hentikan perubahan nilai penyiapan dan kembali ke mode siap Tipe koin Alihkan sakela...

Страница 72: ...nda akan melihat LqC1 Tombol Tampilan Tekan tombol High Temp Tekan tombol Med Temp atau Low Temp sampai muncul di layar Tekan tombol Start Tekan tombol Med Temp atau Low Temp sampai muncul di layar Tekan tombol Start Menampilkan Struktur dari Minggu Senin Selasa Rabu Kamis Jumat Sabtu ...

Страница 73: ...ampai muncul di layar Tekan tombol Start Menampilkan Tekan tombol Start Tekan tombol Med Temp atau Low Temp lalu pilih or Nonanktifkan Aktifkan Satu atau yang lain akan ditampilkan Tekan tombol Start Mesin akan menyiapkan hari harga spesial Minggu lalu maju ke proses berikutnya secara otomatis 1 Lanjutkan untuk menyiapkan mode berikutnya 2 Hentikan perubahan nilai penyiapan dan kembali ke mode sia...

Страница 74: ...ilkan waktu awal harga spesial sebelumnya Tekan tombol Warm atau Cold untuk memilih waktu antara 0 dan 23 Tekan tombol Start Mesin akan menyiapkan waktu mulai harga spesial lalu maju ke proses berikutnya secara otomatis 1 Lanjutkan untuk menyiapkan mode berikutnya 2 Hentikan perubahan nilai penyiapan dan kembali ke mode siap Tipe koin Alihkan sakelar ke nyala mati Tipe kartu Keluarkan kartu layana...

Страница 75: ...lumnya Tekan tombol Warm atau Cold untuk memilih waktu antara 1 dan 24 Tekan tombol Start Mesin akan menyiapkan waktu akhir harga spesial lalu maju ke proses berikutnya secara otomatis 1 Lanjutkan untuk menyiapkan mode berikutnya 2 Hentikan perubahan nilai penyiapan dan kembali ke mode siap Tipe koin Alihkan sakelar ke nyala mati Tipe kartu Keluarkan kartu layanan Tipe susun 1 Panel kontrol terbuk...

Страница 76: ...us mesin pengering dengan harga reg uler Tekan tombol Med Temp atau Low Temp untuk memilih waktu antara 10 dan 99 Tekan tombol Start Mesin akan menyiapkan waktu siklus mesin pengering dengan harga reguler lalu maju ke proses berikutnya secara otomatis 1 Lanjutkan untuk menyiapkan mode berikutnya 2 Hentikan perubahan nilai penyiapan dan kembali ke mode siap Tipe koin Alihkan sakelar ke nyala mati T...

Страница 77: ...bol Start Mesin akan menyiapkan waktu siklus mesin pengering dengan harga spesial lalu maju ke proses berikutnya secara otomatis 1 Lanjutkan untuk menyiapkan mode berikutnya 2 Hentikan perubahan nilai penyiapan dan kembali ke mode siap Tipe koin Alihkan sakelar ke nyala mati Tipe kartu Keluarkan kartu layanan Tipe susun 1 Panel kontrol terbuka 2 Alihkan sakelar ke nyala mati Tipe OPL Koin Tekan Hi...

Страница 78: ...mnya Tekan tombol Med Temp atau Low Temp untuk memilih nilai koin 1 Nilai dapat diatur mulai 0 9 90 dalam pertambahan 0 1 Tekan tombol Start Mesin akan menyiapkan nilai koin 1 lalu maju ke proses berikutnya secara otomatis 1 Lanjutkan untuk menyiapkan mode berikutnya 2 Hentikan perubahan nilai penyiapan dan kembali ke mode siap Tipe koin Alihkan sakelar ke nyala mati Tipe kartu Keluarkan kartu lay...

Страница 79: ... 9 90 dalam pertambahan 0 1 Tekan tombol Start Mesin akan menyiapkan nilai koin 2 lalu maju ke proses berikutnya secara otomatis 1 Lanjutkan untuk menyiapkan mode berikutnya 2 Hentikan perubahan nilai penyiapan dan kembali ke mode siap Tipe koin Alihkan sakelar ke nyala mati Tipe kartu Keluarkan kartu layanan Tipe susun 1 Panel kontrol terbuka 2 Alihkan sakelar ke nyala mati Tipe OPL Koin Tekan Hi...

Страница 80: ...waktu pengisian penuh sebelumnya Tekan tombol Med Temp atau Low Temp untuk memilih waktu antara 1 dan 30 Tekan tombol Start Mesin akan menyiapkan waktu pengisian penuh lalu maju ke proses berikutnya secara otomatis 1 Lanjutkan untuk menyiapkan mode berikutnya 2 Hentikan perubahan nilai penyiapan dan kembali ke mode siap Tipe koin Alihkan sakelar ke nyala mati Tipe kartu Keluarkan kartu layanan Tip...

Страница 81: ... Menampilkan nilai sebelumnya Tekan tombol Med Temp atau Low Temp untuk memilih High atau Low atau Off Tekan tombol Start Mesin akan menyiapkan volume suara alarm lalu maju ke proses berikutnya secara otomatis 1 Lanjutkan untuk menyiapkan mode berikutnya 2 Hentikan perubahan nilai penyiapan dan kembali ke mode siap Tipe koin Alihkan sakelar ke nyala mati Tipe kartu Keluarkan kartu layanan Tipe sus...

Страница 82: ...rt Menampilkan nilai sebelumnya Tekan tombol Med Temp atau Low Temp untuk memilih tombol guna memilih waktu antara 0 180 Tekan tombol Start Mesin akan menyiapkan waktu untuk menyimpan koin lalu maju ke proses berikutnya secara otomatis 1 Lanjutkan untuk menyiapkan mode berikutnya 2 Hentikan perubahan nilai penyiapan dan kembali ke mode siap Tipe koin Alihkan sakelar ke nyala mati Tipe kartu Keluar...

Страница 83: ...rt Menampilkan nilai sebelumnya Tekan tombol Med Temp atau Low Temp lalu pilih atau tipe koin kartu tipe OPL Satu atau yang lain akan ditampilkan Tekan tombol Start Mesin akan menyiapkan tipe produk lalu maju ke proses berikutnya secara otomatis 1 Lanjutkan untuk menyiapkan mode berikutnya 2 Hentikan perubahan nilai penyiapan dan kembali ke mode siap Tipe koin Alihkan sakelar ke nyala mati Tipe ka...

Страница 84: ...lam drum di Celsius 6 kali LED PERIKSA KUNCI Tekan tombol High Temp Tekan tombol Med Temp Tekan tombol Low Temp Tekan tombol No Heat Versi dan kode mesin 7 kali Tes berakhir LqC1 Saat check jika pintu tertutup Test kembali pada langkah 2 Motor on Heater Off Nilai kelembaban terukur 70 239 Saat check jika pintu tertutup Test kembali pada langkah 2 Motor on Heater Off Nilai kelembaban terukur 70 239...

Страница 85: ...art maka pengembalian ke pengaturan pabrik selesai ditampilkan 1 Lanjutkan untuk menyiapkan harga berikutnya 2 Hentikan perubahan nilai penyiapan dan kembali ke mode siap Tipe koin hidupkan matikan sakelar toggle Tipe kartu Keluarkan kartu layanan Tipe susun 1 Lepaskan panel kontrol dan hidupkan 2 matikan sakelar toggle Tipe OPL koin Tekan tombol High Temp dua kali Nilai standar pengering untuk me...

Страница 86: ...maju ke proses berikutnya secara otomatis Tekan tombol Med Temp atau Low Temp untuk memilih hari antara 01 dan 31 Tekan tombol Start Mesin akan menyiapkan hari lalu maju ke proses berikutnya secara otomatis Tekan tombol Med Temp atau Low Temp untuk memilih jam antara 00 dan 23 Tekan tombol Start Mesin akan menyiapkan jam lalu maju ke proses berikutnya secara otomatis Tekan tombol Med Temp atau Low...

Страница 87: ...utton until appears in the display Tekan tombol Start Tekan tombol Med Temp atau Low Temp sampai muncul di layar Tekan tombol Start Layar akan menunjukkan Tekan tombol Start Dalam kasus tipe kartu pengering kartu kredit harus dimasukkan setelah itu mengeluarkan kartu layanan Kemudian tekan kursus siklus dan tombol start Ini hanya berlaku untuk jenis kartu pengering khususnya dan tidak ada penguran...

Страница 88: ...pai muncul di layar Tekan tombol Start Tekan tombol Med Temp sampai muncul di layar Tekan tombol Start Menampilkan disertai bunyi alarm Kembali ke mode siap Masukkan kartu penghentian siklus Tombol Tampilan Tampilkan waktu sekarang dan Menampilkan disertai bunyi alarm Kembali ke mode siap Tipe OPL Mesin pengering akan mengakhiri siklus dengan membuka pintu CATATAN ...

Страница 89: ...gHP tidak tersedia di pengering Tidak bisa masuk 5 dELC Sensor Kelembapan Pengering dELC tidak tersedia di pengering Tidak bisa masuk 6 ItrC Interval Siklus Reguler Jumlah Siklus Reguler 0 65535 7 ItCC Interval Siklus Delicates Reguler ItCC tidak tersedia di pengering Tidak bisa masuk 8 ItAC Interval Warm Cold Reguler ItAC tidak tersedia di pengering Tidak bisa masuk 9 ItHC Interval Siklus Hot Reg...

Страница 90: ...si Total Penghasilan Jumlah uang untuk Total Penghasilan 0 00 65535 32 IttC Interval Total Siklus Jumlah Total siklus 0 65535 33 ACtC Akumulasi Total Siklus Jumlah Total siklus 0 65535 34 SCPr Harga Siklus Super Scpr tidak tersedia pada mesin pengering Tidak bisa dimasukkan 35 toPr Harga Pengisian Penuh 0 00 9 90 36 Itd Interval Uang Jumlah uang untuk siklus reguler 0 65535 37 ACd Akumulasi Uang J...

Страница 91: ...gan pembersih baja tahan karat konvensional yang digunakan sesuai dengan spesifikasi produsen Jangan sekali kali menggunakan wol baja atau pembersih abrasif karena dapat menggores atau merusak permukaan Membersihkan di Sekitar dan di Bawah Pengering Sedot tiras dan debu menggunakan penyedot debu dari sekitar mesin pengering dan di bawahnya secara teratur Pipa ventilasi harus diperiksa apakah ada p...

Страница 92: ...geser 4 sekrup 10 sekrup mesin 8 Depan Kanan Kiri Depan 1 Braket geser Depan Kanan Kiri Depan 2 Bantalan geser 3 Sekrup 4 Sekrup mesin 3 Kit penyusunan Kit penyusunan disediakan di pengering atas Kit penyusunan mencakup braket penyusun 1 braket pengaman 3 baut 1 sekrup 6 1 Braket penyusun 2 Baut 3 Sekrup 4 Braket pengaman Mesin hanya dapat disusun pada model yang didesain oleh LGE Jangan menyusun ...

Страница 93: ...ci bawah pada posisi yang sama Dorong mesin pengering atas yang cocok dengan braket geser penyusunan agar bagian depan atas dan bawah menjadi sejajar Pasang braket penyusun di bagian belakang mesin pengering dan mesin cuci yang disusun Pasang 6 enam sekrup untuk mengencangkan posisi mesin cuci bawah dan mesin pengering atas Lihat Buku Panduan Servis untuk perincian mengenai cara menyusun dan menge...

Страница 94: ...embaca kartu Periksa kabel pembaca kartu PEMULIHAN KEGAGALAN DAYA Jika terjadi kegagalan daya mesin akan berhenti beroperasi tetapi tampilan waktu tetap menyala yang menunjukkan waktu sesaat sebelum terjadi kegagalan daya Tekan tombol Start setelah daya hidup kembali maka mesin akan dinyalakan ulang PENGATURAN STANDAR MESIN PENGERING Pengaturan awal Awal Waktu Siklus Menit 50 Menit Siklus Waktu Pe...

Страница 95: ...strik atau layanan listrik yang tidak memadai 3 Kerusakan atau kegagalan yang disebabkan oleh pipa air yang bocor atau rusak pipa air yang beku saluran pem buangan yang terhalang suplai air yang tidak memadai atau terganggu atau suplai udara yang tidak memadai 4 Kerusakan atau kegagalan akibat mengoperasikan Produk di lingkungan yang korosif atau bertentangan dengan petunjuk yang diuraikan dalam b...

Страница 96: ... BC 31 ABCD Jl Sultan Iskandar Muda Kebayoran Lama Utara Kebayoran Lama Jakarta Selatan DKI Jakarta Raya Indonesia TANDA PENDAFTARAN PETUNJUK PENGGUNAAN MANUAL DAN KARTU JAMINAN GARANSI DALAM BAHASA INDONESIA BAGI PRODUK ELEKTRONIK Nomor I 14 LEI4 02220 0419 ...

Отзывы: