background image

OWNER’S MANUAL

MultiVision

Please read this manual carefully before operating 

the set and retain it for future reference.

60PT100C

60PT100N

Содержание MultiVision 60PT100C

Страница 1: ...OWNER S MANUAL MultiVision Please read this manual carefully before operating the set and retain it for future reference 60PT100C 60PT100N ...

Страница 2: ...tructions in the literature accompany ing the appliance y y Please read these safety precautions carefully before using the product y y In this manual the illustration may be somewhat different from your product because it is just example to help the instruction WARNING CAUTION WARNING CAUTION TO REDUCE THE RISK OF FIRE AND ELECTRIC SHOCK DO NOT EXPOSE THIS PRODUCT TO RAIN OR MOISTURE Read these i...

Страница 3: ...per sonnel Servicing is required when the appa ratus has been damaged in any way such as power supply cord or plug is damaged liquid has been spilled or objects have fallen into the apparatus the apparatus has been exposed to rain or moisture does not oper ate normally or has been dropped y y Never touch this apparatus or antenna dur ing a thunder or lighting storm y y When mounting a monitor on t...

Страница 4: ...g on shelves above the unit y y GROUNDING Ensure that you connect the earth ground wire to prevent possible electric shock i e a monitor with a three prong grounded AC plug must be connected to a three prong grounded AC outlet If grounding methods are not possible have a qualified electrician install a separate circuit breaker Do not try to ground the unit by connecting it to telephone wires light...

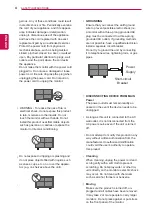
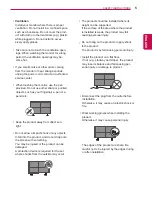
Страница 5: ...act shock or any objects to fall into the product and do not drop onto the screen with something You may be injured or the product can be damaged A protection device is required for the set where shocks from the outside may occur y y The product should be installed where its weight can be supported If the surface of the area where the product is installed is weak the product may fall causing perso...

Страница 6: ... Dip switch setting 22 IC Receiver 24 Using ferrite core 25 MAKING CONNECTIONS 25 RGB input 25 HDMI input 26 HDMI to DVI input 26 DVI input 27 Component input 27 Component input ports 28 REMOTE CONTROL 30 Initializing setup 31 watching MultiVision 31 Using the input list 32 CUSTOMIZING monitor SET TINGS 32 The SETUP Menu 33 PICTURE Settings 37 AUDIO Settings 38 TIME Settings 39 OPTION Settings 41 ...

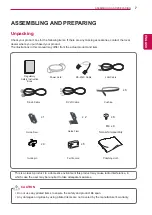
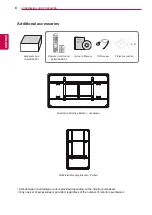
Страница 7: ...ms to ensure the safety and product life span y y Any damages or injuries by using pirated items are not covered by the manufacturer s warranty Caution This is a class A product In a domestic environment this product may cause radio interference in which case the user may be required to take adequate measures Power Cord RS 232C Cable LAN Cable D Sub Cable DVI D Cable Cushion x 6 Polishing cloth Fe...

Страница 8: ...d depending on the monitor purchased y y Only one set of accessories is provided regardless of the number of monitors purchased Protection cushion Owner s Manual Remote Control and batteries AAA IR Receiver Accessory box AA VX200X x 4 MultiVision Mounting Bracket Landscape MultiVision Mounting Bracket Portrait ...

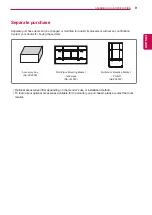
Страница 9: ...ntact your dealer for buying these items y y Optional accessories differ depending on the monitor s use or installation method y y To learn about optional accessories available for the monitor you purchased please contact the local retailer MultiVision Mounting Bracket landscape AB VL200X MultiVision Mounting Bracket Portrait AB VP200X Accessory box AA VX200X ...

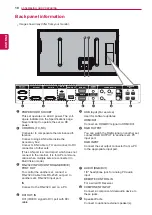
Страница 10: ...RX connector of other sets This LAN port is a control port which does not connect to the internet It is for APL communi cation when multiple sets are connected in Multi Vision mode You can watch the RGB signal on another set connect RGB OUTPUT to another set s PC input port RGB INPUT Connect the set output connector from a PC to the appropriate input port 3 RS 232C INPUT CONTROL SERVICE PORT OUT 7...

Страница 11: ...amage on the screen y y Use the handles of the monitor only to move Caution y y When transporting the monitor do not expose the monitor to jolts or excessive vibration y y When transporting the monitor keep the monitor upright never turn the monitor on its side or tilt towards the left or right y y When transporting the monitor by hand hold the monitor as shown in the following illustration y y Wh...

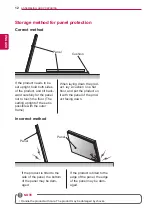
Страница 12: ...ght of the set is possible with the outer frame When laying down the prod uct lay a cushion on a flat floor and put the product on it with the panel of the prod uct facing down Incorrect method Panel Panel If the product is tilted to the side of the panel the bottom of the panel may be dam aged If the product is tilted to the edge of the panel the edge of the panel may be dam aged y y Handle the p...

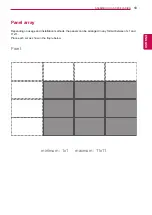
Страница 13: ...ASSEMBLING AND PREPARING Panel array Depending on usage and installation methods the panels can be arranged in any format between 1x1 and 11x11 Place each set as show in the fiqure below minimum 1x1 maxmum 11x11 front ...

Страница 14: ...SEMBLING AND PREPARING Landscape type back Portrait type back minimum 1x1 maxmum 11x11 minimum 1x1 maxmum 11x11 y y In portrait type panels must be installed so that the input ports are placed at the top of the set NOTE ...

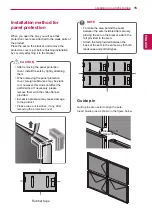
Страница 15: ... When you open the box you will see that protection covers are attached to the weak parts of the product Place the set on the bracket and remove the protection covers just before finishing installation by securely attaching it to the bracket y y To make the area behind the seam between the sets invisible after securely placing the set on the bracket attach the felt provided to the area y y Attach ...

Страница 16: ...hat the sets are aligned properly 1 Align a guide fixer with the holes and fasten them with the screws For a portrait type there is also a fixer fixing point in the center Its position can be changed if necessary You do not have to use them all NOTE 2 When installation of the sets is complete attach the protection cushion provided ...

Страница 17: ... set to prevent damage NOTE y y When sets are built in to a wall the internal temperature may rise to such an extent that it causes overheating which may lead to a fire To prevent the set from overheating please follow the instruc tions below y y Avoid completely sealed installation y y To ensure adequate ventilation keep the top the bottom and the sides of the set a minimum of 20 cm from the wall...

Страница 18: ...gh tension wires The image on the screen may not be properly displayed Do not install the product near a heater This may cause product malfunction Wall mount type Check whether the wall is stable enough to install the product If the wall is weak it may cause an accident Reinforce the wall before installation Secure enough space for cabling before finishing the wall mounting process y y Put down a ...

Страница 19: ...UT RGB IN DVI OUT DVI IN RGB OUT RGB IN DVI OUT DVI IN RGB OUT RGB IN RS 232C DVI RGB BACK PANEL RS 232C Cable Maximum 15 m DVI connection Maximum 5 m RGB connection Maximum 5 m y y This connection is supported only in RGB DVI and RS 232C y y If you need longer connection please use DVI boosters or DVI fiber optic cable y y The maximum length of the cable from the video equipment to the panel is 5...

Страница 20: ... DVI IN RGB OUT RGB IN DVI OUT DVI IN RGB OUT RGB IN DVI OUT DVI IN RGB OUT RGB IN BACK PANEL RX TX CONTROL RX TX CONTROL RX TX CONTROL DVI OUT DVI IN SERVICE ONLY USB HDMI RGB OUT RGB IN SPEAKER 8 AC IN DVI OUT DVI IN SERVICE ONLY USB HDMI RGB OUT RGB IN SPEAKER 8 TX RX CONTROL DVI OUT DVI IN SERVICE ONLY USB HDMI RGB OUT RGB IN SPEAKER 8 DVI OUT DVI IN SERVICE ONLY USB HDMI RGB OUT RGB IN SPEAKE...

Страница 21: ... 2 3 4 1 2 3 4 1 2 3 4 1 2 3 4 1 2 3 4 1 2 3 4 1 2 3 4 1 2 3 4 OFF ON 1 2 3 4 1 2 3 4 1 2 3 4 1 2 3 4 1 2 3 4 1 2 3 4 1 2 3 4 1 2 3 4 1 2 3 4 1 2 3 4 1 2 3 4 1 2 3 4 monitor 1 monitor 2 OFF ON 1 2 3 4 1 2 3 4 1 2 3 4 1 2 3 4 1 2 3 4 1 2 3 4 1 2 3 4 1 2 3 4 1 2 3 4 1 2 3 4 1 2 3 4 1 2 3 4 monitor 3 OFF ON 1 2 3 4 1 2 3 4 1 2 3 4 1 2 3 4 1 2 3 4 1 2 3 4 1 2 3 4 1 2 3 4 1 2 3 4 1 2 3 4 1 2 3 4 1 2 3 ...

Страница 22: ... the signal of the remote control by connecting to the set GB OUT RGB IN R COMP 8 43 fp Front Remote Control Sensor RS 232C Cable y y Install the IR receiver in the first set connected to the computer and the RS 232C cable y y The IR signal of the remote control is sent through the RS 232C cable in cascade NOTE ...

Страница 23: ...23 ENG ENGLISH ASSEMBLING AND PREPARING GB OUT RGB IN R FRONT Side Remote Control Sensor y y Attach the remote control sensor to the middle cabinet BK frame NOTE ...

Страница 24: ...nce in the power cable Wind the power cable on the ferrite core once Place the ferrite core close to the monitor and a wall plug Figure 1 to a wall plug to the moni tor Cross Section of Ferrite Core Figure 4 10 mm 5 mm y y Do not use any pirated items to ensure the safety and product life span y y Any damages or injuries by using pirated items are not covered by the manufacturer s warranty Caution...

Страница 25: ...DMI2 or HDMI1 DVI jack on the monitor 2 Turn on the external equipment Refer to the external equipment s manual for operating instructions 3 Select an input signal Press the INPUT button on the remote control to select the input signal HDMI2 or HDMI1 DVI OUT DVI IN RGB OUT RGB IN SERVICE ONLY USB HDMI 2 HDMI1 DVI 1 external equipment OK Move Input List Input Label Exit HDMI2 HDMI1 DVI D Component ...

Страница 26: ...I COMPONENT IN 1 2 DVI input 1 Connect the DVI output of the PC to the DVI IN jack on the monitor 3 Turn on the PC and the monitor 4 Select an input signal Press the INPUT button on the remote control to select the input signal DVI OUT DVI IN RGB OUT RGB IN R SERVICE ONLY USB HDMI 2 HDMI1 DVI COMPONENT IN PC 1 y y It does not support HDCP High band width Digital Content Protection function when it...

Страница 27: ...ess the INPUT button on the remote control to select the input signal BNC Cable not included Audio Cable not included DVD STB Receiver Component input ports To get better picture quality connect a DVD player to the component input ports as shown below Component ports on the monitor Y PB PR Video output ports on DVD player Y PB PR Y B Y R Y Y Cb Cr Y Pb Pr OK Move Input List Input Label Exit HDMI2 ...

Страница 28: ... on from standby or off to standby To turn on the sets at once in standby mode wait 10 seconds before pressing the power button ENERGY SAVING Adjusts the brightness of the screen to reduce energy consumption AV MODE It helps you select and set images and sounds when connecting AV devices INPUT External input mode rotate in regular sequence AUTO CONFIG Automatic adjustment function Operational for ...

Страница 29: ...K Allows the user to move return one step in an interactive application MUTE Switches the sound on or off EXIT Clears all on screen displays and return to monitor viewing from any menu AV MODE INPUT TV RAD ENERGY LIST Q VIEW FAV RATIO MUTE MARK P P A G E SAVING BACK EXIT OK Q MENU Home 1 2ABC 3DEF 4GHI 5JKL 6MNO 7PQRS 8TUV 0 9WXYZ CHAR NUM DELETE Premium GUIDE REC LIVE TV INFO LZ9600 LW9500 LW7700...

Страница 30: ...he first time y y You can also access Factory Reset by accessing OPTION in the MENU OPTION Factory Reset NOTE y y If you do not complete the Initial setting it will appear whenever the monitor turns on y y If you time out on the OSD On Screen Dis play the installation menu will continuously appear until the set up is completed when ever the monitor is switched on NOTE 3 Select the language desired...

Страница 31: ...iffer from your monitor Adding an Input label Add a label to an input source press the blue but ton you can easily identify a device connected to each input source 1 Press INPUT to access the input sources 2 Press the blue button 3 Press the Navigation buttons to scroll to one of the input sources 4 Press the Navigation buttons to scroll to one of the input labels 5 When you are finished press EXI...

Страница 32: ... and press ENTER 3 Press the Navigation buttons to scroll to the setting or option you want and press ENTER 4 When you are finished press EXIT TIME PICTURE AUDIO OPTION AUDIO See p 37 Adjusts the sound quality effect or volume level PICTURE See p 33 Adjusts the image size quality or effect TIME See p 38 Sets the time date or Timer feature OPTION See p 39 Customizes the general settings ...

Страница 33: ...tion Aspect Ratio only landscape type Changes the image size to view images at its optimal size See p 36 Energy Saving It reduces the Monitor s power consumption The default factory setting is adjusted to the comfortable level to be viewed at home Option Off The Energy Saving is off On The Energy Saving is on y y Image shown may differ from your monitor PICTURE Aspect Ratio 16 9 ꕊ Energy Saving Of...

Страница 34: ...tch the resolution of RGB mode and selection of PC mode 1024x768 1280x768 1360x768 Auto Configure This function is for automatic adjustment of the screen position size and phase The displayed image will be unstable for a few seconds while the auto configuration is in progress Position This function is to adjust picture to left right and up down as you prefer Size This function is to minimize any v...

Страница 35: ...o each video mode execute the Picture Reset function for each Picture Mode Picture Reset Settings of the selected picture modes return to the default factory settings Advanced image options Setting Description Dynamic Contrast Adjusts the contrast to keep it at the best level according to the brightness of the screen The picture is improved by making bright parts brighter and dark parts darker Dyn...

Страница 36: ...thout any images cut off This menu is activated only in 720p 1080p and 1080i in Component HDMI DTV mode y y If there is noise in original Picture You can see the noise at the edge NOTE 4 3 This picture format is 4 3 aspect ratio Just Scan Cinema Zoom Choose Cinema Zoom when you want to enlarge the picture in correct pro portion Note When enlarging or reducing the picture the image may become disto...

Страница 37: ...ptimizes sound for playing games Option Infinite Surround Select this option to sound realistic Treble Controls the dominant sounds in the output When you turn up the treble it will increase the output to the higher frequency range Bass Controls the softer sounds in the output When you turn up the bass it will increase the output to the lower frequency range Sound Reset Settings of the selected So...

Страница 38: ...n individually to prevent overload Auto Off If Auto Off is active and there is no input signal the set switches to off mode automatically after 15 minutes TIME Settings 1 Press MENU to access the menu 2 Press the Navigation buttons to scroll to TIME and press ENTER 3 Press the Navigation buttons to scroll to the setting or option you want and press ENTER To return to the previous level press BACK ...

Страница 39: ...he ISC method reduces image sticking which occurs when a fixed image is played for a long period of time Contact your installation company for details about this function and more information on how to use it Factory Reset This function initializes all settings When the Factory Reset is completed you must restart the Initializing setup Set ID When controlling multiple monitors with the RS232C cont...

Страница 40: ... the image is still not correct your Monitor is functioning properly but needs further adjustment This function is for automatic adjustment of the screen position size and phase The displayed image will be unstable for a few seconds while the auto configuration is in progress Position If the picture is not clear after auto adjustment and especially if characters are still trembling adjust the pict...

Страница 41: ...t is turned on y y Is the power cord inserted into wall power outlet y y Test the wall power outlet plug another product s power cord into the outlet where the product s power cord was plugged in Picture appears slowly after switching on y y This is normal the image is muted during the product startup process Please contact your service center if the picture has not appeared after five minutes No ...

Страница 42: ...stripe on background Horizontal Noise Incorrect position y y Activate the Auto configure feature or adjust size phase or H V position Op tion Screen color is unstable or single color y y Check the signal cable y y Reinstall the PC video card When connecting the HDMI cable to the PC there is no audio y y Check the manual for the video card in the PC to see if it supports HDMI audio and how to set i...

Страница 43: ...r requirement AC 100 240 V 50 60 Hz Product specifications shown above may be changed without prior notice due to upgrade of product functions For the power supply and power consumption refer to the label attached to the product Environment condition Operating Temperature Operating Humidity 0 C to 40 C Less than 80 Storage Temperature Storage Humidity 20 C to 60 C Less than 85 SPECIFICATIONS ...

Страница 44: ...ial function Overload blocking Warnings Recommendations y y Do not plug other electrical products or equipments into the multi outlet that is used for this product y y It is recommended to plug the multi outlet power strip into the wall outlet that is considered total wattage or higher y y It is recommended to use the multi outlet certified by safety standards in your country Mark Japan China Taiw...

Страница 45: ...20 x 1080 28 125 50 00 13 1920 x 1080 67 432 59 94 14 1920 x 1080 67 50 60 00 15 1920 x 1080 56 250 50 00 16 1920 x 1080 27 00 24 00 17 1920 x 1080 33 75 30 00 Signal Component HDMI DTV 480i 576i O X 480p 576p O O 720p 1080i O O 1080p O O Resolution Horizontal Frequency kHz Vertical Frequency Hz 1 640x350 31 468 70 09 2 720x400 31 469 70 08 3 640x480 31 469 59 94 4 800x600 37 879 60 31 5 1360x768 ...

Страница 46: ...rol Button 15 5 Remote control Button 71 Green Remote control Button 16 6 Remote control Button 63 Yellow Remote control Button 17 7 Remote control Button 18 8 Remote control Button 19 9 Remote control Button 56 SET ID Remote control Button 46 SET ALL Remote control Button 02 VOL Remote control Button 03 VOL Remote control Button 6B TOUCH Remote control Button 7B TILE MODE Remote control Button 87...

Страница 47: ...roduct back panel Type of connector D Sub 9 Pin Male 1 5 6 9 No Pin name 1 No connection 2 RXD Receive data 3 TXD Transmit data 4 DTR DTE side ready 5 GND 6 DSR DCE side ready 7 RTS Ready to send 8 CTS Clear to send 9 No Connection y y RS 232C on this monitor is intended to be used with third party RS 232C control hardware and software The instructions below are provided to help with programming s...

Страница 48: ...ions Not standard PC Monitor RXD 2 3 TXD TXD 3 2 RXD GND 5 5 GND DTR 4 6 DTR DSR 6 4 DSR RTS 7 7 RTS CTS 8 8 CTS D Sub 9 D Sub 9 RS 232C Configurations 7 Wire Configurations Standard RS 232C cable PC Monitor RXD 2 3 TXD TXD 3 2 RXD GND 5 5 GND DTR 4 6 DSR DSR 6 4 DTR RTS 7 8 CTS CTS 8 7 RTS D Sub 9 D Sub 9 ...

Страница 49: ...Tint k j 00 to 64 33 Temperature Value d n FF 11 Sharpness k k 00 to 64 34 Auto Volume d u 00 to 01 12 OSDSelect k l 00 to 01 35 Speaker d v 00 to 01 13 Remote Control Lock k m 00 to 01 36 SleepTime f f 00 to 08 14 Treble k r 00 to 64 37 Auto Sleep f g 00 to 01 15 Bass k s 00 to 64 38 Power On Delay f h 00 to 64 16 Balance k t 00 to 64 39 Language f i 00 to 0b 17 Color Temperature x u 00 to 64 40 ...

Страница 50: ... about each function Note In this model Multi Vision will send the Acknowledge after power on processing completion There might be a time delay between command and acknowledge 02 Input Select Command x b To select input source for Multi Vision Transmission x b Set ID Data Cr Ack b Set ID OK NG Data x Use the feature depending on your model Data 40 Component 60 RGB PC 90 HDMI 1 91 HDMI 2 92 DVI D 0...

Страница 51: ...ou can also adjust brightness in the PICTURE menu Transmission k h Set ID Data Cr Ack h Set ID OK NG Data x The data range is from 00 to 64 in Hex Refer to Real data mapping See p 55 09 Color Command k i To adjust screen color You can also adjust color in the PICTURE menu Transmission k i Set ID Data Cr Ack i Set ID OK NG Data x The data range is from 00 to 64 in Hex Refer to Real data mapping See...

Страница 52: ...lance You can also adjust balance in the Audio menu Transmission k t Set ID Data Cr Ack t Set ID OK NG Data x The data range is from 00 to 64 in Hex Refer to Real data mapping See p 55 17 Color Temperature Command x u To adjust color temperature You can also adjust color temperature in the Picture menu Transmission x u Set ID Data Cr Ack u Set ID OK NG Data x The data range is from 00 to 64 in Hex...

Страница 53: ...to Real data mapping See p 55 27 Tile V Size Command d h To set the Vertical size Transmission d h Set ID Data Cr Ack h Set ID OK NG Data x Data Min 00H Max 64H Refer to Real data mapping See p 55 28 Natural Mode In Tile mode Command d j To assign the Tile Natural mode for Tiling function Transmission d j Set ID Data Cr Ack j Set ID OK NG Data x Data 0 Natural Off 1 Natural On 29 Picture Mode Comm...

Страница 54: ...OK NG Data x The data is always FF in Hex The data means temperature value Hexadecimal code 34 Auto volume Command d u Automatically adjust the volume level Transmission d u Set ID Data Cr Ack u Set ID OK NG Data x Data 0 Off 1 On 35 Speaker Command d v Turn the speaker on or off Transmission d v Set ID Data Cr Ack v Set ID OK NG Data x Data 0 Off 1 On 36 Sleep Time Command f f Set Sleep Time Tran...

Страница 55: ... Tile Off Mode 42 V Position Command f r To set the Vertical Position Transmission f r Set ID Data Cr Ack r Set ID OK NG Data x The data range is from 00 to 64 in Hex Refer to Real data mapping See p 55 This function is only working in Tile Off Mode 43 H Size Command f s To set the Horizontal size Transmission f s Set ID Data Cr Ack s Set ID OK NG Data x The data range is from 00 to 64 in Hex Refe...

Страница 56: ... f y To read the serial numbers Transmission f y Set ID Data Cr Ack y Set ID OK NG Data x Data FF to read the serial numbers 45 S W Version Command f z Check the software version Transmission f z Set ID Data Cr Ack z Set ID OK NG Data x Data FF to read the S W version ...

Страница 57: ... our last shipment of this product Please be informed that the open source software is subject to the terms and conditions of the applicable open source licenses which are provided to you herein below License Component GNU GPL v2 0 Linux kernel 2 6 busybox e2fsprogs gdbserver jfsutils lzo msdl 1 1 mtd utils ntpclient procps GNU LGPL v2 1 atk directFB ffmpeg glib gnuTLS gail GTK iconv libintl libgc...

Страница 58: ...hts We protect your rights with two steps 1 copyright the software and 2 offer you this license which gives you legal permission to copy distribute and or modify the software Also for each author s protection and ours we want to make certain that everyone understands that there is no warranty for this free software If the software is modified by someone else and passed on we want its recipients to...

Страница 59: ...onsidered independent and separate works in themselves then this License and its terms do not apply to those sections when you distribute them as separate works But when you distribute the same sections as part of a whole which is a work based on the Program the distribution of the whole must be on the terms of this License whose permissions for other licensees extend to the entire whole and thus ...

Страница 60: ...icense 7 If as a consequence of a court judgment or alle gation of patent infringement or for any other rea son not limited to patent issues conditions are imposed on you whether by court order agree ment or otherwise that contradict the conditions of this License they do not excuse you from the con ditions of this License If you cannot distribute so as to satisfy simultaneously your obligations u...

Страница 61: ...sharing and reuse of software generally NO WARRANTY 11 BECAUSE THE PROGRAM IS LICENSED FREE OF CHARGE THERE IS NO WAR RANTY FOR THE PROGRAM TO THE EXTENT PERMITTED BY APPLICABLE LAW EXCEPT WHEN OTHERWISE STATED IN WRITING THE COPYRIGHT HOLDERS AND OR OTHER PARTIES PROVIDE THE PROGRAM AS IS WITHOUT WARRANTY OF ANY KIND EITHER EXPRESSED OR IMPLIED INCLUDING BUT NOT LIMITED TO THE IMPLIED WARRANTIES ...

Страница 62: ... must give the recipients all the rights that we gave you You must make sure that they too receive or can get the source code If you link other code with the library you must provide complete object files to the recipients so that they can relink them with the library after making changes to the library and rec ompiling it And you must show them these terms so they know their rights We protect you...

Страница 63: ...distributed under the terms of this Lesser General Public License also called this License Each licensee is addressed as you A library means a collection of software functions and or data prepared so as to be conveniently linked with application programs which use some of those functions and data to form executables The Library below refers to any such software library or work which has been distr...

Страница 64: ...our rights to work written entirely by you rather the intent is to exercise the right to control the distribution of derivative or collective works based on the Library In addition mere aggregation of another work not based on the Library with the Library or with a work based on the Library on a volume of a storage or distribution medium does not bring the other work under the scope of this Licens...

Страница 65: ...must supply a copy of this License If the work during execution displays copyright notices you must include the copyright notice for the Library among them as well as a reference directing the user to the copy of this License Also you must do one of these things a Accompany the work with the complete cor responding machine readable source code for the Library including whatever changes were used i...

Страница 66: ...is License to do so and all its terms and conditions for copying distrib uting or modifying the Library or works based on it 10 Each time you redistribute the Library or any work based on the Library the recipient automati cally receives a license from the original licensor to copy distribute link with or modify the Library subject to these terms and conditions You may not impose any further restr...

Страница 67: ...RANTY 15 BECAUSE THE LIBRARY IS LICENSED FREE OF CHARGE THERE IS NO WAR RANTY FOR THE LIBRARY TO THE EXTENT PERMITTED BY APPLICABLE LAW EXCEPT WHEN OTHERWISE STATED IN WRITING THE COPYRIGHT HOLDERS AND OR OTHER PARTIES PROVIDE THE LIBRARY AS IS WITHOUT WARRANTY OF ANY KIND EITHER EXPRESSED OR IMPLIED INCLUDING BUT NOT LIMITED TO THE IMPLIED WARRANTIES OF MERCHANTABILITY AND FITNESS FOR A PARTICULA...

Страница 68: ...0 Ty Coon President of Vice That s all there is to it Mozilla Public License 1 1 MPL 1 1 1 Definitions 1 0 1 Commercial Use means distribution or otherwise making the Cov ered Code available to a third party 1 1 Contributor means each entity that creates or contributes to the creation of Modifications 1 2 Contributor Version means the combination of the Original Code prior Modifications used by a ...

Страница 69: ...nition control means a the power direct or indirect to cause the direction or management of such entity whether by contract or otherwise or b ownership of more than fifty per cent 50 of the outstanding shares or beneficial ownership of such entity 2 Source Code License 2 1 The Initial Developer Grant The Initial Developer hereby grants You a world wide royalty free non exclusive license subject to...

Страница 70: ...to whom you made an Executable version available and if made available via Electronic Distribution Mechanism must remain available for at least twelve 12 months after the date it initially became available or at least six 6 months after a subsequent ver sion of that particular Modification has been made available to such recipients You are responsible for ensuring that the Source Code version rema...

Страница 71: ...icense of Your choice which may contain terms different from this License provided that You are in compliance with the terms of this License and that the license for the Executable version does not attempt to limit or alter the recipient s rights in the Source Code version from the rights set forth in this License If You distribute the Executable version under a different license You must make it ...

Страница 72: ...n of this License Provisions which by their nature must remain in effect be yond the termination of this License shall survive 8 2 If You initiate litigation by asserting a patent infringement claim excluding declatory judgment actions against Initial Developer or a Contributor the Initial Developer or Contributor against whom You file such action is referred to as Participant alleging that a such...

Страница 73: ...shall be governed by California law provisions except to the extent applicable law if any provides other wise excluding its conflict of law provisions With respect to disputes in which at least one party is a citizen of or an entity chartered or registered to do business in the United States of America any litigation relating to this License shall be subject to the jurisdiction of the Federal Cour...

Страница 74: ...sions of ______ License are applicable instead of those above If you wish to allow use of your version of this file only under the terms of the ____ License and not to allow others to use your version of this file under the MPL indicate your decision by deleting the provisions above and replace them with the notice and other provisions required by the ___ License If you do not delete the provision...

Страница 75: ...The model and serial numbers of the monitor is located on the back of the monitor Record it below should you ever need service MODEL SERIAL ...

Отзывы: