background image

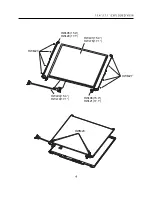
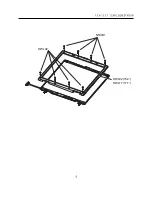
HWM23

HWM27

HWM23

HWM27

HWC11

HWC13

Содержание LM60

Страница 1: ...0 Service Manual LW60 70 LG Electronics ...

Страница 2: ...nfiguration System Block Diagram Fn key combinations Status indicators BIOS Flash BIOS Setup Ch 4 Symptom to part index Power system checkout Numeric error codes Error messages LCD related symptoms Indeterminate problems Ch 5 Removing and replacing a part FRU Ch 6 Part list Part list Exploded view ...

Страница 3: ...an adapter or device consists of more than one part any of the parts FRUs may be the cause of the error Before replacing the adapter or device remove the parts FRUs one by one to see if the symptoms change Replace only the part that changed the symptoms Caution The BIOS configuration on the computer you are servicing may have been customized Running Automatic Configuration my alter the settings No...

Страница 4: ... Do not disassemble it throw it into fire or water or short circuit it Dispose of the battery pack as required by local ordinances or regulations Use only the battery in the appropriate parts listing when replacing the battery pack Use of an incorrect battery can result in ignition or explosion of the battery Warning If the LCD breaks and the fluid from inside the LCD gets into your eyes or on you...

Страница 5: ...ous position Place removed covers and other parts in a safe place away from all personnel while you are servicing the machine Keep your tool box away from walk areas so that other people will not trip over it Do not wear loose clothing that can be trapped in the moving parts of a machine Make sure that your sleeves are fastened or rolled up above your elbows If your hair is long fasten it Insert t...

Страница 6: ...ages Disconnect all power before 1 Performing a mechanical inspection 2 Working near power supplies 3 Removing or installing main units Before you start to work on the machine unplug the power cord If you cannot unplug it ask the customer to power off the wall box that supplies power to the machine and to lock the wall box in the off position If you need to work on a machine that has exposed elect...

Страница 7: ... been powered off Always look carefully for possible hazards in your work area Examples of these hazards are moist floors non grounded power extension cables power surges and missing safety grounds Do not touch live electrical circuits with the reflective surface of a plastic dental mirror The surface is conductive such touching can cause personal injury and machine damage Do not service the follo...

Страница 8: ... shock 2 Mechanical hazards such as loose or missing hardware Refer to the following checklist and begin the checks with the power off and the power cord disconnected Checklist 1 Check exterior covers for damage loose broken or sharp edges 2 Power off the computer Disconnect the power cord 3 Check the power cord for a A third wire ground connector in good condition Use a meter to measure third wir...

Страница 9: ...on your body 3 Prevent the part from touching your clothing Most clothing retains a charge even when you are wearing a wrist strap 4 Use the black side of a grounded work mat to provide a static free work surface The mat is especially useful when handling ESD sensitive devices 5 Select a grounding system such as those listed below to provide protection that meets the specific service requirement N...

Страница 10: ... Opening the CD ROM drive DVD ROM drive or the other optical storage device could result in exposure to hazardous laser radiation There are no serviceable parts inside those drives Do not open Danger Emits visible and invisible laser radiation when open Do not stare into the beam do not view directly with optical instruments and avoid direct exposure to the bean 1 5 Backup Standby RTC battery safe...

Страница 11: ...e Single failures can occur for a variety of reasons that have nothing to do with a hard ware defect such as cosmic radiation electrostatic discharge or software errors Consider replacing a FRU only when a problem recurs If you suspect that a FRU is defective clear the error log and run the test again If the error does not recur do not replace the FRU Be careful not to replace a non defective FRU ...

Страница 12: ...an incompatible card Damage caused foreign material in the diskette drive Diskette drive damage caused by pressure on the diskette drive cover or by the insertion of a diskette with multiple labels Damaged or bent diskette eject button Fusses blown by attachment of a non supported device Forgotten computer password making the computer unusable Sticky keys caused by spilling a liquid onto the keybo...

Страница 13: ...ocations Front view 15 4 LCD latch LCD latch Power switch Volume Down Volume Up Mute WLAN Antenna WLAN Antenna TouchPad button Built in MIC DVD MUSIC LCD Keyboard TouchPad Built in Speaker Built in Speaker Remote Control Receiver ...

Страница 14: ...ront view 17 1 LCD latch LCD latch Power Switch Volume Down Volume Up Mute WLAN Antenna WLAN Antenna TouchPad button Built in MIC DVD MUSIC LCD Keyboard TouchPad Built in Speaker Built in Speaker Remote Control Receiver ...

Страница 15: ... view 15 4 17 1 Fan louvers Right view 15 4 17 1 Emergency eject hole USB connector IrDA port ODD MIC connector Security key hole ODD eject button Headphone connector IEEE 1394 connector Security key hole Kensington Lock User can attach a separately purchased chain lock into the security keyhole and connect it to a fixed object to prevent a notebook theft Emergency eject hole Insert a thin and har...

Страница 16: ...bg abg Mini PCI Type Quad band Antenna Card Slot Express Card Slot 4 in I Card Slot Memory Stick Memory Stick Pro Multi Media Card SD Card ODD Fixed Optical Storage DVD COMBO Super Multi Drive Port VGA 4X USB 2 0 RJ11 RJ45 Headphone out SPDIF Mic in AC in IEEE1394 S Video Input Devices Keyboard 99Key Keyboard Touchpad Buttons Power Volume Down Volume Up Mute DVD MUSIC Indicator LED AC in Power On ...

Страница 17: ...CONN ANALOGVCC 5V Magnetic H P OUT 88E8036 page13 15 H8S 2110B USB4 5 page15 DDR2 THERMAL A MS MSPRO page22 USB6 CD ROM page 5 MDC MODEM DDR2 400 533 MHz page47 1 8V Wireless LED LPC47N217 5V 3 3V page42 Int SPK TV CRT LVDS SPDIF USB Interface page30 3 3V PIRQC D page53 GbE B USB6 WOOFER Express card EXPRESS CARD DOTHAN PWR DIGITAL 3 3V ACIN LOGIN CPU_CORE FWH PCIREQ GNT3 3 3v ALVISO GM 1 5V 3 3V ...

Страница 18: ...age23 28 GMCH_CORE USB4 5 page22 TV CRT LVDS Miscellaneous 5V 3 3V LINE IN 4 in 1 CARD page52 page58 4 Mic IN PATA 66 100 FAN CONN USB0 1 PCI7420 LPC 3 3V 33MHz page32 PCIREQ GNT0 CK 410M Power LED DDR2 page33 5V page47 2 5V page32 page37 AC 97 AZALIA PEG INTERFACE CHG VPD EEPROM LAN page41 5V AMP page32 CODEC LCD CONN 3 3V page29 3 3V RJ11 45 CONN 5V SODIMM 0 1 page35 36 LINE OUT PATA HDD DDR2 DC...

Страница 19: ... both at the same time F7 PgUp Maximum power saving mode when OSD is installed ESC System information F10 Enable Disable Auto Brightness control F9 Enable Disable Auto Sound power management battery mode only F8 TouchPad Disable Impossible to use TouchPad TouchPad Enable Possible to use TouchPad TouchPad Auto Disable When connecting USB mouse to the computer TouchPad is disable The TouchPad initia...

Страница 20: ... Access point for Wireless LAN Connection Blinking short interval Data is transferring with Wireless LAN is on 4 AC Power Power indicator lights up when the power cord is connected to the computer 5 Power Power status indicator indicates the following status of the computer Green The computer is turned on Off The computer is turned off or is in hibernation mode Blinking The computer is in standby ...

Страница 21: ...ash update diskette 4 Insert the diskette into the FDD of your computer 5 Boot your computer with the diskette and type phlash16 wph mode n 6 Cold boot and follow the instruction displayed on the screen Flash options mode n 0 Default mode Keep the current DMI information and update BIOS image only 1 Update DMI information only If new DMI information is not specified the current DMI information is ...

Страница 22: ...or backup and new BIOS files in BIOS Setting Locations a Enter the name of the backup file for existing BIOS or click Browse to locate the file b Enter the name of the new BIOS file or click Browse to locate the file 5 Click Advanced Settings button to access the advanced settings 6 Click Flash BIOS button to start flash BIOS 7 Wait for the operation to complete WinPhlash may take one or two minut...

Страница 23: ...IOS was successfully updated appears on the screen then the computer restarts 9 After the restart make sure the system BIOS is updated 10 If your computer does not restart automatically turn off your computer and then turn it back on by pressing power button ...

Страница 24: ...to change and save the system environment hardware configurations power saving mode etc Open the BIOS Setup Utility in the following situations 1 to change the BIOS setup 2 to replace the backup battery 3 system configuration error occurs 4 to change the boot order 5 to set change a password Press the power button When the LG logo appears on the screen press and enter the BIOS Setup Utility ...

Страница 25: ...d item becomes highlighted Select Menu Move to another menu Change Values Change the value of a selected item Load Default Configuration Display Setup Confirmation window Press Enter to load default configuration Select Sub Menu Some items have sub menus Display the sub menu for a selected item Save and Exit Display Setup Confirmation window Press Enter to save and exit Exit In a sub menu press Es...

Страница 26: ... shows the Version of KBD firm ware UUID This is for display only This shows the UUID Pri Master Enter its submenu by pressing Enter In this submenu it would show the device of Primary IDE Master is HDD and its parameters Pri Slave Enter its submenu by pressing Enter In this submenu it would show the device of Primary IDE Slave is HDD and its parameters Sec Master Enter its submenu by pressing Ent...

Страница 27: ...rcentage Fan Mode Control Set Fan Mode Control Fn Key Setup Set Sticky fn key function Wake On Lan Enables Wake On Lan PXE Remote Boot Enables PXE Remote Boot Execute Disable Bit Capability Enables Execute Disable Bit Capability Security menu Supervisor Password Is This shows the system s supervisor password has been set or not Set Supervisor Password Set Supervisor Password User Password Is This ...

Страница 28: ...lost when the computer is turned off Exit Discarding Changes Select Exit Discarding Changes to discard new setup information If you made changes to items other than date time and passwords the Setup Warning asks you to save the new configurations Select Yes and press Enter to save the new configuration Load Setup Defaults Select Load Setup Defaults to change the setup information to the factory de...

Страница 29: ...nd install the charged battery pack 7 Check that the battery pack supplies power when you power on the computer If you suspect a power problem see the appropriate one of the following power supply checkouts 1 Checking the AC adapter 2 Checking the operational charging 3 Checking the battery pack 4 Checking the backup battery Checking the AC adapter If the power on indicator does not turn on check ...

Страница 30: ...attery pack Note Do not charge battery pack when its temperature is below 0 or above 75 Checking the battery pack 1 Open the Power Meter window by clicking Start Control Panel Power Options and then check the total power remains Battery charging does not start until the power Meter shows that less than 95 of the total power remains under this condition the battery pack can charge to 100 of its cap...

Страница 31: ...pacity of the battery pack When this happens you can perform the full discharge charge to improve the capacity You should perform periodic full discharge charge once every 30 60 days You should always use the battery until its power is low then fully charge the battery 3 Trickle charge If the temperature of the battery pack drops below 10 the trickle charging begins The trickle charging may take 3...

Страница 32: ... voltage is still less than 11 1 V DC after recharging replace the battery 4 If the voltage is more than 11 1 V DC measure the resistance between battery terminals 1 and 2 The resistance must be 2 to 4 typically 3 5 If the resistance is not correct replace the battery pack If the resistance is correct replace the system board Note Charging will take at least 3 hours Note Battery is an expendable s...

Страница 33: ...ror System RAM Failed at offset Load Setup Defaults in BIOS Setup Utility 0220 Monitor type error Monitor type does not match the one specified in CMOS System board 0212 Keyboard Controller Failed Run interactive tests of the keyboard and the auxiliary input device 0211 Keyboard error 1 Check the keyboard if it is pressed 2 Replace the keyboard 0210 Stuck Key error 1 Reset the hard disk drive 2 Lo...

Страница 34: ... Setup Utility 02B1 Diskette drive B error Set up the diskette type in BIOS Setup Utility 02B0 Diskette drive A error Load Setup Defaults in BIOS Setup Utility 0281 Memory Size found by POST differed from EISA CMOS 1 Load Setup Default in BIOS Setup Utility 2 DIMM 3 System board 0280 Previous boot incomplete Default configuration used Run BIOS Setup Utility to reset the time and date 0271 Check da...

Страница 35: ...Floppy configuration changed 1 Load Setup Defaults in BIOS Setup Utility 2 System board 0616 Com B configuration error 1 Load Setup Defaults in BIOS Setup Utility 2 System board 0615 Com B configuration changed 1 Load Setup Defaults in BIOS Setup Utility 2 System board 0614 Com A configuration error 1 Load Setup Defaults in BIOS Setup Utility 2 System board 0613 Com A configuration changed 1 Load ...

Страница 36: ... diskette drive are properly identified 3 Reset the hard disk drive 4 Reinstall the operating system 5 Diskette drive 6 Hard disk drive 7 System board Operating System not found 1 Load Setup Defaults in BIOS Setup Utility 2 Backup battery 3 System board I O Device IRQ Conflict 1 DIMM 2 System board Invalid System Configuration Data 1 DIMM 2 System board Failing bits nnnn 1 Load Setup Defaults in B...

Страница 37: ...nnot be adjusted LCD screen abnormal Characters missing pixels LCD screen unreadable Wrong color displayed 1 Reconnect inverter to the board connector 2 Replace inverter 3 LCD assembly 4 System board LCD backlight not working LCD too dark LCD brightness cannot be adjusted 1 Check out Battery Miser 2 Choose Never in the Turn off Monitor item on Power Options Properties 3 Check the power save mode s...

Страница 38: ...mage Replace any damaged FRU 3 Remove or disconnected all of the following devices a Non LG devices b Printer mouse and other external devices c Battery pack d PC cards e ODD CD ROM Combo drive or FDD drive in the Bay f Hard disk drive Note Use the other memory card because it needs when operating computer 4 Power on the computer 5 Determine whether the problem has changed 6 If the problem does no...

Страница 39: ...ctrical outlets remove the battery pack and then disconnect any interconnecting cables Caution Before the computer is powered on after FRU replacement make sure that all screws springs and other small parts are in place and are not loose inside the computer Verify metal flakes can cause electrical short circuits Note As for the screw every Torque 3 0 2Kgfcm 0 196Nm ...

Страница 40: ...39 Ch5 Removing and replacing a part Battery Pack 1 Push the battery latch in the direction shown below then side the battery pack out of the slot ...

Страница 41: ...40 Ch5 Removing and replacing a part Hard Disk Drive Remove the following parts in order before replacing this part 1 Battery Pack 1 Remove two screws as indicated in the picture ...

Страница 42: ...41 Ch5 Removing and replacing a part 2 Then pull the HDD assembly out in the direction shown below ...

Страница 43: ...42 Ch5 Removing and replacing a part Keyboard Remove the following parts in order before replacing this part 1 Battery Pack 1 Remove 2 screws 2 M2 5 x L6 5 1SZZBA4097A 1 Qty Specification FRU No No ...

Страница 44: ...43 Ch5 Removing and replacing a part 2 To remove 4 hooks insert a type screwdriver into a hook located at the lower end of keyboard and pull it up 3 Remove keyboard and disconnect Keyboard cable ...

Страница 45: ...g a part BMDC MDC Modem Card Remove the following parts in order before replacing this part 1 Battery Pack 1 Remove 2 MDC Board Screws 2 M2 0 X L3 5 1SZZBA4023A 1 Qty Specification FRU No No 2 Remove MDC card and disconnect cable ...

Страница 46: ...following parts in order before replacing this part 1 Battery Pack 2 Keyboard 3 BMDC MDC Modem Card 1 Remove 2 screws 2 M2 0 X L4 5 1SZZBA4019F 1 Qty Specification FRU No No 2 Remove a screw insert a screwdriver into the hole located at the rear of ODD and push it out ...

Страница 47: ...in order before replacing this part 1 Battery Pack 2 Hard Disk Drive 1 Remove 17 screws 14 M2 5 X L6 5 1SZZBA4097A 1 3 M2 0 X L3 0 1SZZBA4017A 2 Qty Specification FRU No No 2 2 2 1 1 1 1 1 1 1 1 1 1 1 1 1 1 2 Remove 3 screws 3 M2 5 X L6 5 1SZZBA4097A 1 Qty Specification FRU No No ...

Страница 48: ...47 Ch5 Removing and replacing a part 3 Disconnect cable 4 Disassemble the KBD Deck Assy ...

Страница 49: ...order before replacing this part 1 Battery Pack 2 Hard Disk Drive 3 Keyboard 4 Keyboard Deck 1 Remove 8 screws and then remove FAN Assembly 2 1 1 2 2 2 2 2 2 1 3 M2 0 X L12 0 1SZZBZ4022A 1 5 M2 0 X L3 5 1SZZBA4023A 2 Qty Specification FRU No No 2 Disconnect connector and pull it up ...

Страница 50: ...Removing and replacing a part Wireless LAN Card Remove the following parts in order before replacing this part 1 Battery Pack 1 Remove Cover Mini PCI screws 2 Disconnect WLAN antenna cable and remove WLAN card ...

Страница 51: ...ht side 1 Remove Wireless cable from hole Remove LCD connector You will see a tag designed to make the work easier Pull out the tag 2 M2 X L3 5 1SZZBA4023A 1 Qty Specification FRU No No Remove the following parts in order before replacing this part 1 Battery Pack 2 Hard Disk Drive 3 Mini PCI Cover Antenna 4 Keyboard 5 Keyboard Deck ...

Страница 52: ...51 Ch5 Removing and replacing a part 4 Disconnect LCD connector and Modem connector Remove WLAN antenna ...

Страница 53: ...rt 5 Remove 2 Hinge Screws and remove Hinge 2 M2 5 X L6 5 1SZZBA4097A 1 Qty Specification FRU No No 6 Remove screw cover and remove 2 Hinge screws Applied both left and right side 4 M2 5 X L6 5 1SZZBA4097A 1 Qty Specification FRU No No ...

Страница 54: ...53 Ch5 Removing and replacing a part ...

Страница 55: ...ving and replacing a part Speaker Remove the following parts in order before replacing this part 1 Battery Pack 2 Hard Disk Drive 3 Keyboard 4 Keyboard Deck 1 Disconnect MIC cable 2 Remove Speaker from Guide Boss ...

Страница 56: ...55 Ch5 Removing and replacing a part 3 Disconnect connector and remove Speaker ...

Страница 57: ...lowing parts in order before replacing this part 1 Battery Pack 2 Hard Disk Drive 3 Keyboard 4 Keyboard Deck 5 Optical Disk Drive 6 Display Module 4 M2 5 x L6 0 1SZZBA4080G 1 Qty Specification FRU No No 2 Remove 2 screws and remove Audio Sub B D 3 M2 x L4 5 1SZZBA4019F 1 Qty Specification FRU No No ...

Страница 58: ...emove 2 Frame Hinge Left screws 2 M2 5 X L6 0 1SZZBA4080G 1 5 M2 X L3 5 1SZZBA4023A 2 Qty Specification FRU No No Remove the following parts in order before replacing this part 1 Battery Pack 2 Hard Disk Drive 3 Keyboard 4 Keyboard Deck 5 Optical Disk Drive 6 Fan Assembly 7 Speaker 8 Sub Board 1 2 1 2 2 2 2 ...

Страница 59: ...58 Ch5 Removing and replacing a part 3 Remove Main Board ...

Страница 60: ...ve the following parts in order before replacing this part 1 Battery Pack 2 Hard Disk Drive 3 Keyboard 4 Keyboard Deck 1 Using a knife remove the logo and rubbers that are covering the screws Then remove all 8 screws 8 M2 5 X L6 0 1SZZBA4080G 1 Qty Specification FRU No No ...

Страница 61: ...60 Ch5 Removing and replacing a part 2 Remove LCD Hook ...

Страница 62: ...61 Ch5 Removing and replacing a part 3 Remove 2 screws and remove tape 2 M2 5 x L4 5 1SZZBA4080F 1 Qty Specification FRU No No ...

Страница 63: ...62 Ch5 Removing and replacing a part 4 Remove LCD power cable and remove Inverter 5 Left Right Remove 4 Hinge screws 4 M2 5 x L4 5 1SZZBA4080F 1 Qty Specification FRU No No ...

Страница 64: ...63 Ch5 Removing and replacing a part 6 Remove LCD panel ...

Страница 65: ...64 Ch5 Removing and replacing a part 7 Remove 8 Hinge Assembly screws Remove LCD Cable Tape 8 M2 x L3 0 1SZZBA4017A 1 Qty Specification FRU No No ...

Страница 66: ...65 Ch5 Removing and replacing a part ...

Страница 67: ...66 Ch5 Removing and replacing a part 8 Remove WLAN Antenna ...

Страница 68: ...67 Ch5 Removing and replacing a part Battery Pack 1 Push the battery latch in the direction shown below then side the battery pack out of the slot ...

Страница 69: ...68 Ch5 Removing and replacing a part Hard Disk Drive Remove the following parts in order before replacing this part 1 Battery Pack 1 Remove two screws as indicated in the picture ...

Страница 70: ...69 Ch5 Removing and replacing a part 2 Then pull the HDD assembly out in the direction shown below ...

Страница 71: ...70 Ch5 Removing and replacing a part Keyboard Remove the following parts in order before replacing this part 1 Battery Pack 1 Remove 2 screws 2 M2 5 x L6 5 1SZZBA4097A 1 Qty Specification FRU No No ...

Страница 72: ...71 Ch5 Removing and replacing a part 2 To remove 4 hooks insert a type screwdriver into a hook located at the lower end of keyboard and pull it up 3 Remove keyboard and disconnect Keyboard cable ...

Страница 73: ...Remove the following parts in order before replacing this part 1 Battery Pack 2 Keyboard 1 Remove 2 screws 2 M2 0 X L4 5 1SZZBA4019F 1 Qty Specification FRU No No 2 Remove a screw insert a screwdriver into the hole located at the rear of ODD and push it out ...

Страница 74: ...Removing and replacing a part Wireless LAN Card Remove the following parts in order before replacing this part 1 Battery Pack 1 Remove Cover Mini PCI screws 2 Disconnect WLAN antenna cable and remove WLAN card ...

Страница 75: ...g a part BMDC MDC Modem Card Remove the following parts in order before replacing this part 1 Battery Pack 1 Remove 2 MDC Board Screws 2 M2 0 X L3 5 1SZZBA4023A 1 Qty Specification FRU No No 2 Remove MDC card and disconnect cable ...

Страница 76: ...in order before replacing this part 1 Battery Pack 2 Hard Disk Drive 2 2 2 1 1 1 1 1 1 1 1 1 1 1 1 1 2 1 Remove 17 screws 13 M2 5 X L6 5 1SZZBA4097A 1 4 M2 0 X L3 0 1SZZBA4017A 2 Qty Specification FRU No No 2 Remove 7 screws 7 M2 5 X L6 5 1SZZBA4097A 1 Qty Specification FRU No No ...

Страница 77: ...76 Ch5 Removing and replacing a part 3 Disconnect cable 4 Disassemble the KBD Deck Assy ...

Страница 78: ... order before replacing this part 1 Battery Pack 2 Hard Disk Drive 3 Keyboard 4 Keyboard Deck 1 Remove 8 screws and then remove FAN Assembly 2 1 1 2 2 2 2 2 1 3 M2 0 X L12 0 1SZZBZ4022A 1 5 M2 0 X L3 5 1SZZBA4023A 2 Qty Specification FRU No No 2 Disconnect connector and pull it up ...

Страница 79: ... in order before replacing this part 1 Battery Pack 2 Hard Disk Drive 3 Mini PCI Cover Antenna 4 Keyboard 5 Keyboard Deck 1 Remove Wireless cable from hole Remove LCD connector You will see a tag designed to make the work easier Pull out the tag 2 Remove 2 Hinge cover screws 3 Remove cap hinge small Applied both left and right side ...

Страница 80: ...79 Ch5 Removing and replacing a part 4 Disconnect LCD connector and Modem connector Remove WLAN antenna ...

Страница 81: ...rt 5 Remove 2 Hinge Screws and remove Hinge 2 M2 5 X L6 5 1SZZBA4097A 1 Qty Specification FRU No No 6 Remove screw cover and remove 2 Hinge screws Applied both left and right side 4 M2 5 X L6 5 1SZZBA4097A 1 Qty Specification FRU No No ...

Страница 82: ...81 Ch5 Removing and replacing a part ...

Страница 83: ...ving and replacing a part Speaker Remove the following parts in order before replacing this part 1 Battery Pack 2 Hard Disk Drive 3 Keyboard 4 Keyboard Deck 1 Disconnect MIC cable 2 Remove Speaker from Guide Boss ...

Страница 84: ...83 Ch5 Removing and replacing a part 3 Disconnect connector and remove Speaker ...

Страница 85: ...g this part 1 Battery Pack 2 Hard Disk Drive 3 Keyboard 4 Keyboard Deck 5 Optical Disk Drive 6 Display Module 1 Remove 4 screws and remove Sub B D 4 M2 5 x L6 0 1SZZBA4080G 1 Qty Specification FRU No No 2 Remove 2 screws and remove Audio Sub B D 3 M2 x L4 5 1SZZBA4019F 1 Qty Specification FRU No No ...

Страница 86: ...ollowing parts in order before replacing this part 1 Battery Pack 2 Hard Disk Drive 3 Keyboard 4 Keyboard Deck 5 Optical Disk Drive 6 Fan Assembly 7 Speaker 1 Remove Audio Sub Board Remove 3 Screws 3 M2 5xL11 D7 3 5 1SZZBZ4023A 1 Qty Specification FRU No No ...

Страница 87: ...86 Ch5 Removing and replacing a part 2 Disconnect connector and remove Woofer ...

Страница 88: ...a part Main Board Remove the following parts in order before replacing this part 1 Battery Pack 2 Hard Disk Drive 3 Keyboard 4 Keyboard Deck 5 Optical Disk Drive 6 Fan Assembly 7 Speaker 8 Woofer 9 Sub Board 1 Remove Cover Block HDD ...

Страница 89: ...rt 2 Remove 6 Main Board screws Remove 2 ODD interface Board screws Remove Main board and ODD board 3 2 3 2 2 2 2 2 1 1 2 2 8 M2 0 X L3 5 1SZZBA4023A 2 2 M2 0 X L2 7 1SZZBZ4002B 1 2 M2 0 X L6 0 1SZZBA4080G 3 Qty Specification FRU No No ...

Страница 90: ...ve the following parts in order before replacing this part 1 Battery Pack 2 Hard Disk Drive 3 Keyboard 4 Keyboard Deck 1 Using a knife remove the logo and rubbers that are covering the screws Then remove all 8 screws 8 M2 5 X L6 0 1SZZBA4080G 1 Qty Specification FRU No No ...

Страница 91: ...90 Ch5 Removing and replacing a part 2 Remove LCD Hook ...

Страница 92: ...91 Ch5 Removing and replacing a part 3 Remove 2 screws and remove tape 2 M2 0 X L3 0 1SZZBA4017A 1 Qty Specification FRU No No ...

Страница 93: ...92 Ch5 Removing and replacing a part 4 Remove LCD power cable and remove Inverter 5 Left Right Remove 4 Hinge screws 4 M2 5 X L6 0 1SZZBA4080G 1 Qty Specification FRU No No ...

Страница 94: ...93 Ch5 Removing and replacing a part 6 Remove LCD panel ...

Страница 95: ...94 Ch5 Removing and replacing a part 7 Remove 8 Hinge Assembly screws Remove LCD Cable Tape 8 M2 0 X L3 0 1SZZBA4017A 1 Qty Specification FRU No No ...

Страница 96: ...95 Ch5 Removing and replacing a part ...

Страница 97: ...96 Ch5 Removing and replacing a part 8 Remove WLAN Antenna ...

Страница 98: ...hion wide LCD mid R 4850BA4011A HWL09 Cushion rear right 15 4 Cushion LCD Rear Right 4850BA4010A HWL08 Cushion rear left 15 4 Cushion LCD Rear Left 4850BA4009A HWL07 LCD plate right 15 4 Hinge Right with BKT 154W 4774BD2001A HWL06 LCD plate left 15 4 Hinge Left BKT154W 4774BD2002A HWL05 LCD Cable 15 4 LCD cable XGA Wanshih 6851B34034B HWL04 LCD Cable 15 4 LCD cable SXGA Wanshih 6851B34034A HWL04 L...

Страница 99: ...W L Antenna RIGHT 5011B00018A HWL30 Antenna left 15 4 17 1 W L Antenna LEFT 5011B00017A HWL29 Magnetic cover 15 4 17 1 Sheet Cover Magnetic 3858BZ4100A HWL28 Magnetic 15 4 17 1 Magnetic LID H5mm 5016BZ9100B HWL27 cover screw bottom mid 17 1 Sheet Cover screw mid 3858BP4260A HWL26 cover screw top 17 1 Cushion rubber cover screw 4850BP4042A HWL25 Cushion rear side 17 1 Cushion rubber supporter LCD s...

Страница 100: ...4 533MHZ DDR2 SDRAM WITH 32MX16 0IMMR00005A NMEM1 Memory HYS64T32000HDL 3 7 A INFINEON 200P SODIMM BK 256MB 32MX64 533MHZ DDR2 SDRAM WITH 32MX16 GIMMR00007A NMEM1 Memory M470T6554BG0 CCC SAMSUNG ELECTRONICS 200P SODIMM BK 512MB 64MX64 400MHZ DDR2 SDRAM WITH 32MX16 0IMMRSS114A NMEM1 Memory HYMP564S646 E3 HYNIX 200P SODIMM BK 512MB 64MX64 400MHZ DDR2 SDRAM WITH 32MX16 0IMMRHY062A NMEM1 Memory HYS64T...

Страница 101: ...E IIIB STANDARD 6871BZT14AE HWC04 Wireless LAN b g WM3B2200BGRW3 INTEL 4 LAYERS REV 1 2 PRO WIRELESS 2200BG LAN MINI PCI TYPE CH 1 14 NETWORK CONNECTIO 6871BZT14AD HWC04 Wireless LAN b g WM3B2200BGMW2 INTEL 4 LAYERS REV 1 2 PRO WIRELESS 2200BG LAN MINI PCI TYPE CH 1 11 NETWORK CONNECTIO 6871BZT14AC HWC04 HDD SCREW D3 0 L 3 0 SWRH4 HDD WH S PJT 1 TIP 1SZZBA4011A HTA02 HDD PLATE ASSY HUNTER WIDE 15 ...

Страница 102: ...10BM21002 HWC13 RTC CR2032 SONY 3 0 VOLT 200MA D2 0MM H3 2MM 6910C00005A HWC12 RTC CR2032 SONY 3V 220MA H COIN 6910BLC3201 HWC12 Adapter HP AP091F13P HIPRO 90W 19V 4 74A 3PIN WITH PFC HUNTER ALL FOR EXPORT SLIM TYPE 6708BA0057B HWC11 Adapter PA 1900 08LG LITEON 90W 19V 4 74A 3PIN WITH PFC HUNTER ALL FOR EXPORT SLIM TYPE 6708BA0056B HWC11 Adapter HP AP091F13P1 HIPRO 90W 19V 4 74A 3PIN WITH PFC HUNT...

Страница 103: ...FCI COMBO EXPRESS CARD SLOT 3301B00549A HWC20 REMOCON ASSY RC 501 HTC LG LOGO FOR HUNTER W W O BATTERY 6710B00009A HWC18 MIC ASSY OB 27L BO SUNG WIM TEK 2V 500MA 1KHZ 44DB HUNTER WIDE 6513B00008A HWC17 MIC ASSY SKB 2744T C1033 SEO KWANG WIM TEK 2V 500MA 1KHZ 44DB 230MM AWG 28 BK WH FOR HUNTER WIDE 15 4 17 1 6513B00006A HWC17 WOOFER ASSY 17 1 Woofer Assy with cushion Rubber woofer 6400WESX06A HWC16...

Страница 104: ...M ASSY 17 1 Case A y Bottom 171W 3111B09711A HWM01 BOTTOM ASSY 15 4 Case A y Bottom 154W without Remote con only GM 3111B09811B HWM01 BOTTOM ASSY 15 4 Case A y Bottom 154W with Remote con only PM 3111B09811A HWM01 Sub BD power button HUNTER W WIMTEC 2 LAYERS REV 0 4 POWER BUTTON SUB B D MAIN ASSY 6871BWS03PB HWD04 Sub BD T pad button 17 1 HUNTER W WIMTEC 2 LAYERS REV 0 1 TOUCH PAD SUB B D MAIN ASS...

Страница 105: ...ZZBA4097A HWM23 SCREW C 17 1 M2 5xL11 D7 3 5 Special Woofer 1SZZBZ4023A HWM22 SCREW B 17 1 M2xL2 7 D5 5 H0 8 ODD I F 1SZZBZ4002B HWM21 SCREW A 15 4 Screw M2 5xL4 5 Silver 1SZZBA4080F HWM20 MDC CABLE HUNTER T N MDC INTERFACE WIM TEK 210MM 2P HUNTER TL 6851B76020C HTM05 COVER SCREW I O PORT N N N N HUNTER WIDE 15 4 INCH COVER SCREW FOR FRAME 3858BZ4472A HWM18 S VIDEO CABLE UL20696 19PIN AWM 80C VW 1...

Страница 106: ... 1 FOR EXPORT 3850BB9196B HWM34 ID LABEL LABEL HUNTER 17 1 WIDE SYSTEM 3850BB9196A HWM34 POP LABEL POP LABEL LW60 70 PM FOR EXPORT 3850BF9046B HWM33 POP LABEL POP LABEL LW60 70 PM FOR DOMESTIC 3850BF9046A HWM33 Remarks Specification Part Number Location ...

Страница 107: ...HWL29 HWL31 HWL10 HWL07 HWL03 15 4 HWL08 HWL34 HWL09 HWL27 HWL30 HWL31 HWL12 HWL11 ...

Страница 108: ...HWL22 HWL29 HWL30 HWL23 HWL18 17 1 ...

Страница 109: ...3 15 4 17 1 E XPLODE D VIE W HWL15 15 4 HWL14 15 4 HWL13 15 4 HWL33 HWM20 ...

Страница 110: ...HWM27 HWL05 15 4 HWL20 17 1 HWL01 15 4 HWL16 17 1 HWM27 HWL04 15 4 HWL19 17 1 HWL06 15 4 HWL21 17 1 HWM20 ...

Страница 111: ...NRUB1 HWL32 HWL02 15 4 HWL17 17 1 ...

Страница 112: ...HWM22 HWC08 HTM05 HTC05 NMEM1 HWC12 HWB01 HWM24 HWM02 HWM14 HWM17 HWS02 HWM01 HWC16 HWM13 HWM15 HWM16 17 1 HWS01 HWM28 ...

Страница 113: ...HWM26 HWC07 HWM25 HWM24 HTA04 HWS03 HWM03 HWC14 15 4 HWC15 17 1 HWC17 HTA05 HTA06 HTA02 HTA03 HTA01 ...

Страница 114: ...HWM23 HWD01 17 1 HWD01 15 4 HWM30 HWM29 HWM31 HWM23 HWM33 ...

Страница 115: ...HWD03 15 4 HWD04 17 1 HWD02 ...

Страница 116: ...HWM10 15 4 HWM12 17 1 HWC09 HWM04 HWM06 HWM11 HWM05 HWM07 HWM22 HWM23 ...

Страница 117: ...HTA07 HWM34 HWM08 HWM09 HWC04 NMEM1 ...

Страница 118: ...HWM23 HWM27 HWM23 HWM27 HWC11 HWC13 ...

Отзывы: