background image

13

INSTALLATION

EN

CAUTION

•  Place the door on a non-scratching surface with 

the inner side facing up.

Removing the Freezer Door

Remove the two hinge bolts.

Twist the hinge to raise the pivoting end so that 

the door can be lifted off. Lift the door off the 

lower hinge pin and remove it.

Remove the door by lifting it off the lower 

hinge pin.

Refitting the Fridge and Freezer 

Door

Refit the doors in the reverse sequence of their 

removal once the appliance has been passed 

through all access doors.

Levelling and Door 

Alignment

Before Beginning

When the appliance doors appear to be uneven, 

follow the instructions below to align the doors.

NOTE

•  The spanner may differ depending on the model. 

You will be provided with either spanner type A 

or B.
-  Spanner Type A

-  Spanner Type B

Levelling the Appliance

The appliance has two front levelling legs. Adjust 

the legs to alter the tilt from front to back or side to 

side. If the appliance seems unsteady, or the doors 

do not close easily, adjust the appliance’s tilt using 

the instructions below.
It is quite normal for the appliance to have a 

backward lean even when the front legs are turned 

all the way.

Содержание GF-B725MBL

Страница 1: ...lify installation and ensure that the product is installed correctly and safely Leave these instructions near the product after installation for future reference EN ENGLISH GF B725MBL GF B725PL GF B730MBL GF B730PL MFL71667901 Rev 03_020421 www lg com Copyright 2020 2021 LG Electronics Inc All Rights Reserved ...

Страница 2: ...TION 9 INSTALLATION 11 Before Installation 11 Removing the Fridge and Freezer Door 12 Levelling and Door Alignment 13 Turning on the Power 15 Moving the Appliance for Relocation 15 OPERATION 17 Before Use 17 Product Features 19 Control Panel 23 InstaView 24 Door in Door 25 Drawer 26 Extra Space 27 Shelf 28 Icemaker 28 Door Basket 29 SMART FUNCTIONS 31 LG ThinQ Application 31 Smart Diagnosis 32 MAI...

Страница 3: ...TROUBLESHOOTING 36 Before Calling for Service 36 ...

Страница 4: ...llowing Technical Safety This appliance is not intended for use by persons including children with reduced physical sensory or mental capabilities or lack of experience and knowledge unless they have been given supervision or instruction concerning use of the appliance by a person This symbol is displayed to indicate matters and operations that can cause risk Read the part with this symbol careful...

Страница 5: ...used in household and similar applications only It should not be used for commercial or catering purposes or in any mobile application such as a caravan or boat Do not store explosive substances such as aerosol cans with a flammable propellant in this appliance This appliance contains a small amount of isobutane refrigerant R600a but it is also combustible When transporting and installing the appl...

Страница 6: ...e inside to remove the odours Do not tilt the appliance to pull or push it when transporting Make sure not to get a body part such as a hand or foot stuck while moving the appliance Risk of Fire and Flammable Materials If a leak is detected avoid any naked flames or potential sources of ignition and air the room in which the appliance is standing for several minutes In order to avoid the creation ...

Страница 7: ...age the power cable during assembly or disassembly of the appliance door Be careful not to point the power plug up or let the appliance lean against the power plug Do not connect a plug adapter or other accessories to the power plug Do not modify or extend the power cable Ensure that the outlet socket is properly grounded and that the earth pin on the power cord is not damaged or removed from the ...

Страница 8: ...excessively or place a heavy object on it Immediately unplug the power plug and contact an LG Electronics customer information centre if you detect a strange sound odour or smoke coming from the appliance Do not place hands or metallic objects inside the area emitting the cold air covers or heat releasing grille on the back Do not apply excessive force or impact to the back cover of the appliance ...

Страница 9: ...er cosmetics etc near the appliance Disposal When discarding the appliance remove the door gasket while leaving the shelves and baskets in place and keep children away from the appliance CAUTION CAUTION To reduce the risk of minor injury to persons malfunction or damage to the product or property when using this product follow basic precautions including the following Operation Do not touch frozen...

Страница 10: ...e or water hose Never eat frozen foods immediately after they have been taken out of the freezer compartment Do not use a thin crystal cup or chinaware when dispensing water or ice Make sure not to get a hand or foot stuck upon opening or closing the appliance door or door in door Maintenance Do not clean glass shelves or covers with warm water when they are cold They may shatter if exposed to sud...

Страница 11: ...limited range of ambient temperatures depending on the climate zone The internal temperatures could be affected by the location of the appliance the ambient temperature the frequency of door opening and so on The climate class can be found on the rating label Australia India Kenya Argentina Ecuador NOTE The appliances rated from SN to T are intended to be used at an ambient temperature between 10 ...

Страница 12: ...ay result in death fire or electric shock Removing the Hinge Cover Remove the screws from the hinge cover at the top of the appliance Lift the hook not visible located at the bottom of the front side of the cover with a flat head screwdriver Removing the Left Right Fridge Door 1 Disconnect all wire harnesses a 2 Rotate the hinge lever b clockwise Lift the top hinge c free of the hinge lever latch ...

Страница 13: ...sed through all access doors Levelling and Door Alignment Before Beginning When the appliance doors appear to be uneven follow the instructions below to align the doors NOTE The spanner may differ depending on the model You will be provided with either spanner type A or B Spanner Type A Spanner Type B Levelling the Appliance The appliance has two front levelling legs Adjust the legs to alter the t...

Страница 14: ...ning it to the left 2 Use the spanner b to adjust the height by turning the adjustment hinge pin to the left or to the right CAUTION Do not adjust the height of the appliance door more than 3 mm 3 Use the spanner a to fasten the keeper nut by turning it to the right NOTE Levelling the doors may not be possible when the floor is not level or is of weak or poor construction The refrigerator is heavy...

Страница 15: ... doors are level Turning on the Power Connecting the Appliance After installing the appliance connect the power plug into the outlet socket NOTE After connecting the power supply cord or plug to the outlet wait 3 or 4 hours before you put food into the appliance If you add food before the appliance has cooled completely your food may spoil Moving the Appliance for Relocation Preparing for Relocati...

Страница 16: ...he appliance with more than two people carefully When transporting the appliance over a long distance keep the appliance upright 5 After installing the appliance connect the power plug into a mains outlet socket and switch it on ...

Страница 17: ...code If you turn off the power the repair technician from the our information centre may have difficulty finding the problem Suggestion for Energy Saving Ensure there is sufficient space between stored foods This allows cold air to be circulated evenly and lowers electricity bills Store hot food only after it has cooled in order to prevent dew or frost When storing food in the freezer compartment ...

Страница 18: ...hill compartments as they may freeze due to the lower temperature In the event of a blackout call the electricity company and ask how long it is going to last You should avoid door openings while the power is off When the power supply gets back to normal check the condition of the food Max Freezing Capacity Express Freeze function will allow the freezer to reach its maximum freezing capacity This ...

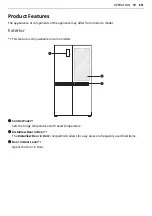
Страница 19: ... to model Exterior 1 This feature is only available on some models a Control Panel 1 Sets the fridge temperature and freezer temperature b InstaView Door in Door 1 The InstaView Door in Door compartment allows for easy access to frequently used food items c Door in Door Lever 1 Opens the Door in Door ...

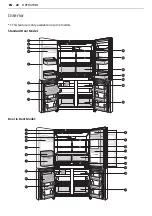
Страница 20: ...20 OPERATION EN Interior 1 This feature is only available on some models Standard Door Model Door in Door Model ...

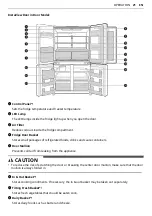
Страница 21: ...of refrigerated foods drinks and sauce containers e Door Mullion Prevents cold air from leaking from the appliance CAUTION To reduce the risk of scratching the door or breaking the center door mullion make sure that the door mullion is always folded in f In Out Basket 1 Stores cooking condiments If necessary the in out basket may be taken out separately g Tilting Fresh Basket 1 Stores fresh vegeta...

Страница 22: ...resh for as long as possible m Extra Space 1 Stores small food items such as cheese and ham n LED Lamp The LED lamp on the bottom of the fridge door lights up when you open the freezer door o Icemaker Type A 1 This is where ice is manually produced and stored p Icemaker Type B 1 This is where ice is manually produced and stored q Freezer Door Basket Stores small packages of frozen food Do not stor...

Страница 23: ...when the indicator light turns on After replacing the air filter press and hold the Replace Air Filter button for 3 seconds to turn the indicator light off Replace the air filter approximately every six months c Freezer Press this button repeatedly to select a desired temperature between 23 C and 15 C The default freezer temperature is 18 C d Express Freeze This function can quickly freeze a large...

Страница 24: ... This appliance incorporates an earth connection for functional purposes only InstaView This feature is only available on some models Using the InstaView Door in Door The InstaView Door in Door lets you see if you re running low on frequently used items like beverages and snacks without opening the fridge door 1 Knock twice on the glass to turn the LED light inside the Door in Door on or off 2 The...

Страница 25: ...door while the door of the appliance is open The door in door may be struck by the edge of the appliance and damaged Using the Moving Basket Adjusting the moving basket allows taller food items to be stored more conveniently 1 To raise the moving basket hold the basket in the centre and push the basket up until it clicks into place 2 To lower the moving basket press up to release the levers at the...

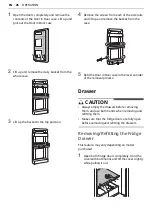
Страница 26: ...e the basket from the case 5 Refit the Door in Door case in the reverse order of the removal process Drawer CAUTION Always empty the drawers before removing them and use both hands when removing and refitting them Make sure that the fridge doors are fully open before removing and refitting the drawers Removing Refitting the Fridge Drawer This feature may vary depending on model purchased 1 Open bo...

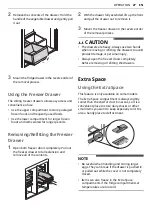
Страница 27: ...ut to remove it 3 Mount the freezer drawer in the reverse order of the removal process CAUTION The drawers are heavy Always use two hands when removing or refitting the drawers to avoid product damage or personal injury Always open the freezer doors completely before removing or refitting the drawers Extra Space Using the Extra Space This feature is only available on some models The Extra Space co...

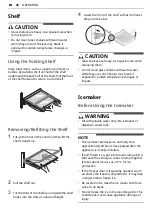
Страница 28: ...oks drop into the slots CAUTION Glass shelves are heavy Use special care when removing them Do not clean glass shelves with warm water while they are cold Shelves may break if exposed to sudden temperature changes or impact Icemaker Before Using the Icemaker WARNING Fill with potable water only into icemaker or dispenser water tank NOTE The icemaker produces ice normally once approximately 48 hour...

Страница 29: ...ver of the water tank and fill it with water to the water level line a 3 Refit the cover and place the filled water tank back into the easy icemaker 4 Rotate the knob on the easy icemaker clockwise 5 Lift the ice storage bin slightly and remove NOTE You can remove the icemaker or ice storage bin to create more space inside the freezer if you do not use it Door Basket Using the In Out Basket This f...

Страница 30: ...and gently pull the basket 2 To close gently push the basket until a clicking sound is heard CAUTION To avoid damaging the drawer do not overload it or apply excessive force when opening or closing Do not allow children to hang from the basket when it is open or closed Removing Refitting the Door Basket 1 To remove the baskets simply lift the basket up and pull straight out 2 To refit the the bask...

Страница 31: ...is too far the signal strength becomes weak It may take a long time to register or installation may fail 2 Turn off the Mobile data or Cellular Data on your smartphone 3 Connect your smartphone to the wireless router NOTE To verify the Wi Fi connection check that f icon on the control panel is lit The appliance supports 2 4 GHz Wi Fi networks only To check your network frequency contact your Inter...

Страница 32: ...onds to temporarily turn it off Run the LG ThinQ application and follow the instructions in the application to register the appliance NOTE To disable the Wi Fi function press and hold the Wi Fi button for 3 seconds The f icon will be turned off RF Radiation Exposure Statement This equipment shall be installed and used at a minimum distance of 20 cm from the human body Open Source Software Notice I...

Страница 33: ... and select the Smart Diagnosis feature in the menu Follow the instructions for audible diagnosis provided in the LG ThinQ application 1 Press the Lock button to activate the lock function If the display has been locked for over 5 minutes you must deactivate the lock and then reactivate it 2 Open the fridge door and then hold the phone on the upper right speaker hole Position the phone so that its...

Страница 34: ...s when cleaning the stainless steel doors Always use a dedicated cloth and wipe in the same direction as the grain This helps reduce surface staining and tarnishing A Stainless Steel protection solution can also be applied to further protect the finish Cleaning the Interior When removing a shelf or drawer from inside the appliance remove all stored foods from the shelf or drawer to prevent injury ...

Страница 35: ...f the cover with the side that says FRONT facing outward 4 Align tabs a on the filter cover with hooks b on the fridge wall 5 Rotate the air filter cover clockwise until the hooks engage and the cover locks in place 6 Press and hold the Replace Air Filter button on the control panel for 3 seconds to reset the filter CAUTION If you wash the filter with water the filter performance may also deterior...

Страница 36: ...ou store hot food without cooling it first Cool the hot food first before putting it in the fridge or freezer compartment Did you put in too much food Maintain an appropriate space between food Are the appliance doors completely closed Completely close the door and make sure that stored food is not obstructing in the door Is there enough space around the appliance Adjust the installation position ...

Страница 37: ... first before putting it in the fridge or freezer compartment Is the air entry or exit of the freezer compartment blocked Make sure that air entry or exit is not blocked so that the air can circulate inside Is the freezer compartment overfilled Maintain an appropriate space between items Frost or condensation has formed inside or outside the appliance Did you open and close the appliance door freq...

Страница 38: ...d it If you try to open the appliance door within one minute after you closed it you may have difficulties because of the pressure inside the appliance Try to open the appliance door again in a few minutes so that the internal pressure stabilizes Door mullion does not fold in and out properly Are front levelling legs extended the appliance level and doors aligned Once the door baskets are filled t...

Страница 39: ... off Normal Operation Rattling noises Rattling noises may come from the flow of appliance the water line on the back of the unit for plumbed models only or items stored on top of or around the appliance Normal Operation Appliance is not resting evenly on the floor Floor is weak or uneven or levelling legs need to be adjusted See the Door Alignment section Appliance with linear compressor was moved...

Страница 40: ... Mobile data of your smartphone and register the appliance using the Wi Fi network The wireless network name SSID is set incorrectly The wireless network name SSID should be a combination of English letters and numbers Do not use special characters The router frequency is not 2 4 GHz Only a 2 4 GHz router frequency is supported Set the wireless router to 2 4 GHz and connect the appliance to the wi...

Страница 41: ...Memo ...

Страница 42: ...Memo ...

Страница 43: ...Memo ...

Страница 44: ......

Отзывы: