

Easy Setup Guide
Accessories
Please make sure the following
items are included with your
monitor. If any items are missing,
contact your dealer.
❈
The Monitor and its accessories may look different from those
shown here.
Display
User's Guide CD/Cards
Power Cord
15-pin D-Sub Signal Cable
<To set it up, this signal cable may be attached
to this product before shipping out.>
Precautions for Safety
Positioning your Monitor
Monitor Driver Installation
Adjusting Screen Resolution
Do not install the monitor close to electric heaters or other heating
appliances. It may cause electric shock, fire, malfunction or damage to
the monitor.
Keep the monitor away from dust, water, and places with high humidity.
Dust or moisture may cause electric short circuit, fire or damage to the
monitor.
Ensure you connect the monitor cord to an earthed power receptacle.
It may otherwise cause electric shock and bodily harm.
Ensure you use correct voltage. Otherwise, damage may be caused to
the monitor, or electric shock.
Do not touch the plug with wet hands. Moisture can cause electric shock.
Fully dry the connector pins before inserting into the receptacle.
Insert the plug fully into the receptacle.
Insecure plug connection may cause fire.
Install the monitor with its ventilation grill open in a space with sufficient
clearance for air circulation (at least 10cm apart from the wall).
Otherwise, the internal temperature will rise to cause monitor damage or
a fire.
Keep the packing materials away from children. The dehumidifying agent
(alumina silica gel) should not be eaten. If it is consumed, immediately
induce vomiting and take the person to a medical doctor. The vinyl bag
could cause suffocation. Keep it away from children.
Always comply with the following instructions for
safe and proper. Avoid risks and accidents.
Take the following steps to set the monitor resolution and frequency
for optimal display.
Choose the "Settings"
menu and select an
optimal resolution.
Click the [Apply] button to
complete resolution setting.
Select the [Advanced] button.
Select the [Monitor] tab and
set the vertical frequency to
60Hz in the "Refresh Rate"
column.
Click the [Apply] button to
complete optimal frequency
setting.
<STEP1>
<STEP2>
<STEP3>
Move the mouse pointer to
an empty area on the
Windows screen (with no
icons or task bars) and click
the right mouse button.
When the pop-up menu
appears, click the "Property"
menu.
❈
The setting method can vary depending on the computer and the O/S.
You may not be able to select certain resolutions depending on the video card
performance.
In such cases, please refer to the user's manual of the computer and/or video card.
Monitor size
Complete resolution
Complete optimal frequency
17inch montior 1280X1024 60Hz
19inch montior 1280X1024 60Hz
Connecting to Your Computer
Before setting up the monitor, ensure that the power to the
monitor, the computer system, and other attached devices is
turned off.
Assemble the Stand Base(Front, Rear) into the Stand Body in the
correct direction.
Once assembled take the monitor up carefully and face the front
side.
Place the monitor with its front facing downward on a soft cloth.
Assemble the Stand Body into the product in the correct direction
as shown in the picture. Make sure you push it until you hear it
“click”.
REAR
REAR
REAR
REAR
FRONT
FRONT
Stand Body
Stand Base
Stand Body
Connecting the stand
Using the Computer
Wall-outlet type
PC-outlet type
MAC
Power Cord
Signal Cable
Varies according to model.
2
1
Mac adapter
For Apple Macintosh use, a separate plug adapter is needed to
change the 15 pin high density (3 row) D-sub VGA connector on the
supplied cable to a 15 pin 2 row connector.
Press button on the side switch panel to turn the power on. When monitor
power is turned on, the 'Self Image Setting Function' is executed automatically.
PC
Place the monitor in a convenient, well-ventilated location near your compauter.
Connect the signal cable. When attached, tighten the thumbscrews to secure
the connection.
Connect the power cord into a proper power outlet that is easily
accessible and close to the display.
'Self Image Setting Function'?
This function provides the user with optimal display settings. When the user
connects the monitor for the first time, this function automatically adjusts the display
to optimal settings for individual input signals. If you want to adjust the monitor while
in use, or wish to manually run this function once again, push the ‘AUTO/SET’
button on the side panel of the monitor. Otherwise, you may execute the ‘ Factory
reset’ option on the OSD adjustment menu. However, be aware that this option
initializes all the menu items except ‘Language’.
Adjust the position of the screen in various ways for maximum
comfort.
Tilt Range : -5˚~20˚
20
To install the monitor driver, open the CD-ROM and
see the Monitor Driver Install Guide.
P/NO. 38409R0022D(0607-REV03)
Printed in Korea
1
2
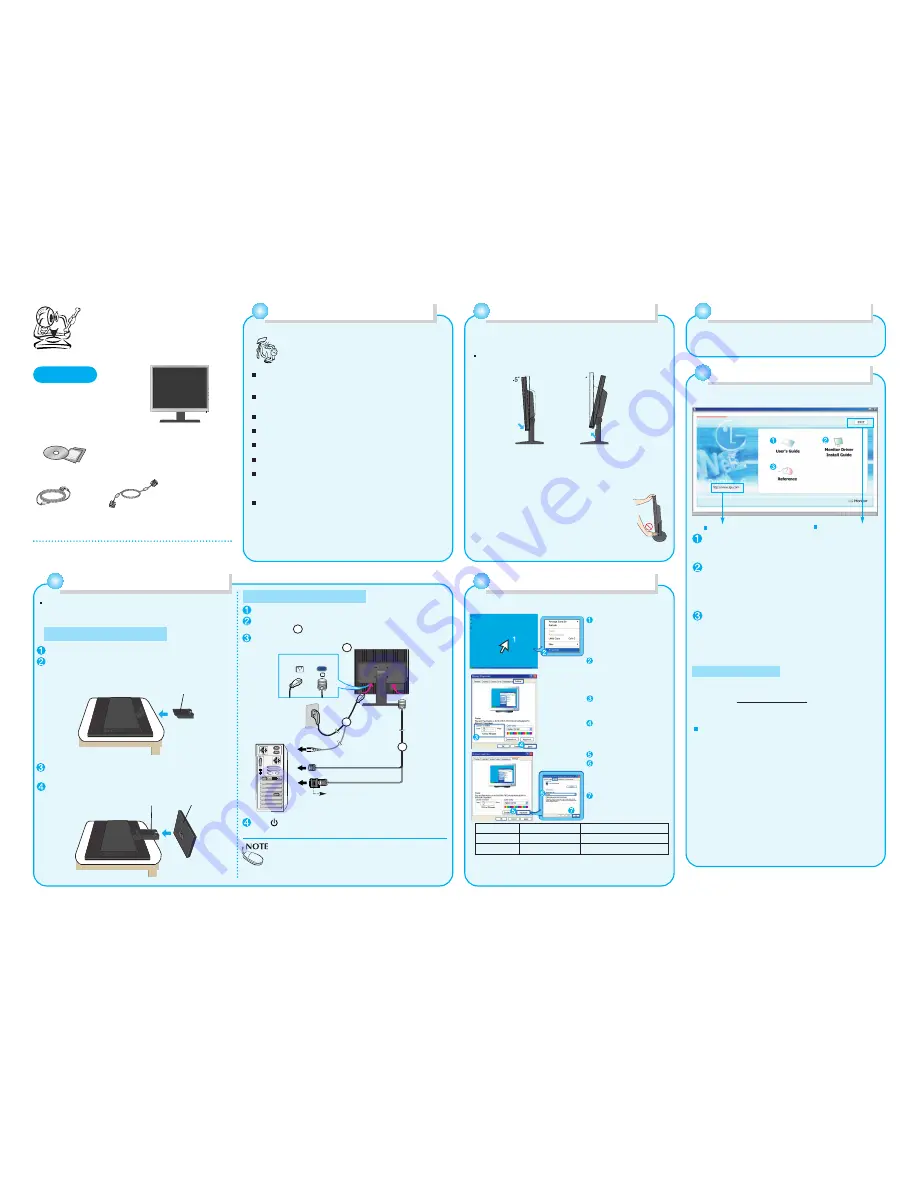
CD-ROM Use and Contents
[Macintosh Users]
The CD-ROM automatically boots up when inserted into the
CD-ROM drive, showing its main screen.
Close the main screen.
User's Guide
- The CD-ROM contains User Guide for the monitor.
It is presented in PDF file in the language you select.
Monitor Driver Install Guide
- Monitor Driver Install Guide is presented in PDF file for
your system specification. You may use a sharp image
screen as the monitor driver sets up the resolution and
refresh rate to your monitor.
Reference
- You can read such reference materials as DDC (Display
Data Channel), Energy Saving Design, Service,
Regulations etc. contained in the CD-ROM.
❈
You need Adobe Acrobat Reader Version 4.0 or higher to read
User Guide for Macintosh. You may download the latest
version from http://www.adobe.com.
1. The CD-ROM automatically boots when inserted into the CD-
ROM drive, showing its main screen.
If it fails Auto Boot and does not launch the main screen,
(1) Open the Mac folder by double clicking the desktop icon.
(2) Click 'LGE.pdf' to view the main screen.
2. User's Guide
- The User Guide for your monitor is presented in PDF file in
the language you select.
3. Reference
- You may read such reference materials as DDC (Display
Data Channel), Energy Saving Design, Service, Regulations,
etc. in the CD-ROM.
❈
Thank for selecting LGE products!
You may go to LGE Web site.
When adjusting the angle of the screen,
do not put your finger in between the
head of the monitor and the stand body .
You can hurt your finger(s).
Warning:


