background image

3. Installation 

 Safety gear Personnel Protection Equipment 

It is recommended to wear the following safety gear when dealing 
with the battery pack. 

Insulated gloves 

Safety goggles 

Safety shoes 

3.1.6   Mounting Bracket  (TBD) 

When installing the battery pack on a wall, make sure that the wall is 

capable of supporting the weight of the battery pack. (Min. 150kg) 

Caution 

Make sure that the battery pack is at all times exposed to the a
mbient air. 
The battery pack is cooled by natural convection. If the battery 
pack is entirely or partially covered or shielded, it may cause the 
battery pack to stop operating. 

Содержание EVESPBO0100A0

Страница 1: ...9 8kWh Battery Pack Product Manual HV ...

Страница 2: ... publication However this manual is subject to change without prior notice In addition the illustrations in this manual are meant only to help explain system configuration concepts and installation instructions Please note the image shown is for illustration purposes only ...

Страница 3: ...on 2 4 2 Storage 2 4 3 Handling 3 Installation 3 1 Mechanical requirements 3 1 1 Packaging and Open out equipment 3 1 2 Package items 3 1 3 Installation locations 3 1 4 Clearances 3 1 5 Tools Safety gears required 3 1 6 Mounting Bracket 3 1 7 Appearance and Dimension 3 1 8 System clearances 3 1 9 Installing the Battery Pack 3 2 Electrical requirements 3 2 1 Spring Terminal blocks RESU10HDLT 3 2 2 ...

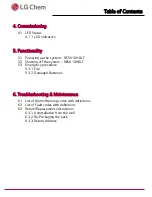
Страница 4: ... Emergency procedure 5 3 1 Fire 5 3 2 Damaged Batteries 6 Troubleshooting Maintenance 6 1 List of Alarm Warning codes with definitions 6 2 List of Fault codes with definitions 6 3 Return Replacement instructions 6 3 1 Uninstallation from the wall 6 3 2 Re Packaging the pack 6 3 3 Return Address 4 1 LED Status 4 1 1 LED indicators ...

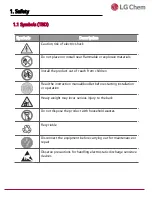
Страница 5: ...n Read the instruction manual booklet before starting installation or operation Heavy weight may incur serious injury to the back Do not dispose the product with household wastes Recyclable Disconnect the equipment before carrying out for maintenance or repair Observe precautions for handling electrostatic discharge sensitive devices 1 Safety 1 1 Symbols TBD ...

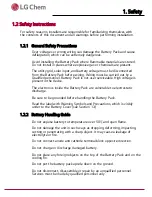
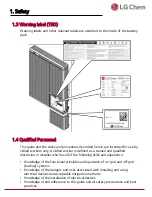
Страница 6: ...is present in the device The electronics inside the Battery Pack are vulnerable to electrostatic discharge Be sure to be grounded before handling the Battery Pack Read the label with Warning Symbols and Precautions which is visibly under to the Battery Cover see Section 1 3 1 2 2 Battery Handling Guide Do not expose battery to temperature over 50 and open flame Do not damage the unit in such ways ...

Страница 7: ... Inverter Make sure not to accumulate snow over the battery pack or submerge battery pack in liquids Do not expose or place near water sources like downspouts or sprinklers If the battery pack is installed in the garage then ensure the product is above the height of the vehicle bumper Ensure proper care is taken to keep off any foreign object on top of the battery pack The RESU battery pack has be...

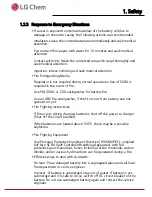
Страница 8: ...ot from battery and not spread to it yet Fire Fighting Instructions If fire occurs during charging batteries shut off the power to charger Shut off the circuit breaker When batteries are heated above 150 C there may be a possible explosion Fire Fighting Equipment Use Personal Protective Equipment Directive 89 686 EEC complied full face SCBA Self Contained Breathing Apparatus with full protective g...

Страница 9: ...defined as a trained and qualified electrician or installer who has all of the following skills and experience Knowledge of the functional principles and operation of on grid and off grid backup systems Knowledge of the dangers and risks associated with installing and using electrical devices and acceptable mitigation methods Knowledge of the installation of electrical devices Knowledge of and adh...

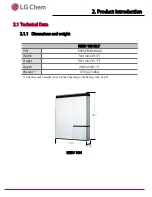
Страница 10: ...tion 2 1 1 Dimensions and weight RESU 10H DLT P N EVESPBO0100A0 Width 744 mm 29 3 Height 907 mm 35 7 Depth 206 mm 8 1 Weight 1 97kg 214lbs 1 A battery pack s weight varies slightly depending on its battery cells weight 907 744 206 RESU 10H ...

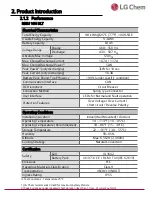
Страница 11: ...operation Protection Features Over Voltage Over Current short circuit Reverse Polarity Certification Safety Cell UL1642 Battery Pack UL1973 CE RCM TUV IEC 62619 Emissions FCC Hazardous Materials Classification Class 9 Transportation UN38 3 UNDOT Ingress Rating IP55 Operating Conditions Installation Location Indoor Wall Mounted Outdoor Operating Temperature 14 113 F 10 45 C Operating Temperature Re...

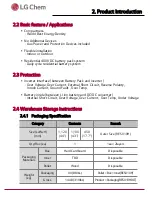
Страница 12: ...rse Polarity Inrush Current Ground Fault Over Temp Battery inside between Li Ion battery and DC DC converter Internal Short Circuit Over Voltage Over Current Over Temp Under Voltage 2 Product Introduction 2 4 Warehouse Storage Instructions 2 4 1 Packaging Specification Category Contents Remark Size LxWxH mm 1 120 44 1 100 43 450 17 7 Outer Size RESU10H Qty Box ea 1 1ea 2layers Packaging Materials ...

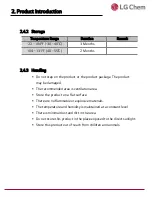
Страница 13: ...damaged The recommended area is ventilation area Store the product on a flat surface There are no flammable or explosive materials The temperature and humidity is maintained at a constant level There is minimal dust and dirt in the area Do not store this product in the place exposed to the direct sunlight Store this product out of reach from children and animals 2 Product Introduction ...

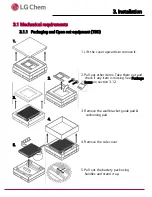
Страница 14: ... 1 Lift the cover upwards to remove it 2 Pull out other items Take them out and check if any item is missing See Package items on section 3 1 2 4 Remove the side cover 5 Pull out the battery pack using handles and stand it up 1 2 3 5 4 3 Remove the wall bracket guide pad cushioning pad ...

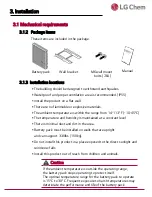
Страница 15: ...n walls that are upright and can support 330lbs 150kg Do not install this product in a place exposed to the direct sunlight and rain snow falls Install this product out of reach from children and animals 3 1 3 Installation locations Caution If the ambient temperature is outside the operating range the battery pack stops operating to protect itself The optimal temperature range for the battery pack...

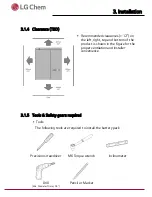
Страница 16: ...ools are required to install the battery pack Precision screwdriver M6 Torque wrench Drill Min Diameter 10mm 0 4 Pencil or Marker Inclinometer Recommended clearances 12 on the left right top and bottom of the product is shown in the figure for the proper ventilation and installer convenience ...

Страница 17: ...ounting Bracket TBD When installing the battery pack on a wall make sure that the wall is capable of supporting the weight of the battery pack Min 150kg Caution Make sure that the battery pack is at all times exposed to the a mbient air The battery pack is cooled by natural convection If the battery pack is entirely or partially covered or shielded it may cause the battery pack to stop operating ...

Страница 18: ... Drive the fasteners through the mounting brackets into the holes Recommended diameter 10mm 0 4 Min Recommended length 70mm 2 8 Min Recommended material Stainless steel 8 8T Minimum fastener count There must be at least two fasteners in each of the four mounting hole rows Minimum bolt clearance At least 250mm 10 ex Between Area1 last fastener and Area2 first fastener ...

Страница 19: ... care is recommended as disassembly change of color scratches leakage of liquid and stains may influence the economic value of the battery pack Appearance Pack appearance and dimension Color and Material Front Rear Cover Silver or Gold Aluminum Top bottom LED Cover Black Plastic RESU10H RESU7H ...

Страница 20: ... clearance for installation cabling and airflow Minimum clearance in the system configuration is as follows 3 1 9 Installing the Battery Pack Caution Make sure that the inverter AC and DC disconnects are turned off before connecting the power cable to the battery pack ...

Страница 21: ...nt the wall bracket to a wall Tighten the screws ensuring that they are horizontally driven into the wall Must be installed with recommended clearances 720mm 29 on the edge of the wall bracket as shown in the figure 3 Mount the battery pack to a wall bracket U shape clip by the support of lift handles Remove the lift handles ...

Страница 22: ...k chassis Tighten to a torque of 5 N m by M6 torque wrench 5 Press the two buttons and Pull the two latches Marked position on the rear side of the wiring section battery cover hinged door 6 Open the wiring box cover about 2 10 degree and pull to remove it Caution The wiring box cover is heavy approx 1 6kg 3 5lb If dropped it may cause injury ...

Страница 23: ...sket sealing foam silicon etc where the battery pack installation is outdoor 9 Connection Power Communication cables according to the labels marked Connect the ground terminal first and next the negative terminal and finally the positive terminal Reattach the transparent protection cover with screw Reattach battery over the two latchets on the rear Caution If you lost or break a protection cover t...

Страница 24: ... Delta R D approved equivalent Power Connector type Phoenix Contact PCB Terminal Block SPT 5 3 V 7 5 ZB P N 1719325 OR Delta R D approved equivalent Connect Disconnect the wire to Connector sequence Press into connector Wire Insert wire into connector Check connection by shaking Remove wire Insert and Press screwdriver into connector Remove screwdriver Connection Disconnection ...

Страница 25: ... 35ft Min wire diameter AWG 18 22 Pinning Pin Description 1 Positive line of the PCS high voltage DC bus 2 Negative line of the PCS high voltage DC bus 3 Equipment grounding conductor 10 12 Pin Description 1 Positive line of auxiliary 12V DC bus 2 Negative line of auxiliary 12V DC bus 3 Logic signal for enable disable the Bi directional DC DC 4 CAN High communication wire 5 CAN Low communication w...

Страница 26: ...3 Installation 3 2 8 Grounding EGC Equipment Grounding Connection TBD Max cable length 10m Min wire diameter AWG8 12 ...

Страница 27: ...4 Commissioning 4 1 LED Status 4 1 1 LED indicators LED Status Action Power on Idle Charging Discharging Fault The LED indicators on the front of the battery pack show its operational state as follows ...

Страница 28: ...imum for the indicators to turn off Put the battery pack in operation by taking the following steps 1 Make sure that the circuit breaker switch is in the OFF position including Trip position 2 Move the circuit breaker switch to the ON position to turn on the main battery pack See if the battery pack is successfully initialized The power on indicator on the front should turn on in green 3 Turn on t...

Страница 29: ...de extinguisher Warning The battery pack may catch fire when heated above 150 C If a fire breaks out in the place where the battery pack is installed perform the following countermeasures 1 If it is safe to do so disconnect the battery pack circuit breaker 2 If the battery pack extinguish the fire before the battery pack catches fire 3 If the battery pack is on fire do not try to extinguish but ev...

Страница 30: ...d Batteries Damaged batteries are dangerous and must be handled with the utmost care They are not fit for use and may pose a danger to people or property If the battery pack seems to be damaged contact LG Chem or your distributor ...

Страница 31: ... current Alarm 100 100 ON Warning 0 100 ON Discharging over current Alarm 100 100 ON Warning 100 0 ON Available charging power limit over Charging power Alarm 100 100 ON Warning 0 100 ON Available discharging power limit over Discharging power Alarm 100 100 ON Warning 100 0 ON Temperature Over temperature Max Cell Temp Alarm 100 100 ON Warning 50 50 ON Under temperature Min Cell Temp Alarm 100 100...

Страница 32: ...t1 0 100 ON ON Fault2 0 0 ON Trip ON Discharging over current Fault1 100 0 ON ON Fault2 0 0 ON Trip ON Available charging power limit over Charging power Fault1 0 100 ON ON Fault2 0 0 ON Trip ON Available discharging power limit over Discharging power Fault1 100 0 ON ON Fault2 0 0 ON Trip ON Temperature Over temperature Max Cell Temp Fault1 0 0 ON ON Fault2 0 0 ON Trip ON Under temperature Min Cel...

Страница 33: ...e wall 1 Switch OFF the Inverter before starting the uninstallation of the battery pack 2 Press the two buttons and Pull the two ratchets Marked position on the rear 3 Open the cover wire about 2 10 degree and remove 4 Loosen the screw Marked position and remove the transparent protection cover ...

Страница 34: ...7 Disconnect the power cable from the terminal block Disconnect the positive terminal first and next the negative terminal and finally ground terminal 8 Assemble transparent protection cover Close the cover wire and lock the ratchet 9 Loosen the two hex socket screws using a socket wrench to detach the battery pack from the wall ...

Страница 35: ...e Packaging the pack 3 Place the wall bracket guide pad cushioning pad over it 2 Put over the side cover 1 Face the front of the battery pack upwards and place it on the box 1 3 2 6 Troubleshooting Maintenance ...

Страница 36: ...4 Put over wall bracket M6 wall mount bolts 5 Place the cover 4 5 Note Use the packaging of the replacement battery pack if the original packaging is not available 6 Troubleshooting Maintenance ...

Страница 37: ...ustralia Address 3 6 Pelle St Mitchell ACT 291 Telephone 61 1300 18 064 Email m_AUservice lgchem com Other Regions Address 29 Gwahaksaneop 3 ro Oksan myeon Heungdeok gu Cheongju si Chungcheongbuk do South Korea Telephone 82 43 219 2695 Email Soongkyu lgchem com Damaged batteries are dangerous and must be handled with extreme caution They are not fit for use and may pose a danger to people or prope...

Страница 38: ...HQ LG Twin Towers 128 Yeoui daero Yeongdeungpo gu Seoul Korea 150 721 TEL 82 2 3773 1114 FAX 82 2 3773 7005 http www lgesspartner com http www lgchem com ...

Отзывы: