56
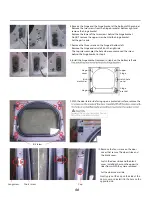
6. Reverse the hinge and the hinge bracket at the bottom of the cabinet.
Remove the two screws from the hinge bracket at bottom right and
remove the hinge bracket.
Remove the lower of the two screws behind the hinge bracket.
Do NOT remove the upper screw behind the hinge bracket.
Set the parts aside.
7. Remove the three screws on the hinge at bottom left.
Remove the hinge and reinstall it on the right side.
The top screw occupies the hole where you removed the screw
behind the hinge bracket in step 6.
8. Install the hinge bracket removed in step 6 on the bottom left side,
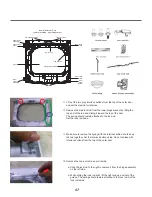
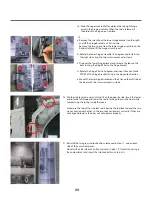
9. With the door laid inside facing up on a protected surface, remove the
Φ5 screw
10. Remove the four screws on the door
cover that secure The door strike and
the blank cover.
Switch the door strike and the blank
cover, installing them on the opposite
sides from which they were removed.
Set the door cover aside.
Long screw
Short screw
Cap
upper
hinge
hinge
cover
latch hole
cover
latch
mechanism
hinge
bracket
hinge
Gently pry out the cap on the side of the
door cover and install it in the hole on the
opposite side.
Содержание DLEX7700*E
Страница 1: ...PRGHO GOH 33 H GOJ 34 H ...
Страница 6: ...6 ...
Страница 9: ...9 ...
Страница 10: ...10 21 8 150 800 800 Connect Inlet Hose ...
Страница 14: ...14 Ω Ω Electric type 15 Inlet valve Measure resistance of the Following terminal Left picture plate ...
Страница 16: ...16 ...
Страница 18: ...18 ...
Страница 19: ...19 ...
Страница 20: ...20 ...
Страница 21: ...21 Damp Dry Signal Temp Damp Dry Signal Temp Power ...
Страница 22: ...22 ...
Страница 25: ...25 GAS ELEC TAP RELAY 1 TAP RELAY 2 ...
Страница 34: ...34 hs lGX pnup ly hs lGY mshtl kl lj uv uv lz lz 6 7ᖙ 4 3ᕏ ...
Страница 41: ...41 4 The Lid Assembly can be separated if pulled gently ...
Страница 46: ...46 ...
Страница 47: ...47 Remove the Top cover Hold the lamp in place while pressing lamp both side Replace the new lamp ...
Страница 49: ...49 2 ...
Страница 51: ...51 Φ Φ Φ Φ Two large screws Two small screws twelve screws Hole plug interlock button ...
Страница 52: ...52 ...
Страница 53: ...53 twelve screws Hole plug interlock button ...
Страница 54: ...54 4 3 While pushing the handle push the button ...
Страница 61: ...61 4V HO7334E 侳8 58 VWV ...
Страница 62: ...62 ...
Страница 63: ...63 ...
Страница 64: ...64 ...
Страница 65: ...65 ...
Страница 66: ...66 ...
Страница 67: ...67 ...
Страница 68: ...68 Laundry Status Run Cycle Again Using LG Smart Laundry DW application ...
Страница 69: ...69 ...
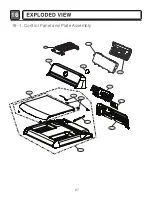
Страница 70: ...67 16 16 1 Control Panel and Plate Assembly A150 A130 A140 A110 A215 A211 A570 A120 A220 A230 A225 A210 A700 ...
Страница 73: ...MFL62119986 ...


