background image

NSTALLATION INSTRUCTIONS

I

6

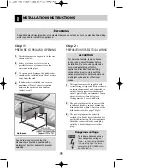
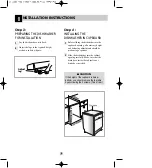
Step 3 : 

PREPARING THE DISHWASHER
FOR INSTALLATION

1

2

Lay the dishwasher on its back.

Adjust the legs to the required height
as shown in below figure.

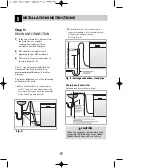
Step 4 : 

INSTALLING THE
DISHWASHER IN CUPBOARD

1

2

Before sliding the dishwasher into the
cupboard opening, all necessary height
and balancing adjustments should be
made using a spanner.

Slide the dishwasher into the cabinet
opening carefully. Make sure that the
drain hose inside the cabinet is not
kinked or stretched.

CAUTION

If the height of the cupboard is below
850mm, you should remove the top table
by unscrewing the 2 screws. (Two of rear)

Adjust
leg

Содержание D1420AB

Страница 1: ...arefully before operating your dishwasher Retain it for future reference OWNER S MANUAL MODEL D1420W L M T B C D A F B U D1421W L M T B C D A F B U You may also find user manual in video version at following link www guidelg com dishwasher ...

Страница 2: ...STALLATION INSTRUCTIONS 5 PARTS NAME 9 FUNCTION OF CONTROL BUTTON 10 BEFORE USING FOR THE FIRST TIME 13 HOW TO USE AND OPERATE 15 OPERATING SEQUENCE 21 PROGRAM 22 USER MAINTENANCE INSTRUCTIONS 23 TROUBLE SHOOTING GUIDE 24 SPECIFICATION ...

Страница 3: ... is accessible The appliance is to be connected to the water mains using new hose sets and that old hose sets should not be reused During use Only suitable household utensils should be placed in the dishwasher Please avoid utensils that are non heatresistant metal decorated etc Do not use any kinds of solvent in your dishwasher They may cause an explosion or fire Do not spray water on the applianc...

Страница 4: ... Periodically examine the cord of your appliance and if its appearance indicates damage or deterioration unplug it discontinue use of the appliance and have the cord replaced with an exact replacement part by an authorized servicer Protect the power cord from physical or mechanical abuse such as being twisted kinked pinched closed in a door or walked upon Pay particular attention to plugs wall out...

Страница 5: ...o not use an extension cord or adapter plug with this appliance Electrical and earthing connections must comply with the national electrical code provincial and municipal code and or other local codes Any bare wood surrounding the dishwasher should be sealed with a waterproof paint or sealant to prevent swelling Dangerous voltage To indicate hazards arising from dangerous voltages Note In case of ...

Страница 6: ... CUPBOARD 1 2 Before sliding the dishwasher into the cupboard opening all necessary height and balancing adjustments should be made using a spanner Slide the dishwasher into the cabinet opening carefully Make sure that the drain hose inside the cabinet is not kinked or stretched CAUTION If the height of the cupboard is below 850mm you should remove the top table by unscrewing the 2 screws Two of r...

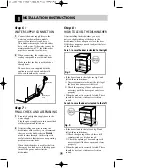
Страница 7: ...aximum internal diameter if used for drainage To prevent siphoning one of the following methods must be used ÆWhen the drain hose is connected to a sink s trap or waste disposal unit the hose must be looped up to the underside of the bench top and secured ÆWhen the drain hose is connected to a separate standpipe it is essential that an airtight connection be made Refer to Fig B Drain hose Extensio...

Страница 8: ...ems or water leaks When the dishwasher is used for the first there may be a loud noise if this happens turn off the power and restart the dishwasher Step 8 HOW TO LEVEL THE DISHWASHER After installing the dishwasher you may notice a slight sticking of the door to the dishwasher when you open or close the door If this does happen you need to adjust the level of the dishwasher If the door slants to ...

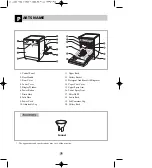
Страница 9: ...ain Hose 8 Inlet Hose 9 Power Cord 10 Adjustable Leg 11 Upper Rack 12 Cutlery Basket 13 Detergent And Rinse Aid Dispenser 14 Vapor Vent Cover 15 Upper Spray Arm 16 Lower Spray Arm 17 Filter ASM 18 Lower Rack 19 Salt Container Cap 20 Cutlery Rack The appearance and specifications may vary without notice Funnel ...

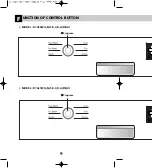
Страница 10: ...UNCTION OF CONTROL BUTTON F 10 Program Program MODEL D1420W L M T B C D A F B U MODEL D1421W L M T B C D A F B U ...

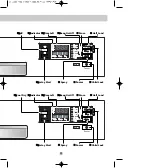
Страница 11: ... Ø Ø Indicator Œ Œ Time Left Rinse º º Beep On Off Half Load Spray æ æ Delay Start Power Child Lock Ł Ł Cool Dry Ø Ø Indicator Œ Œ Time Left Rinse º º Beep On Off Half Load Spray æ æ Delay Start Power Child Lock ...

Страница 12: ...ultaneously for a few seconds Then a On will appear in the display The beep on off function is automatically canceled when power failure occur Rinse Repeated pressing of the Rinse button will select Extra Hot Rinse Extra Hot Rinse If you select the Extra Hot function the operating temperature will be up to 80 Dual wash Auto Eco When you select Rinse an additional rinse cycle is added Half Load In ...

Страница 13: ...2 Set the softening system level of your dishwasher according to the water hardness level Refer to the Step 2 ÆMethod 2 1 Check your water hardness by using test strip 2 Test Procedure Immerse all reaction zones of the test strip for approx 1sec not in running water ŁShake off excess liquid from the strip and wait for 1min Then the green color of the reaction zone will change to the red violet ØCo...

Страница 14: ...w the cap of salt container Before using your dishwasher for the first time fill with salt The container has a capacity of 1 9kg salt Use a funnel for ease and clean filling ensuring that coarse salt or regenerating salt intended for dishwashers is used After filling wipe off any spilled salt to seal the cap properly Screw the cap tightly to prevent any suds from penetrating into the container In ...

Страница 15: ...ommodate different sizes of utensils or cutlery Each tray is adjusted by lifting it out and rotating it front to back The entire cutlery rack can be removed if more space is needed on the upper rack for larger items NOTE Always remove cutlery from the rack before removing the rack Knife fork and spoon handles should be positioned between the tines If the handles of your flatware are too thick then...

Страница 16: ... hinged and clipped away from the basket if you choose not to use them Place knives in the separate rack for located in the top of the dishwasher Take care when loading and unloading sharp items Slide two baskets in opposite directions then pull them apart 4 Loading the Lower Rack The lower basket is best loaded with dinner plates soup bowls dishes pots pans lids and even the grill tray Plates sho...

Страница 17: ...ishwasher Safe Items The combination of high water temperatures and dishwasher detergent may damage particular items therefore we do not recommend using the dishwasher to wash the following Copper or anodized aluminum Hand painted silver or gold leaf crockery Wood or bone handled utensils Iron or non rust proof utensils Plastic items that which are not dishwasher safe OW TO USE AND OPERATE H Take ...

Страница 18: ...hwashers Ordinary hand washing detergent should not be used because the foam can interfere with proper operation PROGRAM AMOUNT OF DETERGENT Dual Wash 25g Auto 20g Eco 15g Gentle 15g Quick 10g Pre Wash No detergent Your upper rack can be raised or lowered to cater for different sized crockery Before adjusting ensure that the rack is empty You can change the position of the upper rack by lifting th...

Страница 19: ...t products ex 3 in 1 Some products integrated rinse aid work best specific programs only Yow will obtain optimum rinsing and drying results by using conventional and separate salt and rinse aid Products that replace regeneration salt can only be used within a specific water hardness range Please contact the detergent manufacturer if the drying performance is very poor or you find the white film wh...

Страница 20: ...rting the next operation This will immediately thin and drain away any excess salt solution ÆFor refilling Salt 10 Energy Test EN50242 Appliance loaded in accordance with standard specifications Example of loaded dishwasher p 15 17 Capacity 14 place settings Comparability course Eco Rinse Aid setting 4 Reference cleaner 8g of detergent onto the inside surface of the door and fill 27g into the dete...

Страница 21: ...l Dry mode And then the dishwasher automatically switches off later Ensure the spray arms can freely rotate Measure out detergent Add the required amount of detergent into the dispenser and close the lid Setting and starting the program Press the program button to select the desired program After 5 seconds the machine will start If necessary select the option function corresponding to the desired ...

Страница 22: ...fter finishing Cool Dry function is automatically performed for the better drying result Quick Can use this program for only removing soil before washing dishes by hand Pre Wash During the Auto program the degree of soiling in the dishes is determined by the amount of clouding of the water According the degree of soiling the program automatically adjust the washing time temperature As a result the...

Страница 23: ...er Upper Spray Arm Pull the upper rack forwards Check that the water jet holes are not blocked If cleaning is required remove the arm by unscrewing the nut Clean the spray arm and replace it in the reverse order Lower Spray Arm Check that the water jet holes are not blocked If cleaning is required remove the arm by pulling up Clean the spray arm and replace it pulling down ÆAfter each cycle clean ...

Страница 24: ...e aid Adjust the level of rinse aid container Too little Rinse Aid dispensed Dry results are not satisfactory Too little Rinse Aid dispensed The spray arms do not rotate smoothly Clean the holes of the spray arm The mounting of the spray arms is blocked by food particles Washing results are not satisfactory Incorrect amount of detergent Utensils incorrectly arranged or overloaded Filters are clogg...

Страница 25: ...rouble The display shows EI code Automatically Drain pump operated Close the water tap and unplug the power plug Call for service Water is leaking from the hose connections Damage to the unit has been caused by a water leak The display shows FE code Automatically Drain pump operated Excessive water is supplied than the normal water level There is a problem with the inlet valve The display shows HE...

Страница 26: ...EMO M 26 ...

Страница 27: ...EMO M 27 ...

Страница 28: ...t Power Supply Power Consumption Water Feed Pressure 14 Place settings See rating label See rating label See rating label 50 800 kPa D1420W L M T B C D A F D1421W L M T B C D A F D1420W L M T B C D A U D1421W L M T B C D A U D1420W L M T B C D A B D1421W L M T B C D A B ...

Страница 29: ...MFL62077123 ﺍﻟﺼﺤﻮﻥ ﻏﺴﺎﻟﺔ ﺗﺸﻐﻴﻞ ﻗﺒﻞ ﺑﻌﻨﺎﻳﺔ ﺍﻟﺪﻟﻴﻞ ﻫﺬﺍ ﻗﺮﺍﺀﺓ ﻳﺮﺟﻰ ﺍﳌﺴﺘﻘﺒﻞ ﻓﻲ ﻛﻤﺮﺟﻊ ﺑﻪ ﺍﺣﺘﻔﻆ D1420W L M T B C D A F B U U D1421W L M T B C D A F B U U www guidelg com dishwasher ﺍﻟﺘﺎﻟﻲ ﺍﻟﺮﺍﺑﻂ ﻣﻦ ﻓﻴﺪﻳﻮ ﻧﺴﺨﺔ ﻓﻲ ﺍﳌﺴﺘﺨﺪﻡ ﺩﻟﻴﻞ ﻋﻠﻰ ﺍﳊﺼﻮﻝ ﺎ ﹰ ﺃﻳﻀ ﳝﻜﻨﻚ ...

Страница 30: ...ﺎﻟﺔ ٣ ﻭﺍﳊﺬﺭ ﺍﻟﺴﻼﻣﺔ ٥ ﺍﻟﺘﺮﻛﻴﺐ ﺗﻌﻠﻴﻤﺎﺕ ٩ ﺍﻷﺟﺰﺍﺀ ﺃﺳﻤﺎﺀ ١٠ ﺍﻟﺘﺤﻜﻢ ﺃﺯﺭﺍﺭ ﻭﻇﺎﺋﻒ ١٣ ﺓ ﹼ ﺮ ﻣ ﻷﻭﻝ ﺍﻻﺳﺘﺨﺪﺍﻡ ﻗﺒﻞ ١٥ ﻭﺍﻟﺘﺸﻐﻴﻞ ﺍﻻﺳﺘﺨﺪﺍﻡ ﻛﻴﻔﻴﺔ ٢١ ﺍﻟﺘﺸﻐﻴﻞ ﺗﺴﻠﺴﻞ ٢٢ ﺍﻟﺒﺮﻧﺎﻣﺞ ٢٣ ﻟﻠﻤﺴﺘﺨﺪﻡ ﺍﻟﺼﻴﺎﻧﺔ ﺗﻌﻠﻴﻤﺎﺕ ٢٤ ﻭﺣﻠﻬﺎ ﺍﳌﺸﺎﻛﻞ ﲢﺪﻳﺪ ﺩﻟﻴﻞ ﺍﳌﻮﺍﺻﻔﺎﺕ ...

Страница 31: ...ﻥ ﻟﻸﻃﻔﺎﻝ ﺗﺴﻤﺢ ﻻ ﺑﺎﳉﻬﺎﺯ ﻳﻌﺒﺜﻮﺍ ﻻ ﺣﺘﻰ ﺍﻟﺼﻐﺎﺭ ﺍﻷﻃﻔﺎﻝ ﻣﺮﺍﻗﺒﺔ ﻳﺠﺐ ﻏﺴﺎﻟﺔ ﺍﺳﺘﺨﺪﺍﻡ ﻗﺒﻞ ﺑﻌﻨﺎﻳﺔ ﺍﻟﺪﻟﻴﻞ ﻫﺬﺍ ﻗﺮﺍﺀﺓ ﺮﺟﻰ ﹸ ﻳ ﺓ ﹼ ﺮ ﻣ ﻷﻭﻝ ﺍﻟﺼﺤﻮﻥ ﻛﻴﻔﻴﺔ ﺣﻮﻝ ﺔ ﹼ ﻣﻬﻤ ﺗﻌﻠﻴﻤﺎﺕ ﻋﻠﻰ ﺍﻟﺪﻟﻴﻞ ﻫﺬﺍ ﻳﺤﺘﻮﻱ ﻭﺻﻴﺎﻧﺘﻬﺎ ﻭﺗﺮﻛﻴﺒﻬﺎ ﺍﻟﺼﺤﻮﻥ ﺎﻟﺔ ﹼ ﻏﺴ ﺗﺮﻛﻴﺐ ﺗﻨﺘﺞ ﻣﺸﺎﻛﻞ ﺃﻱ ﻋﻦ ﻣﺴﺆﻭﻟﻴﺔ ﺃﻱ ﺍﳌﺼﻨﻊ ﻞ ﹼ ﻳﺘﺤﻤ ﻻ ﻫﺬﻩ ﻭﺍﳊﺬﺭ ﺍﻟﺴﻼﻣﺔ ﺗﻌﻠﻴﻤﺎﺕ ﺇﻫﻤﺎﻝ ﻋﻦ ﺍﻟﻌﺎﺩﻱ ﻟﻼﺳﺘﺨﺪﺍﻡ ﻫﺬﻩ ﺍﻟﺼﺤﻮﻥ ﻏﺴﺎﻟﺔ ﻤﺖ ﹼ ﺻﻤ ﺍﳌﻨﺰﻝ ﻓﻲ ﻟﻸﻏﺮﺍﺽ ﻫﺬﻩ ﺍﻟﺼﺤﻮﻥ ﻏﺴﺎﻟﺔ ﺗﺴﺘﺨﺪﻡ ﻻ ﻏﻴﺮ ﺃﺧﺮﻯ ﺃﻏﺮﺍﺽ ﺃﻱ ﺃﻭ ...

Страница 32: ... ﻣﺮﻭﺭ ﺗﺴﻬﻴﻞ ﺧﻼﻝ ﻣﻦ ﻛﻬﺮﺑﺎﺋﻴﺔ ﺻﺪﻣﺔ ﺣﺪﻭﺙ ﺧﻄﺮ ﻣﻦ ﺍﻟﺘﻘﻠﻴﻞ ﻋﻠﻰ ﺍﻷﺭﺿﻲ ﻟﺬﻟﻚ ﻣﻨﺎﺳﺐ ﻣﺄﺧﺬ ﺇﻟﻰ ﺗﻮﺻﻴﻠﻪ ﻟﻴﺘﻢ ﺃﺭﺿﻲ ﻭﺳﻠﻚ ﺛﺎﻟﺚ ﺃﺭﺿﻲ ﲟﻘﺒﺲ ﺍﳉﻬﺎﺯ ﺗﺰﻭﻳﺪ ﰎ ﻛﻤﺎ ﻗﻠﻴﻠﺔ ﻣﻘﺎﻭﻣﺔ ﺍﶈﻠﻴﺔ ﺍﻟﻘﻮﺍﻧﲔ ﺣﺴﺐ ﺍﻷﺭﺿﻴﺔ ﺍﻟﺪﺍﺭﺓ ﺇﻟﻰ ﻭﻣﻮﺻﻮﻝ ﺍﳌﻘﺒﺲ ﺍﻟﻜﻬﺮﺑﺎﺋﻴﺔ ﺍﻟﺼﺪﻣﺔ ﺣﺪﻭﺙ ﺧﻄﺮ ﺇﻟﻰ ﻳﺆﺩﻱ ﻗﺪ ﺍﻷﺭﺿﻴﺔ ﺍﻟﺪﺍﺭﺓ ﺇﻟﻰ ﺻﺤﻴﺢ ﺍﻟﻐﻴﺮ ﺍﻟﺘﻮﺻﻴﻞ ﻳﺆﺩﻱ ﻗﺪ ﲢﺬﻳﺮ ﺣﺎﻝ ﻓﻲ ﺍﳉﻬﺎﺯ ﻣﻘﺒﺲ ﺗﻌﺪﻳﻞ ﲢﺎﻭﻝ ﻭﻻ ﻣﺘﺨﺼﺺ ﻛﻬﺮﺑﺎﺋﻲ ﺃﻭ ﹼﻲ ﻨ ﻓ ﻗﺒﻞ ﻣﻦ ﺍﻟﺘﻮﺻﻴﻞ ﺇﺟﺮﺍﺀ ﻣﻦ ﺗﺄﻛﺪ ﺍﳌﺄﺧﺬ ﺗﻌﺪﻳﻞ ﺺ ﹼ ﻣﺘﺨﺼ ﻓﻨﻲ ﻣ...

Страница 33: ...ﻜﺎﻥ ﻓﻲ ﺍﻟﻜﻬﺮﺑﺎﺋﻲ ﺍﻟﺘﻴﺎﺭ ﻗﺎﺑﺲ ﻭﺻﻞ ﻳﺠﺐ ﻏﺴﺎﻟﺔ ﺧﻠﻒ ﻭﻟﻴﺲ ﺑﺠﺎﻧﺐ ﺇﻟﻴﻪ ﺍﻟﻮﺻﻮﻝ ﻳﺴﻬﻞ ﻏﺴﺎﻟﺔ ﻋﻦ ﻣﺘﺮ ١ ٢ ﻣﺴﺎﻓﺔ ﻭﻳﺮﺗﻔﻊ ﺍﻟﺼﺤﻮﻥ ٧ ﺍﻟﺼﻔﺤﺔ ﺁ ﺍﻟﺼﻮﺭﺓ ﺃﻧﻈﺮ ﺍﻟﺼﺤﻮﻥ ﻓﻲ ﺍﳉﻬﺎﺯ ﻟﻬﺬﺍ ﺍﻷﺭﺿﻲ ﺍﻟﺘﻮﺻﻴﻞ ﻣﻦ ﺑﺪ ﻻ ﺗﻔﺤﺺ ﺮﺟﻰ ﹸ ﻳ ﺍﻟﺘﻮﺻﻴﻼﺕ ﻣﻦ ﺍﻟﺘﺄﻛﺪ ﻋﺪﻡ ﺣﺎﻝ ﻋﺪﻡ ﻳﺠﺐ ﻣﺘﺨﺼﺺ ﻛﻬﺮﺍﺋﻲ ﻗﺒﻞ ﻣﻦ ﺍﻟﺘﻮﺻﻴﻼﺕ ﻋﺒﺮ ﺍﻟﻜﻬﺮﺑﺎﺋﻲ ﺍﳌﺄﺧﺪ ﻧﻔﺲ ﺇﻟﻰ ﺁﺧﺮ ﺟﻬﺎﺯ ﺃﻱ ﻭﺻﻞ ﳑﺎﺛﻠﺔ ﻣﻮﺻﻠﺔ ﺃﻱ ﺃﻱ ﻟﻠﻤﺄﺧﺬ ﻣﻀﺎﻋﻒ ﻭﺻﻞ ﺗﻨﺒﻴﻪ ﺳﻴﺘﻢ ﺍﻟﺘﻲ ﺍﳌﻨﺰﻟﻴﺔ ﺍﻟﻜﻬﺮﺑﺎﺋﻴﺔ ﺍﻟﺪﺍﺭﺓ ﻓﺼﻞ ﻳﺠﺐ ﻟﻠﺴﻼﻣﺔ ﺍﺣﺘﺮﺍﺯﻱ ﻛ...

Страница 34: ...ﺍﺿﺒﻂ ٤ ﺍﳋﻄﻮﺓ ﺍﳋﺰﻥ ﺑﲔ ﺍﻟﺼﺤﻮﻥ ﻏﺴﺎﻟﺔ ﺗﺮﻛﻴﺐ ﺑﻐﺴﺎﻟﺔ ﺍﳋﺎﺹ ﻭﺍﻻﺭﺗﻔﺎﻉ ﺍﳌﺴﺎﺣﺔ ﺿﺒﻂ ﻳﺠﺐ ﺍﻟﺼﻤﻮﻟﺔ ﻣﻔﺘﺎﺡ ﺑﺎﺳﺘﺨﺪﺍﻡ ﺍﻟﺼﺤﻮﻥ ﻭﺗﺄﻛﺪ ﺑﻌﻨﺎﻳﺔ ﻣﻜﺎﻧﻬﺎ ﻓﻲ ﺍﻟﺼﺤﻮﻥ ﻏﺴﺎﻟﺔ ﺃﺩﺧﻞ ﳑﺪﻭﺩﺓ ﺃﻭ ﻣﻠﻮﻱ ﻏﻴﺮ ﺍﻟﺘﺠﻔﻴﻒ ﺧﺮﻃﻮﻡ ﺃﻥ ﻣﻦ ﻢ ﻠ ﻣ ٦٠٠ ﻣﻠﻢ ٨٧٠ ٨٦٠ ﻢ ﻠ ﻣ ٦٠٥ ٦٠٠ ﻋﻠﻴﺎ ﻟﻮﺣﺔ ﺗﻨﺒﻴﻪ ﻣﻦ ﺑﺪ ﻻ ﻣﻠﻢ ٠٥٨ ﻣﻦ ﺃﻗﻞ ﺍﳋﺰﺍﻥ ﺍﺭﺗﻔﺎﻉ ﻛﺎﻥ ﺇﺫﺍ ﻓﻲ ﺍﻟﺒﺮﻏﻴﲔ ﺑﺮﻏﻴﲔ ﺑﺮﺧﻮ ﺍﻟﻌﻠﻴﺎ ﺍﻟﻠﻮﺣﺔ ﻧﺰﻉ ﺍﳋﻠﻒ ...

Страница 35: ...ﻳﻒ ﻭﺣﺪﺓ ﺃﻭ S ﺑﺸﻜﻞ ﺍﻟﻘﺎﻋﺪﺓ ﲢﺖ ﺍﻟﻰ ﻭﻭﺻﻮﻟﻪ ﺩﺍﺋﺮﻳﺎ ﺍﻟﺘﺼﺮﻳﻒ ﺧﺮﻃﻮﻡ ﺑﺈﺣﻜﺎﻡ ﻭﺗﺜﺒﻴﺘﻪ ﺍﻟﺴﻔﻠﻰ ﻗﺎﺋﻢ ﺃﻧﺒﻮﺏ ﺍﻟﻰ ﺍﻟﺘﺼﺮﻳﻒ ﺧﺮﻃﻮﻡ ﺗﻮﺻﻴﻞ ﻋﻨﺪ ﺍﻟﺴﺪﻭﺩ ﺍﻟﺘﻮﺻﻴﻞ ﺇﺟﺮﺍﺀ ﺟﺪﺍ ﺍﳌﻬﻢ ﻓﻤﻦ ﻣﺴﺘﻘﻞ ﻟﻠﻬﻮﺍﺀ ﺏ ﺍﻟﺸﻜﻞ ﺭﺍﺟﻊ ﺍﻷﻗﺼﻰ ﻋﻠﻰ ﻣﻠﻢ ١٠٠٠ ﺍﻷﺩﻧﻰ ﻋﻠﻰ ﻣﻠﻢ ٧٧٠ ﺍﻷﺩﻧﻰ ﻋﻠﻰ ﻣﻠﻢ ٣٠٠ ﺗﻮﺻﻴﻞ ﺳﺪﻭﺩ ﻟﻠﻬﻮﺍﺀ ﻣﻠﻢ ٤٠ ﺑﻘﻄﺮ ﻗﺎﺋﻢ ﺃﻧﺒﻮﺏ ﺍﻷﺩﻧﻰ ﻋﻠﻰ ﻗﺎﺋﻢ ﺃﻧﺒﻮﺏ ﺍﻟﺘﺼﺮﻳﻒ ﺗﻮﺻﻴﻞ ﺏ ﺍﻟﺸﻜﻞ ﺍﻟﺘﺼﺮﻳﻒ ﺧﺮﻃﻮﻡ ﲤﺪﻳﺪ ﺃﺩﻧﺎﻩ ﺍﻟﺸﻜﻞ ﻓﻲ ﻣﺒﲔ ﻫﻮ ﻛﻤﺎ ﺍﻟﺘﺼﺮﻳﻒ ﺧﺮﻃﻮﻡ ﻣﺪﺩ ﺗﻨﺒﻴﻪ ﻋﺪﻡ ﻣﻦ ﺗﺄﻛ...

Страница 36: ...ﻟﺴﺮﻳﻌﺔ ﺍﻟﺪﻭﺭﺓ ﻋﻠﻰ ﺍﻟﻐﺴﺎﻟﺔ ﺗﺸﻐﻴﻞ ﻳﺮﺟﻰ ﻓﻲ ﻣﺸﻜﻠﺔ ﻭﺟﻮﺩ ﻋﺪﻡ ﻣﻦ ﻟﻠﺘﺄﻛﺪ Quick ﻟﻠﻤﻴﺎﻩ ﺗﺴﺮﺏ ﺃﻭ ﺍﻟﺘﺸﻐﻴﻞ ﺍﻟﻐﺴﺎﻟﺔ ﺗﺸﻐﻴﻞ ﻋﻨﺪ ﹰ ﺎ ﻋﺎﻟﻴ ﹰ ﺎ ﺿﺠﻴﺠ ﺗﺴﻤﻊ ﻗﺪ ﻣﺮﺓ ﺗﺸﻐﻴﻠﻬﺎ ﻭﺃﻋﺪ ﺍﻟﻐﺴﺎﻟﺔ ﺃﻃﻔﺊ ﻣﺮﺓ ﻷﻭﻝ ﺛﺎﻧﻴﺔ ﺍﻟﻴﻤﲔ ﺍﻟﻰ ﻣﺎﺋﻞ ﺍﻟﺒﺎﺏ ﺃﻥ ﺣﺎﻟﺔ ﻓﻲ ١ ﺍﳊﺎﻟﺔ ﻓﻲ ﻣﺒﲔ ﻫﻮ ﻛﻤﺎ ﺍﻟﻴﺴﺎﺭ ﺍﻟﻰ ﻣﺎﺋﻼ ﺍﻟﺒﺎﺏ ﻛﺎﻥ ﺇﺫﺍ ﻳﻌﻤﻞ ﺣﺘﻰ ﺃﺩﻧﺎﻩ ﺍﳌﺬﻛﻮﺭﺓ ﺍﻹﺟﺮﺍﺀﺍﺕ ﺭ ﹼ ﺮ ﻛ ﺩ ﺍﻟﺸﻜﻞ ﻳﻨﺒﻐﻲ ﻛﻤﺎ ﺍﻟﺒﺎﺏ ﻓﻲ ﺍﻟﺴﺎﻋﺔ ﻋﻘﺮﺏ ﻣﻌﺎﻛﺲ ﺑﺎﲡﺎﻩ ﺍﻟﺒﺮﻏﻰ ﺍﺭﺥ ١ ﺍﻻﺭﺗﻔﺎﻉ ﻟﺮﻓﻊ ﻭﺩﻭﺭﻩ ﺍﳋﻠﻒ ﻓﻲ ﺍﻟﻴ...

Страница 37: ...ﺧﺮﻃﻮﻡ ٨ ﺍﻟﻄﺎﻗﺔ ﺳﻠﻚ ٩ ﺇﺷﻌﺎﺭ ﺃﻱ ﺑﺪﻭﻥ ﻭﺍﳌﻮﺍﺻﻔﺎﺕ ﺍﳌﻈﻬﺮ ﻳﺨﺘﻠﻒ ﻗﺪ First filling Refilling Accessories ﺍﳌﻠﺤﻘﺎﺕ ﺍﻟﻘﻤﻊ ﻟﻠﺘﻌﺪﻳﻞ ﻗﺎﺑﻠﺔ ﺭﺟﻞ ١٠ ﺍﻷﻋﻠﻰ ﺍﻟﺮﻑ ١١ ﺍﻟﺼﻐﻴﺮﺓ ﺍﻷﻛﻞ ﺃﺩﻭﺍﺕ ﺭﻑ ١٢ ﻟﻠﺸﻄﻒ ﺍﳌﺴﺎﻋﺪﺓ ﻭﺍﳌﺎﺩﺓ ﺍﻟﻐﺴﻴﻞ ﺳﺎﺋﻞ ﺩﺭﺝ ١٣ ﺍﻟﺒﺨﺎﺭ ﻓﺘﺤﺤﺔ ﻏﻄﺎﺀ ١٤ ﺍﻟﻌﻠﻴﺎ ﺍﻟﺮﺵ ﺫﺭﺍﻉ ١٥ ﺍﻟﺴﻔﻠﻰ ﺍﻟﺮﺵ ﺫﺭﺍﻉ ١٦ ﺍﳌﺼﻔﺎﺓ ﻣﺠﻤﻮﻋﺔ ١٧ ﺍﻷﺳﻔﻞ ﺍﻟﺮﻑ ١٨ ﺍﳌﻠﺢ ﻭﻋﺎﺀ ﻏﻄﺎﺀ ١٩ ﺍﻟﺴﻜﺎﻛﲔ ﺭﻑ ٢٠ ...

Страница 38: ... ﺍﻟﻄﻔﻞ ﺣﻤﺎﻳﺔ ﻗﻔﻞ ﺍﻟﻄﺎﻗﺔ ﺍﻟﺮﺵ ﺍﻟﺘﺸﻐﻴﻞ ﺗﺄﺧﻴﺮ ﺍﳌﺆﺷﺮ ﺍﳊﻤﻮﻟﺔ ﻧﺼﻒ ﺍﻟﺸﻄﻒ ﺯﻣﻮﺭ ﺍﻹﻳﻘﺎﻑ ﺍﻟﺘﺸﻐﻴﻞ ﺍﳌﺘﺒﻘﻲ ﺍﻟﻮﻗﺖ ﺍﻟﺒﺎﺭﺩ ﻋﻠﻰ ﺍﻟﺘﺠﻔﻴﻒ ﺍﻟﻄﻔﻞ ﺣﻤﺎﻳﺔ ﻗﻔﻞ ﺍﻟﻄﺎﻗﺔ ﺍﻟﺘﺸﻐﻴﻞ ﺗﺄﺧﻴﺮ ﺍﳌﺆﺷﺮ ﺍﻟﺘﺤﻜﻢ ﺃﺯﺭﺍﺭ ﻭﻇﺎﺋﻒ ﺍﳌﻮﺩﻳﻞ D1420W L M T B C D A F B U U ﺍﳌﻮﺩﻳﻞ D1421W L M T B C D A F B U UU ﺍﻟﺮﺵ ...

Страница 39: ...١١ ﺍﻟﺒﺮﻧﺎﻣﺞ ﺍﻟﺒﺮﻧﺎﻣﺞ ...

Страница 40: ... ﺍﻟﺰﺭ ﻫﺬﺍ ﺇﺿﻐﻂ ﺳﺎﻋﺔ ١٩ ﺇﻟﻰ ﺳﺎﻋﺔ ﻣﻦ ﺍﻟﺘﺸﻐﻴﻞ ﺗﺄﺧﻴﺮ ﺿﺒﻂ ﳝﻜﻦ ﻭﺷﻄﻒ ﹰ ﺍ ﺟﺪ ﺳﺎﺧﻦ Rinse ﺍﻟﺒﺮﻧﺎﻣﺞ ﺍﻟﺒﺮﻧﺎﻣﺞ ﻻﺧﺘﻴﺎﺭ ﺍﻟﺰﺭ ﻫﺬﺍ ﻋﻠﻰ ﺇﺿﻐﻂ UV UV ﺯﺭ ﻋﻠﻰ ﺍﺿﻐﻂ ﺍﻟﺼﺤﻮﻥ ﺗﻌﻘﻴﻢ ﺃﺭﺩﺕ ﺇﺫﺍ UV ﳌﺒﺔ ﺑﺈﺿﺎﺀﺓ ﺍﳌﻌﻘﻤﺔ ﺳﺘﻌﻤﻞ ﺍﻟﺘﺠﻔﻴﻒ ﺩﻭﺭﺓ ﺑﻌﺪ ﺍﻟﺸﺎﺷﺔ ﻧﺎﻓﺬﺓ ﻓﻲ St ﻋﺮﺽ ﺳﻴﺘﻢ ﺍﻷﻥ ﺍﻷﻃﺒﺎﻕ ﻏﺴﺎﻟﺔ ﺑﺎﺏ ﻓﺘﺢ ﻋﻦ ﺍﻟﺒﻨﻔﺴﺠﻴﺔ ﻓﻮﻕ ﺍﻷﺷﻌﺔ ﳌﺒﺔ ﺗﻨﻄﻔﺊ ﻟﻠﻌﲔ ﻭﺍﻗﻲ ﺍﺭﺗﺪﺍﺀ ﺩﻭﻥ ﻣﺒﺎﺷﺮﺓ ﺍﻟﻠﻤﺒﺔ ﺇﻟﻰ ﺗﻨﻈﺮ ﻻ ﺍﻟﺒﺎﺭﺩ ﻋﻠﻰ ﺍﻟﺘﺠﻔﻴﻒ ﻟﻠﺘﺠﻔﻴﻒ ﺃﻓﻀﻞ ﺃﺩﺍﺀ ﲢﻘﻴﻖ ﻓﻲ ﺗﺮﻏﺒﲔ ﻛﻨﺖ ﺇﺫﺍ ﺍﻟ...

Страница 41: ...er ﻭ ﺍﻟﺒﺎﺭﺩ ﻋﻠﻰ ﺍﻟﺘﺠﻔﻴﻒ Cool Dry UV ﺯﺭﻱ ﺇﺿﻐﻂ ٢ ﺍﻷﺧﺮﻯ ﺗﻠﻮ ﻭﺍﺣﺪﺓ ﺗﺘﻐﻴﺮ ﺍﻟﻘﻴﻢ ﻭﺳﺘﺠﺪ ﺍﻟﺒﺎﺭﺩ ﻋﻠﻰ ﺍﻟﺘﺠﻔﻴﻒ Cool Dry UV ﺇﺿﻐﻂ ﺍﻟﻀﺒﻂ ﻗﻴﻤﺔ ﻟﺘﻐﻴﻴﺮ ٣ ﻭ ﺑﲔ ﻗﻴﻢ ﺍﻟﺸﺎﺷﺔ ﺳﺘﻌﺮﺽ ﺍﻟﻘﻴﻤﺔ ﺣﻔﻆ ﻟﻴﺘﻢ ﺍﻟﺮﺵ Spray ﺯﺭ ﺇﺿﻐﻂ ﺍﻟﺼﺤﻴﺤﺔ ﺍﻟﻀﺒﻂ ﻗﻴﻤﺔ ﻋﻠﻰ ﲢﺼﻞ ﻋﻨﺪﻣﺎ ٤ 1 e 14 25 mg l CaCO3 1 f 10 mg l CaCO3 1 d 10 mg l CaO 1 78 f 1 25 e ﺍﻷﻭﻟﻰ ﺍﻟﻄﺮﻳﻘﺔ ﻣﻨﻄﻘﺘﻚ ﻓﻲ ﺍﳌﺎﺀ ﻋﺴﺮ ﺩﺭﺟﺔ ﻣﻦ ﲢﻘﻘﻲ ١ ﺍﻷﻣﺮ ﻫﺬﺍ ﻓﻲ ﺍﳌﻴﺎﻩ ﻣﺮﻓﻖ ﺷﺮﻛﺔ ﺗﺴﺎﻋﺪﻙ ﺃﻥ ﳝﻜﻦ ﳌﺴﺘﻮﻯ ﹰﺎ ﻘ ﻭ...

Страница 42: ...ﺍ ﺃﻥ ﻣﻦ ﻭﺗﺄﻛﺪ ﻭﺁﻣﻦ ﻧﻈﻴﻒ ﺑﺸﻜﻞ ﺍﻟﻌﺒﻮﺓ ﻣﻞﺀ ﻟﻴﻜﻮﻥ ﺍﻟﻘﻤﻊ ﺇﺳﺘﻌﻤﻞ ﺍﻟﺼﺤﻮﻥ ﻏﺴﺎﻻﺕ ﻓﻲ ﻟﻼﺳﺘﺨﺪﺍﻡ ﺍﻟﻌﺒﻮﺓ ﺧﺎﺭﺝ ﺗﺴﺮﺑﻪ ﰎ ﻣﻠﺢ ﺃﻱ ﲟﺴﺢ ﻗﻢ ﺍﻟﻌﺒﻮﺓ ﻣﻞﺀ ﺑﻌﺪ ﺍﺍﻟﻌﺒﻮﺓ ﺧﺎﺭﺝ ﻟﻠﻤﻠﺢ ﺗﺴﺮﺏ ﺃﻱ ﳌﻨﻊ ﻣﺤﻜﻢ ﺑﺸﻜﻞ ﺍﻟﻐﻄﺎﺀ ﺑﺈﻏﻼﻕ ﻗﻢ ﻟﻠﺸﻄﻒ ﻣﺴﺎﻋﺪ ﺇﺿﺎﻓﺔ ٤ ﺍﳋﻄﻮﺓ ﺍﻟﺸﻄﻒ ﻣﺴﺎﻋﺪ ﺑﻨﻮﻋﻴﺔ ﺍﻟﻌﺒﻮﺓ ﺇﻣﻞﺀ ﺛﻢ ﻣﻜﺎﻧﻪ ﻣﻦ ﻭﺍﻧﺰﻋﻪ ﻟﻔﺘﺤﺔ ﺍﻟﺴﺎﻋﺔ ﻋﻘﺎﺭﺏ ﻋﻜﺲ ﺍﻟﻐﻄﺎﺀ ﺑﺘﺪﻭﻳﺮ ﻗﻢ ﺍﻟﺸﻄﻒ ﻣﺴﺎﻋﺪ ﻋﺒﻮﺓ ﳌﻞﺀ ﹰ ﺍ ﺟﻴﺪ ﻭﺃﻏﻠﻘﻪ ﻣﻜﺎﻧﻪ ﺇﻟﻰ ﺍﻟﻐﻄﺎﺀ ﺃﻋﺪ ﻟﻚ ﺑﻌﺪ ﺣﺪ ﺃﻗﺼﻰ ﺇﻟﻰ ﺍﻟﺸﻄﻒ ﲟﺴﺎﻋﺪ ﻣﻦ ﺟﻴﺪ...

Страница 43: ...ﲤﻜﻦ ﺑﻄﺮﻳﻘﺔ ﺍﻟﻔﺨﺎﺭﺍﻳﺎﺕ ﺿﻊ ﺍﳌﺎﺀ ﻣﻼﻗﺎﺓ ﺟﻔﺎﻓﻬﺎ ﺗﺴﻬﻞ ﺑﻄﺮﻳﻘﺔ ﺍﻟﻌﻤﻴﻘﺔ ﺍﻷﻭﺍﻧﻲ ﻭﺿﻊ ﻳﺠﺐ ﻓﻲ ﻭﺿﻌﻬﺎ ﻗﺒﻞ ﹰ ﺎ ﻃﻌﺎﻣ ﲢﺘﻮﻱ ﺍﻟﺘﻲ ﺍﻷﻭﺍﻧﻲ ﻧﻘﻊ ﻳﺠﺐ ﺎﻟﺔ ﹼ ﺍﻟﻐﺴ ﻟﻠﻔﻚ ﺍﻟﻘﺎﺑﻞ ﺍﻟﺴﻜﺎﻛﲔ ﺭﻑ ﻓﻲ ﺍﻟﺴﻜﺎﻛﲔ ﺃﺭﻓﻒ ﻓﻲ ﺍﳌﻮﺟﻮﺩﺓ ﺍﻟﻔﻮﺍﺻﻞ ﹸﺴﺎﻋﺪ ﺗ ﻭﲢﺴﲔ ﺍﻟﺘﻠﻒ ﻟﺘﺠﻨﺐ ﺍﳌﻔﻠﻄﺤﺔ ﺍﻷﻭﺍﻧﻲ ﺑﲔ ﺍﻟﻔﺼﻞ ﺍﻟﺘﻨﻈﻴﻒ ﻗﺪﺭﺍﺕ ﺑﲔ ﻓﻴﻤﺎ ﻭﺍﳌﻼﻋﻖ ﻭﺍﻟﺸﻮﻙ ﺍﻟﺴﻜﺎﻛﲔ ﺃﻳﺪﻱ ﻭﺿﻊ ﻳﺠﺐ ﺍﻟﻌﻠﺐ ﺍﻻﺭﺗﻔﺎﻉ ﻟﻀﺒﻂ ﺍﻟﻘﺎﺑﻠﺔ ﺍﻟﺼﻴﻨﻴﺔ ﻋﻠﻰ ﻣﻨﻔﺼﻞ ﺑﺸﻜﻞ ﺟﺎﻧﺒﻴﺔ ﺻﻴﻨﻴﺔ ﻛﻞ ﺿﺒﻂ ﳝﻜﻦ ﺍﻟﺴﻜﺎﻛﲔ ﺃﻭ ﺍﻷﻭﺍﻧﻲ ﻻﺣﺘﻮﺍﺀ ﻣ...

Страница 44: ... ﻣﻊ ﺗﺪﺍﺧﻠﻬﺎ ﻭﳝﻜﻦ ﺑﻬﺎ ﺍﳋﺎﺹ ﺍﻟﻐﻄﺎﺀ ﻋﻠﻰ ﺍﻟﺼﻐﻴﺮﺓ ﺍﻷﺩﻭﺍﺕ ﺿﻊ ﻋﺪﻡ ﻋﻨﺪ ﹰ ﺍ ﺑﻌﻴﺪ ﻭﺍﺑﻘﺎﺋﻬﺎ ﻋﻠﻴﻬﺎ ﺍﳌﻘﺎﺑﺾ ﻭﺿﻊ ﺍﻻﺳﺘﻌﻤﺎﻝ ﻣﻨﻔﺼﻞ ﻣﻜﺎﻥ ﻓﻲ ﺍﻟﺴﻜﺎﻛﲔ ﻭﺿﻊ ﻳﺠﺐ ﺍﳊﺎﺩﺓ ﺍﻷﺩﻭﺍﺕ ﻭﺗﻔﺮﻳﻎ ﲢﻤﻴﻞ ﻋﻨﺪ ﺍﺣﺬﺭ ﺍﺳﺤﺒﻬﻤﺎ ﺛﻢ ﻣﻌﺎﻛﺲ ﺑﺎﲡﺎﻩ ﺍﻟﺴﻠﺘﲔ ﺍﺳﺤﺐ ﺑﻌﺾ ﻋﻦ ﻻﺑﻌﺎﺩﻫﻤﺎ ﺍﻻﺳﺘﺨﺪﺍﻡ ﻛﻴﻔﻴﺔ 1 2 3 4 5 6 7 8 ﲢﺬﻳﺮ ﺍﳌﺪﺑﺒﺔ ﺍﻷﻃﺮﺍﻑ ﺫﺍﺕ ﻭﺍﻷﺩﻭﺍﺕ ﺍﻟﺴﻜﺎﻛﲔ ﻭﺿﻊ ﻳﺘﻮﺟﺐ ﻓﻲ ﺗﻮﺿﻊ ﺃﻥ ﺃﻭ ﻷﺳﻔﻞ ﺍﳊﺎﺩﺓ ﻭﺃﻃﺮﺍﻓﻬﺎ ﺍﻟﺴﻠﺔ ﺩﺍﺧﻞ ﺃﻓﻘﻴﺔ ﻭﺿﻌﻴﺔ ﺍﻟﺴﻔﻠﻲ ﺍﻟﺮﻑ ﲢﻤﻴﻞ ٤ ﻭﺃﻭﻋﻴﺔ ﺍﻟﺼﺤﻮﻥ ﻟﺘﺤﻤﻴﻞ ﺍ...

Страница 45: ...ﻭﺍﻟﺰﺑﺎﺩﻱ ﻟﻠﻔﺘﺢ ﺍﻟﻘﺎﺑﻞ ﺍﻟﻔﻨﺎﺟﲔ ﺭﻑ ﻋﻠﻲ ﺍﻟﻌﻠﻮﻱ ﺍﻟﺮﻑ ﻓﻲ ﺍﳌﻴﺎﻩ ﺭﺷﺎﺵ ﺫﺭﺍﻉ ﺣﺮﻛﺔ ﺇﻋﺎﻗﺔ ﻣﻦ ﺇﻧﺘﺒﻪ ﺍﻟﺼﺤﻮﻥ ﺎﻟﺔ ﹼ ﻏﺴ ﻓﻲ ﺁﻣﻨﺔ ﺍﻟﻐﻴﺮ ﺍﻷﺩﻭﺍﺕ ﻗﺪ ﺍﻟﺘﻨﻈﻴﻒ ﻣﻮﺍﺩ ﻣﻊ ﹰ ﺍ ﺟﺪ ﺍﳊﺎﺭﺓ ﺍﳌﻴﺎﻩ ﻣﺰﻳﺞ ﺇﻥ ﺑﻌﺪﻡ ﻧﻮﺻﻲ ﻓﺈﻧﻨﺎ ﻭﻟﻬﺬﺍ ﺍﻷﺩﻭﺍﺕ ﺑﻌﺾ ﺗﻠﻒ ﻳﺴﺒﺐ ﺍﻟﺘﺎﻟﻴﺔ ﺍﻷﺩﻭﺍﺕ ﺍﺳﺘﺨﺪﺍﻡ ﺍﻟﻴﻮﺩ ﻣﻊ ﺍﻷﳌﻴﻨﻴﻮﻡ ﺃﻭ ﺑﺎﻟﻨﺤﺎﺱ ﺍﳌﻄﻌﻤﺔ ﺍﳌﻮﺍﺩ ﺍﻟﺬﻫﺐ ﺃﻭ ﺑﺎﻟﻔﻀﺔ ﹰ ﺎ ﻳﺪﻭﻳ ﻋﻠﻴﻬﺎ ﺍﳌﺮﺳﻮﻡ ﺍﻟﻔﺨﺎﺭﻳﺎﺕ ﺃﻭ ﺍﳋﺸﺐ ﻣﻦ ﻣﻘﺎﺑﺾ ﲢﺘﻮﻱ ﺍﻟﺘﻲ ﺍﻟﻄﻌﺎﻡ ﺃﺩﻭﺍﺕ ﺍﻟﻌﻈﻢ ﺍﻟﺼﺪﺃ ﺗﻘﺎﻭﻡ ﻻ ﺍﻟﺘﻲ ﺍﻷﺩﻭﺍﺕ ﺃﻭ...

Страница 46: ...ﺍﺩ ﺇﺿﺎﻓﺔ ﻳﺠﺐ Pre Wash ﺍﻟﻐﺴﻴﻞ ﻗﺒﻞ ﺑﺮﻧﺎﻣﺞ ﻋﺪﺍ ﺍﻻﺳﺘﺨﺪﺍﻡ ﺩﻟﻴﻞ ﻓﻲ ﺍﳌﺼﻨﻊ ﺗﻮﺻﻴﺎﺕ ﺍﺗﺒﺎﻉ ﻳﺮﺟﻰ ﺍﳌﻄﻠﻮﺑﺔ ﺍﻟﺘﻨﻈﻴﻒ ﻣﻮﺍﺩ ﻛﻤﻴﺔ ﻣﻦ ﻟﻠﺘﺄﻛﺪ ﺍﻟﻜﻤﻴﺔ ﻣﻦ ﺑﺴﻴﻂ ﺑﺸﻜﻞ ﺃﻗﻞ ﻛﻤﻴﺔ ﺍﺳﺘﺨﺪﻡ ﳝﻜﻦ ﺍﻻﺗﺴﺎﺥ ﻣﺘﻮﺳﻄﺔ ﻛﺎﻧﺖ ﺇﺫﺍ ﺍﻟﻌﺎﺩﻳﺔ ﺟﺮﺍﻡ ٥٢ ﻭ ﺟﺮﺍﻡ ٥١ ﺍﳊﺎﻭﻳﺎﺕ ﲢﻤﻞ ﺍﳌﻄﻠﻮﺏ ﺍﻟﺒﺮﻧﺎﻣﺞ ﻋﻠﻰ ﺍﻟﻐﺴﻴﻞ ﻣﻮﺍﺩ ﻛﻤﻴﺔ ﺗﻌﺘﻤﺪ ﺍﳉﺪﻭﻝ ﻣﺮﺍﺟﻌﺔ ﻳﺮﺟﻰ ﺑﻌﺪ ﺍﻟﺘﻨﻈﻴﻒ ﻣﻮﺍﺩ ﲢﻤﻴﻞ ﻣﺨﺰﻥ ﻏﻄﺎﺀ ﺇﻏﻼﻕ ﻳﺠﺐ ﻣﻠﺌﻬﺎ ﺍﻟﻐﺴﻴﻞ ﻋﻨﺪ ﹰ ﺎ ﺗﻠﻘﺎﺋﻴ ﺍﻟﻐﺴﻴﻞ ﻣﻮﺍﺩ ﺗﺨﺮﺝ ﺑﻌﺪ ﻣﻔﺘﻮﺡ ﺍﻟﺘﻨﻈﻴﻒ ﻣﻮﺍﺩ ﻣﺨﺰﻥ ﻏﻄﺎ...

Страница 47: ...ﻣﺎﺕ ﻇﻬﻮﺭ ﺣﺎﻝ ﻓﻲ ﺃﻭ ﹰ ﺍ ﺟﺪ ﹰ ﺎ ﺳﻴﺌ ﺍﻟﺘﺠﻔﻴﻒ ﺗﻨﻈﻴﻒ ﻣﺎﺩﺓ ﺍﺳﺘﺨﺪﺍﻡ ﻋﻨﺪ ﺍﻷﺑﻴﺾ ﺍﻟﺸﺮﻳﻂ ﻣﺘﻜﺎﻣﻠﺔ ﻣﻦ ﺗﻨﻈﻴﻒ ﻣﻮﺍﺩ ﺍﺳﺘﺨﺪﺍﻡ ﻣﻊ ﺍﻟﻌﻤﻞ ﻧﻀﻤﻦ ﻻ ﻧﺤﻦ ﺍﻟﻨﻮﻉ ﺫﺍﻙ ﺍﻟﺸﻄﻒ ﻣﺴﺎﻋﺪ ﻋﻦ ﻣﻌﻠﻮﻣﺎﺕ ﻭﺍﻟﻌﻼﻣﺎﺕ ﺍﻟﺒﻘﻊ ﺇﺯﺍﻟﺔ ﻋﻠﻰ ﺍﻟﺸﻄﻒ ﻣﺴﺎﻋﺪ ﻳﻌﻤﻞ ﺍﺳﺘﺨﺪﺍﻡ ﹼ ﻥ ﺇ ﺍﻷﻭﺍﻧﻲ ﺟﻔﺎﻑ ﻣﻦ ﻭﻳﺤﺴﻦ ﺍﻟﺼﺤﻮﻥ ﻋﻦ ﺍﻷﻭﺍﻧﻲ ﻏﺴﻴﻞ ﻧﻮﻋﻴﺔ ﻣﻦ ﻳﺤﺴﻦ ﺍﳌﻨﺎﺳﺒﺔ ﺍﻟﻜﻤﻴﺔ ﺯﺍﺋﺪﺓ ﺭﻏﻮﺓ ﺪ ﹼ ﻟ ﻳﻮ ﻓﻘﺪ ﺯﺍﺋﺪﺓ ﻛﻤﻴﺔ ﺍﺳﺘﺨﺪﺍﻡ ﺎ ﹼ ﺃﻣ ﻟﻠﻤﻴﺎﻩ ﻭﺗﺴﺮﺏ ﺍﻟﺘﻌﺒﺌﺔ ﺇﻋﺎﺩﺓ ٨ ﺍﻟﺸﻄﻒ ﻣﺴﺎﻋﺪ ﺗﻌﺒﺌﺔ ﻹﻋﺎﺩﺓ ﻣﺴﺎﻋﺪ ﺧﺰ...

Страница 48: ...ﻟﺒﺮﺍﻣﺞ ﻋﻠﻰ ﻳﻌﻤﻞ ﺍﳉﻬﺎﺯ ﻛﺎﻥ ﺇﺫﺍ ﻟﻠﻤﺨﺰﻥ ﺍﳌﻠﺢ ﺇﺿﺎﻓﺔ ﻓﻴﺠﺐ ﲢﺬﻳﺮ ﻷﻥ ﺍﳌﻠﺢ ﻣﺨﺰﻥ ﺇﻟﻰ ﺍﻟﺘﻨﻈﻴﻒ ﻣﻮﺍﺩ ﺑﺈﺿﺎﻓﺔ ﺗﻘﻢ ﻻ ﺍﳌﺎﺀ ﺮ ﹼ ﻣﻴﺴ ﺳﻴﺘﻠﻒ ﺫﻟﻚ ﺍﻟﺘﺠﻔﻴﻒ ٩ ﹰ ﻼ ﻛﺎﻣ ﺍﻟﺒﺎﺏ ﺑﻔﺘﺢ ﻧﻨﺼﺢ ﺍﻟﺘﺠﻔﻴﻒ ﻋﻠﻰ ﻟﻠﻤﺴﺎﻋﺪﺓ ﺍﻟﻐﺴﻴﻞ ﺩﻭﺭﺓ ﺇﻧﺘﻬﺎﺀ ﺑﻌﺪ EN٥٠٢٤٢ ﺍﻟﻄﺎﻗﺔ ﻓﺤﺺ ١٠ ﺍﻟﻘﻴﺎﺳﻴﺔ ﻟﻠﻤﻮﺻﻔﺎﺕ ﹰ ﺎ ﻭﻓﻘ ﺍﳉﻬﺎﺯ ﲢﻤﻴﻞ ﰎ ١٧ ١٥ ﺹ ﻠﺔ ﹼ ﺍﶈﻤ ﺍﻟﺼﺤﻮﻥ ﺎﻟﺔ ﹼ ﻏﺴ ﻋﻦ ﻣﺜﺎﻝ ﹰ ﺎ ﻣﻜﺎﻧ ١٤ ﻟـ ﺿﺒﻂ ﺍﻟﺴﻌﺔ ﺇﻳﻜﻮ ﺍﳌﻘﺎﺭﻧﺔ ﻧﻈﺎﻡ ٤ ﺍﻟﺸﻄﻒ ﻣﺴﺎﻋﺪ ﺿﺒﻂ ﺳﻄﺢ ﺩﺍﺧﻞ ﺍﳌﻨﻈﻒ ﻣﻦ ﺟﺮﺍﻡ ٨ ﺍﳌﻨﻈﻒ ﻣﺮﺟﻊ...

Страница 49: ...ﺮﻑ ﺑﺈﻓﺮﺍﻍ ﻗﻢ ﺍﻟﺘﺴﺎﻗﻂ ﻣﻦ ﺍﻟﻌﻠﻮﻱ ﺍﻟﺮﻑ ﻣﻦ ﺍﳌﺎﺀ ﻗﻄﺮﺍﺕ ﳝﻨﻊ ﺫﻟﻚ ﺍﻷﺳﻔﻞ ﻓﻲ ﺍﻷﻭﺍﻧﻲ ﻋﻠﻰ ﻭﺑﻌﺪ ﺍﺧﺘﺮﺕ ﺍﻟﺬﻱ ﺍﻟﺒﺮﻧﺎﻣﺞ ﺯﻣﻦ ﺳﻴﻈﻬﺮ ﻛﻤﺎ ﺍﻟﺰﻣﻦ ﻳﺒﺪﺃ ﺛﻢ ﻭﻣﻦ ﺍﳌﺘﺒﻘﻲ ﺍﻟﺰﻣﻦ ﺳﻴﻈﻬﺮ ﺍﻟﺒﺪﺀ ﺃﺧﺮﻯ ﺑﻌﺪ ﺩﻗﻴﻘﺔ ﺑﺎﻟﻨﻘﺼﺎﻥ ﺗﺘﻮﻗﻒ ﺍﻟﺘﺸﻐﻴﻞ ﺩﻭﺭﺓ ﺧﻼﻝ ﺍﻟﺒﺎﺕ ﻓﺘﺢ ﰎ ﺇﺫﺍ ﺇﻋﺎﺩﺓ ﻭﻋﻨﺪ ﺳﻼﻣﺔ ﻛﺈﺟﺮﺍﺀ ﺍﻟﻌﻤﻞ ﻋﻦ ﺍﻟﻐﺴﺎﻟﺔ ﺍﻟﻨﻘﻄﺔ ﻣﻦ ﻟﻠﻌﻤﻞ ﺍﻟﻐﺴﺎﻟﺔ ﺳﺘﻌﻮﺩ ﺍﻟﺒﺎﺏ ﺇﻏﻼﻕ ﻋﻨﺪﻫﺎ ﺗﻮﻗﻔﺖ ﺍﻟﺘﻲ ﺍﻟﻐﺴﻴﻞ ﺑﺮﻧﺎﻣﺞ ﻧﻬﺎﻳﺔ ﻓﻲ ﻭﺳﻴﻨﻄﻠﻖ ﺍﻟﻨﻬﺎﻳﺔ ﻭﻫﻲ End ﻛﻠﻤﺔ ﻋﺮﺽ ﺳﻴﺘﻢ ﺎﻟﺔ ﹼ ﻏﺴ ﺳﺘﻨﻄﻔﺊ ﺫﻟ...

Страница 50: ...ﺸﻐﻴﻞ ﺳﻴﺘﻢ ﺍﻟﺒﺮﻧﺎﻣﺞ ﻫﺬﺍ ﻣﻦ ﺍﻻﻧﺘﻬﺎﺀ ﻓﻌﻨﺪ ﹰ ﺎ ﺣﺪﻳﺜ ﻋﻠﻰ ﻟﻠﺤﺼﻮﻝ ﺗﻠﻘﺎﺋﻲ ﺑﺸﻜﻞ ﺍﻟﺒﺎﺭﺩ ﺍﻟﺘﺠﻔﻴﻒ ﺑﺮﻧﺎﻣﺞ ﺟﻴﺪﺓ ﻧﺘﺎﺋﺞ ﺍﻟﻐﺴﻴﻞ ﻗﺒﻞ ﻗﺒﻞ ﺍﻷﻭﺍﻧﻲ ﻋﻦ ﺍﻷﻭﺳﺎﺥ ﻹﺯﺍﻟﺔ ﺍﻟﺒﺮﻧﺎﻣﺞ ﻫﺬﺍ ﻳﺴﺘﺨﺪﻡ ﹰ ﺎ ﻳﺪﻭﻳ ﻏﺴﻬﺎ ﺍﻟﺘﻠﻘﺎﺋﻴﺔ ﺍﻟﺘﺸﻐﻴﻞ ﺇﻋﺎﺩﺓ ﻋﻨﺪ ﺛﺎﻧﻴﺔ ﻟﻠﻌﻤﻞ ﺳﺘﻌﻮﺩ ﻓﺈﻧﻬﺎ ﺍﻟﻜﻬﺮﺑﺎﺋﻲ ﺍﻟﺘﻴﺎﺭ ﺇﻧﻘﻄﺎﻉ ﻧﺘﻴﺠﺔ ﺍﻟﺼﺤﻮﻥ ﺎﻟﺔ ﹼ ﻏﺴ ﺇﻃﻔﺎﺀ ﰎ ﺇﺫﺍ ﹰ ﺎ ﺁﻟﻴ ﺍﻟﺘﺸﻐﻴﻞ ﺇﻋﺎﺩﺓ ﺍﻟﻄﺎﻗﺔ Power ﺯﺭ ﻋﻠﻰ ﺍﻟﻀﻐﻂ ﻭﺑﻌﺪ ﺍﻟﻄﺎﻗﺔ ﻋﻮﺩﺓ ﺍﻟﺘﺠﻔﻴﻒ ﺍﻟﺒﺎﺭﺩ ﺍﻟﺘﺠﻔﻴﻒ ﺍﳊﺎﺭ ﺍﻟﺸﻄﻒ ﻡ ﹾ ٧٠ ﻡ ﹾ ٦٠ ﻡ...

Страница 51: ... arm ﺍﻟﺸﺒﻜﻴﺔ ﺍﳌﺼﻔﺎﺓ STS ﻣﺼﻔﺎﺓ ﺍﻟﻌﻠﻴﺎ ﺍﳋﺎﺭﺟﻴﺔ ﺍﳌﺼﻔﺎﺓ ﺍﻟﺴﻔﻠﻲ ﺍﻟﺮﺷﺎﺵ ﺫﺭﺍﻉ ﻣﺴﺪﻭﺩﺓ ﻏﻴﺮ ﺍﳌﺎﺀ ﺑﺨﺎﺥ ﻓﺘﺤﺎﺕ ﺃﻥ ﻣﻦ ﺗﺄﻛﺪ ﻭﺃﺧﺮﺟﻬﺎ ﺍﻟﺬﺭﺍﻉ ﺇﺳﺤﺐ ﻟﻠﺘﻨﻈﻴﻒ ﺍﳊﺎﺟﺔ ﺣﺎﻝ ﻓﻲ ﻣﻜﺎﻧﻬﺎ ﻣﻦ ﺑﺎﻟﺴﺤﺐ ﻣﻜﺎﻧﻬﺎ ﺇﻟﻰ ﻭﺃﻋﺪﻫﺎ ﺍﻟﺮﺷﺎﺵ ﺫﺭﺍﻉ ﻒ ﹼ ﻧﻈ ﻟﻸﺳﻔﻞ ﺍﻟﻌﻠﻮﻳﺔ ﺍﻟﺮﺷﺎﺵ ﺫﺭﺍﻉ ﺍﻷﻣﺎﻡ ﺇﻟﻰ ﺍﻟﻌﻠﻮﻱ ﺍﻟﺮﻑ ﺇﺳﺤﺐ ﻣﺴﺪﻭﺩﺓ ﻏﻴﺮ ﺍﳌﺎﺀ ﺑﺨﺎﺥ ﻓﺘﺤﺎﺕ ﺃﻥ ﻣﻦ ﺗﺄﻛﺪ ﻓﻚ ﺑﻌﺪ ﺍﻟﺬﺭﺍﻉ ﺇﺳﺤﺐ ﻟﻠﺘﻨﻈﻴﻒ ﺍﳊﺎﺟﺔ ﺣﺎﻝ ﻓﻲ ﺍﻟﺒﺮﺍﻏﻲ ﻣﻜﺎﻧﻬﺎ ﺇﻟﻰ ﻭﺃﻋﺪﻫﺎ ﺍﻟﺮﺷﺎﺵ ﺫﺭﺍﻉ ﻒ ﹼ ﻧﻈ ﺍﻟﺮﺵ ﺫﺭﺍﻉ ﺍﻷﻋﻠﻰ ﻏﺴﻴﻞ...

Страница 52: ...ﻭ ﻓﻴﻮﺯ ﻗﺎﻃﻊ ﺍﺣﺘﺮﺍﻕ ﺍﻟﻜﻬﺮﺑﺎﺋﻲ ﺍﻟﺘﻴﺎﺭ ﻗﻄﻊ ﰎ ﺟﻴﺪ ﺑﺸﻜﻞ ﺍﻟﺒﺎﺏ ﺇﻏﻼﻕ ﻳﺘﻢ ﻟﻢ ﺍﻟﺘﺸﻐﻴﻞ ﺯﺭ ﺿﻐﻂ ﻳﺘﻢ ﻟﻢ ﺑﺬﺭﺍﻉ ﻋﺎﻟﻘﺔ ﻃﻌﺎﻡ ﺑﻘﺎﻳﺎ ﻭﺟﻮﺩ ﺍﻟﺮﺷﺎﺵ ﻣﺴﺎﻋﺪ ﺃﻭ ﺍﻟﺘﻨﻈﻴﻒ ﻣﺎﺩﺓ ﻛﻤﻴﺔ ﺻﺤﻴﺤﺔ ﻏﻴﺮ ﺍﻟﺸﻄﻒ ﻓﺎﺭﻍ ﺍﳌﻠﺢ ﻣﺨﺰﻥ ﺍﻹﻏﻼﻕ ﻣﺤﻜﻢ ﻏﻴﺮ ﺍﳌﻠﺢ ﻣﺨﺰﻥ ﻏﻄﺎﺀ ﺍﻟﺸﻄﻒ ﻣﺴﺎﻋﺪ ﻣﻦ ﺍﻟﻜﺜﻴﺮ ﺇﺧﺮﺍﺝ ﰎ ﺍﻟﺸﻄﻒ ﻣﺴﺎﻋﺪ ﻣﻦ ﺍﻟﻜﺜﻴﺮ ﺇﺧﺮﺍﺝ ﰎ ﺍﻟﺘﻨﻈﻴﻒ ﻣﻮﺍﺩ ﻣﻦ ﺻﺤﻴﺤﺔ ﻏﻴﺮ ﻛﻤﻴﺔ ﻛﺜﻴﺮﺓ ﺃﻭ ﹰ ﺍ ﺟﻴﺪ ﻣﺮﺗﺒﺔ ﻏﻴﺮ ﺍﻟﺼﻌﺎﻡ ﺃﺩﻭﺍﺕ ﻣﺴﺪﻭﺩﺓ ﺍﳌﻴﺎﻩ ﺭﺵ ﻓﺘﺤﺎﺕ ﺑﺄﺩﻭﺍﺕ ﻣﻘﻴﺪﺓ ﺍﳌﻴﺎﻩ ﺭﺵ ﺃﺫﺭﻉ ﺣﺮﻛﺔ ﺍ...

Страница 53: ...ﻭ ﺍﻟﻐﺸﻴﻞ ﻙ ﹼ ﺮ ﻣﺤ ﻳﻌﻤﻞ ﻻ ﻙ ﹼ ﺮ ﺍﶈ ﺍﻟﺘﺠﻔﻴﻒ ﻙ ﹼ ﺮ ﻣﺤ ﺍﳌﻴﺎﻩ ﺗﺰﻳﻮﺩ ﻳﺘﻢ ﻻ ﺍﳌﻴﺎﻩ ﺻﻨﺒﻮﺭ ﻓﺘﺢ ﻳﺘﻢ ﻟﻢ ﹰ ﺍ ﺟﻴﺪ ﻳﻌﻤﻞ ﻻ ﺍﳌﺎﺀ ﻣﺆﺷﺮ ﺍﳌﺎﺀ ﺗﺰﻭﻳﺪ ﺧﺮﻃﻮﻡ ﻣﻦ ﺗﺴﺮﺏ ﻳﻮﺟﺪ ﺍﳌﺎﺀ ﻓﻲ ﺏ ﹼ ﺮ ﺗﺴ ﺑﺴﺒﺐ ﺍﳉﻬﺎﺯ ﻓﻲ ﺗﻠﻒ ﺍﻻﻋﺘﻴﺎﺩﻱ ﺍﻟﺘﺰﻭﻳﺪ ﻳﻔﻮﻕ ﺍﳌﺎﺀ ﺗﺰﻭﻳﺪ ﺍﳌﺎﺀ ﺇﺩﺧﺎﻝ ﺎﻡ ﹼ ﺻﻤ ﻓﻲ ﻣﺸﻜﻠﺔ ﻳﻮﺟﺪ ﺗﺎﻟﻔﺔ ﺍﳌﺎﺀ ﺗﺴﺨﲔ ﺩﺍﺭﺓ ﺍﻟﺘﺰﻭﻳﺪ ﻳﺘﻢ ﺃﻭ ﺍﳊﺮﺍﺭﺓ ﻣﻴﺰﺍﻥ ﻓﻲ ﻣﺸﻜﻠﺔ ﺍﳊﺮﺍﺭﺓ ﻣﺮﺗﻔﻊ ﲟﺎﺀ ﻙ ﹼ ﺮ ﺍﶈ ﻓﻲ ﻣﺸﻜﻠﺔ ﻙ ﹼ ﺮ ﺍﶈ ﻓﻲ ﻣﺸﻜﻠﺔ ﺍﳋﺮﻃﻮﻡ ﺑﺘﺴﻮﻳﺔ ﻗﻢ ﺍﳌﺼﺎﻓﻲ ﻒ ﹼ ﻧﻈ ﺇﺗﺼﻞ ﳌﺸﻜﻠﺔ...

Страница 54: ...ﻠﺼﻖ ﻋﻠﻰ ﺍﻟﻄﺎﻗﺔ ﺩ ﹼ ﻭ ﻣﺰ ﺍﳌﻌﺪﻝ ﻣﻠﺼﻖ ﻋﻠﻰ ﺍﻟﻄﺎﻗﺔ ﺍﺳﺘﻬﻼﻙ ﺑﺎﺭ ﻛﻴﻠﻮ ٨٠٠ ٥٠ ﺍﳌﺎﺀ ﺗﺰﻭﻳﺪ ﻇﻐﻂ D1420W L M T B C D A F D1421W L M T B C D A F ﻣﻠﻢ ٥٩٨ D1420W L M T B C D A B D1421W L M T B C D A B ﻣﻠﻢ ٥٦٧ ﻣﻠﻢ ٨١٩ ﻣﻠﻢ ٦٠٠ ﻣﻠﻢ ٥٩٨ ﻣﻠﻢ ٥٦٧ ﻣﻠﻢ ٨١٩ D1420W L M T B C D A U D1421W L M T B C D A U ...

Отзывы: