background image

23

ENGLISH

REMOTE CONTROL

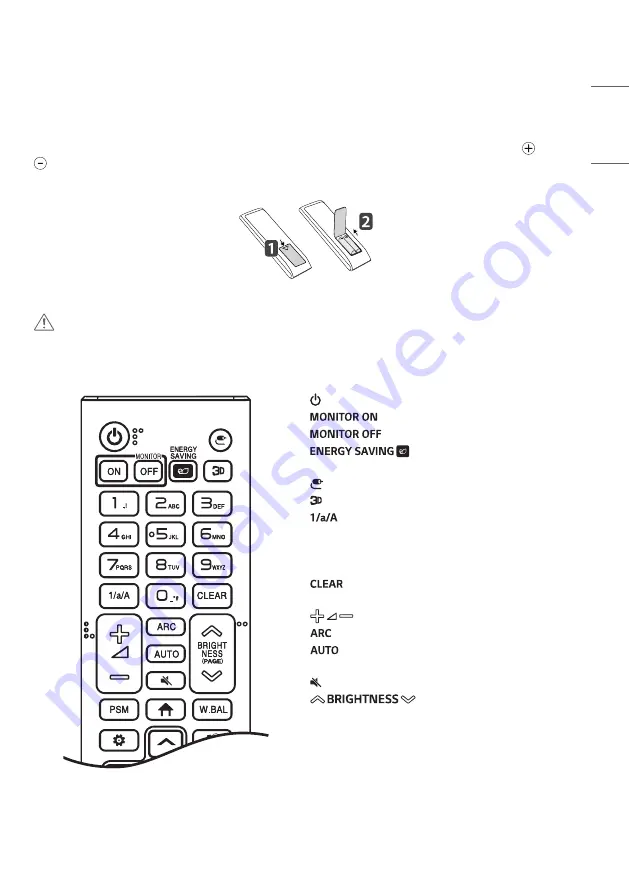
The descriptions in this manual are based on the buttons on the remote control. Please read this manual carefully to 

use the monitor correctly. To install batteries, open the battery cover, place batteries (1.5 V AAA) matching 

 and 

 terminals to the labels inside the compartment, and close the battery cover. To remove the batteries, perform the 

installation actions in reverse. The illustrations may differ from the actual accessories.

 CAUTION


Do not mix old and new batteries, as this may damage the remote control.


Be sure to point the remote control toward the remote control sensor on the monitor.


Some features of the remote control may not be supported in certain models.

hri^[`X\Z_[


(POWER)

 Turns the monitor on or off.

 Turns the monitor on.

 Turns the monitor off.

   Reduces power consumption by 

adjusting peak screen brightness.


(INPUT)

 Selects the input mode.

 The function is not supported in this model.

 Toggles between numerical and alphabetical.

Number and Alphabet buttons

Enters numerical or alphabetical characters depending 

upon the setting.

 Deletes the entered numerical or alphabetical 

character.

     (Volume Up/Down Button)

 Adjusts the volume.

 Selects the Aspect Ratio mode.

 Automatically adjusts picture position and 

minimizes image instability (available for RGB input only).


(MUTE)

 Mutes all sounds.


 Adjusts the brightness of the 

display. 

PAGE

 The function is not supported in this model.

Содержание 55TC3CG

Страница 1: ...MANUAL LG Digital Signage MONITOR SIGNAGE Please read this manual carefully before operating your set and retain it for future reference www lg com Copyright 2020 LG Electronics Inc All Rights Reserved 55TC3CG ...

Страница 2: ...g the Remote control 12 Precautions for Experiencing Image Retention 13 Product Disposal 13 ASSEMBLY AND PREPARATION 14 Optional Accessories 15 Parts and Buttons 16 Connecting the Speakers 17 Connecting the IR Sensor 19 Portrait Layout 19 Installing on a Wall 21 REMOTE CONTROL 23 MAKING CONNECTIONS 25 Connecting to a PC 25 External Device Connection 25 Using the Input List 26 Connecting Multiple M...

Страница 3: ...recautions are intended to prevent unexpected danger or harm by helping the user to use the product safely and for its intended purpose WARNING If you ignore the warning message you may be seriously injured or there is a possibility of accident or death CAUTION If you ignore the caution message you may be slightly injured or the product may be damaged WARNING Indoor Use Only ...

Страница 4: ...rmly so it cannot come loose Poor connection may cause a fire or electric shock In the presence of thunder and lightning never touch the power cord and signal cable because it can be very dangerous It can cause electric shock Be careful not to step or place heavy objects electronic appliances clothing etc on the power cord or AC adapter Additionally do not bend or pull out the power cord or AC ada...

Страница 5: ...he AC power source even if the unit is turned off Power consumption will be 0 only when the power plug is unplugged Use the appliance coupler as the disconnect device CAUTION If the outlet pins of the power plug or AC adapter is covered with dust be sure to wipe them and keep them clean Overheating due to layers of dust may cause a fire or electric shock If the outlet pins of the power plug or AC ...

Страница 6: ... may be electrocuted or the product can be damaged Use the correct number of people according to the weight of the product Under 25 Kg 55 1 lbs per person use lifting equipment when exceeding 100 Kg 220 4 lbs If use the damaged product again contact the service center because it can cause electric shock or fire Do not hold it upside down while holding only the stand It is for stand supported model...

Страница 7: ...unction may occur Do not install this product by yourself as you may injure yourself or cause damage to the product Please contact service engineer authorized by service center Do not install this product on a wall if it could be exposed to oil or oil mist This may damage the product and cause it to fall Do not leave the power or signal cable etc on the pathway This could cause a trip or fall whic...

Страница 8: ...e to internal heat buildup Do not cover the product with a tablecloth or a curtain or other materials e g plastic while plugged in Do not block the ventilation hole of the product The product can be deformed or fire can break out due to overheating inside the product Do not install the product in an area with poor ventilation e g on a bookshelf in a closet or outside and avoid placing on cushions ...

Страница 9: ...tric shock may occur or damage to the screen if its scratched When you want to clean the front frame spray water onto a soft cloth 2 to 4 times and wipe in one direction only Too much moisture may cause staining CAUTION When cleaning the product or the screen unplug the power cord and wipe it gently with a soft cloth Do not spray water or other liquids directly on the product Especially do not cle...

Страница 10: ... or impact on the product or screen It can cause injury to human problem to product and damage the screen If you can smell smoke or other odors or hear a strange sound unplug the power cord and contact the service center If you continue to use the product without taking proper measures it may cause electrical shock or fire Do not attempt to disassemble repair or modify the product yourself Please ...

Страница 11: ...uct Also do not throw toys or objects to the product or screen It can cause injury to human problem to product and damage the screen All the power sources must be disconnected by removing the power cables to remove all power from the unit CAUTION This panel is an advanced product that contains millions of pixels You may occasionally see pixel spots when viewing the screen Since these deactivated p...

Страница 12: ... Used batteries which include rechargeable batteries should be recycled separately from waste Please dispose used batteries and rechargeable batteries at a local recycling center or a retail store that handles batteries CAUTION Do not short circuit and disassemble of batteries It may cause electrical shock or fire The remote control may not function properly in sunlight or under a strong lamp Move...

Страница 13: ...tention Most third party products have the same issue The resulting damage is not covered by the product warranty Use a screen saver when using the monitor for a prolonged period of time Product Disposal Do not dispose of this product with general household waste Disposal of this product must be carried out in accordance to the regulations of your local authority ...

Страница 14: ...our product may vary depending on the model or region Product specifications or contents in this manual may be changed without prior notice due to upgrade of product functions SuperSign Software Manual Downloading from the LG Electronics website Visit the LG Electronics website http partner lge com and download the latest software for your model The warranty will not cover any damage caused by usi...

Страница 15: ... 0 3 inches Screws Diameter 3 0 mm x Pitch 1 27 mm x Length 8 0 mm Diameter 0 1 inches x Pitch 0 05 inches x Length 0 3 inches Card Easy Setup Guide Power Cord Connecting Cable Speaker kit SP 5200 Cable holder Cable Tie Screws Diameter 4 0 mm x Length 8 mm Diameter 0 15 inches x Length 0 3 inches including spring washer NOTE Optional accessories are available for some models If necessary please pu...

Страница 16: ... may be different according to the model Buttons Adjusts up and down Moves left and right Displays the current signal and mode Accesses the main menus or saves your input and exits the menus Change the input signal Turns the power on or off ...

Страница 17: ...nly The image may be different according to the model 1 Connect an input signal cable before installing the speakers 2 Mount the speakers by using screws as shown below Make sure the power cable is disconnected before making a connection Landscape Portrait ...

Страница 18: ...e speaker cable After installing your speakers organize the speaker cables Landscape Portrait NOTE Please turn off the power before removing the cable Connecting or removing the speaker cable while turned on may result in no sound ...

Страница 19: ...eceiver is made with a magnet Attach the magnetic sheet to the desired position on the product It is recommended to attach it to the location illustrated in the figure below Basic installation Portrait Layout When installing in a portrait layout rotate the monitor counterclockwise 90 degrees when facing the screen ...

Страница 20: ...stem refer to the manual provided with the Kensington security system or visit http www kensington com Connect the Kensington security system cable between the monitor and a table NOTE The Kensington security system is optional You can obtain additional accessories from most electronics retail stores The illustration shows a general example of installation and may look different from the actual pr...

Страница 21: ...e monitor Make sure that the wall mounting bracket is securely fixed to the monitor and to the wall 1 Use only screws and wall mounting brackets that conform to VESA standards 2 Screws which are longer than standard length may damage the inside of the monitor 3 A non VESA standard screw may damage the product and cause the monitor to fall LG Electronics is not liable for any accidents related to t...

Страница 22: ...age the monitor and void your warranty Use only screws and wall mounting brackets that meet the VESA standard Any damage or injuries caused by misuse or use of improper accessories are not covered by the warranty NOTE The wall mount kit includes the installation guide and all necessary parts The wall mounting bracket is optional You can obtain additional accessories from your local dealer The leng...

Страница 23: ...rol sensor on the monitor Some features of the remote control may not be supported in certain models POWER Turns the monitor on or off Turns the monitor on Turns the monitor off Reduces power consumption by adjusting peak screen brightness INPUT Selects the input mode The function is not supported in this model Toggles between numerical and alphabetical Number and Alphabet buttons Enters numerical...

Страница 24: ...our input BACK Allows you to move back one step in the user interaction function Quit all OSD tasks and applications Allows you to control various multimedia devices to enjoy multimedia simply by using the remote control through the SimpLink menu Selects the TILE Mode When the Picture ID number matches the Set ID number you can control whichever monitor you want in multi display format USB Menu Co...

Страница 25: ...C Some of the cables are not provided This monitor supports the feature a feature that enables a PC to recognize devices attached by the user without device configuration or user intervention when powering up External Device Connection Connect a HD receiver DVD or VCR player to the monitor and select an appropriate input mode Some of the cables are not provided For the best picture and sound quali...

Страница 26: ...PCs require you to manually change the default audio output to HDMI If you want to use HDMI PC mode you must set your PC DTV to PC mode You may experience compatibility issues if you use HDMI PC mode Make sure the power cable is disconnected If you connect a gaming device to the monitor use the cable provided with the gaming device It is recommended to use the speakers that are provided as optiona...

Страница 27: ...P OUT DP IN DP OUT HDMI IN DP OUT DP IN DP OUT DP IN RS 232C IN RS 232C OUT RS 232C IN RS 232C OUT RS 232C IN RS 232C OUT NOTE In general up to 100 monitors can be connected via the DP OUT port at the recommended resolution if the signal is stable and there is no cable loss To connect more than 100 monitors it is recommended to use a distributor If the signal cable connecting the product to your P...

Страница 28: ...nd the product or the cable connection status is unstable Check the signal cable Access the input menu to check the input signal The signal from the PC Graphics card is out of the vertical or horizontal frequency range of the product Adjust the frequency range by referring to the specifications in this manual The position of the screen is incorrect Check if the graphics card resolution and frequen...

Страница 29: ...log signal Press the button in the remote control to automatically select the optimal screen status that fits into the current mode If the adjustment is not satisfactory adjust the display settings manually in the OSD menu Issues Related to Screen Color Screen has poor color resolution 16 colors Use PC settings to set the color to 24 bits True Color or above Screen color is unstable or mono colore...

Страница 30: ...izer sound Sound is too low Adjust the volume of the product or external device For some models you will need to purchase external speakers separately since they do not have speakers built in Other Issues The power suddenly turned off Check if the auto off function is activated on the settings related time Power source has not being supplied properly See if the product power cord is connected prop...

Страница 31: ... fingertip If holding the tip of the touch pen or near the tip of the touch pen If using the touch pen while pressing it with strong force on the screen The location of a touch does not correspond to the touch coordinates This may occur when the touch screen is not calibrated properly Change your tablet PC settings A touch is applied to a monitor other than the one I intended This may occur if the...

Страница 32: ...ains visible This phenomenon is referred to as image sticking Image sticking does not occur when using constantly changing images but may occur when using a fixed image for an extended period of time Therefore it is recommended that you use the instructions below to decrease the likelihood of image sticking occurring when using a fixed image It is recommended that you change the screen at least on...

Страница 33: ...30 to 83 kHz Vertical frequency HDMI1 2 DisplayPort OPS PC 58 Hz to 62 Hz Synchronization Separate Sync Digital Input output ports LAN HDMI IN1 HDMI IN 2 DP IN OUT RS 232C IN OUT USB 2 0 IN IR LIGHT SENSOR AUDIO OUT TOUCH USB SPEAKER OUT OPS Embedded battery Applied Power Rated power AC 100 240 V 50 60 Hz 1 7 A Power consumption On Mode 105 W Typ Sleep Mode 0 5 W Standby Mode 0 5 W Audio RMS Audio...

Страница 34: ...5 60 1080 50i 28 1 50 1080 60i 33 75 60 1080 50p 56 25 50 1080 60p 67 432 59 94 1080 60p 67 5 60 2160 30p 67 5 30 HDMI1 2 DisplayPort OPS 2160 50p 112 5 50 HDMI1 2 DisplayPort 2160 60p 135 60 HDMI1 2 DisplayPort NOTE Horizontal frequency The horizontal interval is the time taken to display one horizontal line When 1 is divided by the horizontal interval the number of horizontal lines displayed eve...

Страница 35: ...actured under license from Dolby Laboratories Dolby Dolby Vision Dolby Audio Dolby Atmos and the double D symbol are trademarks of Dolby Laboratories For DTS patents see http patents dts com Manufactured under license from DTS Licensing Limited DTS the Symbol DTS and the Symbol together DTS 2 0 Channel DTS 2 0 Digital Out DTS HD and DTS Virtual X are registered trademarks or trademarks of DTS Inc ...

Страница 36: ... to ENERGYSTAR gov for more information on the ENERGY STAR program Temporary noise is normal when powering ON or OFF this device The model and serial number of the product are located on the back and on one side of the product Record them below in case you ever need service Supplier s Declaration of Conformity Trade Name LG Responsible Party LG Electronics USA Inc Address 111 Sylvan Avenue North B...

Страница 37: ...Please read this manual carefully before operation and retain it for future reference webOS 4 1 www lg com USER MANUAL LG Digital Signage MONITOR SIGNAGE ...

Страница 38: ...ting Data Cloning Sync Mode Signage 365 Care Multi Screen Leveler Tool General 13 Language System Information Set ID Time Setting Power Network Safety Mode Advanced Setting Display 25 Picture Mode Aspect Ratio Rotation Advanced Setting Video Output Resolution Sound 31 Sound Mode Sound Out Audio Out AV Sync Adjustment Digital Audio Input Admin 34 Lock Mode Change Password Enterprise Settings Factor...

Страница 39: ...ce lge com This offer is valid for a period of three years after our last shipment of this product This offer is valid to anyone in receipt of this information CONTENT MANAGER 36 Web Login 36 Content Manager 36 Player Scheduler Template Group Manager 2 0 43 Gallery Mode 46 ScreenShare 47 LG Presenter 48 Connect Screen Share Handover MANAGEMENT TOOLS 51 Admin 51 Picture ID 52 TO CONTROL AN EXTERNAL...

Страница 40: ... screen Dashboard This feature displays key information about your Signage monitor in the center of the home screen In the Dashboard you can manually change settings by selecting the corresponding items Manual Download Downloads a manual by scanning a QR code NOTE If the dashboard is locked the focus does not move Some QR code apps on mobile devices may not work You can access the page to download...

Страница 41: ...lls by changing screen scanning method White Balance Configure white balance settings White Pattern R G B Gain and Luminance Reset Reset to initial settings Reboot to Apply Reboot the set to configure a changed Frame Control Scan Inversion value NOTE When Tile Mode is enabled automatically set Frame Control for odd numbered rows and Scan Inversion for even numbered rows On Off Scheduler Ez Setting...

Страница 42: ...le in the internal external memory Preview You can preview the uploaded file SuperSign Contents When the automatic input switches this feature will play the file s distributed in SuperSign CMS SI App Play via URL Run SI App or Play via URL when automatic input switch occurs SI App SI App behavior depends on the settings from SI SERVER SETTING menu in Ez Setting Play via URL Play via URL behavior d...

Страница 43: ...signals for more than 10 seconds an email is sent 5 Schedule Play Status An email is sent if content cannot be played between the scheduled start time and end time in either Content Management Schedule status or SuperSign Content status However this does not apply when terminated using the remote control 6 Fail Over Status An email is sent if input switching occurred due to an error Excludes input...

Страница 44: ...Setting is not set to Set Automatically website navigation may be difficult Check General Time Setting Set Automatically Setting Data Cloning Ez Setting Settings Data Cloning This feature is used to copy and import the settings of the device to other devices Export Setting Data Export the settings of the device to another device Import Setting Data Import the settings of another device into the de...

Страница 45: ... displayed and you can continue to install the Signage 365 Care solution If the account number is not registered Unknown is displayed as the account name and you cannot continue to install the solution Enable Disable Sets whether to Enable Disable the Signage 365 Care solution Account Displays user s currently connected account number and name Version Displays the version of the Signage 365 Care s...

Страница 46: ... you enter multi screen mode without having set any screen layout the screen layout selection menu appears When the screen layout selection menu is not displayed on the screen go to the screen layout menu bar by pressing the up arrow key on your remote control and select your desired screen layout If you want to close the screen layout menu press the back key Closing Screen Layout Menu From the sc...

Страница 47: ...Split Screens Press the button on the upper right of each split screen select Video File and then select a storage device to view the list of videos in the selected device Next select your desired video from the list to play it NOTE Videos created with HEVC MPEG 2 H 264 or VP9 codecs can be played on split screens When using PIP mode the following combinations cannot be used Main Sub HEVC HEVC H 2...

Страница 48: ...of the product The leveler and angle indicator on the left side of the screen show the degree of left or right tilt The leveler and angle indicator on the right side of the screen show the degree of front or back tilt NOTE When the product is tilted more than 5 degrees in any direction a flashing arrow indicates the direction to adjust the product to make it level The reference point of the horizo...

Страница 49: ...on You can control each product separately by using the Set ID you assigned to each product Auto Set ID Automatically assigns a unique Set ID number to each product when several products are connected for display Reset Set ID Reset the Set ID of the product to 1 Time Setting General Time Setting This feature enables you to view and change the time and date on the device Set Automatically Set Time ...

Страница 50: ...is feature to On the product turns off if there is no input from the remote control for 4 hours If you set this feature to Off the 4 Hours Off feature is disabled It is recommended that you set this feature to Off if you intend to use the product for long periods of time as the feature turns the power of the product off DPM Set the Display Power Management DPM mode If this feature is not set to Of...

Страница 51: ...ust be input from the remote control s Power or Input button or the monitor s On button Power On Delay 0 250 This feature prevents overload by implementing a power on delay when multiple monitor sets turn on You can set the delay interval in the range of 0 to 250 seconds Power On Status Select the operating status of the monitor when the main power has turned on You can choose from among PWR Power...

Страница 52: ...your Internet provider or consult your router manual Wi Fi Connection If you have set your monitor up for a wireless network you can view and connect to available wireless Internet networks Add a Hidden Wireless Network You can add a wireless network by manually typing in its name Connect via WPS PBC Press the button on the wireless router that supports PBC to easily connect to the router Connect ...

Страница 53: ...ction Security Key Security key The security key you enter to connect to the desired wireless network Connected Devices Count Number of connected devices Shows the number of devices currently connected to your Signage device via a Wi Fi connection Up to 10 devices are supported UPnP Open and block UDP port 1900 which is used for UPnP The default setting is On Setting this feature to Off blocks UDP...

Страница 54: ...tion You may experience undesired results if the network connection speed does not meet the requirements of the content being accessed Some INTERNET connection operations may not be possible due to certain restrictions set by the Internet service provider ISP supplying your Internet connection Any fees charged by an ISP including without limitation connection charges are your responsibility NOTE I...

Страница 55: ...r that supports wireless connection is necessary the wireless connection function of the corresponding router must also be activated Ask the router manufacturer whether the router supports wireless connection To connect to a wireless router verify the SSID and security settings of the wireless router Please refer to the user guide of the corresponding router regarding SSID and security settings of...

Страница 56: ...ction for the amount of time set in duration if the still image is maintained for the period set in standby On with moving detection It only applies in the Orbiter mode When the still image remains for the StandBy time the afterimage prevention function works for the Duration time On without moving detection It only applies in the Orbiter mode When you tap the DONE button the afterimage prevention...

Страница 57: ...te background image This option is only available when User Image is selected Action Cycle You can select from among 1 10 min 20 min 30 min 60 min 90 min 120 min 180 min 240 min This option is only available when Orbiter is selected Orbiter The screen location moves at every set interval User Video Download In order to download a video there must be a video file in the ISM folder on your USB stora...

Страница 58: ...the prefix of the URL URL Suffix URL Suffix Set the suffix of the URL Play via URL URL Enter the part of the URL that excludes the prefix and suffix URL string length is limited to 15 characters Check button The button used to complete and apply the Beacon settings NOTE Some models do not support background screening services in iOS A reboot is recommended for the settings to be applied properly T...

Страница 59: ...ding on the model it can be displayed as PC OPS Control Depending on the supported interface the sub menu of Control Interface Selection may be different The PC products that support the power control are MP500 MP700 and you have to purchase them separately if necessary If you change Control Interface Selection the RS232C SYNC feature of Sync Mode may be restricted Background Image This feature en...

Страница 60: ...default port number is 41794 IP ID 3 254 This menu sets a unique ID for synchronizing with the application LED Controller Allows a specific LED display manufacturer to remotely control some features of the linked display USB2 to HDBaseT This function transfers the data received from the USB2 terminal of the display to HDBaseT On Transfer the data of the device connected to USB2 to the HDBaseT equi...

Страница 61: ...ation Allow an expert or anyone who loves picture quality to manually tune to the best picture quality NOTE The type of Picture Mode you can select may vary depending on the model or input signal Expert is an option that allows a picture quality expert to fine tune the picture quality using a specific image Thus it may not be effective for a normal picture HDR This feature enables you to choose th...

Страница 62: ...or temperature the warmer the colors on the screen will feel Advanced Controls Expert Controls Customize the advanced options Dynamic Contrast Optimize the difference between the light and dark parts of the screen according to the brightness of the image Super Resolution Sharpen the areas of the screen that are blurry or barely distinguishable Color Gamut Select the range of colors available Dynam...

Страница 63: ...g brightness levels and lessening blurriness based on the displayed image LED Local Dimming Make the light areas of the screen lighter and the dark areas darker for maximum contrast Setting this feature to Off may increase the monitor s power consumption TruMotion Reduce image shaking and image sticking that can occur with moving images If you set the External Input Rotation this feature is unavai...

Страница 64: ...hen the screen rotation is enabled the PIP mode of the multi screen is unavailable NOTE Depending on the model the automatic screen rotation feature may not be supported External Input Rotation This feature rotates the screen clockwise You can set this feature to Off 90 180 270 Setting External Input Rotation to On 90 or 270 resizes the video to be Full Wide for the ARC If External Input Rotation ...

Страница 65: ... Saving Automatically adjust the brightness of the screen according to the brightness of the picture to save energy On Enable the Smart Energy Saving feature Off Disable the Smart Energy Saving feature Brightness Control Adjust the brightness of the screen to save energy Auto Automatically adjust the brightness of the screen according to ambient light Off Disable energy saving Minimum Medium Maxim...

Страница 66: ...lor is set to the default value On Enables the Color Calibration feature The screen color is set to match the actual color temperature NOTE The screen color may change if you enable or disable the feature If the Picture Mode is Calibration this feature will not be available LED Local Dimming Make the light areas of the screen lighter and the dark areas darker for maximum contrast NOTE Return to de...

Страница 67: ...es Cinema Optimize sound for watching movies Clear Voice III Enhance voices so they can be heard more clearly Sports Optimize sound for watching sports Music Optimize sound for listening to music Game Optimize sound for playing video games Balance Balance Adjust the output volume for the left speaker and the right speaker Equalizer Equalizer Manually adjust sound by using the equalizer Reset Reset...

Страница 68: ...or digital audio output Audio Input Digital Audio Output Auto Dolby Digital Plus Dolby Digital Dolby Digital Dolby Digital AAC Media Dolby Digital AAC Dolby Digital HE AAC Dolby Digital DTS HD DTS Express DTS DTS MPEG PCM PCM All PCM NOTE Some recently connected devices may automatically attempt to reconnect to the Signage monitor when it is turned on It is recommended that you set LG audio device...

Страница 69: ... such as those connected to the digital audio output port LG audio equipment or headphones The larger the number is the slower the voice output is than the default value Internal Speaker 0 15 Adjust the sync of sound from the internal speakers The larger the number is the slower the voice output is than the default value Optical adjusts sync for the sound from digital optical audio output A greate...

Страница 70: ...cannot use your remote control However Power On feature is available Press and hold the Settings key for at least 10 seconds and enter password to access the settings menu in IR Operation Lock Local Key Lock This feature enables you to configure the Local Key Operation Lock feature so that settings or content cannot be changed If you set this feature to Off Normal you can use the local keys on the...

Страница 71: ...e has been entered the monitor set gets reset thereby applying the corresponding enterprise settings This feature does not get activated if a code has already been entered Factory Reset Initializes all settings in Setting and files from the internal storage The exceptions are RGB gain value of Calibration mode Video Wall Tile Mode Tile Mode Setting Natural Mode Frame Control Scan Inversion and Ser...

Страница 72: ...you to play manage contents of video image template SuperSign and playlist in an integrated way The OLED models do not support the playback and management of image content and template content Continuous Play 1 Select your desired type of content from the tab on the left and then select your desired content 2 Click Play in the upper right hand corner of the screen and enjoy the content you have se...

Страница 73: ...ng a playlist you cannot include characters that cannot be used in file names on Windows such as and in the names of the files in the playlist In addition if the playlist contains content files whose names include such characters you cannot move or copy the playlist 1 Select the Playlist tap from the tab on the left and click Create Playlist in the upper right hand of the screen 2 Select the conte...

Страница 74: ...nt files whose names include such characters you cannot move or copy the playlist 5 Watch the playlist or external input you selected play back at its scheduled time Importing a Schedule 1 Click Import in the upper right hand corner of the screen 2 Select the external storage device from which you wish to import a schedule 3 Select the schedule you wish to import to your monitor You can only choos...

Страница 75: ...ime overlaps the previously created schedule is deleted When a schedule that has not been set repeatedly is completed the schedule is automatically deleted Schedule does not work while Scheduling list app is running Template Template The Content Manager app s editor feature enables you to add your desired templates 1 Select the template of your desired format You can choose between Landscape mode ...

Страница 76: ...Layer III MP3 3gp 3g2 Video H 264 AVC MPEG 4 Audio AAC AMR NB AMR WB mkv Video MPEG 2 MPEG 4 H 264 AVC VP8 VP9 HEVC Audio Dolby Digital Dolby Digital Plus AAC PCM DTS MPEG 1 Layer I II MPEG 1 Layer III MP3 ts trp tp mts Video H 264 AVC MPEG 2 HEVC Audio MPEG 1 Layer I II MPEG 1 Layer III MP3 Dolby Digital Dolby Digital Plus AAC PCM mpg mpeg dat Video MPEG 1 MPEG 2 Audio MPEG 1 Layer I II MPEG 1 La...

Страница 77: ...ge device which was artificially maneuvered on the PC The device may cause the product to malfunction or fail to be played Remember to only use USB storage devices that store normal music image and or movie files Storage devices formatted with utility programs that are not supported by Windows may not be recognized Please connect power to a USB storage device over 0 5 A which requires an external ...

Страница 78: ...B external hard disk and 32 GB or less for USB memory Any device with more than the recommended capacity may not work properly If a USB external hard disk with an energy saving feature does not work turn the hard disk off and on again to make it work properly USB storage devices USB 2 0 or below are also supported However they may not work properly in the videos list A maximum of 999 folders or fi...

Страница 79: ...ster mode Slave Play Schedule and Playlists distributed in Master mode Remove monitor sets for their groups Monitor sets that have been added to a group are automatically switched to Slave mode Conversely when a monitor set has been deleted from a group it is automatically initialized and switched to Master mode If a new Slave has been added to an existing group or if the Data Cloning or the distr...

Страница 80: ... in the group that are not Data Cloning or content synchronized Data Cloning or Synchronıze button will be activated 6 You can re copy the master device s setting data to the group by using Data Cloning 7 You can re distribute the content distributed to the group by using Synchronıze Deleting a Group 1 Click Delete Group 2 Select the group you wish to delete and click Delete 3 Check that the group...

Страница 81: ... URL provided CAUTION You can create up to 25 groups You can add up to 12 slave devices to a group You can distribute the schedules stored on external devices after executing Content Manager s import operation Make sure to delete all schedules stored on the slave sets before distributing any schedules A list of devices you can add to your desired group appears only when the following conditions ha...

Страница 82: ...e preview image that appears at the bottom of the screen to play You can also go to MY THEMES at the top right of the screen and set the order of the themes to play Within the theme player you can go to the theme selection list through GO TO LIST and turn on or off the background music through THEME SOUND A total of 5 themes Sunny Day Rainy Day Art Gallery Art Photos and Colorful Spring are availa...

Страница 83: ...t according to the instructions provided by the guide that can be accessed through the CONNECTION GUIDE button in the upper right 2 Once the connection is established Screen Share between the user device and the monitor is enabled NOTE For the information on how to use Intel WiDi visit PC laptop manufacturer webpage This feature only works properly with WiDi 3 5 or later versions This feature only...

Страница 84: ...o connect your Signage device to the Client Screen Share Share the PC screen of the connected Client with your Signage device Hand over If a Client is already connected and another Client needs to share screen you can request for a hand over to the connected Client to get permission to share screen Settings You can see the information of the Client or change the language used by the Client NOTE Th...

Страница 85: ...shown on Signage and click Connect 5 Enter the PIN code you see on your Signage device into the PIN code field on the Client 1 2 No Item Description 1 Auto search Automatically search Signage in the same network 2 Manual search Type the IP address and name manually or select the device you want to connect in the connection list CAUTION Signage and the PC need to be in the network that they can be ...

Страница 86: ...running PC2 The PC you want to connect to the Signage device connected to PC1 On PC2 1 Run Client program to connect Signage that PC1 is connected to On PC1 1 When the hand over request pop up appears on PC2 select whether to approve or deny the request 2 If you approve the request for hand over the Signage device will be disconnected and the Client on PC2 will be connected to the Signage device 3...

Страница 87: ...ing Enable disable Set Automatically feature and displays changes the time set for the product Network Set the name and IP address of your Signage monitor Tile Mode Display the tile mode settings of the product Fail Over Turns the Fail Over feature on or off and sets related items Play via URL Turn Play via URL on or off and set URLs S W Update Update the firmware of the product Charts Output the ...

Страница 88: ...RS 232C OUT RS 232C IN RS 232C OUT RS 232C IN RS 232C OUT RS 232C IN 2 Press the red Picture ID On button on the remote control 3 Make sure that the Picture ID you set is identical to the Set ID of the monitory you wish to control A set with a Set ID that is different from the Picture ID cannot be controlled by IR signals NOTE If Picture ID has been set to 2 only the upper right monitor which has ...

Страница 89: ...splayed Pop up message displayed Only one of the states is shown Screen of the product 2 Equipped with OPS External input configured for OPS All states are shown OPS 3 Connected to a PC with a USB C cable External input configured for USB C All states are shown PC connected with USB C 4 External input configured except for OPS USB C PC connected to the front of the product with a touch cable All s...

Страница 90: ...get Set the optimal color value of the installed set as the target Please set the target to 3 000K in the broadcasting station environment Reference RGB Saves and resets the currently set Manual Calibration value during Smart Calibration 3 With START SMART CALIBRATION you can correct the color brightness 4 If you set the Schedule Setting menu calibration is performed automatically on a regular bas...

Страница 91: ... can manually adjust the color of the selected location Screen Split Set the manual adjustment area Calibration Position Select the manual adjustment location Screen Split 4 Calibration Position 3 Screen Split 9 Calibration Position 5 ...

Страница 92: ...ton 13 Number Key 3 Remote control button 14 Number Key 4 Remote control button 15 Number Key 5 Remote control button 16 Number Key 6 Remote control button 17 Number Key 7 Remote control button 18 Number Key 8 Remote control button 19 Number Key 9 Remote control button 02 Vol Remote control button 03 Vol Remote control button E0 Brightness Page Up Remote control button E1 Brightness Page Down Remo...

Страница 93: ...l button 44 OK Remote control button 28 BACK Remote control button 7B Tile Remote control button 5B Exit Remote control button 72 Picture ID On red Remote control button 71 Picture ID Off green Remote control button 63 Yellow Remote control button 61 Blue Remote control button 5F W Bal Remote control button 3F S Menu Remote control button 7C Home Remote control button 97 Swap Remote control button...

Страница 94: ... differ according to the model Connect the RS 232C cable as shown in the picture The RS 232C protocol is used for communication between the PC and product You can turn the product on off select an input source and adjust the OSD menu from your PC Monitor 4 Monitor 3 Monitor 2 Monitor 1 PC RS 232C IN RS 232C OUT RS 232C IN RS 232C OUT RS 232C IN RS 232C OUT RS 232C IN RS 232C OUT 4P Cable sold sepa...

Страница 95: ... chain cannot be used Be sure to only use the provided gender to connect properly When you have daisy chained multiple Signage products to control them simultaneously if you attempt to turn on off the master device in a continuous manner some products may not turn on In this case you can turn those monitors on by pressing the MONITOR ON button not the Power button ID BACK TILE ON OFF EXIT Power MO...

Страница 96: ...10 Tint k j 00 to 64 11 Color Temperature x u 70 to D2 12 Balance k t 00 to 64 13 Sound Mode d y See Sound Mode 14 Mute on k e 00 to 01 15 Volume Control k f 00 to 64 16 Current Time 1 year month day f a See Current Time 1 17 Current Time 2 hour minute second f x See Current Time 2 18 No Signal Power Off 15 Min f g 00 to 01 19 No IR Power Off 4hour m n 00 to 01 20 Language f i See Language 21 Defa...

Страница 97: ... Tile Mode d d 00 to FF 36 Check Tile Mode d z FF 37 Tile ID d i See Tile ID 38 Natural Mode d j 00 to 01 39 DPM f j See DPM 40 Remote Control Local Key Lock k m 00 to 01 41 Power On Delay f h 00 to FA 42 Select Fail Over Mode m i 00 to 02 43 Select Fail Over Input m j See Select Fail Over Input 44 Remote Control Key Lock t p 00 to 02 45 Local Key Lock t o 00 to 02 46 Status Check s v See Status C...

Страница 98: ...61 Multi Screen Mode Input x c See Multi screen Mode Input 62 Aspect Ratio Multi screen x d See Aspect Ratio Multi screen 63 Screen Off Multi screen x e See Screen Off Multi screen 64 Screen Off Always s n 0d 00 to 01 65 Stop Video k x 00 to 01 66 Wireless Wake On LAN s n 90 00 to 01 67 OSD Lock k l 00 to 01 68 HDMI IT Content s n 99 00 to 01 69 Holiday Setting s n 9b See Holiday Setting 70 UPnP s...

Страница 99: ...re d w FF 85 Apply to all inputs s n 52 01 86 Timer Power On f d See Timer Power On 87 Timer Power Off f e See Timer Power Off 88 LCIN008 Control s n b8 See LCIN008 Control 89 Transfer Control s n cb See Transfer Control 90 Multichannel s n 76 01 to 09 91 Change Setid j x See Change Setid 92 Gamma s n ad 00 to 03 93 Black Level s n ae 00 to 02 94 UHD Deep Color s n af See UHD Deep Color 95 Sync Mo...

Страница 100: ... 105 HDR Picture Mode s n c4 See HDR Picture Mode 106 Dynamic Tone Mapping s n c5 00 to 01 107 LED Local Dimming s n c6 00 to 03 108 USB2 to HDBaseT s n c3 00 to 01 109 Change Password s n a7 See Change Password 110 Brightness Range Adjustment s n ab See Brightness Range Adjustment 111 Color Calibration s n d6 00 to 01 Note Commands may not work when there is no external input used Some commands m...

Страница 101: ...y increase depending on the command Cr Carriage Return This parameter corresponds to 0 x 0D in ASCII code White Space This parameter corresponds to 0 x 20 in ASCII code Acknowledgment Command2 Set ID OK NG Data x The product transmits an ACK acknowledgment based on this format when receiving normal data At this point if the data is FF it indicates the present status data If the data is in data wri...

Страница 102: ...V A8 OPS PC 99 HDMI2 OPS DTV A9 HDMI2 OPS PC C0 DISPLAYPORT DTV D0 DISPLAYPORT PC C1 DISPLAYPORT USB C DTV D1 DISPLAYPORT USB C PC C2 HDMI3 DTV D2 HDMI3 PC C3 HDBaseT DTV D3 HDBaseT PC E0 SuperSign webOS Player E1 Others E2 Multi Screen E3 Play via URL Acknowledgment b Set ID OK NG Data x Some input signals may not be available for all models If it is not distributed from SuperSign W WebOS Player ...

Страница 103: ...the screen sharpness Transmission k k Set ID Data Cr Data 00 32 Sharpness 0 50 Acknowledgment k Set ID OK NG Data x 09 Color Command k i Adjusts the screen colors Transmission k i Set ID Data Cr Data 00 64 Color 0 100 Acknowledgment i Set ID OK NG Data x 05 Picture Mode Command d x Selects a picture mode Transmission d x Set ID Data Cr Data 00 Mall QSR 01 General 02 Gov Corp 03 Transportation 04 E...

Страница 104: ...mmand k f Adjusts the playback volume Transmission k f Set ID Data Cr Data 00 64 Volume 0 100 Acknowledgment f Set ID OK NG Data x This feature may not be available for all models 10 Tint Command k j Adjusts the screen tints Transmission k j Set ID Data Cr Data 00 64 Tint Red 50 Green 50 Acknowledgment j Set ID OK NG Data x 11 Color Temperature Command x u Adjusts the screen color temperature Tran...

Страница 105: ...onds Enter fx Set ID ff to view the Time 2 hour minute second settings This feature is only available when Clock 1 year month day has been set Acknowledgment x Set ID OK NG Data1 Data2 Data3 x 18 No Signal Power Off 15Min Command f g Sets the monitor to enter Automatic Standby mode if there is no signal for 15 minutes Transmission f g Set ID Data Cr Data 00 Off 01 On Acknowledgment g Set ID OK NG ...

Страница 106: ...c Set ID Data Cr Data IR_KEY_CODE Acknowledgment c Set ID OK NG Data x For key codes see IR Codes Some key codes may not be supported depending on the model 24 Time Elapsed Command d l Displays the time that has elapsed after your monitor has turned on Transmission d l Set ID Data Cr Data FF Read status Acknowledgment l Set ID OK NG Data x The data received is displayed in hexadecimal 25 Product S...

Страница 107: ...a Cr Data 00 FE Blue Gain 0 254 FF Checks blue gain value Acknowledgment o Set ID OK NG Data x 30 White Balance Red Offset Command s x Adjusts the red offset value for white balance Transmission s x Set ID Data Cr Data 00 7F Red Offset 0 127 FF Checks red offset value Acknowledgment x Set ID OK NG Data x 31 White Balance Green Offset Command s y Adjusts the green offset value for white balance Tra...

Страница 108: ... Checks the tile mode Transmission d z Set ID Data Cr Data FF Check Tile Mode Acknowledgment z Set ID OK NG Data1 Data2 Data3 x Data1 00 Tile Mode off 01 Tile Mode on Data2 00 0F Tile column Data3 00 0F Tile row This feature may not be available for all models 37 Tile ID Command d i Sets the tile ID value of the product Transmission d i Set ID Data Cr Data 01 E1 Tile ID 1 225 FF Checks the Tile ID...

Страница 109: ...nowledgment h Set ID OK NG Data x The maximum value may differ depending on the model 42 Fail Over Mode Command m i Selects a sound mode Transmission m i Set ID Data Cr Data 00 Off 01 Auto 02 User Setting Acknowledgment i Set ID OK NG Data x 43 Fail Over Input Select Command m j Selects an input source for fail over This feature is only available when Fail Over is set to Custom Transmission m j Se...

Страница 110: ...duct Acknowledgment v Set ID OK NG Data Data1 x Data 02 when a signal is found Data1 00 No signal 01 Signal present Data 03 when the monitor is currently in PM mode Data1 00 Screen is on 01 Screen is off 02 Screen Off Always is activated 03 Sustain Aspect Ratio is activated 04 Screen Off Backlight On is activated Data 07 when checking whether the Top Bottom and Main temperature sensors are working...

Страница 111: ...ead the start end times enter FF for parameters Data2 through Data5 Example 1 sd 01 01 ff ff ff ff Checks the start time Example 2 sd 01 02 ff ff ff ff Checks the end time This feature only works when Clock 1 year month day and Clock 2 hour minute second have been set Acknowledgment d Set ID OK NG Data1 Data2 Data3 Data4 Data5 x This feature may not be available for all models 48 PM Mode Command s...

Страница 112: ... 010177223241 255255254000 010177222001 IP 10 177 223 241 subnet 255 255 254 0 gateway 10 177 222 1 3 Network read sn 01 80 ff 4 DNS setting sn 01 81 156147035018 DNS 156 147 35 18 5 Applying the settings sn 01 82 80 applies the saved IP mode auto manual subnet mask and gateway sn 01 82 81 applies the saved DSN Each IP address contains 12 decimal digits Acknowledgment n Set ID OK NG Data1 Data x T...

Страница 113: ...ID OK NG Data x This feature does not work if the current time is not set This feature may not be available for all models 54 Time Sync Command s n 16 Sets Time Sync Transmission s n Set ID 1 6 Data Cr Data 00 Off 01 On This feature only works when the monitor is in Master mode This feature does not work if the current time is not set Acknowledgment n Set ID OK NG 1 6 Data x This feature may not b...

Страница 114: ...K will be acknowledged ACK even if there is no saved list ex1 ss 01 f1 ff ff Reads the 1st index data in Brightness Schedule ex2 ss 01 ff Reads all index data in Brightness Schedule ex3 ss 01 e1 ff ff Deletes the 1st index data in Brightness Schedule ex4 ss 01 07 1E 46 Adds a schedule whose time is 07 30 and whose backlight is 70 Acknowledgement s Set ID OK NG Data1 Data2 Data3 x This feature may ...

Страница 115: ...ys feature the monitor enters Screen Off mode regardless of whether or not you have activated PM mode Transmission s n Set ID 0 d Data Cr Data 00 Off 01 On Acknowledgment n Set ID OK NG 0 d Data x This feature may not be available for all models 65 Stop Video Command k x Controls Stop Video Transmission k x Set ID Data Cr Data 00 The Stop Video feature is on 01 The Stop Video feature is off This f...

Страница 116: ...lready been set for Data 5 every year or every month 2 Checking a Schedule Data1 Select the desired schedule F1 Reads the 1st schedule F2 Reads the 2nd schedule F3 Reads the 3rd schedule F4 Reads the 4th schedule F5 Reads the 5th schedule F6 Reads the 6th schedule F7 Reads the 7th schedule Data2 FF 3 Deleting a Schedule E0 Deletes all holiday schedules E1 Deletes the 1st holiday schedule E2 Delete...

Страница 117: ...ble for all models 72 USB Lock Command s n 9e Sets USB Lock Transmission s n Set ID 9 e Data Cr Data 00 USB Unlock 01 USB Lock Acknowledgment n Set ID OK NG 9 e Data x This feature may not be available for all models 73 Wi Fi Lock Command s n 9f Sets Wi Fi Lock Transmission s n Set ID 9 f Data Cr Data 00 Wi Fi Unlock 01 Wi Fi Lock Acknowledgment n Set ID OK NG 9 f Data x This feature may not be av...

Страница 118: ...ID OK NG a 1 Data1 x 2 n Set ID OK NG a 1 Data1 Data2 x This feature may not be available for all models 76 Digital Audio Input Command s n a2 Sets Digital Audio Input Transmission s n Set ID a 2 Data Cr Data 00 Digital 01 Analog Acknowledgment n Set ID OK NG a 2 Data x This feature may not be available for all models 77 Booting Logo Image Command s n a3 Sets Booting Logo Image Transmission s n Se...

Страница 119: ...ta Cr Data 00 Off 01 On Acknowledgment n Set ID OK NG a 9 Data x This feature may not be available for all models 82 Audio Out Command s n aa Sets Audio Out to Off Variable Fixed Transmission s n Set ID a a Data Cr Data 00 Off 01 Variable 02 Fixed Acknowledgment n Set ID OK NG a a Data x This feature may not be available for all models 83 DPM Wake Up Control Command s n 0b Controls the DPM Wake Up...

Страница 120: ...Power On s E1 Delete the 1st Timer Power On E2 Delete the 2nd Timer Power On E3 Delete the 3rd Timer Power On E4 Delete the 4th Timer Power On E5 Delete the 5th Timer Power On E6 Delete the 6th Timer Power On E7 Delete the 7th Timer Power On 3 01h to 0ch Timer Power On days setting 02 Repeat Daily 03 Repeat from Monday to Friday 04 Repeat from Monday to Saturday 05 Repeat from Saturday to Sunday 0...

Страница 121: ... Data3 must be set to FFH Example 1 fe 01 f1 ff ff Reads the 1st index data in Timer Power Off Example 2 fe 01 e1 ff ff Reads the 1st index data in Timer Power Off Example 3 fe 01 04 02 03 Sets the Timer Power Off as Monday Saturday 02 03 This feature only works when Clock 1 year month day and Clock 2 hour minute second have been set Acknowledgment e Set ID OK NG Data1 Data2 Data3 x 88 LCIN008 Con...

Страница 122: ... 4 03 High2 BT 1886 Acknowledgment n Set ID OK NG a d Data x This feature may not be available for all models 93 Black Level Command s n ae It sets the Black Level mode Transmission s n Set ID a e Data Cr Data 00 Low 01 High 02 Auto Acknowledgment n Set ID OK NG a e Data x This feature may not be available for all models 94 UHD Deep Color Command s n af It sets the UHD Deep Color mode for each inp...

Страница 123: ...trols Transmission s n Set ID c 1 Data Cr Data 00 Off 01 On Acknowledgment n Set ID OK NG c 1 Data x This feature may not be available for all models 99 Scan Inversion Command s n 87 It controls the on off status of Scan Inversion Transmission s n Set ID 8 7 Data Cr Data 00 Off 01 On Acknowledgment n Set ID OK NG 8 7 Data x This feature may not be available for all models If you change the values ...

Страница 124: ...00 Off 01 On Acknowledgment z Set ID OK NG Data x This feature may not be available for all models 104 Stereo Mode Command s n c2 Controls Stereo Mode Transmission s n Set ID c 2 Data Cr Data 00 Left Right 01 Left Left 02 Right Right Acknowledgment n Set ID OK NG c 2 Data x This feature may not be available for all models 105 HDR Picture Mode Command s n c4 Selects a HDR Picture Mode Transmission ...

Страница 125: ...ailable for all models 110 Brightness Range Adjustment Command s n ab Adjust the brightness range Transmission s n Set ID a b Data1 Data2 Cr Data 1 00 Minimum brightness control 01 Maximum brightness control Data 1 00 64 Range control Acknowledgement n Set ID OK NG a b Data1 Data2 x This feature may not be available for all models Data2 only supports Hex values that are multiples of 5 The range of...

Страница 126: ......

Отзывы: