background image

LED TV

50/55/65US660H*

www.lg.com

12

14

16

20

a


X 4

(M4 X L16)

50/55US660H*

12

14

16

20

b


X 6

(M4 X L20)

65US660H*

:  


Содержание 50US660H Series

Страница 1: ...LED TV 50 55 65US660H www lg com 12 14 16 20 a X 4 M4 X L16 50 55US660H 12 14 16 20 b X 6 M4 X L20 65US660H ...

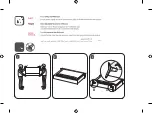
Страница 2: ...2 1 B A B A B 3 ...

Страница 3: ...4 A B A B A B A B B A B A B A B A a 5 A 50 55US660H B A B b 65US660H 5 B B A 6 7 ...

Страница 4: ...PCMCIA CARD SLOT COMPONENT IN AV IN ...

Страница 5: ...Satellite IN HDMI IN ARC ...

Страница 6: ...H P OUT CLOCK ...

Страница 7: ......

Страница 8: ... F F G 50US660H0GD 50US660H0TD 1130 722 231 663 86 3 11 5 11 3 55US660H0GD 55US660H0TD 1244 786 231 726 87 1 14 5 14 3 65US660H0TD 1463 914 269 850 87 8 21 6 21 3 AC 100 240 V 50 60 Hz Kg MFL71709804 2007 REV01 ...

Страница 9: ... www lg com Copyright 2020 LG Electronics Inc All Rights Reserved Disclaimer LG LED TV applies LCD screen with LED backlights Please read this manual carefully before operating your set and retain it for future reference MFL71709902 2101 REV04 ...

Страница 10: ...ty places Otherwise this may result in fire electric shock combustion explosion malfunction or product deformation Ventilation Install yourTV where there is proper ventilation Do not install in a confined space such as a bookcase Do not install the product on a carpet or cushion Do not block or cover the product with cloth or other materials while unit is plugged in Take care not to touch the vent...

Страница 11: ...ments accessories approved by LG Electronics Otherwise this may result in fire electric shock malfunction or product damage Never disassemble the AC adapter or power cord This may result in fire or electric shock Handle the adapter carefully to avoid dropping or striking it An impact could damage the adapter To reduce the risk of fire or electrical shock do not touch theTV with wet hands If the po...

Страница 12: ... connection HDMI cables and USB devices should have bezels less than 10 mm thick and 18 mm width Use an extension cable that supports USB if the USB cable or USB memory stick does not fit into yourTV s USB port A B A B A 10 mm B 18 mm Use a certified cable with the HDMI logo attached If you do not use a certified HDMI cable the screen may not display or a connection error may occur Recommended HDM...

Страница 13: ...ing theTV the screen should face away from you to avoid damage Hold the top and bottom of theTV frame firmly Make sure not to hold the transparent part speaker or speaker grill area When transporting a largeTV there should be at least 2 people When transporting theTV by hand hold theTV as shown in the following illustration When transporting theTV do not expose theTV to jolts or excessive vibratio...

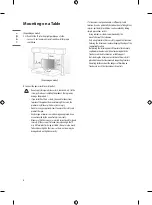
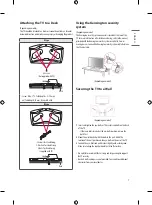
Страница 14: ...securely If they are not fastened securely enough theTV may tilt forward after being installed Do not use too much force and over tighten the screws otherwise screw may be damaged and not tighten correctly If a television is not positioned in a sufficiently stable location it can be potentially hazardous due to falling Many injuries particularly to children can be avoided by taking simple precauti...

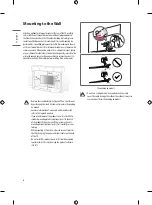
Страница 15: ... manual provided with the Kensington security system or visit http www kensington com Connect the Kensington security system cable between theTV and a table Depending on model Securing the TV to a Wall Depending on model 1 Insert and tighten the eye bolts orTV brackets and bolts on the back of theTV If there are bolts inserted at the eye bolts position remove the bolts first 2 Mount the wall brack...

Страница 16: ...xed wall mounts 10 cm 10 cm 10 cm 10 cm 10cm Remove the stand before installing theTV on a wall mount by performing the stand attachment in reverse Depending on model For more information of screws and wall mount bracket refer to the Separate purchase If you intend to mount the product to a wall attachVESA standard mounting interface optional parts to the back of the product When you install the s...

Страница 17: ...ity If the image quality is poor with an antenna connected try to realign the antenna in the correct direction An antenna cable and converter are not supplied For a location that is not supported with ULTRA HD broadcasting thisTV cannot receive ULTRA HD broadcasts directly Depending on model Satellite dish Connect theTV to a satellite dish to a satellite socket with a satellite RF cable 75 Ω Depen...

Страница 18: ... not sufficient the USB storage device may not be detected properly It is recommended that you use an external USB HDD with a rated voltage of 5V of less and a rated current of 500 mA or less External Devices Available external devices are Blu ray player HD receivers DVD players VCRs audio systems USB storage devices PC gaming devices and other external devices The external device connection may d...

Страница 19: ...pending on model Use only with the 3 Pole 3 5 mm Stereo Jack Do not connect your headphones or earphones to the port for connecting an external speaker Method of volume control port Depending on model Cable Spec UP DOWN Each up down pins are connected to CPU with pull up resistor respectively CPU detects transition from 3 3V to level for volume control ...

Страница 20: ...TV 2 1 Broadband Modem Pro Centric Server Broadband Modem Pro Centric Server Router Broadband Modem Connect the port of the Modem or Router to the port on theTV Connect the port of the PC to the port on theTV Depending on model Do not connect a modular phone cable to the port Since there are various connection methods please follow the specifications of your telecommunication carrier or internet s...

Страница 21: ...turned on press the button one time You can adjust the Menu items using the button Turns the power off Changes the input source Scrolls through the saved programmes Adjusts the volume level Adjusting the Angle of the TV to suit view Depending on model Swivel 20 degrees to the left or right and adjust the angle of theTV to suit your view 20 20 When adjusting the angle of the product watch out for y...

Страница 22: ... saved programme list SPACE Opens an empty space on the screen keyboard Returns to the previously viewed programme Adjusts the volume level Accesses the Home menu Shows the previous history Shows the previous history Mutes all sounds Accesses the Accessibility menu Scrolls through the saved programmes Moves to the previous or next screen Shows programme guide Displays and removes hotel interactive...

Страница 23: ... of customer s equipment with LGE software If needed please consult with LGE and upload revised software version according to the guidance provided by LGE Cannot control theTV with the remote control Check the remote control sensor on the product and try again Check if there is any obstacle between the product and the remote control Check if the batteries are still working and properly installed t...

Страница 24: ... period of time may cause image sticking Avoid displaying a fixed image on theTV screen for a long period of time Generated sound Cracking noise A cracking noise that occurs when watching or turning off theTV is generated by plastic thermal contraction due to temperature and humidity This noise is common for products where thermal deformation is required Electrical circuit humming panel buzzing A ...

Страница 25: ...DVB T T21 46 862 MHz 950 2 150 MHz 46 890 MHz VHF III 174 230 MHz UHF IV 470 606 MHz UHFV 606 862 MHz S Band II 230 300 MHz S Band III 300 470 MHz Maximum number of storable programmes 6 000 3 000 External antenna impedance 75 Ω CI Module W x H x D 100 0 mm x 55 0 mm x 5 0 mm 1 Only DVB T2 support models Despite DVB T2 Model DVB T T2 does not apply in Philippine 2 Only DVB T2 C S2 support models 3...

Страница 26: ...ated with a minimum distance of 20 cm between the device and the body IEEE 802 11ac is not available in all countries Only Nigeria Connection and use of this communications equipment is permitted by the Nigerian Communications Commission Environment condition OperatingTemperature 0 C to 40 C Operating Humidity Less than 80 StorageTemperature 20 C to 60 C Storage Humidity Less than 85 The energy in...

Страница 27: ... 59 94 60 4096 x 2160p 53 94 54 56 25 67 43 67 5 112 5 134 86 135 23 97 24 25 29 97 30 50 59 94 60 HDMI PC supported Mode PC audio is not supported Use HDMI IN 1 for PC mode Depending on model Resolution Horizontal Frequency kHz Vertical Frequency Hz 640 x 350 31 46 70 09 720 x 400 31 46 70 08 640 x 480 31 46 59 94 800 x 600 37 87 60 31 1024 x 768 48 36 60 1360 x 768 47 71 60 01 1152 x 864 54 34 6...

Страница 28: ...le Format Item Info mp3 Bit rate 32 Kbps 320 Kbps Sample freq 16 kHz 48 kHz Support MPEG1 MPEG2 Channels mono stereo wav Bit rate Sample freq 8 kHz 96 kHz Support PCM Channels mono stereo ogg Bit rate 64 kbps 320 kbps Sample freq 8 kHz 48 kHz Support Vorbis Channels mono stereo wma Bit rate 128 kbps 320 kbps Sample freq 8 kHz 48 kHz Support WMA Channels up to 6 ch flac Bit rate Sample freq 8 kHz 9...

Страница 29: ... Layer I II MPEG 1 Layer III MP3 Dolby Digital Dolby Digital Plus AAC PCM Dolby AC 41 mpg mpeg dat Video MPEG 1 MPEG 2 Audio MPEG 1 Layer I II MPEG 1 Layer III MP3 vob Video MPEG 1 MPEG 2 Audio Dolby Digital MPEG 1 Layer I II DVD LPCM 1 Dolby AC 4 This feature is available in certain models only Cautions for Video Playback Only UHD models ULTRA HDVideo 3840 x 2160 4096 x 2160 Some HEVC encoded ULT...

Страница 30: ...cost of performing such distribution such as the cost of media shipping and handling upon email request to opensource lge com This offer is valid for a period of three years after our last shipment of this product This offer is valid to anyone in receipt of this information Licenses Supported licenses may differ by model The terms HDMI HDMI High Definition Multimedia Interface and the HDMI Logo ar...

Страница 31: ... Key 0 9 Alphabet buttons SPACE Remote control Button 53 Remote control Button 1A Remote control Button 02 Remote control Button 03 Remote control Button 7C Remote control Button B5 Remote control Button 09 Remote control Button 00 Remote control Button 01 Remote control Button AB Remote control Button 0C Remote control Button AA Remote control Button 40 Remote control Button 41 Remote control But...

Страница 32: ...71 Remote control Button 63 Remote control Button 61 Remote control Button 20 Remote control Button 21 Remote control Button 39 Remote control Button B1 Remote control Button B0 Remote control Button BA Remote control Button 8F Remote control Button 8E Remote control Button DC Remote control Button 9F Remote control Button 91 Remote control Button E8 Remote control Button ...

Страница 33: ...nally Connect the serial port of the control device to the RS 232C jack on the product back panel RS 232C connection cables are not supplied with the product AType Not Provided Provided BType RS 232C IN CONTROL SERVICE Not Provided Type of Connector D Sub 9 Pin Male 6 1 5 9 No Pin name 1 3 5V 2 RXD Receive data 3 TXD Transmit data 4 IR OUT fromTV 5 GND 6 No Connection 7 No Connection 5V available ...

Страница 34: ...5 5 GND DTR 4 6 DSR DSR 6 4 DTR RTS 7 8 CTS CTS 8 7 RTS Communication Parameters Baud rate 9 600 bps UART Data length 8 bits Parity None Stop bit 1 bit Communication code ASCII code Use a crossed reverse cable Set ID For Set ID number see Real Data Mapping 1 Press to access the main menus 2 Press the Navigation buttons to scroll to Support or General Set ID and press 3 Scroll left or right to sele...

Страница 35: ...nding on Model Transmission Command1 Command2 Set ID Data Cr Command1 First command to control theTV j k m or x Command2 Second command to control theTV Set ID You can adjust the set ID to choose desired monitor ID number in option menu Adjustment range is 1 to 99 When selecting Set ID 0 every connected set is controlled Set ID is indicated as decimal 1 to 99 on menu and as Hexa decimal 0 x 0 to 0...

Страница 36: ...ID OK NG Data x Using the PC input you select either 16 9 or 4 3 screen aspect ratio In DTV HDMI 1080i 50 Hz 60 Hz 720p 50Hz 60 Hz 1080p 24 Hz 30 Hz 50 Hz 60 Hz Component 720p 1080i 1080p mode Just Scan is available FullWide is supported only for Digital Analogue AV 3 Screen Mute Command k d To select screen mute on off Transmission k d Set ID Data Cr Data 00 Screen mute off Picture on Video mute ...

Страница 37: ...n the picture settings Transmission k i Set ID Data Cr Data Min 00 to Max 64 Refer to Real data mapping Ack i Set ID OK NG Data x 9 Tint Command k j To adjust the screen tint You can also adjust tint in the picture settings Transmission k j Set ID Data Cr Data Red 00 to Green 64 Refer to Real data mapping Ack j Set ID OK NG Data x 10 Sharpness Command k k To adjust the screen sharpness You can als...

Страница 38: ... adjust Colour Temperature in the picture settings Transmission x u Set ID Data Cr Data Warm 00 to Cool 64 Refer to Real data mapping Ack u Set ID OK NG Data x 15 Energy Saving Command j q To reduce the power consumption of theTV You can also adjust Energy Saving in picture settings Transmission j q Set ID Data Cr Power Saving Function Level Description 7 6 5 4 3 2 1 0 0 0 0 0 Low Power 0 0 0 0 Of...

Страница 39: ...0 0 20 decimal Ack v Set ID OK NG Data x 18 Tune Command Command m a Select channel to following physical number Transmission m a Set ID Data 00 Data 01 Data 02 Cr Data 00 High channel data Data 01 Low channel data ex No 47 00 2F 2FH No 394 01 8A 18AH DTV No 0 Don t care Data 02 Antenna 0 x 00 Analogue Main 0 x 10 DTV Main 0 x 20 Radio Cable 0 x 80 Analogue Main 0 x 90 DTV Main 0 x A0 Radio Satell...

Страница 40: ...d m g To control the backlight Transmission m g Set ID Data Cr Data Min 00 to Max 64 Ack g Set ID OK NG Data x 22 Input select Command x b Main Picture Input To select input source for main picture Transmission x b Set ID Data Cr Data Structure MSB LSB 0 0 0 0 0 0 0 0 External Input Input Number External Input Data 0 0 0 0 DTV 0 0 0 1 Analogue 0 0 1 0 AV 0 1 0 0 Component 0 1 1 0 RGB 0 1 1 1 HDMI ...

Страница 41: ...33 ENGLISH _Index Real data mapping 00 Step 0 A Step 10 Set ID 10 F Step 15 Set ID 15 10 Step 16 Set ID 16 64 Step 100 6E Step 110 73 Step 115 74 Step 116 CF Step 199 FE Step 254 FF Step 255 ...

Страница 42: ...The model and serial number of the product are located on the back and on one side of the product Record them below in case you ever need service Model Serial no ...

Отзывы: