background image

28

ENG

ENGLISH

SPECIFICATIONS

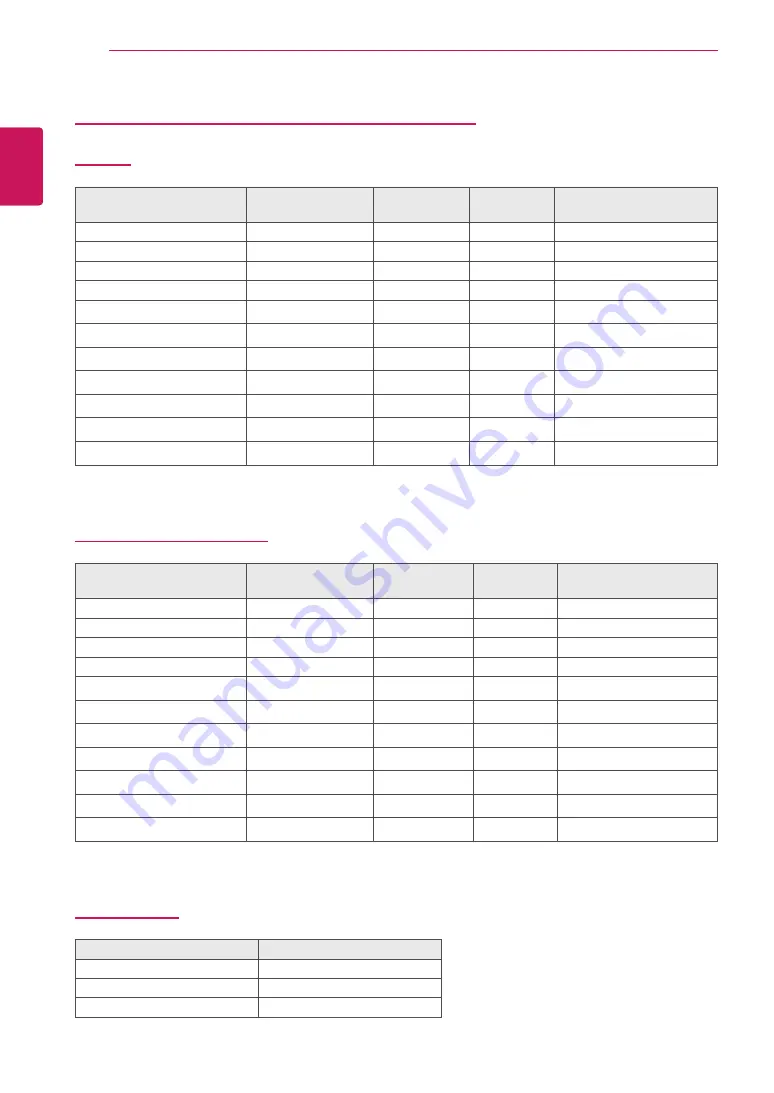
Factory Support Mode (Preset Mode, PC) 
HDMI

Display Modes (Resolution)

Horizontal 

Frequency(kHz)

Vertical 

Frequency(Hz)

Polarity(H/V)

Remarks

640 x 480

31.469

59.94

-/-

800 x 600

37.879

60.317

+/+

1024 x 768

48.363

60

-/-

1152 x 864

54.347

60.05

+/+

1280 x 720

45

60

+/+

1280 x 1024

63.981

60.02

+/+

1600 x 900

60

60

+/+

1920 x 1080

67.5

60

+/-

2560 x 1440

88.79

59.95

+/-

3840 x 2160

67.5

30

+/-

3840 x 2160

135

60

+/-

DisplayPort / USB-C

Display Modes (Resolution)

Horizontal 

Frequency(kHz)

Vertical 

Frequency(Hz)

Polarity(H/V)

Remarks

640 x 480

31.469

59.94

-/-

800 x 600

37.879

60.317

+/+

1024 x 768

48.363

60

-/-

1152 x 864

54.347

60.05

+/+

1280 x 720

45

60

+/+

1280 x 1024

63.981

60.02

+/+

1600 x 900

60

60

+/+

1920 x 1080

67.5

60

+/-

2560 x 1440

88.79

59.95

+/-

3840 x 2160

66.66

30

+/-

3840 x 2160

133.32

60

+/-

Power LED

Mode

LED Color

On Mode

White

Sleep Mode

Off

Off Mode

Off

Содержание 32MU89

Страница 1: ...se read the safety information carefully before using the product IPS LED Monitor LED Monitor Model List Owner s Manual IPS LED MONITOR LED MONITOR LG LED Monitors are LCD Monitors with LED Backlighting 32UD89 32MU89 ...

Страница 2: ...o Use the Joystick Button 7 Input Connector 8 Moving and Lifting the Monitor 9 Installing the Monitor 9 Assembling the stand base 10 Using the cable holder 11 Installing onto a table 12 Adjusting the angle 12 Adjusting the Stand Height 13 Pivot Feature 14 Using the Kensington lock 15 Detaching the Stand Body 15 Installing the wall mount plate 15 Installing to a wall 17 USING THE MONITOR 17 Connect...

Страница 3: ...g content is only applied to the monitor which is sold in Europe market and which needs to meet the ErP Directive This monitor is set to be turned off automatically in 4 hours after you turned on display if there is no adjustment to display To make this setting be disabled change the option to Off in OSD menu of Automatic Standby VESA VESA logo DisplayPort compliance logo and DisplayPort complianc...

Страница 4: ... If you use generic cables not certified by LG the screen may not display or there may be image noises y y Note that the components may look different from those shown here y y Without prior notice all information and specifications in this manual are subject to change to improve the performance of the product y y To purchase optional accessories visit an electronics store or online shopping site ...

Страница 5: ...duct package y y Required and Recommended You can download and install the latest version from the enclosed CD or from the LGE website www lg com y y Optional You can download and install the latest version from the LGE website www lg com Drivers and Software Installation Priority 32UD89 32MU89 Monitor Driver Recommended O OnScreen Control Recommended O Dual Controller Optional O ...

Страница 6: ...r on Press the joystick button once with your finger to turn on the monitor Power off Press and hold the joystick button once with your finger to turn off the monitor Volume Control You can control the volume by moving the joystick button left right Component and Button Description Power LED y y On power is on y y Off power is off Joystick Button y y The joystick button is located at the bottom of...

Страница 7: ...7 ENG ENGLISH ASSEMBLING AND PREPARING Input Connector ...

Страница 8: ... move it y y Before moving or lifting the monitor disconnect the power cord and all cables y y Hold the top and bottom of the monitor frame firmly Do not hold the screen itself y y When holding the monitor the screen should face away from you to prevent it being scratched y y When moving the monitor avoid any strong shock or vibrations to the product y y When moving the monitor keep it upright nev...

Страница 9: ...assem bly stand body and base y y Press the stand until the button reaches the top 1 Please put a soft cloth on a low table or box to protect the screen of the monitor 2 Please put the monitor on the soft cloth with the screen facing down 4 Turn the screw clockwise to secure the stand base 3 1 2 3 Assemble the Head and Stand body 1 2 3 Assemble the Stand body and Stand base CAUTION NOTE ...

Страница 10: ...h the monitor screen The force applied to the monitor screen may cause damage to it y y Do not apply foreign substances oils lubricants etc to the screw parts when assembling the product Doing so may damage the product y y Applying excessive force when tightening screws may cause damage to the monitor Damage caused in this way will not be covered by the product warranty CAUTION Using the cable hol...

Страница 11: ...n plug the power cord into the wall outlet 100 mm 100 mm 100 mm 100 mm y y Unplug the power cord prior to moving or install ing the monitor There is risk of electric shock y y Make sure to use the power cord that is pro vided in the product package and connect it to a grounded power outlet y y If you need another power cord please contact your local dealer or the nearest retail store CAUTION 3 Pre...

Страница 12: ... The angle of the screen can be adjusted forwards or backwards for a comfortable viewing experience Front Side Rear Side y y To avoid injury to the fingers when adjusting the screen do not hold the lower part of the moni tor s frame as illustrated below WARNING y y Be careful not to touch or press the screen area when adjusting the angle of the monitor 110 0 mm y y Do not put your fingers or hand ...

Страница 13: ...g the stand base make sure that when rotating the monitor using the pivot feature the stand does not make contact with the monitor y y Auto Pivot feature of the display is not supported y y The screen can be rotated easily using the screen pivot shortcut key provided with your Windows operating system Note that some Windows versions and some graphics card drivers may use different settings for the...

Страница 14: ... Kensington security system cable between the Monitor set and a table y y Take care when rotating the monitor if the cable is connected y y To avoid injury when rotating the display do not place your fingers between the display and the stand base WARNING y y Use of the Kensington lock is optional The accessories can be purchased at your local electronics store y y The left or right side of the mon...

Страница 15: ...mm 100 mm Wall Mount A x B 100 x 100 Standard screw M4 x L10 Number of screws 4 Wall Mount Plate Optional RW120 1 Place the monitor s screen face down To protect the screen from scratches cover the surface with a soft cloth 2 Remove the stand from the monitor by pressing the button on the bottom center of the back of the monitor Detaching the Stand Body 1 Installing the wall mount plate This monit...

Страница 16: ...et and screws that conform to the VESA standard Damage caused by the use or misuse of inappropriate components will not be covered by the product warranty y y Screw length from outer surface of back cover should be under Max 8 mm y y Use the screws specified by the VESA standard y y The wall mount kit includes the installation guide and all necessary parts y y The wall mounting bracket is optional...

Страница 17: ...tor Connect your PC to the monitor us ing the DisplayPort cable as illustrated below Press the menu button and then select the input option from the input menu NOTE HDMI connection Transmits the digital video and audio signals from your PC and A V devices to the monitor Connect your PC and AV device to the monitor with the HDMI cable as illustrated below Press the menu button and then select the i...

Страница 18: ...C cable as shown in the illustration below Press the menu button and then select the input option from the input menu NOTE USB C C cable Connecting to AV Devices HDMI connection Transmits the digital video and audio signals from your PC and A V devices to the monitor Connect your PC and AV device to the monitor with the HDMI cable as illustrated below Press the menu button and then select the inpu...

Страница 19: ... used only for Service y y Peripheral devices are sold separately y y If you use angled earphones it may cause a prob lem with connecting another external device to the monitor Therefore it is recommended to use straight earphones Angled Straight y y Depending on the audio settings of the PC and external device headphones and speaker functions may be limited NOTE Service only port SERVICE ONLY ...

Страница 20: ...enu features Power Off Menu Input Exit Game Main menu disabled Displays information on the current input Main menu enabled Turns off the monitor Main menu disabled Displays information on the current input Main menu enabled Enters the Game features Main Menu Features Main Menu Description Menu Configures the screen settings Game Sets the picture mode for gaming Input Sets input mode Power Off Turn...

Страница 21: ...e input mode Aspect Ratio Adjusts the aspect ratio of the screen Full Wide Displays the video in wide screen regardless of the video signal input Original Displays video according to the aspect ratio of the video signal input 1 1 The aspect ratio is not adjusted from the original NOTE y y The display may look the same for Full Wide Original and 1 1 options at the recommended resolu tion 3840 x 216...

Страница 22: ...deo signal this is the darkest color the monitor can display High Keeps the current contrast ratio of the screen Low Lowers the black levels and raises the white levels from the current contrast ratio of the screen HDMI ULTRA HD Deep Color Provides sharper images when connected to a device supporting ULTRA HD Deep Color 4K 60 Hz Support Format1 Resolution Frame rate Hz Color Depth Chroma Sampling ...

Страница 23: ... to have better visibility in dark scenes Increasing the Black Stabilizer value brightens the low gray level area on the screen You can easily distinguish objects on dark game screens Reducing the Black Stabilizer value darkens the low gray level area and increases the dynam ic contrast on the screen Color Adjust Gamma Mode 1 Mode 2 Mode 3 The higher the gamma value the darker the image becomes Li...

Страница 24: ...ted by your graphics card Set this option to Disable if your graphics card does not support DisplayPort 1 2 NOTE OSD Lock This feature disables the configuration and adjustment of menus On Enables OSD Lock Off Disables OSD Lock NOTE y y All features are disabled except Brightness Contrast Volume Input OSD Lock in General and the Exit button OSD Size User can select OSD Size to Large or Small Deep ...

Страница 25: ...s being displayed Are some functions not available when you press the Menu button y y The OSD is locked Go to Menu General and set OSD Lock to Off The screen retains an image Does image sticking occur even when the monitor is turned off y y Displaying a still image for a prolonged time may cause damage to the screen resulting in the retention of the image y y To extend the lifetime of the monitor ...

Страница 26: ...upports Plug Play function y y Check if the graphics card s resolution or frequency is within the range allowed by the monitor and set it to the recommended optimal resolution in Control Panel Display settings y y Not setting the graphics card to the recommended optimal resolution may result in blurred text a dimmed screen a truncated display area or misalignment of the display y y The setting met...

Страница 27: ... 0 3 W AC DC adaptor Type LCAP31 LIEN CHANG ELECTRONIC ENTERPRISE production Output 19 V 7 37 A Environmental Conditions Operating Condition Temperature 0 C to 40 C Humidity 80 Storing Condition Temperature 20 C to 60 C Humidity 85 Dimension Monitor Size Width x Height x Depth With Stand 713 8 mm x 485 4 mm x 259 2 mm Without Stand 713 8 mm x 410 2 mm x 44 6 mm Weight Without Packaging With Stand ...

Страница 28: ...00 60 60 1920 x 1080 67 5 60 2560 x 1440 88 79 59 95 3840 x 2160 67 5 30 3840 x 2160 135 60 DisplayPort USB C Display Modes Resolution Horizontal Frequency kHz Vertical Frequency Hz Polarity H V Remarks 640 x 480 31 469 59 94 800 x 600 37 879 60 317 1024 x 768 48 363 60 1152 x 864 54 347 60 05 1280 x 720 45 60 1280 x 1024 63 981 60 02 1600 x 900 60 60 1920 x 1080 67 5 60 2560 x 1440 88 79 59 95 38...

Страница 29: ...me LG Model 32UD89 32MU89 Responsible Party LG Electronics Inc Address 1000 Sylvan Ave Englewood Cliffs NJ 07632 U S A TEL 201 266 2534 Refer to ENERGY STAR gov for more information on the ENERGY STAR program To obtain the source code under GPL LGPL MPL and other open source licenses that is contained in this product please visit http opensource lge com In addition to the source code all referred ...

Отзывы: