•
TIFF or TIF
•
PNG
Configuring confidential jobs
Using the control panel
1
From the home screen, touch
Settings
>
Security
>
Confidential Print Setup
.
2
Configure the settings.
Using the Embedded Web Server
1
Open a web browser, and then type the printer IP address in the address field.
Notes:
•
View the printer IP address on the home screen. The IP address appears as four sets of numbers
separated by periods, such as 123.123.123.123.
•
If you are using a proxy server, then temporarily disable it to load the web page correctly.
2
Click
Settings
>
Security
>
Confidential Print Setup
.
3
Configure the settings.
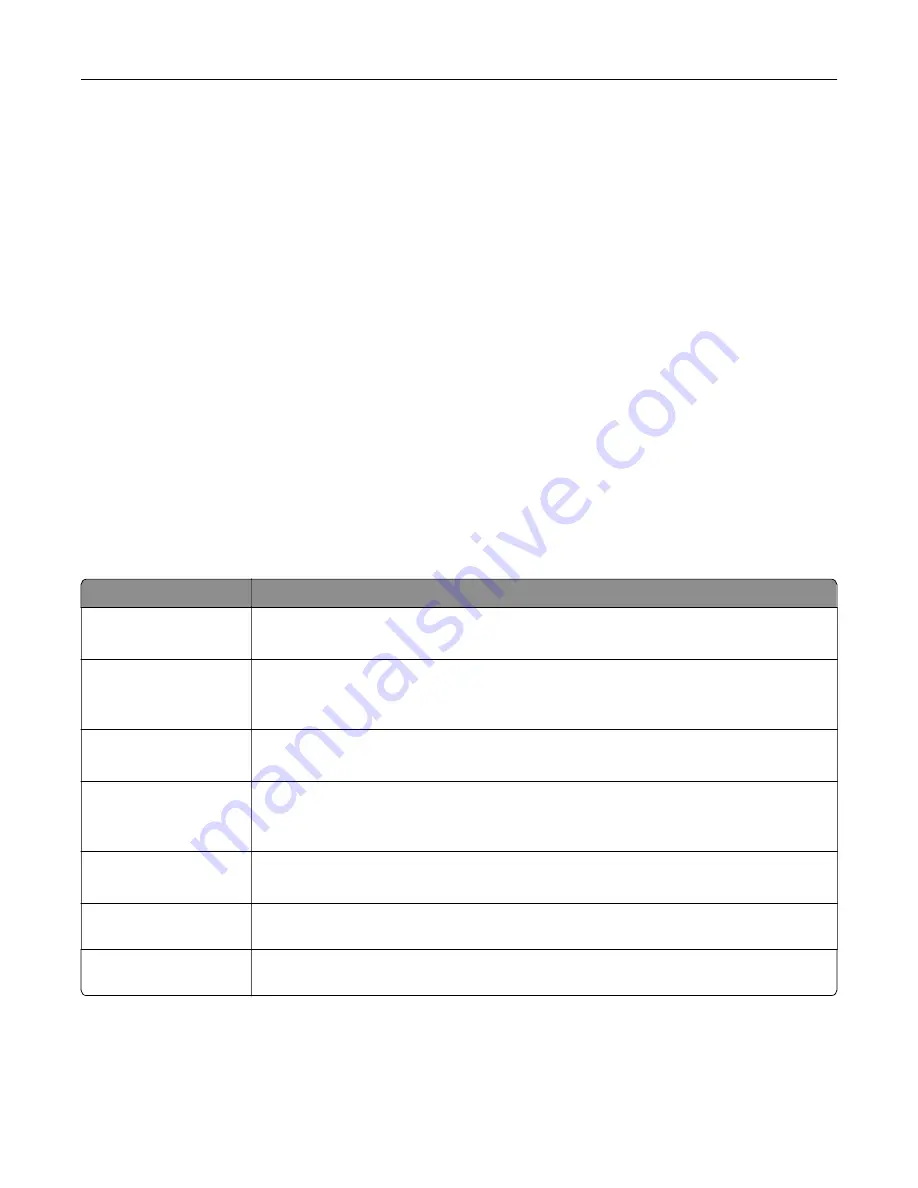
Use
To
Max Invalid PIN
Set the number of times an invalid PIN can be entered.
Note:
When the limit is reached, the print jobs for that user name are deleted.
Confidential Job
Expiration
Set the expiration time for confidential print jobs.
Note:
Confidential held jobs are stored in the printer until they are released or deleted
manually.
Repeat Job Expiration
Set the expiration time for a repeat print job.
Note:
Repeat held jobs are stored in the printer memory for reprinting.
Verify Job Expiration
Set the expiration time that the printer prints a copy before printing the remaining copies.
Note:
Verify jobs print one copy to check if it is satisfactory before printing the
remaining copies.
Reserve Job Expiration
Set the expiration time that the printer stores print jobs.
Note:
Reserve held jobs are automatically deleted after printing.
Require All Jobs to be
Held
Set the printer to hold all print jobs.
Keep duplicate
documents
Set the printer to print all documents with the same file name.
55
Содержание XM1342
Страница 134: ...4 Unpack the new toner cartridge 5 Shake the toner cartridge to redistribute the toner Maintain the printer 134...
Страница 136: ...2 Remove the used imaging unit Maintain the printer 136...
Страница 139: ...3 Open the front door 4 Remove the imaging unit 5 Close the front door 6 Remove the tray Maintain the printer 139...
Страница 144: ...4 Insert the new separator pad until it clicks into place 5 Close the ADF cover Maintain the printer 144...
Страница 148: ...3 Open the front door 4 Remove the imaging unit 5 Close the front door 6 Remove the tray Maintain the printer 148...


