6
From the control panel, set the paper size and paper type to
match the paper loaded.
Loading the multipurpose feeder
1
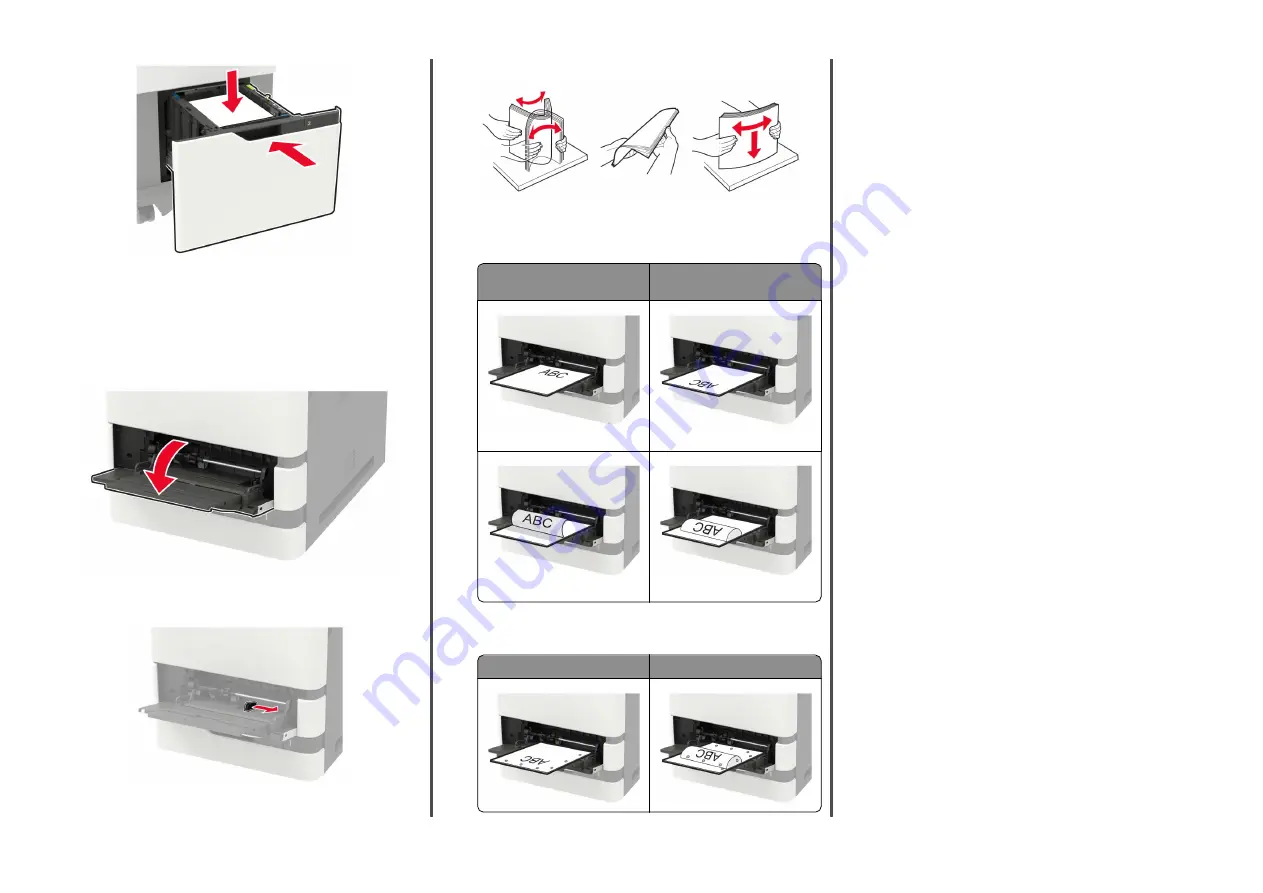
Open the multipurpose feeder.
2
Adjust the guide to match the size of the paper that you are
loading.
3
Flex, fan, and align the paper edges before loading.
4
Load paper with the printable side faceup.
•
Load letterhead depending on whether an optional staple
finisher is installed or not.
Without an optional staple
finisher
With an optional staple finisher
One
‑
sided printing
One
‑
sided printing
Two
‑
sided printing
Two
‑
sided printing
•
When loading prepunched paper, make sure that the holes
on the long edge of the paper are against the right side of
the paper guide.
One
‑
sided printing
Two
‑
sided printing
•
Load envelopes with the flap side down and against the left
side of the paper guide.
Warning—Potential Damage:
Do not use envelopes with
stamps, clasps, snaps, windows, coated linings, or
self
‑
stick adhesives.
5
From the control panel, set the paper size and paper type to
match the paper loaded.
Setting the size and type of the
specialty media
The trays automatically detect the size of plain paper. For specialty
media like labels, card stock, or envelopes, do the following:
1
From the home screen, navigate to:
Settings
>
Paper
>
Tray Configuration
>
Paper Size/Type
>
select a paper source
2
Set the size and type of the specialty media.
Installing the printer software
Notes:
•
The print driver is included in the software installer package.
•
For Macintosh computers with macOS version 10.7 or later,
you do not need to install the driver to print on an AirPrint-
certified printer. If you want custom printing features, then
download the print driver.
1
Obtain a copy of the software installer package.
•
From the software CD that came with your printer.
•
From our website or the place where you purchased the
printer.
2
Run the installer, and then follow the instructions on the
computer screen.
Installing the fax driver
1
Go to our website or the place where you purchased the
printer, and then obtain the installer package.
2
Run the installer, and then follow the instructions on the
computer screen.
13


