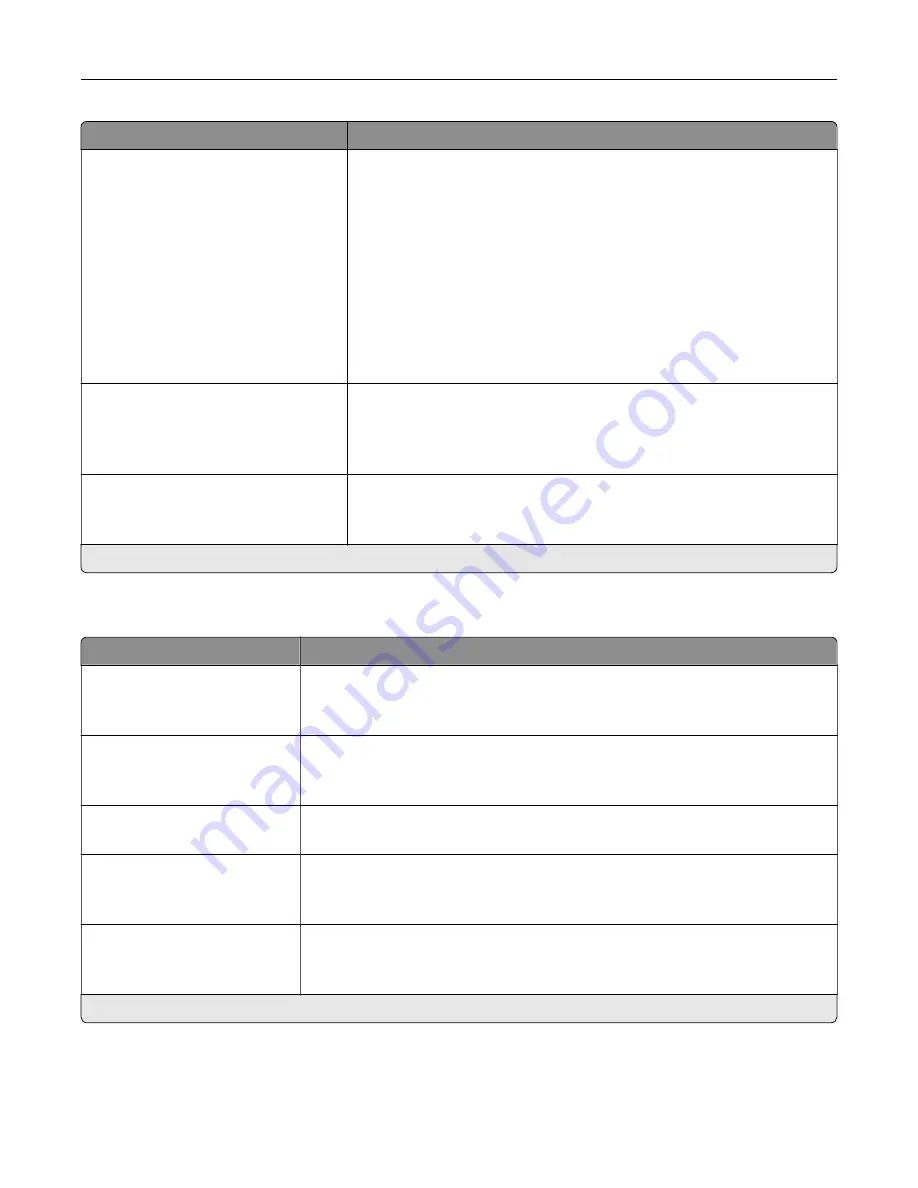
Menu item
Description
Resource Save
Off*
On
Determine what the printer does with downloaded resources, such as
fonts and macros, when it receives a job that requires more than the
available memory.
Notes:
•
When set to Off, the printer retains downloaded resources only until
memory is needed. Resources associated with the inactive printer
language are deleted.
•
When set to On, the printer preserves all the permanent
downloaded resources across all language switches. When
necessary, the printer shows memory full messages instead of
deleting permanent resources.
Print All Order
Alphabetical*
Newest First
Oldest First
Specify the order when you choose to print all held and confidential jobs.
Note:
This menu item appears only when a printer hard disk is installed.
PJL File Access Control
Off*
On
Determine access to Printer Job Language (PJL) files.
Note:
An asterisk (*) next to a value indicates the factory default setting.
Quality
Menu item
Description
Print Mode
Black and White
Color*
Set how the printer generates color content.
Print Resolution
4800 CQ*
1200 dpi
Set the resolution for the printed output.
Note:
4800 CQ provides high
‑
quality output at maximum speed.
Toner Darkness
1 to 5 (4*)
Determine the lightness or darkness of text images.
Halftone
Normal*
Detail
Enhance the printed output to have smoother lines with sharper edges.
Color Saver
Off*
On
Reduce the amount of toner used to print graphics and images.
Note:
When set to On, this setting overrides the value of the Toner Darkness
setting.
Note:
An asterisk (*) next to a value indicates the factory default setting.
Understanding the printer menus
86
Содержание XC8155
Страница 66: ...5 Touch Scan Here If necessary change the scan settings 6 Scan the document Scanning 66 ...
Страница 159: ... Scanner glass pad 3 Close the scanner cover Emptying the hole punch box 1 Open door J Maintaining the printer 159 ...
Страница 160: ...2 Remove and empty the hole punch box 3 Insert the hole punch box 4 Close door J Maintaining the printer 160 ...
Страница 170: ...2 Remove the waste toner bottle 3 Remove the imaging unit 4 Remove the photoconductor unit Maintaining the printer 170 ...
Страница 172: ...Replacing an imaging unit 1 Open door A 2 Remove the waste toner bottle Maintaining the printer 172 ...
Страница 176: ...3 Remove the pick roller 4 Unpack the new pick roller Maintaining the printer 176 ...
Страница 186: ...4 Insert the new transfer roller 5 Remove the white packing material 6 Close door B Maintaining the printer 186 ...
Страница 193: ...2 Open door G 3 Remove the staple cartridge 4 Unpack the new staple cartridge Maintaining the printer 193 ...
Страница 195: ...2 Open door G 3 Pull out the staple cartridge holder Maintaining the printer 195 ...
Страница 218: ...2 Open door G 3 Pull out the staple cartridge holder Clearing jams 218 ...
Страница 222: ... Area J1 Areas J3 and J4 Areas J5 and J6 3 Close door J Clearing jams 222 ...
Страница 227: ...5 Insert the staple cartridge holder 6 Close door J Clearing jams 227 ...
Страница 284: ...Installing the staple finisher 1 Turn off the printer 2 Open door C 3 Remove the paper bail Upgrading and migrating 284 ...
Страница 287: ...4 Open the covers at the side of the caster base 5 Open door C Upgrading and migrating 287 ...


