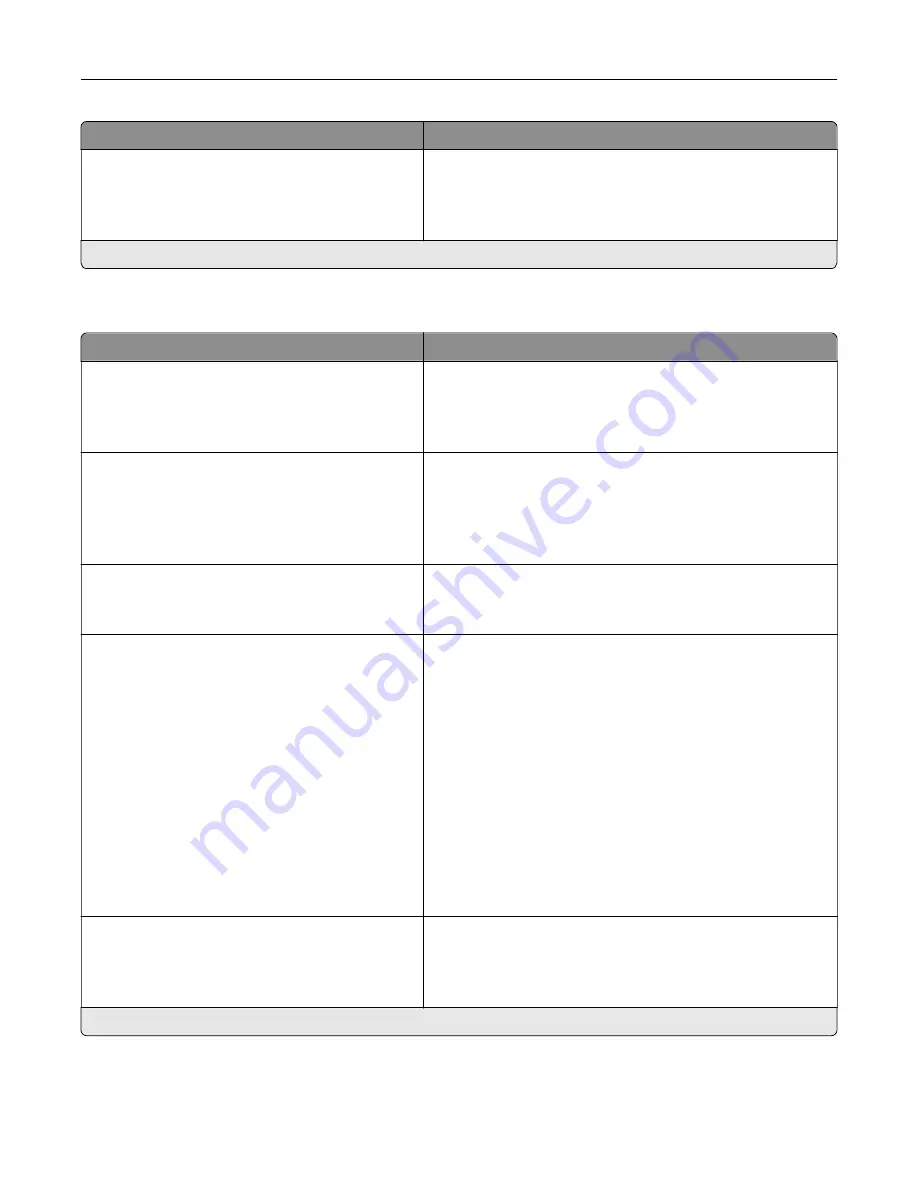
Menu item
Description
Jam Content Recovery
Scanner Jam Recovery
Job level
Page level*
Specify how to restart a scan job after resolving a paper jam.
Note:
An asterisk (*) next to a value indicates the factory default setting.
Power Management
Menu item
Description
Sleep Mode Profile
Print from Sleep Mode
Stay awake after printing
Enter Sleep Mode after printing*
Set the printer to stay in Ready mode or return to Sleep mode
after printing.
Timeouts
Proximity Sensor
Disabled
Short Range
Long Range*
Determines the approximate distance of an object for the
printer to sense it.
Timeouts
Sleep Mode
1–120 minutes (15*)
Set the idle time before the printer begins operating in Sleep
mode.
Timeouts
Hibernate Timeout
Disabled
1 hour
2 hours
3 hours
6 hours
1 day
2 days
3 days*
1 week
2 weeks
1 month
Set the time before the printer turns off.
Timeouts
Hibernate Timeout on Connection
Hibernate
Do Not Hibernate*
Set Hibernate Timeout to turn off the printer while an active
Ethernet connection exists.
Note:
An asterisk (*) next to a value indicates the factory default setting.
Understanding the printer menus
74
Содержание XC8155
Страница 66: ...5 Touch Scan Here If necessary change the scan settings 6 Scan the document Scanning 66 ...
Страница 159: ... Scanner glass pad 3 Close the scanner cover Emptying the hole punch box 1 Open door J Maintaining the printer 159 ...
Страница 160: ...2 Remove and empty the hole punch box 3 Insert the hole punch box 4 Close door J Maintaining the printer 160 ...
Страница 170: ...2 Remove the waste toner bottle 3 Remove the imaging unit 4 Remove the photoconductor unit Maintaining the printer 170 ...
Страница 172: ...Replacing an imaging unit 1 Open door A 2 Remove the waste toner bottle Maintaining the printer 172 ...
Страница 176: ...3 Remove the pick roller 4 Unpack the new pick roller Maintaining the printer 176 ...
Страница 186: ...4 Insert the new transfer roller 5 Remove the white packing material 6 Close door B Maintaining the printer 186 ...
Страница 193: ...2 Open door G 3 Remove the staple cartridge 4 Unpack the new staple cartridge Maintaining the printer 193 ...
Страница 195: ...2 Open door G 3 Pull out the staple cartridge holder Maintaining the printer 195 ...
Страница 218: ...2 Open door G 3 Pull out the staple cartridge holder Clearing jams 218 ...
Страница 222: ... Area J1 Areas J3 and J4 Areas J5 and J6 3 Close door J Clearing jams 222 ...
Страница 227: ...5 Insert the staple cartridge holder 6 Close door J Clearing jams 227 ...
Страница 284: ...Installing the staple finisher 1 Turn off the printer 2 Open door C 3 Remove the paper bail Upgrading and migrating 284 ...
Страница 287: ...4 Open the covers at the side of the caster base 5 Open door C Upgrading and migrating 287 ...


