


Configuring confidential jobs
1
From the control panel, navigate to:
Settings
>
Security
>
Confidential Print Setup
2
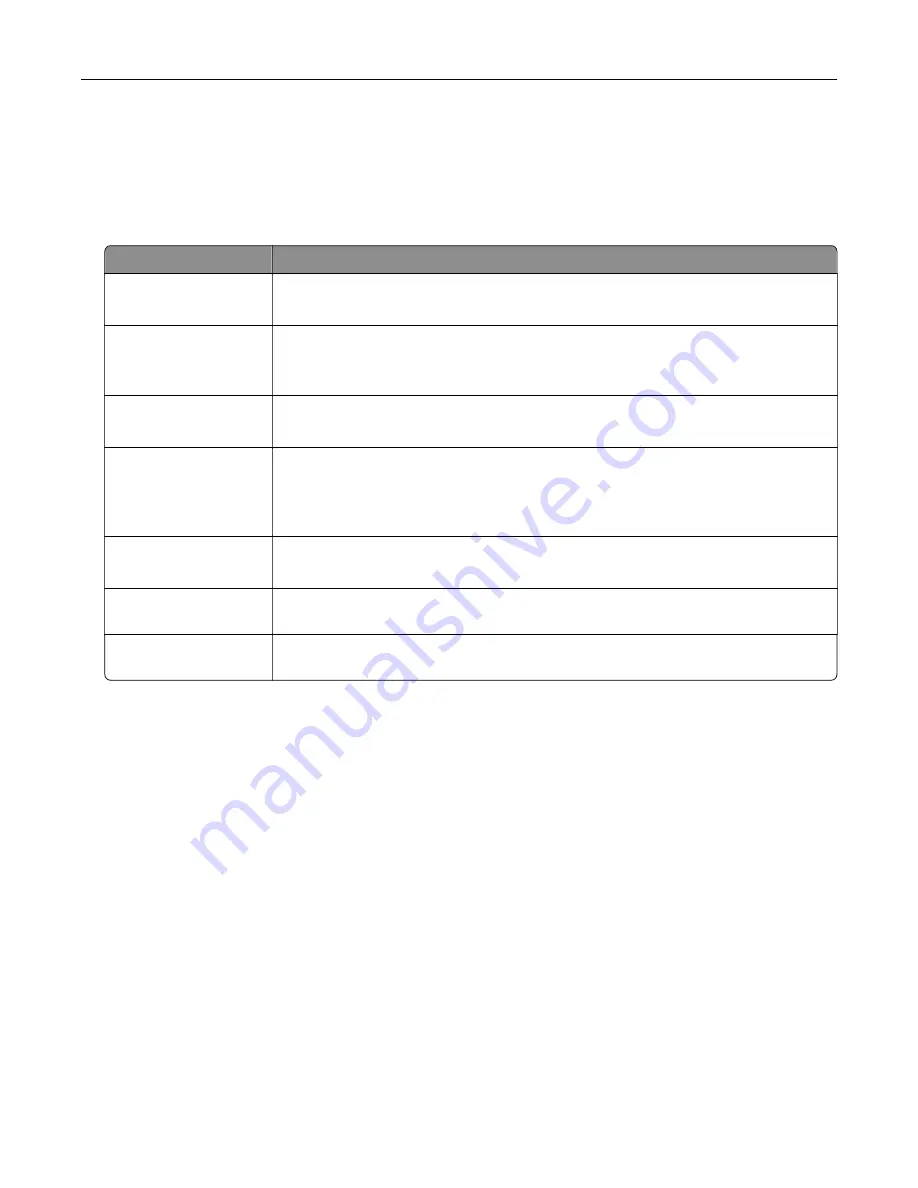
Configure the settings.
Use
To
Max Invalid PIN
Set the number of times an invalid PIN can be entered.
Note:
When the limit is reached, the print jobs for that user name are deleted.
Confidential Job
Expiration
Set the expiration time for confidential print jobs.
Note:
Confidential held jobs are stored in the printer until they are released or
deleted manually.
Repeat Job Expiration
Set the expiration time for a repeat print job.
Note:
Repeat held jobs are stored in the printer memory for reprinting.
Verify Job Expiration
Set the expiration time that the printer prints a copy before printing the remaining
copies.
Note:
Verify jobs print one copy to check if it is satisfactory before printing the
remaining copies.
Reserve Job Expiration
Set the expiration time that the printer stores print jobs.
Note:
Reserve held jobs are automatically deleted after printing.
Require All Jobs to be
Held
Set the printer to hold all print jobs.
Keep duplicate
documents
Set the printer to print all documents with the same file name.
Printing confidential and other held jobs
For Windows users
1
With a document open, click
File
>
.
2
Click
Properties
,
Preferences
,
Options
, or
Setup
.
3
Click
Print and Hold
.
4
Select
Use Print and Hold
, and then assign a user name.
5
Select the print job type (Confidential, Repeat, Reserve, or Verify).
If the print job is confidential, then enter a four
‑
digit PIN.
6
Click
OK
or
.
Printing
43
Содержание XC8155
Страница 66: ...5 Touch Scan Here If necessary change the scan settings 6 Scan the document Scanning 66 ...
Страница 159: ... Scanner glass pad 3 Close the scanner cover Emptying the hole punch box 1 Open door J Maintaining the printer 159 ...
Страница 160: ...2 Remove and empty the hole punch box 3 Insert the hole punch box 4 Close door J Maintaining the printer 160 ...
Страница 170: ...2 Remove the waste toner bottle 3 Remove the imaging unit 4 Remove the photoconductor unit Maintaining the printer 170 ...
Страница 172: ...Replacing an imaging unit 1 Open door A 2 Remove the waste toner bottle Maintaining the printer 172 ...
Страница 176: ...3 Remove the pick roller 4 Unpack the new pick roller Maintaining the printer 176 ...
Страница 186: ...4 Insert the new transfer roller 5 Remove the white packing material 6 Close door B Maintaining the printer 186 ...
Страница 193: ...2 Open door G 3 Remove the staple cartridge 4 Unpack the new staple cartridge Maintaining the printer 193 ...
Страница 195: ...2 Open door G 3 Pull out the staple cartridge holder Maintaining the printer 195 ...
Страница 218: ...2 Open door G 3 Pull out the staple cartridge holder Clearing jams 218 ...
Страница 222: ... Area J1 Areas J3 and J4 Areas J5 and J6 3 Close door J Clearing jams 222 ...
Страница 227: ...5 Insert the staple cartridge holder 6 Close door J Clearing jams 227 ...
Страница 284: ...Installing the staple finisher 1 Turn off the printer 2 Open door C 3 Remove the paper bail Upgrading and migrating 284 ...
Страница 287: ...4 Open the covers at the side of the caster base 5 Open door C Upgrading and migrating 287 ...