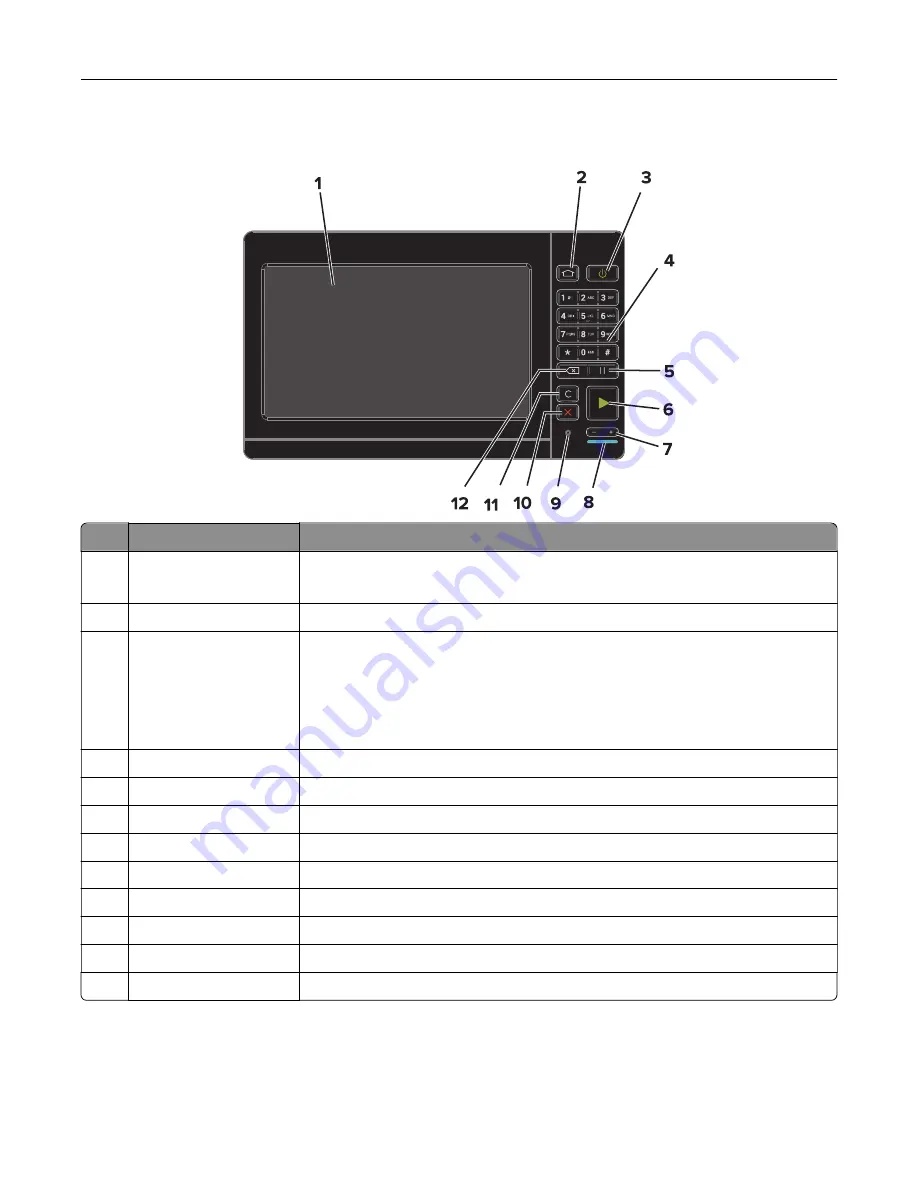
Using the control panel
Use the
To
1
Display
•
View the printer messages and supply status.
•
Set up and operate the printer.
2
Home button
Go to the home screen.
3
Power button
•
Turn on or turn off the printer.
Note:
To turn off the printer, press and hold the power button for five
seconds.
•
Set the printer to Sleep or Hibernate mode.
•
Wake the printer from Sleep or Hibernate mode.
4
Keypad
Enter numbers or symbols in an input field.
5
Pause button
Place a dial pause in a fax number.
6
Start button
Start a job, depending on which mode is selected.
7
Volume buttons
Adjust the volume of the headset or speaker.
8
Indicator light
Check the status of the printer.
9
Headset or speaker port Attach a headset or speaker.
10
Stop or Cancel button
Stop the current job.
11
Clear all or Reset button Reset the default settings of a function such as copying, faxing, or scanning.
12
Backspace button
Move the cursor backward and delete a character in an input field.
Learning about the printer
16
Содержание XC8155
Страница 66: ...5 Touch Scan Here If necessary change the scan settings 6 Scan the document Scanning 66 ...
Страница 159: ... Scanner glass pad 3 Close the scanner cover Emptying the hole punch box 1 Open door J Maintaining the printer 159 ...
Страница 160: ...2 Remove and empty the hole punch box 3 Insert the hole punch box 4 Close door J Maintaining the printer 160 ...
Страница 170: ...2 Remove the waste toner bottle 3 Remove the imaging unit 4 Remove the photoconductor unit Maintaining the printer 170 ...
Страница 172: ...Replacing an imaging unit 1 Open door A 2 Remove the waste toner bottle Maintaining the printer 172 ...
Страница 176: ...3 Remove the pick roller 4 Unpack the new pick roller Maintaining the printer 176 ...
Страница 186: ...4 Insert the new transfer roller 5 Remove the white packing material 6 Close door B Maintaining the printer 186 ...
Страница 193: ...2 Open door G 3 Remove the staple cartridge 4 Unpack the new staple cartridge Maintaining the printer 193 ...
Страница 195: ...2 Open door G 3 Pull out the staple cartridge holder Maintaining the printer 195 ...
Страница 218: ...2 Open door G 3 Pull out the staple cartridge holder Clearing jams 218 ...
Страница 222: ... Area J1 Areas J3 and J4 Areas J5 and J6 3 Close door J Clearing jams 222 ...
Страница 227: ...5 Insert the staple cartridge holder 6 Close door J Clearing jams 227 ...
Страница 284: ...Installing the staple finisher 1 Turn off the printer 2 Open door C 3 Remove the paper bail Upgrading and migrating 284 ...
Страница 287: ...4 Open the covers at the side of the caster base 5 Open door C Upgrading and migrating 287 ...


