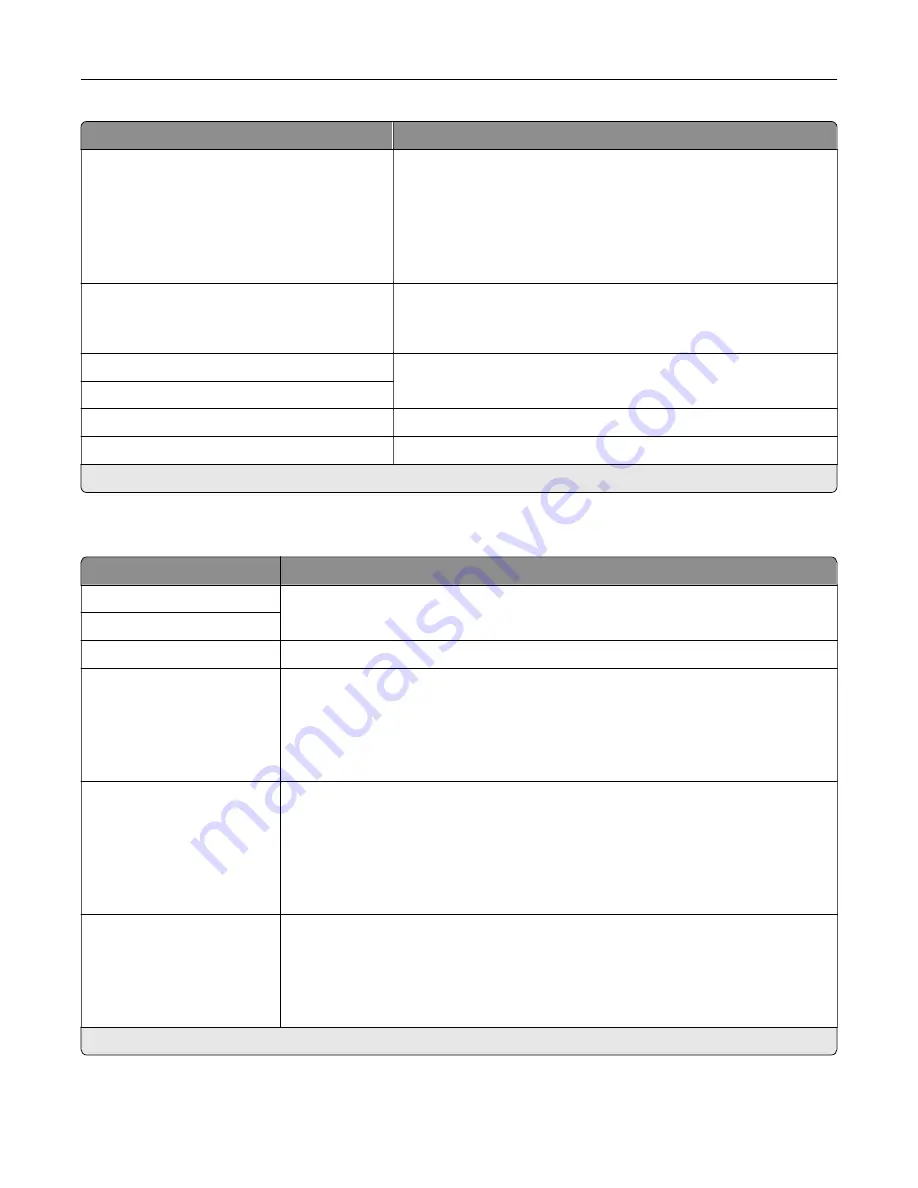
Menu item
Description
User
‑
Initiated E
‑
None*
Use Device SMTP Credentials
Use Session User ID and Password
Use Session E
‑
mail address and Password
Prompt user
Specify whether credentials are required for user
‑
initiated e
‑
mail.
Use Active Directory Device Credentials
Off*
On
Specify whether credentials are required for user
‑
initiated e
‑
mail.
Device Userid
Specify the user ID and password to connect to the SMTP server.
Device Password
Kerberos 5 REALM
Specify the realm for the Kerberos 5 authentication protocol.
NTLM Domain
Specify the domain name for the NTLM security protocol.
Note:
An asterisk (*) next to a value indicates the factory default setting.
E
‑
mail Defaults
Menu item
Description
Subject:
Specify the e
‑
mail subject and message.
Message:
File Name
Specify the filename for the scanned document.
Format
JPEG (.jpg)
PDF (.pdf)*
TIFF (.tif)
XPS (.xps)
Specify the file format of the scanned document.
PDF Settings
PDF Version (1.5*)
Archival Version (A
‑
1a*)
Highly Compressed (Off*)
Secure (Off*)
Archival (PDF/A) (Off*)
Configure the PDF settings of the scanned document.
Notes:
•
Archival Version and Archival (PDF/A) are supported only when PDF Version is
set to 1.4.
•
Highly Compressed appears only when a hard disk is installed.
Content Type
Text
Text/Photo*
Photo
Graphics
Improve the output result based on the content type of the original document.
Note:
An asterisk (*) next to a value indicates the factory default setting.
Understanding the printer menus
114
Содержание XC8155
Страница 66: ...5 Touch Scan Here If necessary change the scan settings 6 Scan the document Scanning 66 ...
Страница 159: ... Scanner glass pad 3 Close the scanner cover Emptying the hole punch box 1 Open door J Maintaining the printer 159 ...
Страница 160: ...2 Remove and empty the hole punch box 3 Insert the hole punch box 4 Close door J Maintaining the printer 160 ...
Страница 170: ...2 Remove the waste toner bottle 3 Remove the imaging unit 4 Remove the photoconductor unit Maintaining the printer 170 ...
Страница 172: ...Replacing an imaging unit 1 Open door A 2 Remove the waste toner bottle Maintaining the printer 172 ...
Страница 176: ...3 Remove the pick roller 4 Unpack the new pick roller Maintaining the printer 176 ...
Страница 186: ...4 Insert the new transfer roller 5 Remove the white packing material 6 Close door B Maintaining the printer 186 ...
Страница 193: ...2 Open door G 3 Remove the staple cartridge 4 Unpack the new staple cartridge Maintaining the printer 193 ...
Страница 195: ...2 Open door G 3 Pull out the staple cartridge holder Maintaining the printer 195 ...
Страница 218: ...2 Open door G 3 Pull out the staple cartridge holder Clearing jams 218 ...
Страница 222: ... Area J1 Areas J3 and J4 Areas J5 and J6 3 Close door J Clearing jams 222 ...
Страница 227: ...5 Insert the staple cartridge holder 6 Close door J Clearing jams 227 ...
Страница 284: ...Installing the staple finisher 1 Turn off the printer 2 Open door C 3 Remove the paper bail Upgrading and migrating 284 ...
Страница 287: ...4 Open the covers at the side of the caster base 5 Open door C Upgrading and migrating 287 ...


