Diagnostic information
2-8
Marketing Name
Go Back
Previous
Next
Blank page
Blank pages may be caused by improperly installed ink cartridges. Make sure the ink cartridges are properly
installed.Reinstall the ink cartridges. The cartridges should
click
firmly into their matching color slots.
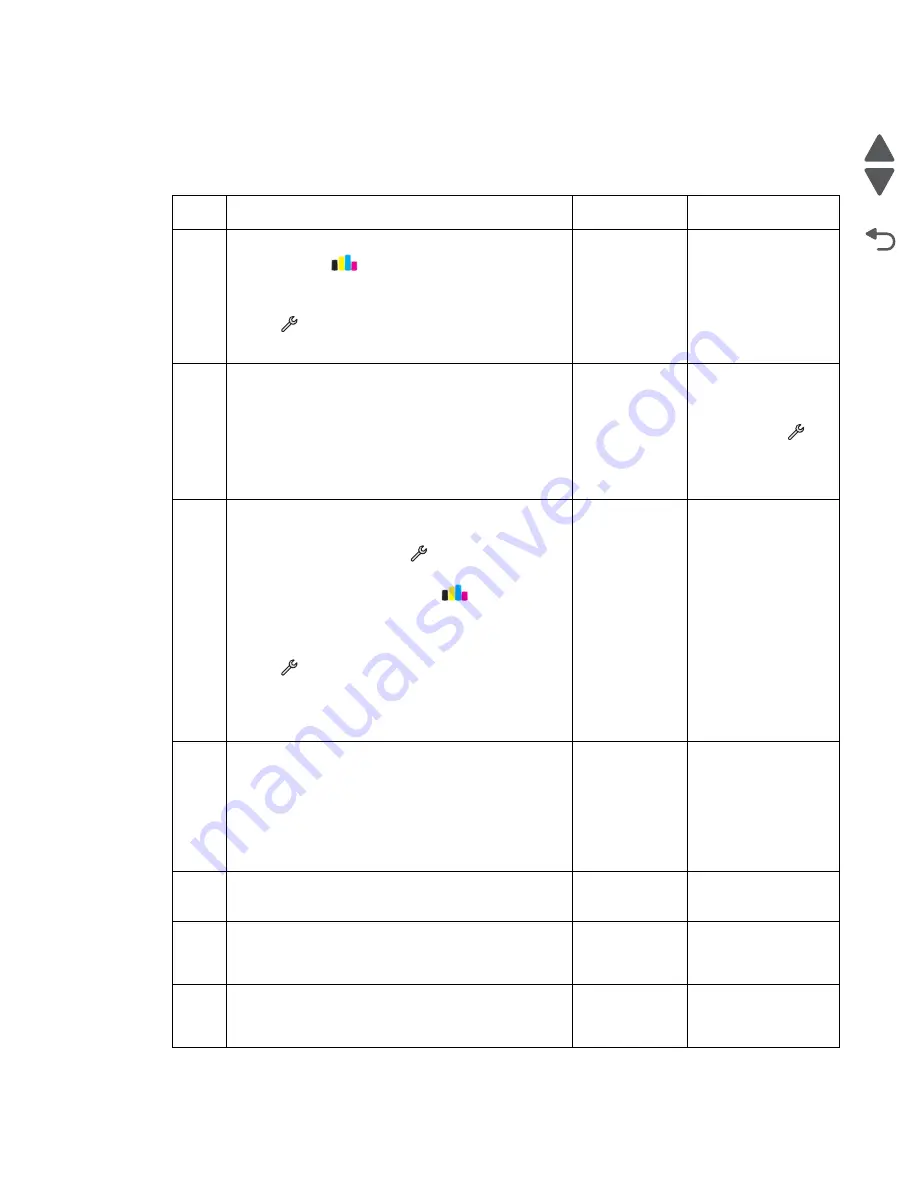
Step
Questions / actions
Yes
No
1
Deep clean or clean the printhead. From the home
screen, touch
>
More Options
>
Deep
Clean
Printhead
>
Deep Clean Color
and Black
.
Run a test print. From the home screen,
touch
>
Print Reports
>
Demonstration Page
.
Does the problem remain?
Go to step 2.
Problem resolved
2
Check the ink tubes going to the printhead if they are
filled with ink and that no air is inside the tubes.
Is ink present in all the ink tubes?
Go to step 3.
Bring the printer up in
Manufacturing mode.
From the home
screen, touch
>
Manufacturing
Test
>
Initial prime
sequence.
3
Align the printer. Do either of the following:
• Bring the printer up in Manufacturing mode. From
the home screen, touch
>
Manufacturing
Test
>
Align Printer
.
• From the home scree, touch
>
More
Options
>
Align Printer
.
Run a test print. From the home screen,
touch
>
Print Reports
>
Demonstration Page
.
Make sure the alignment sensor is not contaminated
with ink mist.
Does the problem remain?
Go to step 4.
Problem resolved
4
Check for the following:
• If the printhead is properly connected to the carrier
card.
• If the carrier card is properly connected to the
system board.
Are the printhead and cables properly connected?
Go to step 5.
Reseat the cables.
5
Check the carrier card for any damage.
Is the carrier card free from damage?
Go to step 6.
Go to step 7.
6
Replace the printhead. See
Does the problem remain?
Go to step 7.
Problem resolved
7
Replace the carrier card. See
.
Does the problem remain?
Go to step 8.
Problem resolved
Содержание Pro5500 Series
Страница 11: ...Safety information xi 4447 20x Go Back Previous Next 012 3456789...
Страница 191: ...Repair information 4 22 4447 20x Go Back Previous Next Disassembly Flow chart This is the photo of the ADF input tray...
Страница 254: ...4 85 Service Manual 4447 20x Go Back Previous Next Disassembly Flow chart...
Страница 260: ...5 6 Service Manual 4447 20x Go Back Previous Next Wireless card Card reader JP3...
Страница 261: ...Connector locations 5 7 4447 20x Go Back Previous Next Carrier card J1 J2 J3...
Страница 262: ...5 8 Service Manual 4447 20x Go Back Previous Next...
Страница 266: ...7 2 Service Manual 4447 20x Go Back Previous Next Assembly 1 Covers 5 6 8 9 10 11 12 13 16 17 1 14 15 7 2 3 4...
Страница 268: ...7 4 Service Manual 4447 20x Go Back Previous Next Assembly 2 Engine 1 2 3 5 4...
Страница 270: ...7 6 Service Manual 4447 20x Go Back Previous Next Assembly 3 Fluid system assembly 1 3 2 5 4...
Страница 274: ...7 10 Service Manual 4447 20x Go Back Previous Next...
Страница 277: ...I 3 Service Manual 4447 20x Go Back Previous Next...


