


Software
Supported operating systems
Using the software CD, you can install the printer software on the following operating systems:
•
Windows 10
•
Windows 8.1
•
Windows Server 2012 R2
•
Windows Server 2012
•
Windows 7 SP1
•
Windows Server 2008 R2 SP1
•
Windows Server 2008 SP2
•
Windows Vista SP2
•
Mac OS X version 10.7 or later
•
Red Hat Enterprise Linux WS
•
openSUSE Linux
•
SUSE Linux Enterprise Server
•
Debian GNU/Linux
•
Ubuntu
•
Fedora
•
IBM AIX
•
Oracle Solaris SPARC
•
Oracle Solaris x86
Notes:
•
For Windows operating systems, the print drivers and utilities are supported in both 32
‑
and 64
‑
bit
versions.
•
For drivers and utilities that are compatible with Mac OS X version 10.6 or earlier and for specific
supported Linux or UNIX operating system versions, go to our website.
•
For more information on software compatibility with all other operating systems, contact customer
support.
Installing the printer software
Notes:
•
The print driver is included in the software installer package.
•
For Macintosh computers with macOS version 10.7 or later, you do not need to install the driver to print
on an AirPrint-certified printer. If you want custom printing features, then download the print driver.
1
Obtain a copy of the software installer package.
•
From the software CD that came with your printer.
•
From our website or the place where you purchased the printer.
Upgrading and migrating
200
Содержание MX-B557P
Страница 1: ...LASER PRINTER MX B557P MX B707P User s Guide October 2021 Machine type 4064 Models 29H 69H ...
Страница 5: ...Upgrading and migrating 176 Hardware 176 Software 200 Firmware 202 Notices 204 Index 213 Contents 5 ...
Страница 90: ...For non touch screen printer models press to navigate through the settings Understanding the printer menus 90 ...
Страница 103: ...5 Insert the pick roller 6 Close the multipurpose feeder 7 Turn on the printer Maintaining the printer 103 ...
Страница 109: ...2 Unlock the fuser 3 Remove the used fuser 4 Unpack the new fuser Maintaining the printer 109 ...
Страница 110: ...5 Insert the new fuser until it clicks into place 6 Lock the fuser 7 Close the door Maintaining the printer 110 ...
Страница 114: ...3 Remove the used hot roll fuser wiper Maintaining the printer 114 ...
Страница 120: ...2 Remove the used pick roller 3 Unpack the new pick roller Maintaining the printer 120 ...
Страница 121: ...4 Install the new pick roller 5 Close the multipurpose feeder Maintaining the printer 121 ...
Страница 142: ...2 Remove the staple cartridge holder 3 Remove the loose staples Clearing jams 142 ...
Страница 146: ...5 Insert the staple cartridge holder until it clicks into place 6 Close the door Clearing jams 146 ...
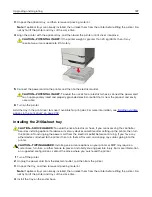
Страница 193: ...b Insert the tabs of the guide bar into the output expander Upgrading and migrating 193 ...