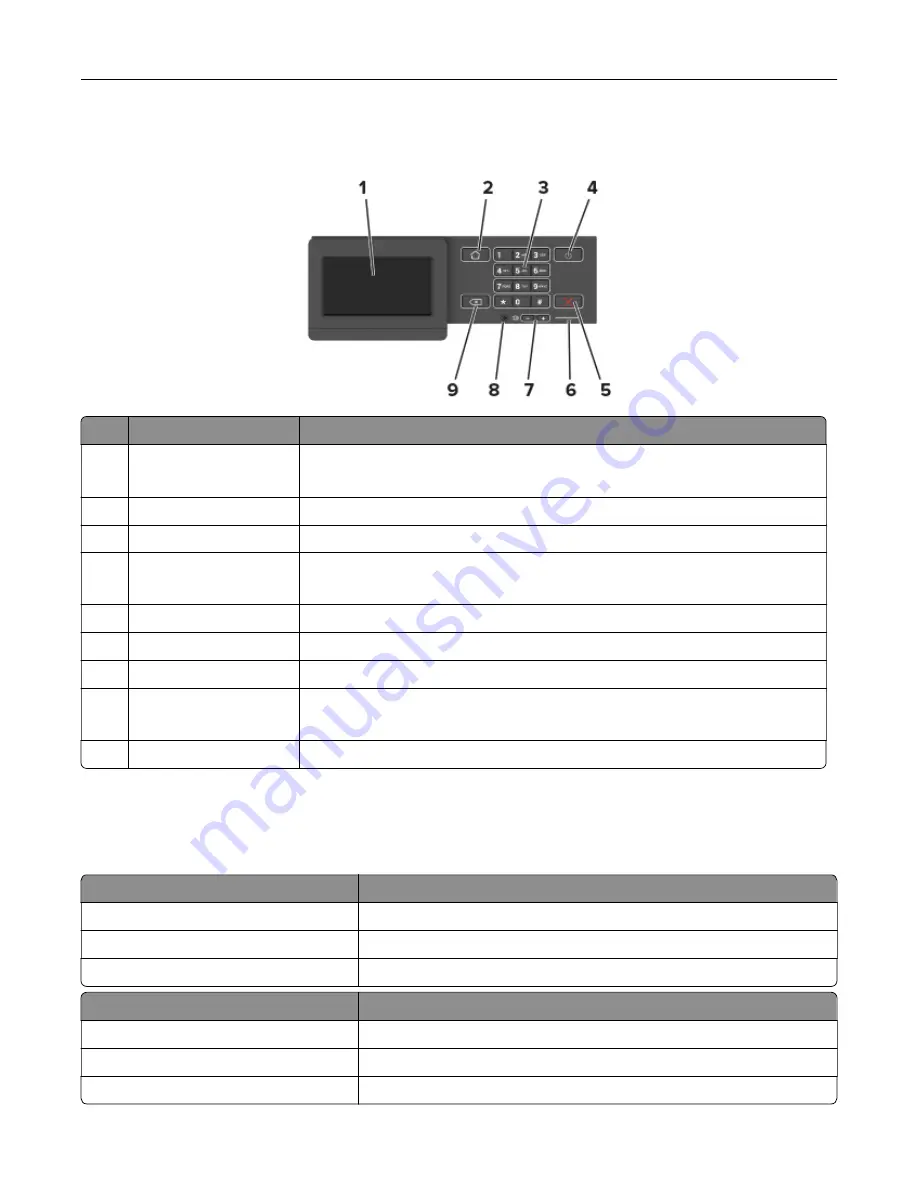
Panel with touch-screen display
Use the
To
1
Display
•
View printer messages and supply status.
•
Set up and operate the printer.
2
Home button
Go to the home screen.
3
Numeric keypad
Enter numbers or symbols in an input field.
4
Power button
Turn on or turn off the printer.
Note:
To turn off the printer, press and hold the power button for five seconds.
5
Stop or Cancel button
Stop the current printer task.
6
Indicator light
Check the printer status.
7
Volume buttons
Adjust the speaker volume.
8
Headset or speaker port Attach a headset or speaker.
Note:
This feature is available only in some printer units.
9
Back button
Return to the previous screen.
Understanding the status of the power button and
indicator light
Indicator light
Printer status
Off
The printer is off or in Hibernate mode.
Blue
The printer is ready or processing data.
Red
The printer requires user intervention.
Power button light
Printer status
Off
The printer is off, ready, or processing data.
Solid amber
The printer is in Sleep mode.
Blinking amber
The printer is in Hibernate mode.
Using the control panel
14
Содержание MX-B557P
Страница 1: ...LASER PRINTER MX B557P MX B707P User s Guide October 2021 Machine type 4064 Models 29H 69H ...
Страница 5: ...Upgrading and migrating 176 Hardware 176 Software 200 Firmware 202 Notices 204 Index 213 Contents 5 ...
Страница 90: ...For non touch screen printer models press to navigate through the settings Understanding the printer menus 90 ...
Страница 103: ...5 Insert the pick roller 6 Close the multipurpose feeder 7 Turn on the printer Maintaining the printer 103 ...
Страница 109: ...2 Unlock the fuser 3 Remove the used fuser 4 Unpack the new fuser Maintaining the printer 109 ...
Страница 110: ...5 Insert the new fuser until it clicks into place 6 Lock the fuser 7 Close the door Maintaining the printer 110 ...
Страница 114: ...3 Remove the used hot roll fuser wiper Maintaining the printer 114 ...
Страница 120: ...2 Remove the used pick roller 3 Unpack the new pick roller Maintaining the printer 120 ...
Страница 121: ...4 Install the new pick roller 5 Close the multipurpose feeder Maintaining the printer 121 ...
Страница 142: ...2 Remove the staple cartridge holder 3 Remove the loose staples Clearing jams 142 ...
Страница 146: ...5 Insert the staple cartridge holder until it clicks into place 6 Close the door Clearing jams 146 ...
Страница 193: ...b Insert the tabs of the guide bar into the output expander Upgrading and migrating 193 ...


