


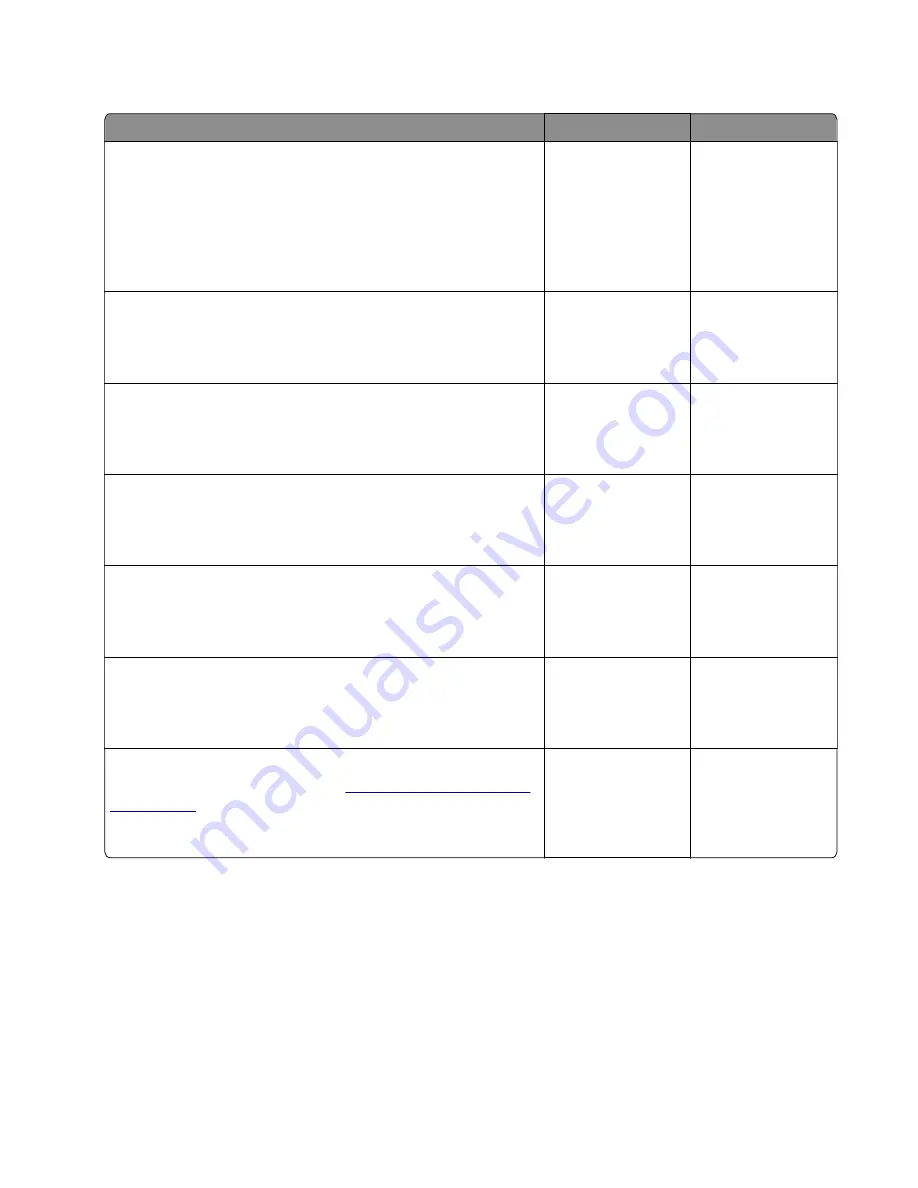
USB print service check
Action
Yes
No
Step 1
Enter Diagnostic mode and perform a print test to make sure the
printer prints correctly. Verify that the indicator light is on, and then
print the menu settings page. Navigate to:
Reports
>
Menu Settings Page
Are the internal pages printing?
Go to step 2.
Go to step 7.
Step 2
Verify if the user's applications are set up correctly.
Are they set up correctly?
Go to step 4.
Go to step 3.
Step 3
Try a different application to run a print job.
Did the output print?
This is not a printer
issue.
Go to step 4.
Step 4
Check the printer driver.
Is the correct driver being used and properly set up?
Go to step 6.
Go to step 5.
Step 5
Use a different driver.
Did this fix the issue?
The problem is
solved.
Go to step 6.
Step 6
Try a different USB cable.
Did this fix the issue?
The problem is
solved.
Go to step 7.
Step 7
Replace the controller board. Go to
Did this fix the issue?
The problem is
solved.
Contact the next
level support
Network service check
Note:
Before starting this service check, print out the network setup page. This page is found under
Menu
>
Reports
>
Network Settings
. Consult the network administrator to verify that the physical and
wireless network settings displayed on the network settings page for the device are properly
configured. If a wireless network is used, then verify that the printer is in range of the host computer or
wireless access point, and there is no electronic interference. Have the network administrator verify that
the device is using the correct SSID, and wireless security protocols. For more network troubleshooting
information, consult the Lexmark Network Setup Guide.
4514-330
Diagnostics and troubleshooting
157
Содержание MS312
Страница 11: ...Part number index 335 Part name index 339 4514 330 Table of contents 11 ...
Страница 12: ...4514 330 Table of contents 12 ...
Страница 182: ...4514 330 182 ...
Страница 214: ...5 Remove the three screws B and then remove the left front mount B 4514 330 Parts removal 214 ...
Страница 230: ...5 Remove the four screws B and then remove the right front mount B 4514 330 Parts removal 230 ...
Страница 232: ...Cartridge plunger removal 1 Open the front door 2 Tilt the cartridge plunger 4514 330 Parts removal 232 ...
Страница 234: ...b Set the spring over the plunger 4514 330 Parts removal 234 ...
Страница 240: ...3 Squeeze the latches B to release the left and right links B 4514 330 Parts removal 240 ...
Страница 262: ...c Bring the cable in front of the two cable holders near the ACM shaft 4514 330 Parts removal 262 ...
Страница 263: ...d Loop the cable behind the right cable holder e Twist the cable so that it forms a loop 4514 330 Parts removal 263 ...
Страница 267: ...11 Disconnect the two springs D D 4514 330 Parts removal 267 ...
Страница 269: ...15 Rotate and then remove the 2nd pickup bushing 16 Pull out the shaft and remove the ACM 4514 330 Parts removal 269 ...
Страница 284: ...3 Swing the right cover backward to remove 4 Remove the screw D 4514 330 Parts removal 284 ...
Страница 286: ...4514 330 286 ...
Страница 291: ...4514 330 291 ...
Страница 293: ...Assembly 1 Covers 4514 330 Parts catalog 293 ...
Страница 295: ...Assembly 2 Electronics 1 1 2 3 4 5 7 8 9 6 4514 330 Parts catalog 295 ...
Страница 297: ...Assembly 3 Electronics 2 4 3 2 1 6 5 4514 330 Parts catalog 297 ...
Страница 299: ...4514 330 Parts catalog 299 ...
Страница 300: ...Assembly 4 Frame 2 5 6 9 10 11 13 14 12 8 1 4 4 3 7 4514 330 Parts catalog 300 ...
Страница 302: ...4514 330 Parts catalog 302 ...
Страница 303: ...Assembly 5 Option trays 3 4 5 6 1 2 4514 330 Parts catalog 303 ...
Страница 306: ...4514 330 Parts catalog 306 ...
Страница 308: ...4514 330 308 ...
Страница 312: ...4514 330 312 ...
Страница 314: ...4514 330 314 ...
Страница 326: ...4514 330 326 ...
Страница 338: ...4514 330 Part number index 338 ...
Страница 342: ...4514 330 Part name index 342 ...


