


Adding available options in the print driver
For Windows users
1
Open the printers folder.
2
Select the printer you want to update, and then do either of the following:
•
For Windows 7 or later, select
Printer properties
.
•
For earlier versions, select
Properties
.
3
Navigate to the Configuration tab, and then select
Update Now
‑
Ask Printer
.
4
Apply the changes.
For Macintosh users
1
From System Preferences in the Apple menu, navigate to your printer, and then select
Options & Supplies
.
2
Navigate to the list of hardware options, and then add any installed options.
3
Apply the changes.
Firmware
Exporting or importing a configuration file
You can export the configuration settings of your printer into a text file, and then import the file to apply the
settings to other printers.
1
Open a web browser, and then type the printer IP address in the address field.
Notes:
•
View the printer IP address on the printer home screen. The IP address appears as four sets of
numbers separated by periods, such as 123.123.123.123.
•
If you are using a proxy server, then temporarily disable it to load the web page correctly.
2
From the Embedded Web Server, click
Export Configuration
or
Import Configuration
.
3
Follow the instructions on the screen.
4
If the printer supports applications, then do the following:
a
Click
Apps
> select the application >
Configure
.
b
Click
Export
or
Import
.
Updating firmware
Some applications require a minimum device firmware level to operate correctly.
For more information on updating the device firmware, contact your Lexmark representative.
1
Open a web browser, and then type the printer IP address in the address field.
Upgrading and migrating
312
Содержание CX920
Страница 164: ... Scanner glass Scanner glass pad 3 Close the scanner cover Maintaining the printer 164 ...
Страница 167: ...2 Remove and then empty the hole punch box 3 Insert the hole punch box 4 Close the door Maintaining the printer 167 ...
Страница 172: ...5 Insert the new toner cartridge 6 Remove the waste toner bottle Maintaining the printer 172 ...
Страница 177: ...8 Insert the waste toner bottle and then close the door Maintaining the printer 177 ...
Страница 189: ...Replacing the ADF separator roller 1 Turn off the printer 2 Remove the ADF separator pad Maintaining the printer 189 ...
Страница 192: ...2 Open door B 3 Remove the ADF pick and feed rollers 4 Unpack the new pick and feed rollers Maintaining the printer 192 ...
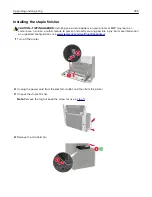
Страница 194: ...2 Remove the empty staple cartridge 3 Unpack the new staple cartridge Maintaining the printer 194 ...
Страница 207: ... Below the fuser area Duplex area Clearing jams 207 ...
Страница 212: ...2 Open door J Clearing jams 212 ...
Страница 214: ... Areas H1 and H2 Area H6 Clearing jams 214 ...
Страница 218: ...2 Remove the staple cartridge holder 3 Remove the loose staples Clearing jams 218 ...
Страница 220: ...2 Remove the staple cartridge holder 3 Remove the loose staples Clearing jams 220 ...
Страница 222: ...2 Remove the staple cartridge holder 3 Remove the loose staples Clearing jams 222 ...
Страница 272: ...6 Remove the controller board shield 7 Unpack the printer hard disk Upgrading and migrating 272 ...
Страница 276: ...6 Remove the controller board shield Upgrading and migrating 276 ...
Страница 279: ...4 Remove the controller board shield Upgrading and migrating 279 ...
Страница 281: ...8 Attach the thumbscrews 9 Connect the wireless print server to the controller board Upgrading and migrating 281 ...
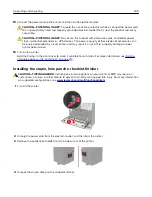
Страница 285: ...7 Connect the tray connector to the printer 8 Open trays 2 and 3 Upgrading and migrating 285 ...
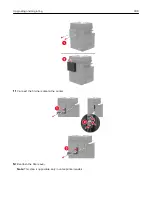
Страница 290: ...9 Remove the stabilizing feet from the tray Upgrading and migrating 290 ...
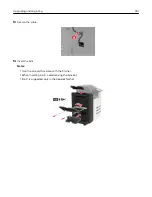
Страница 294: ...17 Secure the tray cable with the clamp Upgrading and migrating 294 ...
Страница 295: ...18 Connect the tray cable to the printer 19 Attach the tray cable cover Upgrading and migrating 295 ...
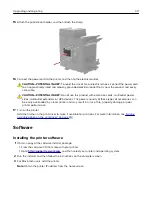
Страница 296: ...20 Slide the tray until it clicks into place 21 Attach the stabilizing feet to the printer Upgrading and migrating 296 ...
Страница 301: ...7 Remove the paper guides 8 Attach the sensor cover Upgrading and migrating 301 ...
Страница 307: ...8 Attach the finisher to the printer Upgrading and migrating 307 ...


