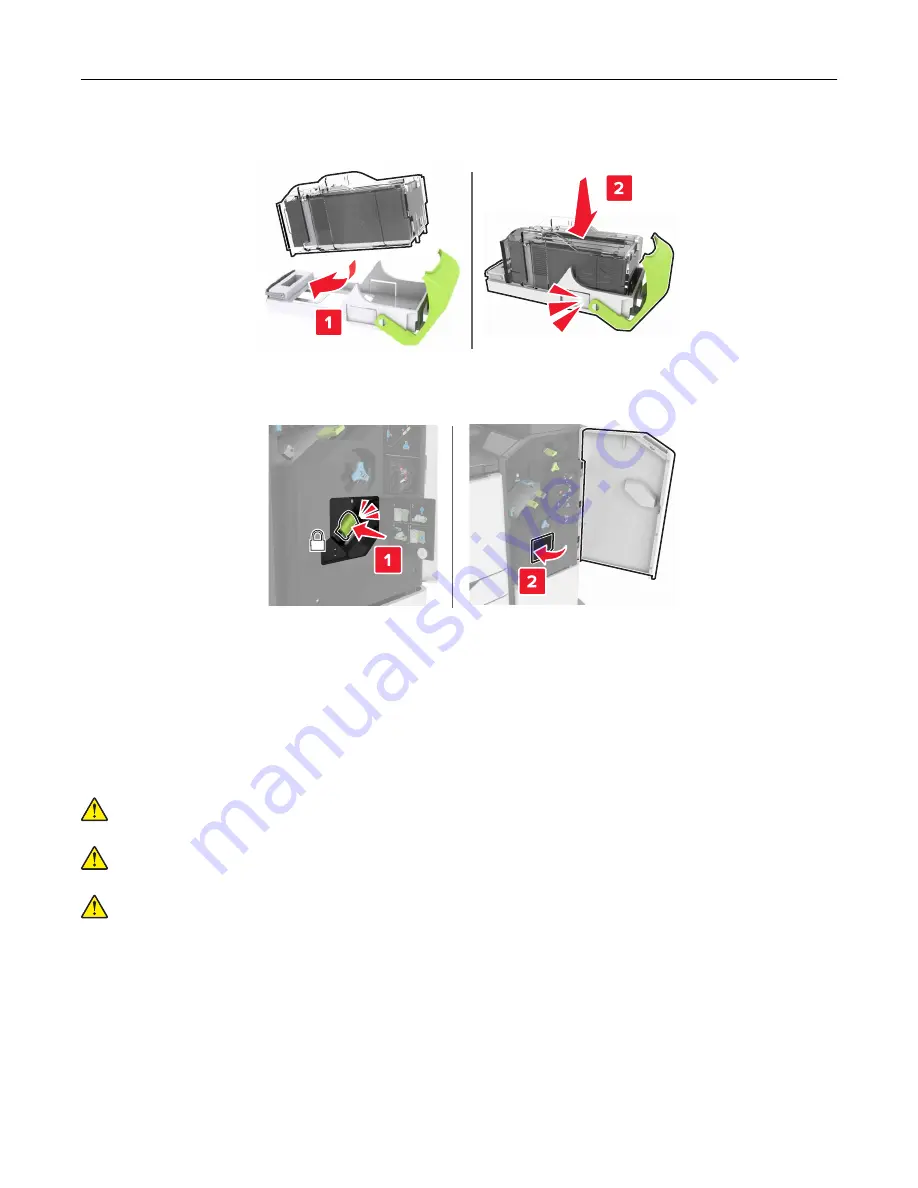
5
Insert the staple cartridge until it
clicks
into place.
6
Insert the staple cartridge holder until it
clicks
into place.
7
Close door J.
Moving the printer
Moving the printer to another location
CAUTION—POTENTIAL INJURY:
The printer weight is greater than 18 kg (40 lb) and requires two or
more trained personnel to lift it safely.
CAUTION—POTENTIAL INJURY:
To avoid the risk of fire or electrical shock, use only the power cord
provided with this product or the manufacturer's authorized replacement.
CAUTION—POTENTIAL INJURY:
When moving the printer, follow these guidelines to avoid personal
injury or printer damage:
•
Make sure that all doors and trays are closed.
•
Turn off the printer, and then unplug the power cord from the electrical outlet.
•
Disconnect all cords and cables from the printer.
•
If the printer has a caster base, then carefully roll it to the new location. Use caution when passing over
thresholds and breaks in flooring.
•
If the printer does not have a caster base but is configured with optional trays, then lift the printer off the
trays. Do not try to lift the printer and the trays at the same time.
•
Always use the handholds on the printer to lift it.
Maintaining the printer
100
Содержание CX820 Series
Страница 1: ...XC8100 Series User s Guide March 2016 www lexmark com Machine type s 7564 Model s 596 598 ...
Страница 60: ...2 Remove and empty the hole punch box 3 Insert the hole punch box 4 Close door J Maintaining the printer 60 ...
Страница 64: ...2 Open door A 3 Remove the waste toner bottle Maintaining the printer 64 ...
Страница 69: ...2 Open door A 3 Remove the waste toner bottle Maintaining the printer 69 ...
Страница 72: ...2 Open door A 3 Remove the waste toner bottle Maintaining the printer 72 ...
Страница 76: ...3 Remove the pick roller 4 Unpack the new pick roller Maintaining the printer 76 ...
Страница 83: ...4 Remove the waste toner bottle 5 Open door A1 6 Remove the transfer belt Maintaining the printer 83 ...
Страница 93: ...2 Open door G 3 Remove the staple cartridge 4 Unpack the new staple cartridge Maintaining the printer 93 ...
Страница 95: ...2 Open door G 3 Pull out the staple cartridge holder Maintaining the printer 95 ...
Страница 113: ...2 Remove the jammed paper Note Make sure that all paper fragments are removed Clearing jams 113 ...
Страница 119: ...2 Open door G 3 Pull out the staple cartridge holder Clearing jams 119 ...
Страница 123: ... Area J1 Areas J3 and J4 Areas J5 and J6 3 Close door J Clearing jams 123 ...
Страница 127: ...Staple jam in door J 1 Open door J 2 Remove the staple cartridge holder Clearing jams 127 ...
Страница 129: ...5 Insert the staple cartridge holder 6 Close door J Clearing jams 129 ...
Страница 179: ...Installing the staple finisher 1 Turn off the printer 2 Open door C 3 Remove the paper bail Upgrading and migrating 179 ...
Страница 182: ...4 Open the covers at the right side of the caster base 5 Open door C Upgrading and migrating 182 ...


