Paper
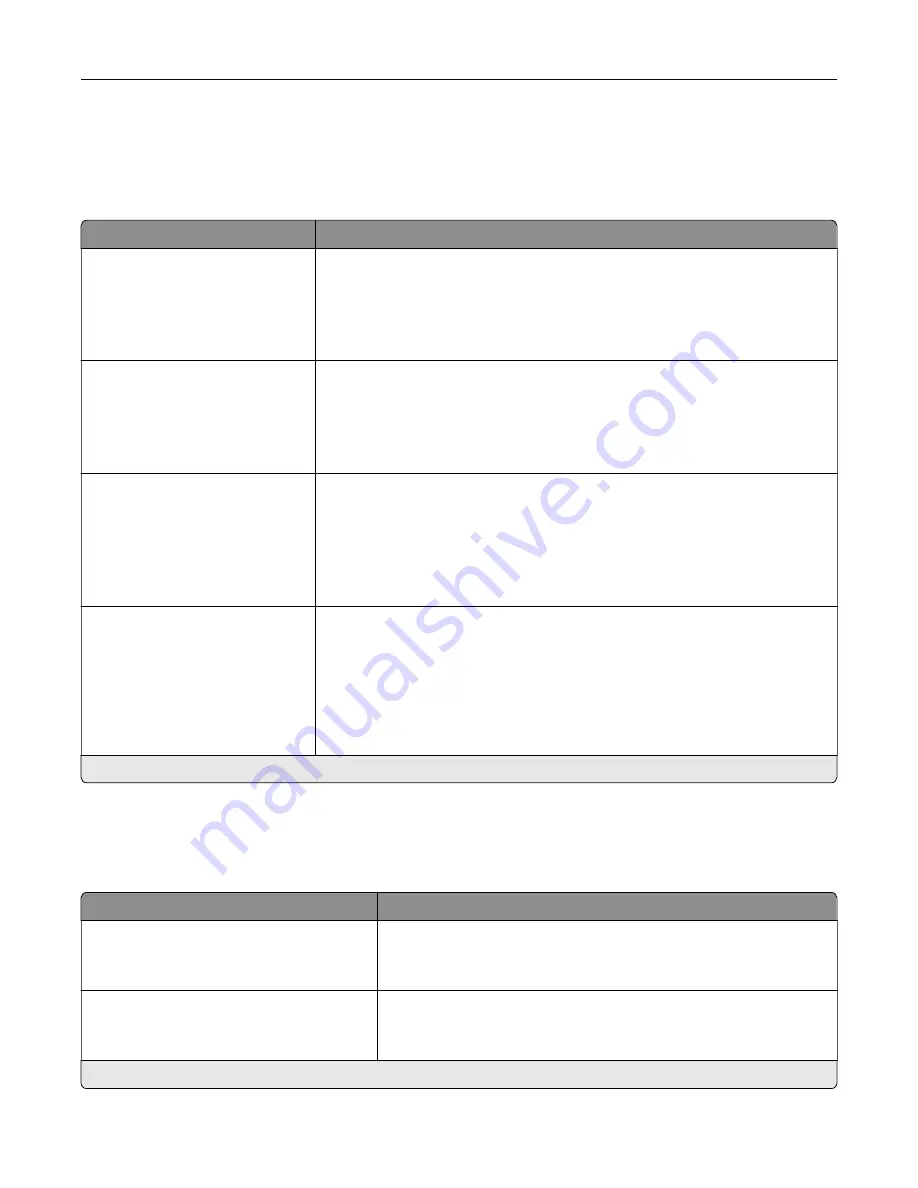
Tray Configuration
Menu item
Description
Default Source
Tray [x] (1*)
Multipurpose Feeder
Manual Paper
Manual Envelope
Set the paper source for all print jobs.
Paper Size/Type
Tray [x]
Multi
‑
Purpose Feeder
Manual Paper
Manual Envelope
Specify the paper size or paper type loaded in each paper source.
Substitute Size
Off
Statement/A5
Letter/A4
11 x 17/A3
All Listed*
Set the printer to substitute a specified paper size if the requested size is not
loaded in any paper source.
Notes:
•
Off prompts the user to load the required paper size.
•
All Listed allows all available substitutions.
Configure MP
Cassette*
Manual
First
Determine the behavior of the multipurpose feeder.
Notes:
•
Cassette configures the multipurpose feeder as the automatic paper
source.
•
Manual sets the multipurpose feeder only for manual-feed print jobs.
•
First configures the multipurpose feeder as the primary paper source.
Note:
An asterisk (*) next to a value indicates the factory default setting.
Media Configuration
Universal Setup
Menu item
Description
Units of Measure
Inches
Millimeters
Specify the unit of measurement for the universal paper.
Note:
Inches is the U.S. factory default setting. Millimeters is the
international factory default setting.
Portrait Width
3–52 inches (8.5*)
76–1321 mm (216*)
Set the portrait width of the universal paper.
Note:
An asterisk (*) next to a value indicates the factory default setting.
Understanding the printer menus
68
Содержание C9235
Страница 1: ...C9235 Printer User s Guide May 2020 www lexmark com Machine type s 5059 Model s 190...
Страница 102: ...2 Remove and then empty the hole punch box 3 Insert the hole punch box 4 Close the door Maintaining the printer 102...
Страница 106: ...4 Shake the toner cartridge three times 5 Insert the new toner cartridge Maintaining the printer 106...
Страница 108: ...9 Insert the waste toner bottle and then close the door Maintaining the printer 108...
Страница 112: ...8 Insert the waste toner bottle and then close the door Maintaining the printer 112...
Страница 135: ...Below the fuser area Duplex area Clearing jams 135...
Страница 140: ...2 Open door J 3 Open door H Clearing jams 140...
Страница 145: ...Staple jam in the staple nisher 1 Slide the staple nisher 2 Remove the staple cartridge holder Clearing jams 145...
Страница 147: ...Staple jam in the staple hole punch nisher 1 Open door H 2 Remove the staple cartridge holder Clearing jams 147...
Страница 188: ...6 Remove the controller board shield Upgrading and migrating 188...
Страница 191: ...6 Remove the controller board shield 7 Unpack the printer hard disk Upgrading and migrating 191...
Страница 197: ...4 Remove the controller board shield Upgrading and migrating 197...
Страница 199: ...8 Attach the thumbscrews 9 Connect the wireless print server to the controller board Upgrading and migrating 199...
Страница 203: ...7 Connect the tray connector to the printer 8 Open trays 2 and 3 Upgrading and migrating 203...
Страница 208: ...9 Remove the stabilizing feet from the tray Upgrading and migrating 208...
Страница 212: ...17 Secure the tray cable with the clamp Upgrading and migrating 212...
Страница 213: ...18 Connect the tray cable to the printer 19 Attach the tray cable cover Upgrading and migrating 213...
Страница 214: ...20 Slide the tray until it clicks into place 21 Attach the stabilizing feet to the printer Upgrading and migrating 214...
Страница 219: ...7 Remove the paper guides 8 Attach the sensor cover Upgrading and migrating 219...
Страница 225: ...8 Attach the nisher to the printer Upgrading and migrating 225...


