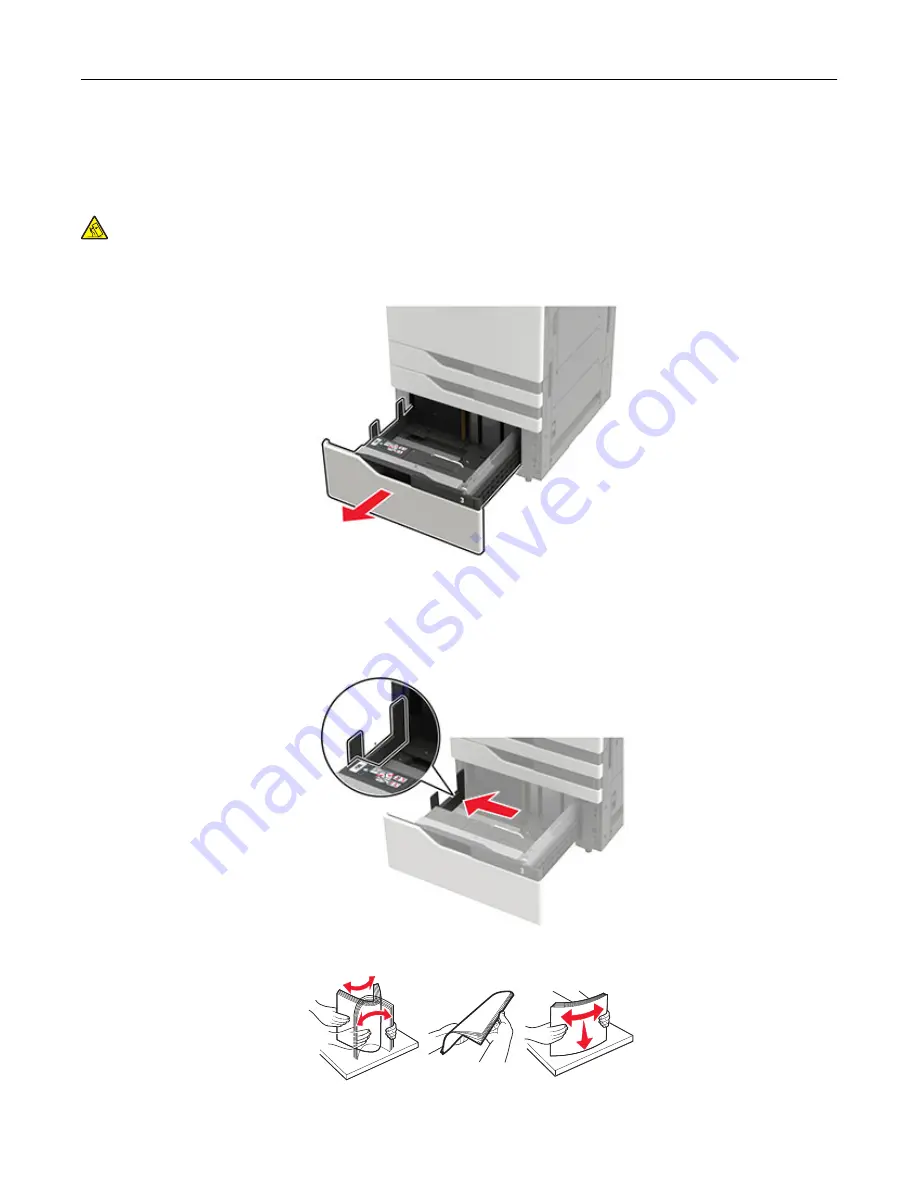
Loading the 2500
‑
sheet tray
The 2500
‑
sheet tray supports only one paper size, either A4 or letter. To check the supported paper size,
pull out the tray and then locate the size indicator on the bottom of the tray.
CAUTION—TIPPING HAZARD:
To reduce the risk of equipment instability, load each tray separately.
Keep all other trays closed until needed.
1
Pull out the tray.
Notes:
•
To avoid paper jams, do not remove trays while the printer is busy.
•
To avoid errors, make sure that the transfer guide is always at the left side of the tray.
2
Flex, fan, and align the paper edges before loading.
Loading paper and specialty media
29
Содержание C9235
Страница 1: ...C9235 Printer User s Guide May 2020 www lexmark com Machine type s 5059 Model s 190...
Страница 102: ...2 Remove and then empty the hole punch box 3 Insert the hole punch box 4 Close the door Maintaining the printer 102...
Страница 106: ...4 Shake the toner cartridge three times 5 Insert the new toner cartridge Maintaining the printer 106...
Страница 108: ...9 Insert the waste toner bottle and then close the door Maintaining the printer 108...
Страница 112: ...8 Insert the waste toner bottle and then close the door Maintaining the printer 112...
Страница 135: ...Below the fuser area Duplex area Clearing jams 135...
Страница 140: ...2 Open door J 3 Open door H Clearing jams 140...
Страница 145: ...Staple jam in the staple nisher 1 Slide the staple nisher 2 Remove the staple cartridge holder Clearing jams 145...
Страница 147: ...Staple jam in the staple hole punch nisher 1 Open door H 2 Remove the staple cartridge holder Clearing jams 147...
Страница 188: ...6 Remove the controller board shield Upgrading and migrating 188...
Страница 191: ...6 Remove the controller board shield 7 Unpack the printer hard disk Upgrading and migrating 191...
Страница 197: ...4 Remove the controller board shield Upgrading and migrating 197...
Страница 199: ...8 Attach the thumbscrews 9 Connect the wireless print server to the controller board Upgrading and migrating 199...
Страница 203: ...7 Connect the tray connector to the printer 8 Open trays 2 and 3 Upgrading and migrating 203...
Страница 208: ...9 Remove the stabilizing feet from the tray Upgrading and migrating 208...
Страница 212: ...17 Secure the tray cable with the clamp Upgrading and migrating 212...
Страница 213: ...18 Connect the tray cable to the printer 19 Attach the tray cable cover Upgrading and migrating 213...
Страница 214: ...20 Slide the tray until it clicks into place 21 Attach the stabilizing feet to the printer Upgrading and migrating 214...
Страница 219: ...7 Remove the paper guides 8 Attach the sensor cover Upgrading and migrating 219...
Страница 225: ...8 Attach the nisher to the printer Upgrading and migrating 225...


