background image

Repair information

4-257

5062

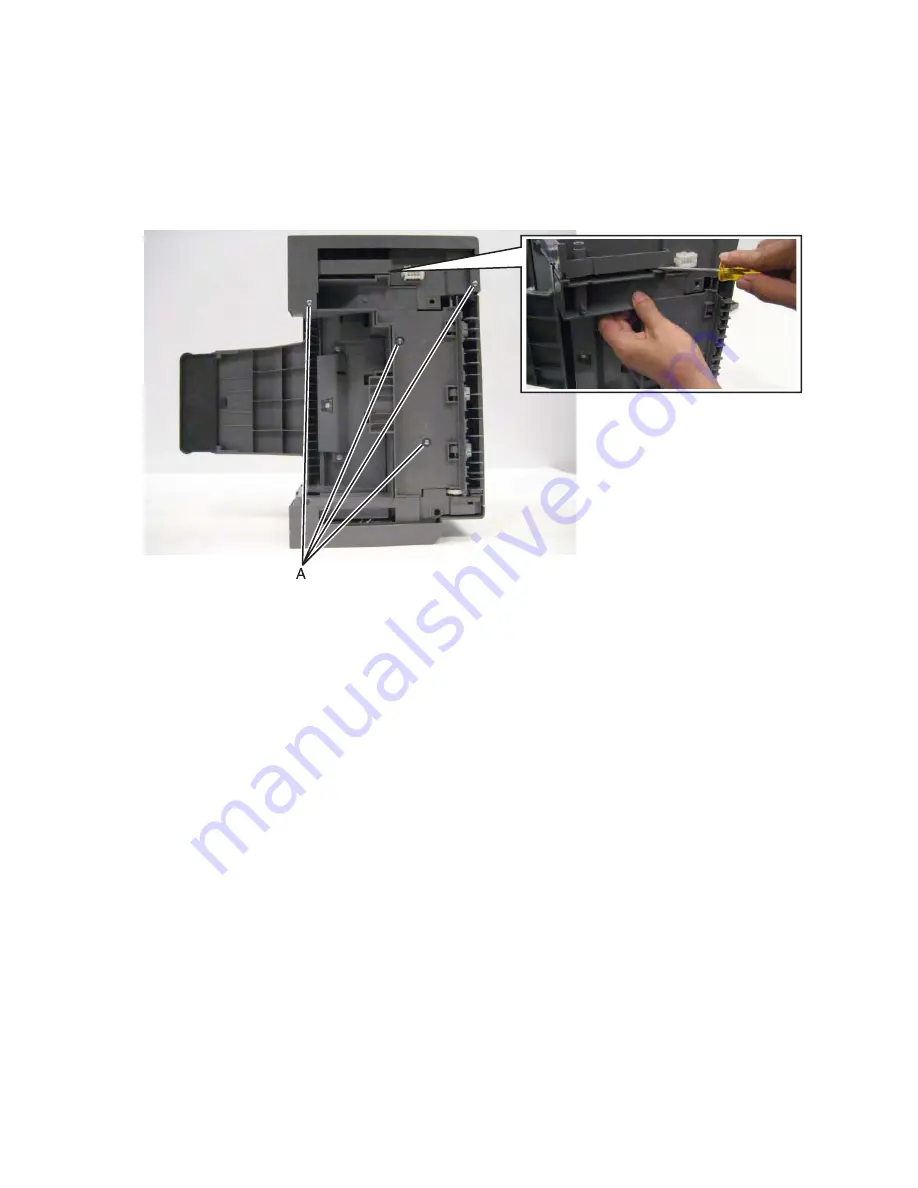
Finisher or stacker rear cover removal

See 

“Finisher assembly” on page 7-23

 for the part number.

1.

Remove the option from the printer.

2.

Remove the four screws (A) from the bottom of the option. 

3.

Using a flat-blade screwdriver, pry out the bottom plate, and then remove it.

Содержание C792de

Страница 1: ...e Type 5062 xxx Table of Contents Start Diagnostics Safety and Notices Trademarks Index Lexmark and Lexmark with diamond design are trademarks of Lexmark International Inc registered in the United Sta...

Страница 2: ...lication to products programs or services do not imply that the manufacturer intends to make these available in all countries in which it operates Any reference to a product program or service is not...

Страница 3: ...g paper 1 11 Tools required for service 1 12 Acronyms 1 13 Diagnostic information 2 1 Troubleshooting map 2 1 Error code divisions 2 2 Power on Self Test POST sequence 2 2 Paper jams 2 3 Understanding...

Страница 4: ...tridge motor error service check 2 67 143 xx Magenta cartridge motor error service check 2 69 144 xx Yellow cartridge motor error service check 2 70 146 xx Autocomp tray 1 motor error service check 2...

Страница 5: ...Input S1 narrow media and near narrow media sensor service check 2 121 Jam clearance cover open 550 sheet 2000 sheet input option service check 2 123 Media size error 550 sheet 2000 sheet input optio...

Страница 6: ...ple Test 3 19 Hole Punch Test 3 19 Finisher Feed Test 3 19 Finisher Sensor Test 3 20 BASE SENSOR TEST 3 20 DEVICE TESTS 3 21 Quick Disk Test 3 21 Disk Test Clean 3 21 Flash Test 3 21 PRINTER SETUP 3 2...

Страница 7: ...9 Theory of operation 3 30 Paper path transport components 3 30 Paper path Information 3 30 Transport components 3 31 Bubble sensors 3 31 Duplexing models with duplex support only 3 31 Print engine th...

Страница 8: ...ct removal 4 56 Front access door beacon removal 4 57 Fuser assembly removal 4 58 Fuser drive assembly removal 4 61 Fuser system card and LVPS cable removal 4 63 Fuser thermistor removal 4 66 High vol...

Страница 9: ...55 550 sheet media tray assembly removal 4 155 550 sheet tray controller card assembly removal 4 156 550 sheet tray deflector removal 4 158 550 sheet tray drive assembly removal 4 159 550 sheet tray l...

Страница 10: ...eSmart finisher and High capacity output stacker 4 243 Finisher or stacker access door beacon LED and beacon housing removal 4 243 Finisher or stacker bin full spring removal 4 243 Finisher or stacker...

Страница 11: ...87 HTU output bin removal 4 289 HTU output bin extension removal 4 289 HTU output bin solenoid removal 4 290 HTU output bin wire stop removal 4 291 HTU output option guide removal 4 292 HTU output opt...

Страница 12: ...bly 8 Optional 2000 sheet high capacity feeder 7 20 Assembly 9 Finisher assembly 7 22 Assembly 10 Finisher stapler assembly 7 26 Assembly 11 High capacity output stacker 7 28 Assembly 12 Internal opti...

Страница 13: ...as Lasersystem und der Drucker sind so konzipiert da im Normalbetrieb bei der Wartung durch den Benutzer oder bei ordnungsgem er Wartung durch den Kundendienst Laserbestrahlung die Klasse I bersteigen...

Страница 14: ...ressora cont m um produto laser da Classe IIIb 3b designado laser de arseneto de pot ssio de 5 milliwatts operando numa faixa de comprimento de onda entre 770 e 795 nan metros O sistema e a impressora...

Страница 15: ...essa olet alttiina n kym tt m lle lasers teilylle l katso s teeseen VARNING Osynlig laserstr lning n r denna del r ppnad och sp rren r urkopplad Betrakta ej str len Laser notis Denna skrivare r i USA...

Страница 16: ...0825 1 Els productes l ser de classe I no es consideren perillosos Aquesta impressora cont un l ser de classe IIIb 3b d arseni r de gal li nominalment de 5 mil liwats i funciona a la regi de longitud...

Страница 17: ...Notices and safety information xvii 5062...

Страница 18: ...xviii Service Manual 5062...

Страница 19: ...ignes d entretien et de r paration de ce produit s adressent uniquement un personnel de maintenance qualifi Le d montage et l entretien de ce produit pouvant pr senter certains risques lectriques le p...

Страница 20: ...obre el mantenimiento de este producto est dirigida exclusivamente al personal cualificado de mantenimiento Existe mayor riesgo de descarga el ctrica y de da os personales durante el desmontaje y la r...

Страница 21: ...ducte est orientada exclusivament a professionals i no est destinada a ning que no ho sigui El risc de xoc el ctric i de danys personals pot augmentar durant el proc s de desmuntatge i de servei d aqu...

Страница 22: ...rvice menus and the basic theory of printer operation 4 Repair information provides instructions for making printer adjustments and removing and installing FRUs 5 Connector locations uses illustration...

Страница 23: ...ION A caution identifies something that might cause a servicer harm CAUTION This type of caution indicates there is a danger from hazardous voltage in the area of the product where you are working Unp...

Страница 24: ...xxiv Service Manual 5062...

Страница 25: ...ing It supports a wide variety of paper sizes and has a standard multipurpose feeder that makes it easy to print on envelopes transparencies labels card stock and non standard size paper You can add o...

Страница 26: ...eet trays or one 2000 sheet tray with up to two 550 sheet trays CAUTION TIPPING HAZARD Floor mounted configurations require additional furniture for stability You must use either a printer stand or pr...

Страница 27: ...792 paper handling options These options are not compatible with any other Lexmark printer Some of the following options are not available in every country or region Available internal options Memory...

Страница 28: ...specifications Average nominal power requirements for the base printer configuration Power levels are shown in watts Maximum current shown in amp ergs Notes Using a power converter or inverter is not...

Страница 29: ...Allow additional clearance around the printer for adding options such as additional input drawers high capacity output stacker banner tray StapleSmart finisher or 5 bin mailbox Status 1 meter average...

Страница 30: ...serial parallel network Host system and application Page complexity and content Printer options installed or selected Available printer memory Media size and type Resolution Processor 1 2 GHZ Power P...

Страница 31: ...r 216 x 279 mm 8 5 x 11 in Legal 216 x 356 mm 8 5 x14 in Executive1 184 x 267 mm 7 3 x 10 5 in Oficio 216 x340 mm 8 5 x 13 4 in Folio 216 x 330 mm 8 5 x 13 in Statement1 140 x 216 mm 5 5 x8 5 in Unive...

Страница 32: ...in unless the size is specified by the software application Paper type 550 sheet trays standard or optional Optional 2000 sheet feeder Multipurpose feeder Duplex unit Paper Plain Bond Colored Custom...

Страница 33: ...ality We recommend Lexmark part number 12A5950 letter size glossy paper and Lexmark part number 12A5951 A4 size glossy paper Always print several samples before buying large quantities of any type of...

Страница 34: ...cts both print quality and the ability of the printer to feed the paper properly Leave the paper in its original wrapper until it is time to use it This limits the exposure of the paper to moisture ch...

Страница 35: ...papers that fail EN12281 2002 European Paper having a weight less than 60 g m2 16 lb Multiple part forms or documents Selecting paper Proper paper loading helps prevent jams and ensures trouble free p...

Страница 36: ...screwdriver magnetic 2 Phillips screwdriver magnetic 2 Phillips screwdriver magnetic short blade Needlenose pliers Diagonal side cutters Spring hook Feeler gauges Analog or digital multimeter Paralle...

Страница 37: ...Black LASER Light Amplification by Stimulated Emission of Radiation LCD Liquid Crystal Display LED Light Emitting Diode LVPS Low Voltage Power Supply M Magenta MROM Masked Read Only Memory MS Microswi...

Страница 38: ...1 14 Service Manual 5062...

Страница 39: ...499 Paper jams on page 2 3 User messages text 0 99 User messages on page 2 41 Error codes 100 199 900 999 Service errors on page 2 50 Other symptoms Symptoms on page 2 56 Service checks Service check...

Страница 40: ...splash screen appears on the display The following errors or messages may appear Close Door or Insert Cartridge display if the front access door is open or the print cartridge is missing Any cartridg...

Страница 41: ...age you must clear all jammed paper from the paper path Area Jam number What to do See 1 200 203 230 239 Open the side door and then remove the jammed paper 200 paper jam on page 2 4 201 paper jam on...

Страница 42: ...that might cause the paper to jam If clearing a paper jam does not fix the problem go to Input S1 narrow media and near narrow media sensor service check on page 2 121 200 02 Paper hit the input senso...

Страница 43: ...aring a paper jam does not fix the problem go to 147 xx Staging motor error service check on page 2 73 200 31 Near narrow media sensor is made when the printer tries to print from an idle state Possib...

Страница 44: ...ck on page 2 121 200 42 Narrow media sensor is made early Possible causes Incorrect paper settings Defective narrow media sensor Clear away anything in the paper path that might cause the paper to jam...

Страница 45: ...er jam does not fix the problem go to Input S1 narrow media and near narrow media sensor service check on page 2 121 Error code Description Action 201 01 Bubble sensor active when printer powers up or...

Страница 46: ...1 05 201 07 201 08 Bubble sensor is never made or is made late See 201 03 on page 2 8 201 42 A narrow banner media error has occurred Clear away anything in the paper path that might cause the paper t...

Страница 47: ...ss door 3 Firmly grasp the jammed paper on each side and then gently pull it out Note Make sure all paper fragments are removed 4 Close the door 5 From the operator panel touch Continue jam cleared Pa...

Страница 48: ...sor broke early Possible causes Damaged paper exit sensor or paper exit sensor flag Faulty fuser Faulty system board The fuser exit sensor may not be functioning properly Go to 121 xx Fuser error serv...

Страница 49: ...y cable connector Faulty fuser motor Faulty system board Clear away anything in the paper path that might cause the paper to jam If clearing a paper jam does not fix the problem go to 120 xx Motor fus...

Страница 50: ...Be sure the paper settings match the media used Go to Redrive bubble sensor service check on page 2 133 203 05 203 07 Redrive bubble sensor does not break or breaks late Possible causes Incorrect pap...

Страница 51: ...sensor never broke Possible causes Damaged D1 sensor Faulty fuser Faulty system board Check for anything in the paper path that might cause the paper to jam If clearing the jam does not solve the pro...

Страница 52: ...ing the jam does not solve the problem go to D1 and D2 sensor service check on page 2 114 232 08 D2 sensor is never made See 232 03 on page 2 13 Error code Description Action 241 01 S1 sensor is made...

Страница 53: ...S1 narrow media and near narrow media sensor service check on page 2 121 241 08 While feeding from tray 1 the S1 sensor does not break Possible causes Incorrect media setting Incorrect paper loading I...

Страница 54: ...edia loading Obstruction on the paper path Damage tray restraints 1 Check if media is loaded properly 2 Check tray restraints 3 Clear the paper path 4 Reseat the option tray 2 5 Check the pick arm rol...

Страница 55: ...8 244 08 245 08 Paper jam 550 sheet 2000 sheet input option service check on page 2 98 244 01 Tray 4 sensor is reached during POR or after clearing the paper jam tray 4 sensor is still triggered Possi...

Страница 56: ...edia loading Obstruction on the paper path Damage tray restraints 1 Check if media is loaded properly 2 Check tray restraints 3 Clear the paper path 4 Reseat the option tray 4 5 Check the pick arm rol...

Страница 57: ...rolls failure 1 Clear the paper path 2 Make sure the paper setting match the media 3 Check if the pick roll are worn out If problem persists go to 241 03 242 03 243 03 244 03 242 05 243 05 244 05 245...

Страница 58: ...jam The S1 sensor may not be functioning properly See Input S1 narrow media and near narrow media sensor service check on page 2 121 250 05 S1 sensor never broke Possible causes Damaged S1sensor Fault...

Страница 59: ...ce if damaged 5 If paper other than 20 lb plain letter A4 paper is being used load 20 lb plain letter A4 and print the Print Quality pages to see if the problem remains Use Tray 1 to test print qualit...

Страница 60: ...ALIBRATE THE PRINTER Perform color adjust from the operator panel Quality menu CHECK THE SOFTWARE PROGRAM OR APPLICATION The software program or application may have specified an off white background...

Страница 61: ...emoval on page 4 76 Is a problem found Replace the ITU block assembly Go to step 3 3 Reseat the JHVPS1 connector on the system board Does this fix the problem Problem solved Go to step 4 4 Replace the...

Страница 62: ...tridge of the color that is not printing Additional checks blank page Step Questions actions Yes No 1 Is all the packing material for the cartridge in question removed Go to step 2 Remove the packing...

Страница 63: ...H VOLTAGE CONTACTS Check the high voltage spring contacts to ensure they are not bent corroded or damaged Replace as necessary Characters have jagged or uneven edges If you are using downloaded fonts...

Страница 64: ...onfiguration menu Turn the printer off hold down 2 and 6 while turning the printer back on and release the buttons when the splash screen appears 2 Touch Color Alignment Print Alignment Page The color...

Страница 65: ...ransfer belt For more information see the instruction sheet that came with the replacement part Horizontal lines Try one or more of the following SELECT ANOTHER TRAY OR FEEDER From the operator panel...

Страница 66: ...r obstacles Are there obstacles in the route Go to step 3 Remove obstacles or contamination 3 Check the print cartridge for proper installation Is the above component properly installed Go to step 4 I...

Страница 67: ...bly in the printer Re print the defective image Does the error continue Go to step 3 Problem solved 3 Check the media condition Load new dry recommended media Re print the defective image Does the err...

Страница 68: ...job to print specify the correct type settings from the computer For Windows users specify the setting from Print Properties For Macintosh users specify the setting from the Print dialog LOAD PAPER F...

Страница 69: ...erties For Macintosh users specify the setting from the Print dialog LOAD STANDARD PAPER WITHOUT TEXTURED OR ROUGH FINISHES MAKE SURE THERE IS NO DEFECTIVE PRINT CARTRIDGE Replace the worn or defectiv...

Страница 70: ...roperties For Macintosh users specify the type from the Print dialog MAKE SURE THERE IS NO DEFECTIVE PRINT CARTRIDGE Replace the defective print cartridge Print is too light Try one or more of the fol...

Страница 71: ...the print cartridge Note If print quality does not improve replace the print cartridge of the color that is not printing MAKE SURE THERE IS NO DEFECTIVE PRINT CARTRIDGE Replace the defective print car...

Страница 72: ...ing measurement in the chart Using the charts Measure repeating horizontal lines from the reference lines at the top to determine what may have caused the lines to form in that pattern Be sure to use...

Страница 73: ...or whichever color has the shadow images 1 Remove the print cartridge Warning Be careful not to touch the photoconductor drum Doing so may affect the print quality of future print jobs 2 Firmly shake...

Страница 74: ...continue Go to step 3 Problem solved 3 Check for obstructions in the area of the media feed units Are the media feed unit assemblies free from any obstructions Go to step 4 Remove obstructions 4 Chec...

Страница 75: ...e the print cartridge for the color in question Does this fix the problem Problem solved Go to step 2 2 Check the high voltage contact from the HVPS to the cartridge See Cartridge contact block assemb...

Страница 76: ...type from Print Properties For Macintosh users specify the paper type from the Print dialog CHECK THE PAPER TEXTURE SETTING From the operator panel Paper menu make sure the Paper Texture setting matc...

Страница 77: ...the tray or feeder 1 From the operator panel Paper menu check the Paper Type setting 2 Before sending the print job specify the correct paper type setting For Windows users specify the paper type from...

Страница 78: ...the above component free of excess wear and contamination Go to step 4 Replace the print cartridge 4 Check the ITU assembly for contamination and wear Is the above component free of excess wear and co...

Страница 79: ...ntinue Additional messages may include Show Me The printer will present instructions Cancel Job The printer job can be canceled Wait for supplies If job parking is enabled and the job meets all the re...

Страница 80: ...Material If packaging material is detected by the printer Check all areas Check area name or Check number of areas may appear Press Select to continue Restore Held Jobs Go Stop If the printer detects...

Страница 81: ...length and width guides to ensure the media is properly fitted Make sure the print job is requesting the correct size of media Adjust the Paper Size setting for the media size being used If the MP Fee...

Страница 82: ...emoval on page 4 142 39 Complex Page The page is too complex to print Options are Select Continue to continue The job may not print correctly Cancel the job 50 PPDS Font Error Select Continue to clear...

Страница 83: ...led If this does not fix the problem replace the PCI card 56 Parallel Port x Disabled Select Continue to clear the message The printer discards any data received through the parallel port Make sure th...

Страница 84: ...ix the problem replace the system board See System board removal on page 4 142 63 Unformatted disk Select Continue to clear the message and continue printing Format the disk If the error message remai...

Страница 85: ...nnector is damaged on system board replace the system board See System board removal on page 4 142 If the fuser cable is damaged replace the cable Check for continuity in the fuser cable If continuity...

Страница 86: ...ent transfer module When print quality is reduced install the new transfer module using the instruction sheet that comes with the replacement transfer module If the problem persists replace the system...

Страница 87: ...it using the instruction sheet that comes with the replacement specified photoconductor unit If the problem persists replace the system board See System board removal on page 4 142 88 xx color Cartrid...

Страница 88: ...nsor 133 01 black 133 02 cyan 133 03 magenta and 133 04 yellow 133 05 A timeout error has occurred while waiting for the indicated cartridge POR the printer If the error message persists go to 133 xx...

Страница 89: ...ailed POR the printer If the error message persists go to 150 xx Duplex motor error service check on page 2 74 151 01 151 09 ITU Motor Error An error has occurred in the ITU motor POR the printer If t...

Страница 90: ...s Hardware Error The printhead PLL failed to achieve lock POR the printer If the error message persists go to 110 xx Printhead error service check on page 2 57 938 10 Electronics Hardware Error The hu...

Страница 91: ...tation failure occurred POR the printer If the error message persists go to 938 28 Remote weather station error service check on page 2 107 938 29 938 30 Electronics Hardware Error A weather station f...

Страница 92: ...rred POR the printer If the error message persists RAM soldered on board is bad Replace the system board See System board removal on page 4 142 961 00 961 99 Memory Failure A memory failure has occurr...

Страница 93: ...d Go to 990 05 POST error 550 sheet input option service check on page 2 111 991 00 991 99 device Error The specified device has detected an error POR the printer If the error message persists replace...

Страница 94: ...option service check on page 2 118 Printout is skewed Go to Skew 550 sheet input option service check on page 2 134 Tray LED won t light up during paper jam or tray empty Go to Tray jam indicator 550...

Страница 95: ...head See Printhead removal installation and alignment on page 4 119 Go to step 2 2 Turn the printer off and open the system board shield Check the printhead cables A in connectors JMM1 JPH1 and JPH2 f...

Страница 96: ...Replace the printhead See Printhead removal installation and alignment on page 4 119 Replace the system board See System board removal on page 4 142 Step Questions actions Yes No 1 Turn the printer o...

Страница 97: ...roperly connected Go to step 4 Reseat the cable 4 Is the BLDE Y Fuser cable damaged Replace the BLDE Y Fuser cable See EP drive assembly removal on page 4 54 Go to step 5 5 Replace the fuser motor See...

Страница 98: ...Check the cable in connector JFSR1 D for proper connection to the system board Is the cable properly connected Go to step 3 Reseat the cable 3 Check the cable for damage Is the cable damaged Replace...

Страница 99: ...step 6 6 Open the left access door remove the two screws A and pull out the fuser autoconnect enough to check the cable for proper connection Is the cable properly connected Go to step 7 Reseat the ca...

Страница 100: ...U autoconnect cable in connector JITM1 B for proper connection to the system board Is the cable properly connected Go to step 3 Reseat the cable 3 Check the cable for damage Is the cable damaged Repla...

Страница 101: ...nothing Go to step 2 2 Turn the printer off open the system board shield and remove the connector shield Check the cables in connector JLVPS1 and J9 E for proper connection to the system board Are the...

Страница 102: ...ables are interchangeable on the terminals so check all four cables for any 133 xx error Are the cables properly connected Go to step 2 Reseat the cable 2 Check the cables in the indicated connectors...

Страница 103: ...33 01 or 133 05 Black B JCMKM1 133 02 or 133 05 Cyan A JCMCY1 133 03 or 133 05 Magenta B JCMKM1 133 04 or 133 05 Yellow A JCMCY1 Is either cable damaged Replace the cable Go to step 3 4 Replace the in...

Страница 104: ...le for proper connection to the system board Is the cable properly connected Go to step 2 Reseat the cable 2 Check the cable in the connector JKI1 BLDC K ITU cable for damage Is the cable damaged Repl...

Страница 105: ...le 5 Replace the EP drive assembly See EP drive assembly removal on page 4 54 Does the error reoccur Replace the system board See System board removal on page 4 142 Problem solved Step Questions actio...

Страница 106: ...d See System board removal on page 4 142 Go to step 4 4 Remove the system board cage See System board cage with board removal on page 4 145 Check the cable connected to the cyan cartridge motor Is the...

Страница 107: ...nnector JCM1 BLDC C M cable for proper connection to the system board Is the cable properly connected Go to step 2 Reseat the cable 2 Check the cable for damage Is the cable damaged Replace the BLDC C...

Страница 108: ...Replace the EP drive assembly See EP drive assembly removal on page 4 54 Does the error reoccur Replace the system board See System board removal on page 4 142 Problem solved Step Questions actions Y...

Страница 109: ...board See System board removal on page 4 142 Go to step 4 4 Remove the system board cage See System board cage with board removal on page 4 145 Check the cable connected to the yellow cartridge motor...

Страница 110: ...Check the cable for damage Is the cable damaged Replace the Tray 1 machine side cable See Autocomp W2W cable on page 7 35 Go to step 3 3 Remove the standard media tray Check the cable A from the paper...

Страница 111: ...maged Replace the staging motor cable See Staging paper path reference edge assembly removal on page 4 136 to access the cable Go to step 3 3 Remove the LVPS See Low voltage power supply LVPS removal...

Страница 112: ...the cable properly connected Go to step 2 Reseat the cable 2 Replace the staging deflector assembly See Staging deflector assembly removal on page 4 135 Does the error reoccur Replace the system boar...

Страница 113: ...path reference edge assembly removal on page 4 136 to access the cable Go to step 4 4 Remove the rear cover and the left cover See Rear cover removal on page 4 18 and Left cover removal on page 4 10 C...

Страница 114: ...cable 2 Check the cable in the connector JKI1 BLDC K ITU cable for damage Is the cable damaged Replace the BLDC K ITU cable See EP drive assembly removal on page 4 54 Go to step 3 3 Remove the rear c...

Страница 115: ...ace the main fan See Main fan removal on page 4 88 Does the error reoccur Replace the system board See System board removal on page 4 142 Problem solved Step Questions actions Yes No 1 Turn the printe...

Страница 116: ...e cable for damage Is the cable damaged Replace the blower right side waste cable See Printhead access cover removal on page 4 17 to access the cable on top of the frame Go to step 3 3 Remove the cart...

Страница 117: ...ut sensor See Sensor input S1 narrow media near narrow media removal on page 4 133 Go to step 2 2 Remove the staging deflector assembly See Staging deflector assembly removal on page 4 135 Is the inpu...

Страница 118: ...Is the input sensor flag damaged Replace the input sensor See Sensor input S1 narrow media near narrow media removal on page 4 133 Go to step 3 3 Is the staging deflector assembly damaged Replace the...

Страница 119: ...al on page 4 133 Does the error reoccur Replace the System Board See System board removal on page 4 142 Problem solved Step Questions actions Yes No 1 Reseat the ITU Did the error clear Problem solved...

Страница 120: ...S1 narrow media near narrow media removal on page 4 133 Does the error reoccur Replace the System Board See System board removal on page 4 142 Problem solved Step Questions actions Yes No 1 Open the...

Страница 121: ...tor assembly removal on page 4 135 Is the near narrow media sensor D in the staging deflector assembly loose Reseat the sensor and add a sensor retainer See Sensor input S1 narrow media near narrow me...

Страница 122: ...e near narrow media sensor flag damaged Replace the near narrow media sensor See Sensor input S1 narrow media near narrow media removal on page 4 133 Go to step 3 3 Is the staging deflector assembly d...

Страница 123: ...133 Does the error reoccur Replace the System Board See System board removal on page 4 142 Problem solved Step Questions actions Yes No 1 Reseat the ITU Did the error clear Problem solved Go to step...

Страница 124: ...4 135 Is the cable connected correctly Go to step 6 Reseat the cable 6 Replace the near narrow media sensor See Sensor input S1 narrow media near narrow media removal on page 4 133 Does the error reoc...

Страница 125: ...row media sensor See Sensor input S1 narrow media near narrow media removal on page 4 133 Go to step 2 2 Remove the staging deflector assembly See Staging deflector assembly removal on page 4 135 Is t...

Страница 126: ...e narrow media sensor flag damaged Replace the narrow media sensor flag See Sensor input S1 narrow media near narrow media removal on page 4 133 Go to step 3 3 Is the staging deflector assembly damage...

Страница 127: ...3 Does the error reoccur Replace the system board See System board removal on page 4 142 Problem solved Step Questions actions Yes No 1 Reseat the ITU Did the error clear Problem solved Go to step 2 2...

Страница 128: ...error reoccur Replace the system board See System board removal on page 4 142 Problem solved Step Questions actions Yes No 1 Replace the fuser Did the problem clear Problem solved Go to step 2 2 Open...

Страница 129: ...nect enough to check the cable for proper connection Is the cable connected correctly Go to step 5 Reseat the cable 5 Check the cable for damage Is the cable damaged Replace the fuser system card and...

Страница 130: ...Questions actions Yes No 1 Is the bin full flag damaged Replace the bin full flag See Bin full flag removal on page 4 36 Go to step 2 2 Remove the top cover assembly Is the sensor in the top cover as...

Страница 131: ...S1 sensor See Sensor input S1 narrow media near narrow media removal on page 4 133 Go to step 2 2 Remove the staging deflector assembly See Staging deflector assembly removal on page 4 135 Is the S1...

Страница 132: ...heck if the pass thru sensor is seated correctly and the sensor flag can move back to its original position when it is triggered Is the pass thru sensor free of obstruction Go to step 4 Install the pa...

Страница 133: ...ut option Replace the controller card assembly See 2000 sheet high capacity feeder controller card assembly removal on page 4 174 Does the problem persist For 550 sheet input option Replace the 550 sh...

Страница 134: ...properly Go to step 3 For 550 sheet input option Replace the 550 sheet drawer assembly See 550 sheet drawer assembly removal on page 4 155 For 2000 sheet input option Replace the 2000 sheet jam clear...

Страница 135: ...rive assembly removal on page 4 175 6 Check the next pass thru sensor above the defective option Refer to the paper path guide Is the sensor not damaged Go to step 7 Go to step 3 7 For 550 sheet input...

Страница 136: ...t retracted Did the jam clearance cover close properly Go to step 3 For 550 sheet input option Replace the 550 sheet drawer assembly See 550 sheet drawer assembly removal on page 4 155 For 2000 sheet...

Страница 137: ...echanical wear or damage 2 Check if the pick arm spring is not dislodge Is the pick assembly not damaged Go to step 7 For 550 sheet input option Replace the pick assembly See 550 sheet tray pick assem...

Страница 138: ...s packet including on page 7 5 Replace the MPF paper pick assembly See MPF paper pick assembly removal including the MPF ratchet collar and MPF drive pulley on page 4 97 3 Turn the printer off and ope...

Страница 139: ...the MPF drive belt B broken Replace the MPF drive belt See MPF drive assembly removal on page 4 102 Go to step 7 7 Is the MPF drive assembly damaged Replace the MPF drive assembly See MPF drive assemb...

Страница 140: ...board See System board removal on page 4 142 Go to step 2 2 1 Print the following data Event log Menu setting page Network setting page 2 Turn off the printer and reattach the communication cables 3 T...

Страница 141: ...le in the JMPF1 MPF sensor cable connector for damage Is the cable damaged Replace the MPF sensor cable See MPF sensor cable on page 7 35 Go to step 3 3 Remove the MPF sensor plate assembly See MPF se...

Страница 142: ...2 Check the cable for damage Is the cable damaged Replace the waste toner cable See Waste toner cable removal on page 4 149 Go to step 3 3 Remove the waste toner sensor See Waste toner sensor removal...

Страница 143: ...ck the cable for damage Is the cable damaged Replace the waste toner cable See Waste toner full cable removal on page 4 150 Go to step 3 3 Remove the waste toner full sensor See Waste toner full senso...

Страница 144: ...ck the cable for damage Is the cable damaged Replace the thermistor and redrive cable See Fuser thermistor removal on page 4 66 Go to step 3 3 Remove the fuser and check the connection of the thermist...

Страница 145: ...for proper connection to the system board Is the cable properly connected Go to step 2 Reseat the cable 2 Check the cable for damage Is the cable damaged Replace the weather station compensation ther...

Страница 146: ...ce the system board with a new and not previously installed system board See System board removal on page 4 142 Go to step 3 3 Turn the printer power off for ten or more seconds Then turn the printer...

Страница 147: ...onnected on the 2000 sheet controller card and on the other end Elevator home sensor Paper level sensor connector Jam door clearance sensor connector Pass thru sensor connector Pick motor connector Fe...

Страница 148: ...0 sheet high capacity feeder pick assembly See the installation note of 2000 sheet high capacity feeder pick assembly removal on page 4 207 Does the problem persist Go to step 7 Problem solved 7 Repla...

Страница 149: ...ectors 2 Replace the 550 sheet tray pass thru sensor See 2000 sheet high capacity feeder pass thru sensor removal on page 4 205 Does the problem persist Go to step 3 Problem solved 3 Replace the 2000...

Страница 150: ...e Sensor D1 D2 and fuser bubble removal on page 4 132 Go to step 2 2 Open the system board shield Check the cable in connector JDP1 for proper connection to the system card Is the cable properly conne...

Страница 151: ...Is the cable connected correctly Go to step 5 Reseat the cable 5 Check the cable for damage Is the cable connected correctly Replace the duplexer cable To access the cable see LVPS exit duct removal...

Страница 152: ...blem fixed Problem solved Replace the system board See System board removal on page 4 142 Step Questions actions Yes No 1 Open the left access door and open the duplex assembly Is the D1 or D2 flag da...

Страница 153: ...per connection to the system card Is the cable properly connected Go step 3 Reseat the cable 3 Check the cable for damage Is the cable damaged Replace the duplexer cable To access the cable see LVPS e...

Страница 154: ...e Is the cable properly connected Replace the duplexer cable To access the cable see LVPS exit duct removal on page 4 85 and Left cover removal on page 4 10 Go to step 6 6 Replace the duplex assembly...

Страница 155: ...e correct Replace the system board See System board removal on page 4 142 Go to step 3 3 Is the JLVPS1 cable correctly installed at JLVPS1 on the system board Go to step 4 Reseat the cable 4 1 Turn th...

Страница 156: ...contamination and wear Go to step 3 For 550 sheet input option Replace the pick roll assembly See 550 sheet tray pick roll assembly removal on page 4 169 For 2000 sheet input option Replace the pick r...

Страница 157: ...ion only Is there damage or wear on the media tray Replace the whole input option For 550 sheet input option Replace the media tray assembly See 550 sheet media tray assembly removal on page 4 155 For...

Страница 158: ...Be sure that Power In PWR IN PPORT engine and PPORT Next option connectors are connected properly on the controller card Are the connectors connected properly Go to step 4 Properly connect the connec...

Страница 159: ...e sensor flag damaged Replace the input sensor See Sensor input S1 narrow media near narrow media removal on page 4 133 Go to step 2 2 Turn the printer off and open the system board shield Check the c...

Страница 160: ...Input sensor B S1 sensor C Narrow media sensor D Near narrow media sensor Is the cable properly connected Go to step 5 Reseat the cable 5 Replace the sensor Sensor input S1 narrow media near narrow m...

Страница 161: ...input option Replace the drawer assembly See 550 sheet drawer assembly removal on page 4 155 For 2000 sheet input option Replace the jam clearance cover See 2000 sheet high capacity feeder jam cleara...

Страница 162: ...tion Replace the jam door clearance sensor See 2000 sheet high capacity feeder jam door clearance sensor removal on page 4 188 4 For 550 sheet input option Replace the controller card assembly See 550...

Страница 163: ...ear restrain on the media tray for any damage Is the rear restrain not damaged Go to step 5 For 550 sheet input option Replace the media tray assembly See 550 sheet media tray assembly removal on page...

Страница 164: ...to the correct hole and slot during installation Is the tray pick assembly inserted on the correct hole and slot Go to step 2 Properly install the 550 sheet tray pick assembly 2 Check the 550 sheet t...

Страница 165: ...the 2000 sheet high capacity feeder media tray assembly close properly Go to step 2 Go to step 4 2 Check the media size actuator Is the media actuator not deformed or not damaged Go to step 3 Replace...

Страница 166: ...eet high capacity feeder bellcrank assembly if the recoil spring is loose Is the recoil spring fastened on the bellcrank Go to step 7 Reinstall the recoil spring 7 Check the tray slide assembly for da...

Страница 167: ...nder Printers and Faxes on the host computer Delete all print jobs in the print queue Is the printer online and in a Ready state Go to step 5 Go to step 4 4 Change the printer status to online Did thi...

Страница 168: ...ess network to the printer Did this fix the problem Problem solved Go to step 17 17 Are the other devices on the wireless network communicating properly Go to step 18 Contact the network administrator...

Страница 169: ...e cable properly connected Go to step 3 Reseat the cable 3 Check the cable in connector JTCVR1 for damage Is the cable damaged Replace the bin full and output beacon cable To access the cable see Top...

Страница 170: ...sembly still in the printer push up on the bar on the bottom of the pick arm to raise the arm and then pull the larger latch in the back forward to lock it in place Did this fix the problem Problem so...

Страница 171: ...Paper path redrive assembly with sensors removal on page 4 113 Go to step 2 2 Turn the printer off and open the system board shield Check the cable in connector JRDR1 for proper connection to the sys...

Страница 172: ...test on each of the 550 sheet input option Is one of the 550 sheet input options causing the skew Go to step 4 Go to step 1 4 1 Check the paper restrains for damage and if it s set correctly 2 Check f...

Страница 173: ...l the splash screen appears 2 Select PRINT TESTS 3 Select Tray 1 for the paper source 4 Select Single Is the printout skewed Go to Skew on page 2 36 Go to step 2 2 Are there any 550 sheet input option...

Страница 174: ...1 Remove the 2000 sheet high capacity feeder media tray assembly from the drawer 2 Check the media tray for damage 3 Check if the elevator plate is level 4 Check the lift drive gears for damage Is the...

Страница 175: ...city feeder pick assembly removal on page 4 207 2 Check if the elevator plate moves up when you close the 2000 sheet high capacity feeder media tray 1 Open the jam clearance cover 2 Close the 2000 she...

Страница 176: ...Go to step 5 5 Check if the 2000 sheet high capacity feeder elevator home sensor is seated properly Is the elevator home sensor seated properly Go to step 6 Reseat the elevator home sensor 6 Replace...

Страница 177: ...sheet input option Replace the controller card assembly See 550 sheet tray controller card assembly removal on page 4 156 For 2000 sheet input option Replace the controller card assembly See 2000 she...

Страница 178: ...2 140 Service Manual 5062...

Страница 179: ...following actions wake the printer from Sleep Mode Touching the screen or any hard buttons Opening an input tray cover or door Sending a print job from a computer Performing a Power on Reset POR 5 Ind...

Страница 180: ...drive 5 Menus Opens the administrative menus 6 Status message bar Shows the current printer status such as Ready or Busy Note Make sure Ready appears before performing any printer task Shows printer c...

Страница 181: ...ft 4 Right arrow Scrolls right 5 Right scroll increase Increases a value 6 Left scroll decrease Decreases a value 7 Down arrow Scrolls down 8 Accept Submit Saves a setting 9 Cancel Cancels an action o...

Страница 182: ...reen Unselected radio button Indicates that an item is not selected Selected radio button Indicates a selection Index Displays information about the key functions of the printer including instructions...

Страница 183: ...uality Menu Transfer Module Paper Loading Print Directory Job Accounting Menu Staples Custom Types Print Demo Utilities Menu Hole Punch Box Custom Names Asset Report XPS Menu Custom Bin Names PDF Menu...

Страница 184: ...rmation see Diagnostics menu on page 3 7 Configuration menu 1 Turn off the printer 2 Press and hold 2 and 6 3 Turn on the printer 4 Release the buttons when the splash screen appears The Configuration...

Страница 185: ...ignment Page REGISTRATION See REGISTRATION on page 3 9 Top Margin Bottom Margin Left Margin Right Margin Quick Test See Quick Test on page 3 10 Alignment Menu See Alignment Menu on page 3 10 Cyan Yell...

Страница 186: ...Test See Diverter Test on page 3 19 Mechanical Test See Mechanical Test on page 3 19 BASE SENSOR TEST See BASE SENSOR TEST on page 3 20 FINISHER TESTS Staple Test See Staple Test on page 3 19 Hole Pu...

Страница 187: ...ual diode alignment See DUAL DIODE ADJUST on page 3 9 Use REGISTRATION to align the black image on the page Use Alignment to align the individual colors The black image should be aligned before the in...

Страница 188: ...ation settings The Quick Test is printed from the default paper source unless the default paper source contains envelopes In that case it prints from tray 1 It should be printed on A4 or letter paper...

Страница 189: ...LLOW or MAGENTA 3 Navigate to Linearity Quick Test A two page instruction sheet prints See Printhead mechanical alignment test page on appendix page A 7 for a full page sample The printer prints the t...

Страница 190: ...the Alignment Menu MISC TESTS Toggle ITU The test is used to verify that ITU belt retraction BOR hardware is functioning properly Two options are available Raise Belt and Lower Belt If the belt is alr...

Страница 191: ...are blank The Print Test page always prints single sided regardless of the Duplex setting or the presence of the Duplex option To run the Print Test 1 From the Diagnostics menu touch PRINT TESTS 2 Sel...

Страница 192: ...o DRAM to verify that each bit in memory can be set and read correctly To run the DRAM Test From the Diagnostics menu navigate to HARDWARE TESTS DRAM Test DRAM Test Testing appears on the screen follo...

Страница 193: ...ult P and F represent the same numbers for DRAM If the test passes the Pass Count increases by 1 However if the test fails one of the following failure messages appears for approximately three seconds...

Страница 194: ...ult paper source If the default paper source supports only envelopes then the page is printed from Tray 1 Check the Quick Test Page for the correct offset between the placement of the first scan line...

Страница 195: ...o determine if the input tray sensors are working correctly To run the Sensor Test 1 From the Diagnostics menu navigate to INPUT TRAY TESTS Sensor Test 2 Select the input source All installed sources...

Страница 196: ...output bin or Continuous media continues feeding to the selected output bin until Stop X is pressed 4 Press Stop X to exit the test Feed to All Bins One page is fed to every bin including the finishe...

Страница 197: ...r the last sheets are accumulated the pack is stapled To exit the test press Stop X Hole Punch Test This test verifies that media can be fed to the finisher output bin and then hole punched The printe...

Страница 198: ...Low Self priming Home Signal To run the Finisher Sensor Test select Finisher Sensor Test from FINISHER TESTS in the Diagnostics menu When you select a Sensor group such as Bin Level from the menu Bin...

Страница 199: ...ntents will be lost warning appears 2 To exit the test immediately and return to DEVICE TESTS select No and touch To continue with the test select Yes and touch When the test starts a progress bar app...

Страница 200: ...tain areas of the printer that cannot be determined using hardware sensors The configuration IDs are originally set at the factory when the printer is manufactured However you may need to reset Config...

Страница 201: ...d in order to determine if data is available on the parallel port Increasing the value increases the amount of time by 50 ns per increment Decreasing the value decreases the sample time by 50 ns per i...

Страница 202: ...he log contains the following information for each error in the log Page count when the error occurred except for 900 service RIP software errors Code versions of all packages when error occurred Pane...

Страница 203: ...Tray Insert Msg See Tray Insert Msg on page 3 26 SIZE SENSING See SIZE SENSING on page 3 27 Panel Menus See Panel Menus on page 3 27 PPDS Emulation See PPDS Emulation on page 3 27 Download Emuls See D...

Страница 204: ...pping Color trapping is an aid to graphics and text When text or graphics appear over other colors a misalignment may allow white paper to show through at the borders of the colors Color trapping incr...

Страница 205: ...ts The customer can restore either the network settings or the base printer settings to their factory default values When Restore Base is selected non critical base printer NVRAM settings are restored...

Страница 206: ...e prompt is directed to when the envelopes are sensed to be the wrong size Action for Prompts This setting enables users to have the printer resolve media change prompt situations automatically Such p...

Страница 207: ...ndby If set to Off this setting disables Standby Mode in the General Settings menu UI Automation Once enabled this setting creates an ENABLE_UI_AUTOMATION file in the shared directory As long as this...

Страница 208: ...ettings to see if the paper being used matches the user s settings It is not uncommon to find a user printing on cardstock with the printer programmed to print on a plain paper setting The printer s f...

Страница 209: ...sor located after the fuser exit rollers in the paper path senses the bubble in the paper as it exits the fuser It then adjusts the fuser motor speed as necessary to avoid jams and smearing on the tra...

Страница 210: ...er to the paper 5 Fuse the toner to the paper 6 Clean erase the photoconductor and the ITU In summary the printer s controller board receives print data and the command to print The controller board t...

Страница 211: ...the laser beam Service tips If the surface of the charge roller is damaged such as a nick or pit it will cause the charge to be uneven on the photoconductor This will cause a repeating mark on the pr...

Страница 212: ...contaminated with toner or other debris it will cause vertical streaking of white lightness on the page Cleaning the lens will solve the problem Never touch the surface of the photoconductor with your...

Страница 213: ...to write on a can and then rolling it over glitter The glitter sticks to the glue but won t stick to the rest of the can Service tips Never touch the surface of the developer roller with your bare han...

Страница 214: ...act between the Photoconductors and the ITU belt Service tips Never touch the surface of the ITU belt with your bare hand The oil from your skin will cause a charge differential on the surface and ton...

Страница 215: ...rge Once the image on the transfer belt reaches the transfer roll the negatively charged toner clings to the paper and the entire image is transferred from the transfer belt to the paper Service tips...

Страница 216: ...can cause toner to be pulled off the page or cause paper jams Toner that rubs off a printed page can be a sign of a malfunctioning fuser or an improper paper setting Always check the paper type settin...

Страница 217: ...r every page that is printed After the toner is moved to the cleaning blade the toner is moved from the cleaning blade G to the waste toner area using an auger system Photoconductor Clean Erase After...

Страница 218: ...and cables from the printer before beginning 2 Place the printer on a corner of a work area so the front and back can be accessed 3 Remove the system board shield a Open the system board shield door a...

Страница 219: ...bles from the new printhead to the system board Note Use the packaging that came with the printhead FRU to prop up the printhead 5 Connect the power cord to the outlet and to the printer Reconnect any...

Страница 220: ...3 42 Service Manual 5062...

Страница 221: ...al grounds They increase the risk of damage because they make a discharge path from your body through the ESD sensitive part Large metal objects can be discharge paths without being grounded Prevent E...

Страница 222: ...this chapter are arranged by area of the printer Base printer cover removals on page 4 2 Base printer removals on page 4 35 Input option removals on page 4 154 Output option removals on page 4 224 Bas...

Страница 223: ...Repair information 4 3 5062 3 Use a flat blade screwdriver to carefully pry up the front access door pivot and lift the pivot enough to remove the door...

Страница 224: ...5062 Left access door assembly removal See Left and rear covers on page 7 5 for the part number 1 Open the left access door assembly 2 Remove the three screws A from the cable cover and remove the cab...

Страница 225: ...information 4 5 5062 3 Lift the locking tabs B on the connectors to disconnect the two cables 4 Remove the cables from the cable retainers C 5 Close the left access door 6 Open the multipurpose feede...

Страница 226: ...o the left Carefully use a flat blade screwdriver to lift the multipurpose feeder inner cover and remove Note Be careful not to scratch or mar the cover Note Using a flat blade screwdriver pry out the...

Страница 227: ...access cover slightly grasp one of the pins and move the left access door back and forth gently while pulling the pin out This aligns the holes so the pins come out easily 9 Remove the other pin E in...

Страница 228: ...4 8 Service Manual 5062 10 Open the left access door all the way and disconnect the rear piston by pulling apart the clamps F from the tabs 11 Remove the E clip G from the front piston F G 1126829...

Страница 229: ...Place the MPF cover on the bottom of the left cover and hold it in place while you put the assembly into place 2 Replace the pins making sure the flat side of each pin faces away from the printer 3 Re...

Страница 230: ...and rear covers on page 7 5 for the part numbers 1 Remove the rear cover See Rear cover removal on page 4 18 2 Use a flat blade screwdriver to disconnect the cable from the low voltage power supply 3...

Страница 231: ...ation 4 11 5062 4 Open the left access door and remove two screws B from the top and middle of the left cover 5 Open the standard media tray and remove the screw C from the front of the printer B 88A0...

Страница 232: ...4 12 Service Manual 5062 6 Lift the top cover enough to free the top of the left cover 7 Close the left access door and use a flat blade screwdriver to pop out the front of the lower left cover...

Страница 233: ...apart the clamps F from the tabs 10 Slide the left cover over the piston arm to remove the left cover and lower left cover together Note If you are removing the left cover to access another part then...

Страница 234: ...4 14 Service Manual 5062 11 Slide the lower left cover down to remove it from the left cover...

Страница 235: ...frame cable cover removal See Front on page 7 7 for the part number 1 Remove the ITU assembly See ITU assembly removal on page 4 72 2 Remove the screw A 3 Slide the cover toward the rear of the print...

Страница 236: ...urpose feeder MPF cover removal See Left and rear covers on page 7 5 for the part number 1 Remove the left access door assembly See Left access door assembly removal on page 4 4 2 Separate the MPF fro...

Страница 237: ...umber 1 Remove the OP panel display See OP panel display removal on page 4 109 2 Remove any other cables or cards from the operator panel cover Note Your operator panel assembly may have more or fewer...

Страница 238: ...t of the printer to unlatch the tabs on the right edge and remove the cover Rear cover removal See Left and rear covers on page 7 5 for the part number 1 Remove the rear upper cover See Rear upper cov...

Страница 239: ...Repair information 4 19 5062 3 Remove the three screws A and the two screws B A 88A0323 B 88A0212 A 88A0323...

Страница 240: ...Push in the indicated areas of the right side and left side covers and pull out the rear cover tabs Note On the right cover side start with the top tab On the left cover side start with the bottom ta...

Страница 241: ...r removal See Left and rear covers on page 7 5 for the part number 1 Open the system board shield door and remove the two screws A and the one screw B 2 Pull toward the rear and lift the corner off th...

Страница 242: ...4 22 Service Manual 5062 3 Separate the system board shield door from the rear upper cover...

Страница 243: ...ge 4 142 2 Remove the rear cover See Rear cover removal on page 4 18 3 Remove the top cap cover See Top cap cover removal on page 4 27 Note If you have any output options installed then the top cap co...

Страница 244: ...4 24 Service Manual 5062 6 Remove the screw B 7 Remove the four screws C B 88A0212 C 88A0323...

Страница 245: ...Repair information 4 25 5062 8 Pull the tabs D away from the pins and then pull out and down on the rear of the right cover to remove it D...

Страница 246: ...em board shield door remove the rear upper cover See Rear upper cover removal on page 4 21 System board shield removal See Left and rear covers on page 7 5 for the part number 1 Open the system board...

Страница 247: ...ng the shield open about an inch and slide the shield to the left to remove the shield Top cap cover removal See Top right and front covers on page 7 3 for the part number 1 Squeeze the cover and rock...

Страница 248: ...ers on page 7 3 for the part number 1 Remove the printhead access cover See Printhead access cover removal on page 4 17 2 Remove the rear cover See Rear cover removal on page 4 18 3 Remove the screw A...

Страница 249: ...Repair information 4 29 5062 5 Remove three screws on the front B 6 Open the left access door and remove the screw C B 88A0323 C 88A0323...

Страница 250: ...4 30 Service Manual 5062 7 On the top remove two metal screws D 8 On the right side remove two screws E and one screw F D 88A0212 E 88A0323 F 88A0212...

Страница 251: ...Repair information 4 31 5062 9 Pull the tabs away from the pins and lift the top cover 10 Clip the cable tie G and disconnect the cable H from the bin full sensor H G...

Страница 252: ...and sensor cables If you are replacing the cover then also disconnect the output option cable from JOOPT1 on the system board Waste toner left cover removal See Top right and front covers on page 7 3...

Страница 253: ...Repair information 4 33 5062 4 Remove the eight screws A from the waste toner left cover A 88A0323 88A0323 A...

Страница 254: ...Pinch the release tab D and disconnect the beacon cable Waste toner sensor cover removal 1 Remove the waste toner container See Waste toner container removal on page 4 147 2 Remove the screw A to rem...

Страница 255: ...printer removals ACM bias spring removal See Left on page 7 11 for the part number 1 Remove the paper pick mechanism assembly See Paper pick mechanism assembly removal on page 4 116 2 Remove the screw...

Страница 256: ...4 36 Service Manual 5062 Bin full flag removal See Top right and front covers on page 7 3 for the part number 1 Pull the flag forward out of the clips 2 Rotate the flag and pull to remove it...

Страница 257: ...top cover See Top cover removal on page 4 28 2 Press in the tabs to remove the sensor from under the top cover Cartridge blower assembly removal See Front on page 7 7 for the part number 1 Remove the...

Страница 258: ...4 38 Service Manual 5062 3 Remove the screw A in the top cover A 88A0323...

Страница 259: ...Repair information 4 39 5062 4 Lift the blower assembly slightly up and to the left to free the bottom 5 Flex the top cover up and rotate the blower assembly to the right to free the hook at the top...

Страница 260: ...4 40 Service Manual 5062 6 Press the release tab B to disconnect the cable from the assembly B...

Страница 261: ...l See Front continued on page 7 9 for the part number 1 Remove the waste toner container See Waste toner container removal on page 4 147 2 Remove the print cartridges 3 Remove the three screws A from...

Страница 262: ...board with the ridges on the cartridge contact block assembly Cartridge memory block removal See Front continued on page 7 9 for the part number 1 Remove the ITU assembly See ITU assembly removal on p...

Страница 263: ...memory block to locate the correct connector Note To easily route the new cable to the system board tie a string at least twelve inches long to the end of the cable you disconnect from the system boa...

Страница 264: ...s the sensor push the right side of the sensor to remove it and then disconnect the cable from the sensor 5 Remove the two screws F and pull to remove the memory block As you pull the cable through be...

Страница 265: ...ng cable removal See M K cartridge metering cable on page 7 34 and C Y cartridge metering cable on page 7 34 for the part number 1 Remove the system board shield See System board shield removal on pag...

Страница 266: ...and then pull the cable out of the printer Installation notes 1 Connect the cable to the system board 2 Tie the correct strings to the sensor ends of the cable 3 From the inside of the printer pull t...

Страница 267: ...47 5062 Cartridge rail removal See Front on page 7 7 for the part number 1 Remove the print cartridges 2 Remove the screw A from the rail you want to remove 3 Slide the rail forward and drop it down t...

Страница 268: ...ervice Manual 5062 Installation notes 1 Insert the tab on the rail into the slot B in the back and then lift and slide the rail into the notches C on the top 2 Apply the correct color label to new rai...

Страница 269: ...ve the ITU assembly See ITU assembly removal on page 4 72 2 Remove the fuser See Fuser assembly removal on page 4 58 Front crank a Remove the waste toner left cover See Waste toner left cover removal...

Страница 270: ...move the left cover See Left cover removal on page 4 10 b Remove two screws B and the four screws C to remove the rear fuser guide c Remove the E clip D d Unhook the spring E and pull to remove the be...

Страница 271: ...covers on page 7 5 for the part number 1 Remove the left access door assembly See Left access door assembly removal on page 4 4 2 Remove the screw A that secures the duplex assembly to the left acces...

Страница 272: ...2 Installation notes 1 If you are replacing the duplex drive belt then carefully check the routing as you install the new belt 2 Align the edge A of the duplex assembly under the back edge of the left...

Страница 273: ...Repair information 4 53 5062 3 Align the top edge of the duplex assembly with the post and then replace the screw...

Страница 274: ...system board cage with board See System board cage with board removal on page 4 145 2 Disconnect the cable A from the fuser motor Note If you are replacing the cables remove the toroids from the old...

Страница 275: ...Repair information 4 55 5062 4 Push the assembly up and pull to remove it...

Страница 276: ...r 1 Remove the system board cage with board See System board cage with board removal on page 4 145 2 Remove the main fan See Main fan removal on page 4 88 3 Remove one screw A and three screws B 4 Cli...

Страница 277: ...cover See Waste toner left cover removal on page 4 32 2 Remove the two screws A from the beacon cover and then lift off the cover 3 Carefully pull the cable through the holes B to remove it Installati...

Страница 278: ...rough the opening in the waste toner left cover before attaching the beacon cover screws Fuser assembly removal See Left on page 7 11 for the part numbers 1 Open the left access door assembly CAUTION...

Страница 279: ...Repair information 4 59 5062 2 Pull down the two fuser latches A 3 Pull to remove the fuser assembly A...

Страница 280: ...4 60 Service Manual 5062 Installation note After inserting the fuser assembly push up the handles and then push up the tab under the right handle 2 1 1...

Страница 281: ...age 7 15 for the part number 1 Remove the rear cover See Rear cover removal on page 4 18 2 Remove the fuser assembly See Fuser assembly removal on page 4 58 3 Remove the E clip A and the washer under...

Страница 282: ...from the fuser motor 5 Remove the three screws C 6 Remove the fuser drive assembly Installation note Be sure to apply grease to the gear and post using the instruction sheet and two kinds of grease th...

Страница 283: ...ge 7 13 for the part number 1 Remove the ITU See ITU assembly removal on page 4 72 2 Remove the fuser See Fuser assembly removal on page 4 58 3 Remove the waste toner left cover See Waste toner left c...

Страница 284: ...two screws C and then remove the cable end and support guide from the frame Note If you are just testing the cable as part of a service check then stop here 7 Remove the OP panel See Operator panel OP...

Страница 285: ...nformation 4 65 5062 8 Clip all cable ties securing the cable 9 Remove the system board shield See System board shield removal on page 4 26 10 Disconnect the fuser system card cable D from the system...

Страница 286: ...rom the LVPS and remove the cable Fuser thermistor removal See Fuser thermal guide assembly on page 7 37 for the part number 1 Remove the fuser See Fuser assembly removal on page 4 58 2 Disconnect the...

Страница 287: ...or the part number 1 Remove the ITU block assembly See ITU block assembly removal on page 4 76 2 Remove the rear cover See Rear cover removal on page 4 18 3 Remove the two screws A to remove the conne...

Страница 288: ...ice Manual 5062 5 Remove three screws C and then pull out the cartridge contact block assembly 6 Remove the screw D from the center of the plate over the HVPS 7 Pull the HVPS board forward C 88A0212 D...

Страница 289: ...ard 9 Pull the board all the way out of the printer Note If you are replacing only the HVPS cable then stop here 10 Remove the screw E and three screws F from the bottom of the board to remove the met...

Страница 290: ...4 70 Service Manual 5062 Installation notes Be sure the HVPS cable sits in the groove under the HVPS board Be sure the ITU block assembly sits flat before attaching the three screws to reinstall it...

Страница 291: ...Disconnect the cable from the UICC card to remove it Housing interlock assembly removal See Front on page 7 7 for the part number 1 Remove the LVPS See Low voltage power supply LVPS removal on page 4...

Страница 292: ...rinter to remove the assembly Clip and remove cable ties as needed Note Observe the cable routing for reinstallation ITU assembly removal See Left continued on page 7 13 for the part number 1 Remove t...

Страница 293: ...rmation 4 73 5062 4 Grasp the ITU handle A and carefully slide the ITU assembly from the printer Warning Be careful to support the ITU as you remove it to avoid damaging the components on the left acc...

Страница 294: ...ear cover See Rear cover removal on page 4 18 2 Remove the right cover See Right cover removal on page 4 23 3 Remove the ITU assembly See ITU assembly removal on page 4 72 4 Remove two screws A to rem...

Страница 295: ...Repair information 4 75 5062 6 Clip the cable tie and remove the toroid Note Be sure to replace the toroid during reinstallation 7 From the right side and back of the printer remove four screws C...

Страница 296: ...ull to remove the autoconnect ITU block assembly removal See Front on page 7 7 for the part number 1 Remove the ITU assembly See ITU assembly removal on page 4 72 2 Remove the three screws A from the...

Страница 297: ...Repair information 4 77 5062 3 Pull up to remove the assembly Installation note Be sure the ITU block assembly sits flat before attaching the three screws to reinstall it...

Страница 298: ...ervice Manual 5062 Left access door piston removal See Left continued on page 7 13 for the part number 1 Open the left access door assembly Front piston a Remove the E clip G from the front piston G 1...

Страница 299: ...e post H from the piston where it attaches to the printer Note The piston is under pressure from the spring Hold the piston firmly as you remove the post c Remove the E clip I and post J from the othe...

Страница 300: ...4 80 Service Manual 5062 Rear piston a Disconnect the piston by pulling apart the clamps F from the tabs b Remove the E clip G and post H from the piston where it attaches to the printer F H G 1126830...

Страница 301: ...Remove the E clip I and post J from the other end to remove the piston Logo panel removal See Top right and front covers on page 7 3 for the part number 1 Open the front access door 2 Remove the three...

Страница 302: ...and pull to remove it Low voltage power supply LVPS removal See Rear on page 7 15 for the part number 1 Remove the rear cover See Rear cover removal on page 4 18 2 Push the release A to disconnect th...

Страница 303: ...Repair information 4 83 5062 3 Remove two screws D to remove the connector shield from the system board 4 Disconnect the LVPS cables E from the system board D 88A0232 E...

Страница 304: ...4 84 Service Manual 5062 5 Disconnect the thermistor cable from the system board 6 Remove the three screws F and the two screws G 7 Remove the LVPS F 88A0212 G G 88A0323...

Страница 305: ...and then attach the thermistor to the replacement LVPS with a new cable tie 10B1648 LVPS exit duct removal See Rear on page 7 15 for the part number 1 Remove the LVPS See Low voltage power supply LVP...

Страница 306: ...anual 5062 4 Remove two screws B LVPS fan removal See Rear on page 7 15 for the part number 1 Remove the rear cover See Rear cover removal on page 4 18 2 Disconnect the fan cable A from the system boa...

Страница 307: ...pair information 4 87 5062 3 Push in to open the cable clip B behind the system board shield 4 Feed the cable through the slot in the system board cage and the clip 5 Remove the two screws C B C 10B15...

Страница 308: ...ble through the slot in the fan housing D as you remove the fan Main fan removal See Rear on page 7 15 for the part number 1 Remove the rear cover See Rear cover removal on page 4 18 2 Disconnect the...

Страница 309: ...al See Front continued on page 7 9 for the part number 1 Remove the standard media tray See Standard media tray removal on page 4 142 2 Remove the waste toner container See Waste toner container remov...

Страница 310: ...4 90 Service Manual 5062 c Remove the screw A on the bottom of the printer and the screw B on the front A 10J1046 B 88A0323...

Страница 311: ...Repair information 4 91 5062 d Lift the rail out of the printer Right rail a Remove the screw C to release the tension on the right side cover C 88A0323...

Страница 312: ...Manual 5062 b Shut the front access door c Gently lay the printer on its back d Remove the screw D on the bottom of the printer and the screw E and screw F on the front of the printer D 10J1046 E 88A0...

Страница 313: ...Repair information 4 93 5062 e Pull aside the right side cover f Pull up and to the left to remove the rail from the printer...

Страница 314: ...fit them over the pins on the front of the printer MPF breakaway assemblies removal See Left on page 7 11 for the part numbers 1 Remove the rear cover See Rear cover removal on page 4 18 2 Remove the...

Страница 315: ...ove the bottom plate Note If you are replacing the input option cable then push it up through the frame and then stand the printer back up to remove the cable Rear breakaway assembly a Remove three sc...

Страница 316: ...4 96 Service Manual 5062 Front breakaway assembly a Remove two screws E b Using a flat blade screwdriver pry out the top and then pull to remove the assembly E 88A0323...

Страница 317: ...ft and rear covers on page 7 5 for the part numbers 1 Remove the left cover See Left cover removal on page 4 10 2 Remove the waste toner left cover See Waste toner left cover removal on page 4 32 3 Ca...

Страница 318: ...4 98 Service Manual 5062 5 Remove the ratchet collar C and remove the bushing under it 6 From the front of the printer rotate the front bushing so the tabs line up with the slots in the frame C...

Страница 319: ...information 4 99 5062 7 Slide the rod toward the front of the printer to free the rear side Installation note Be sure to replace the thrust washer in the ratchet collar before installing the MPF drive...

Страница 320: ...s replace both pick rolls and the special wear strip at the same time 1 Open the left access door 2 Remove the screw A in the top cover Remove the rubber rolls A from the hubs The hubs stay on the pri...

Страница 321: ...062 Installation notes Slide the edge of a pick tire between the rear hub extension and the printer frame and then slide the roll down to the hub Be sure the flaps on the pick rolls slant away from th...

Страница 322: ...al 5062 Verify the rolls turn freely MPF drive assembly removal See Rear on page 7 15 for the part number 1 Remove the LVPS exit duct See LVPS exit duct removal on page 4 85 2 Slide the belt off the M...

Страница 323: ...Repair information 4 103 5062 3 Remove four screws A and remove the assembly 4 Remove the E clip B and the gear C to remove the belt from the assembly A 88A0323 B C 1126831...

Страница 324: ...e sure the belt sits on the teeth at the base of the gear MPF sensor plate assembly removal See Left and rear covers on page 7 5 for the part number 1 Open the left access door assembly 2 Use a flat b...

Страница 325: ...flat blade screwdriver behind the top of the strip and then twist the screwdriver to pop out the strip Operator panel OP assembly removal 1 Remove the top cap cover See Top cap cover removal on page 4...

Страница 326: ...4 106 Service Manual 5062 3 Remove four screws A 4 Rotate the panel up and pull it out A 88A0323...

Страница 327: ...Repair information 4 107 5062 5 Disconnect the cables B going from the UICC card to the printer 6 Remove the operator panel assembly B...

Страница 328: ...right and front covers on page 7 3 for the part number 1 Remove the OP panel UICC card See OP panel UICC card removal on page 4 110 2 Remove the button you want by squeezing in the latches A and push...

Страница 329: ...2 OP panel display removal See Top right and front covers on page 7 3 for the part number 1 Remove the OP panel UICC card See OP panel UICC card removal on page 4 110 2 Remove the four screws A and li...

Страница 330: ...and then perform a POR before replacing a second component listed above If this procedure is not followed the printer will be rendered inoperable Never replace two or more of the components listed ab...

Страница 331: ...Be sure to secure the ESD ground under the screw next to the bracket 3 Enter the Diagnostics menu hold 3 and 6 turn the printer on and release the buttons when the splash screen appears 4 Determine if...

Страница 332: ...standard media tray See Standard media tray removal on page 4 142 2 Remove the waste toner container See Waste toner container removal on page 4 147 3 Remove the print cartridges 4 Shut the front acce...

Страница 333: ...Push down on the sensor to remove it from the rear frame and then disconnect the cable A Paper path redrive assembly with sensors removal See Left continued on page 7 13 for the part number 1 Remove...

Страница 334: ...4 114 Service Manual 5062 4 Disconnect the sensor cables A 5 Clip the cable tie and route the cables through the frame A...

Страница 335: ...and three from the front 7 Insert a flat blade screwdriver angled toward the top of the front side of the assembly and deflect the front plate enough to drop down the front end of the assembly 8 Pull...

Страница 336: ...are routed as shown before you reinstall the assembly Paper pick mechanism assembly removal See Front continued on page 7 9 for the part number 1 Remove the standard media tray See Standard media tra...

Страница 337: ...Repair information 4 117 5062 3 Lower the pick arm all the way 4 Rotate the release lever B pull it toward you and then lower the assembly to remove it from the printer B...

Страница 338: ...ber Note Replace both rolls at the same time 1 Remove the paper pick mechanism assembly See Paper pick mechanism assembly removal on page 4 116 2 Remove the screws A from both sides to release the pic...

Страница 339: ...3 for the part number 1 Remove the printhead access cover See Printhead access cover removal on page 4 17 2 Remove the system board shield See System board shield removal on page 4 26 3 Disconnect th...

Страница 340: ...4 120 Service Manual 5062 4 Remove the six screws B from the brackets and remove the brackets 5 Tilt the printhead forward and lift to remove it B 10J3568...

Страница 341: ...gning the printhead 1 Place the printhead into the printer angled forward sliding the adjustment screws into the slots in the printer frame 2 Lower the back of the printhead until the post on the back...

Страница 342: ...m board Warning Be careful reconnecting the printhead ribbon cables Flat ribbon cables can easily be damaged and should be connected gently by hand 4 Slide the left side of the printhead toward the ba...

Страница 343: ...uick Test An alignment page prints Note If you cannot see the triangles on the top of the test page go to Top Margin on page 4 125 and adjust the top margin until the triangles are visible 9 Use a fla...

Страница 344: ...that houses the four color planes The black plane is aligned to the printer and the color planes are aligned to black After you install the printhead and adjust the course alignment with the alignmen...

Страница 345: ...st the Dual Diode value for that color Enter the number nearest the center of the solid color area to adjust it Example The solid color area on the following test page is closer to 4 than 0 Enter 4 fo...

Страница 346: ...argin 1 Select Left Margin 2 Adjust the left margin until the points of the left alignment marks touch the edge of the page Increasing the value moves the alignment marks to the left Decreasing the va...

Страница 347: ...ent pages print The first page is for adjusting the Skew and Top Margin and the second page is for the Left Margin and Right Margin For now you just need the Skew instructions on the first page 4 Hold...

Страница 348: ...alignment pages Two pages print The first page is for adjusting the Skew and Top Margin and the second page is for the Left Margin and Right Margin 11 Follow the instructions on the pages to adjust t...

Страница 349: ...to move the gray stripe back toward 0 14 Repeat the color alignment process for Cyan and Magenta Redrive gears removal See Left on page 7 11 for the part number 1 Remove the top cover See Top cover re...

Страница 350: ...4 130 Service Manual 5062 Redrive motor removal See Left on page 7 11 for the part number 1 Remove the top cover See Top cover removal on page 4 28 2 Slide off the cap A A...

Страница 351: ...Repair information 4 131 5062 3 Disconnect the cable B from the motor 4 Remove the two screws C to remove the motor B C 88A0212...

Страница 352: ...d fuser bubble removal 1 Open the left access door 2 Remove two screws A from the duplex unit and remove the rail cover 3 Pull out the sensor assembly and rotate it up 4 Slide out the sensor you are r...

Страница 353: ...the duplex unit before you reattach the rail cover Sensor input S1 narrow media near narrow media removal See Left on page 7 10 for the part number 1 Remove the staging deflector assembly See Staging...

Страница 354: ...to remove the sensor Installation note Reinstall a sensor retainer after you attach the new sensor Speaker removal See Top right and front covers on page 7 3 for the part number 1 Remove the operator...

Страница 355: ...y removal See Left on page 7 11 for the part number 1 Remove the ITU assembly See ITU assembly removal on page 4 72 2 Push the top of the deflector down and rotate it back to release the upper hooks 3...

Страница 356: ...e bottom and top posts on each side Staging paper path reference edge assembly removal See Front on page 7 7 for the part number 1 Remove the rear cover See Rear cover removal on page 4 18 2 Remove th...

Страница 357: ...r information 4 137 5062 6 Push the top of the deflector assembly down and rotate it back to release the upper hooks 7 Set the deflector assembly out of the way as far as the sensor cables will allow...

Страница 358: ...4 138 Service Manual 5062 8 Remove the screw A to remove the ground cable 9 Remove two screws C from the ITU DS roller plate and then remove the plate A 88A0212 10J1733...

Страница 359: ...ation 4 139 5062 10 Remove two screws D 11 Lift the bottom of the staging assembly and then rock it back to free it from the frame 12 Disconnect the two cables from the motors to remove the assembly D...

Страница 360: ...nd then swing the plate into place to reattach the two screws Check the alignment of the reference edge See Aligning the staging paper path reference edge on page 4 140 Aligning the staging paper path...

Страница 361: ...he screw clockwise to move the left marks up the page or turn it counterclockwise to move the right marks up 4 Reprint the Quick Test page to check the changes and then continue adjusting the screw as...

Страница 362: ...perform a POR before replacing a second component listed above If this procedure is not followed the printer will be rendered inoperable Never replace two or more of the components listed above witho...

Страница 363: ...shield from the system board 4 Disconnect all cables from the system board Note Some cables have special connectors that require you to press in tabs to disconnect the cables 5 Remove any options fro...

Страница 364: ...Service Manual 5062 6 Remove the screws B from the ports 7 Remove the nine screws C and then remove the system board by sliding it to the left so the Ethernet port D clears the shield B 88A0232 C 88A0...

Страница 365: ...are sure you have resolved the problem If the problem is not resolved then turn the printer off and reinstall the old part If the problem is resolved then turn the printer off and turn it back on with...

Страница 366: ...to press in tabs to disconnect the cables 4 Remove the screw B 5 Tilt the cage forward and slide it up to remove it Installation notes Be sure to reinstall any toroids you had to remove Some connecto...

Страница 367: ...green handles forward and pull out the waste toner container Waste toner gears removal See Rear on page 7 15 for the part number 1 Remove the EP drive See EP drive assembly removal on page 4 54 2 Remo...

Страница 368: ...1 Remove the waste toner container See Waste toner container removal on page 4 147 2 Remove the screw A and remove the waste toner sensor cover 3 From the left side of the printer push in the clips an...

Страница 369: ...ble cover See Lower frame cable cover removal on page 4 15 4 Remove the LVPS See Low voltage power supply LVPS removal on page 4 82 5 Disconnect the cable connector from the system board at JWTB1 Note...

Страница 370: ...ble and then pull the cable through the frame to remove it Waste toner full cable removal See Waste toner full cable on page 7 36 for the part number 1 Remove the ITU block assembly See ITU block asse...

Страница 371: ...pull the cable through the frame Waste toner full sensor removal See Front on page 7 7 for the part number 1 Remove the waste toner container See Waste toner container removal on page 4 147 2 Pry out...

Страница 372: ...Front on page 7 7 for the part number 1 Remove the lower frame cable cover See Lower frame cable cover removal on page 4 15 2 Disconnect the cable 3 Using a short screwdriver remove five screws D fou...

Страница 373: ...Repair information 4 153 5062 4 Pull the right frame back to free the side of the tray and then pull the tray forward to remove it...

Страница 374: ...4 154 Service Manual 5062 Input option removals 550 sheet tray Note Carefully remove the 550 sheet tray option from the base printer before proceeding...

Страница 375: ...he part number 1 Remove the 550 sheet media tray assembly from the 550 sheet drawer assembly The 550 sheet drawer assembly remains 550 sheet media tray assembly removal See Optional 550 sheet tray on...

Страница 376: ...155 2 Remove the top metal cover See 550 sheet tray top metal cover removal on page 4 172 3 Remove the deflector See 550 sheet tray deflector removal on page 4 158 4 Remove the pick assembly See 550...

Страница 377: ...Repair information 4 157 5062 8 Remove the 550 sheet tray controller card assembly from the shield...

Страница 378: ...metal cover See 550 sheet tray top metal cover removal on page 4 172 2 Disconnect the pass thru sensor connector A from the pass thru sensor 3 Remove the pass thru sensor cable 4 Remove the screw B se...

Страница 379: ...removal 1 Remove the media tray assembly See 550 sheet media tray assembly removal on page 4 155 2 Remove the top metal cover See 550 sheet tray top metal cover removal on page 4 172 3 Remove the def...

Страница 380: ...cord with a prying tool 6 Remove the six screws A and one screw B securing the drive assembly to the drawer 7 Open the jam clearance cover 8 Lift the left side of the drive assembly to access the cont...

Страница 381: ...Repair information 4 161 5062 9 Disconnect the three drive connectors C from the controller card assembly 10 Pull up the left side of the drive assembly until the left tip D clears the drawer C D...

Страница 382: ...awer assembly on page 7 19 for the part number 1 Remove the media tray assembly See 550 sheet media tray assembly removal on page 4 155 2 Place the drawer on a vertical position to have access to the...

Страница 383: ...n 4 163 5062 Warning Do not forcefully separate the bottom cover from the drawer the ground cable C is still attached to it 4 Remove the two screws D securing the left anti tip latch assembly to the d...

Страница 384: ...oval See Optional 550 sheet drawer assembly on page 7 19 for the part number 1 Remove the top metal cover See 550 sheet tray top metal cover removal on page 4 172 2 Remove the deflector See 550 sheet...

Страница 385: ...sheet tray pick assembly removal See Optional 550 sheet drawer assembly on page 7 19 for the part number 1 Remove the media tray assembly See 550 sheet media tray assembly removal on page 4 155 2 Dis...

Страница 386: ...4 166 Service Manual 5062 3 Turn the shaft clockwise until the tab B aligns with the opening 4 Pull down the pick arm to release the pick assembly B...

Страница 387: ...Repair information 4 167 5062 5 Pull out the pick assembly 6 Remove the 550 sheet tray pick assembly Warning Do not change the location of the spring...

Страница 388: ...4 168 Service Manual 5062 Installation notes 1 Align the shaft to the left hole of the drive assembly 2 Insert the shaft into the hole...

Страница 389: ...l 550 sheet drawer assembly on page 7 19 for the part number 1 Remove the media tray assembly See 550 sheet media tray assembly removal on page 4 155 2 Remove the pick assembly See 550 sheet tray pick...

Страница 390: ...4 170 Service Manual 5062 This is the photo of the pick roll assembly Installation note Before installing the pick tire be sure that the pick tire is fully aligned against one end of the hub...

Страница 391: ...mbly See 550 sheet media tray assembly removal on page 4 155 2 Remove the top metal cover See 550 sheet tray top metal cover removal on page 4 172 3 Remove the two screws A securing the right anti tip...

Страница 392: ...cover removal 1 Remove the media tray assembly See 550 sheet media tray assembly removal on page 4 155 2 Remove the 10 screws A and one screw B securing the top metal cover to the drawer 3 Remove the...

Страница 393: ...lcrank assembly removal See Optional 2000 sheet high capacity feeder on page 7 21 for the part number 1 Remove the media tray assembly See 2000 sheet high capacity feeder media tray assembly removal o...

Страница 394: ...card assembly removal See Optional 2000 sheet high capacity feeder on page 7 21 for the part number 1 Remove the rear cover See 2000 sheet high capacity feeder rear cover removal on page 4 218 2 Disc...

Страница 395: ...pacity feeder media tray assembly removal on page 4 204 2 Remove the jam clearance top cover See 2000 sheet high capacity feeder jam clearance top cover removal on page 4 187 3 Remove the rear cover S...

Страница 396: ...4 176 Service Manual 5062 6 Remove the screw A to disconnect the ground cable from the rear 7 Remove the three drive assembly connectors B from the controller card assembly A 88A0231 B...

Страница 397: ...Repair information 4 177 5062 8 Release the three drive assembly cables from the cable guides C C...

Страница 398: ...4 178 Service Manual 5062 9 Remove the three screws D securing the drive assembly to the drawer 10 Remove the drive assembly D 88A0442...

Страница 399: ...y feeder elevator home sensor removal See Optional 2000 sheet high capacity feeder on page 7 21 for the part number 1 Remove the rear cover See 2000 sheet high capacity feeder rear cover removal on pa...

Страница 400: ...4 180 Service Manual 5062 4 Remove the three screws B securing the controller card housing B 88A0231...

Страница 401: ...5 Detach the controller card housing Note The controller card housing does not need to be completely removed from the machine It may be allowed to hang on the side 6 Remove the screw C securing the e...

Страница 402: ...4 182 Service Manual 5062 7 Press the latch D to remove the elevator home sensor 8 Remove the elevator home sensor cable D...

Страница 403: ...gh capacity feeder rear cover removal on page 4 218 4 Remove the left side cover See 2000 sheet high capacity feeder left side cover removal on page 4 193 5 Remove the right side cover See 2000 sheet...

Страница 404: ...5062 10 Release the jam clearance cover cable from the cable guides B 11 Open the jam clearance cover 12 Remove the 4 screws C securing the jam clearance cover to the drawer 13 Close the jam clearanc...

Страница 405: ...pair information 4 185 5062 14 Pull out the jam clearance cover to clear the slots from the frame 15 Press the metal tab to release the jam clearance cover and pull up to remove the jam clearance cove...

Страница 406: ...4 186 Service Manual 5062 Warning Be careful not to damage the jam clearance cover sensor This is the photo of the 2000 sheet high capacity feeder jam clearance cover...

Страница 407: ...jam clearance top cover removal 1 Open the jam clearance cover 2 Remove the two screws A and one screw B securing the jam clearance top cover to the drawer 3 Lift the right side of the jam clearance t...

Страница 408: ...000 sheet high capacity feeder jam clearance top cover removal on page 4 187 3 Remove the rear cover See 2000 sheet high capacity feeder rear cover removal on page 4 218 4 Remove the right side cover...

Страница 409: ...Repair information 4 189 5062 8 Release the jam clearance cover cable from the cable guides B 9 Remove the screw C and press the latch D to release the jam clearance cover sensor B D C 88A0312...

Страница 410: ...igh capacity feeder rear cover removal on page 4 218 2 Remove the left side cover See 2000 sheet high capacity feeder left side cover removal on page 4 193 3 Remove the right side cover See 2000 sheet...

Страница 411: ...pacity feeder left anti tip latch assembly removal See Optional 2000 sheet high capacity feeder on page 7 21 for the part number 1 Remove the jam clearance top cover See 2000 sheet high capacity feede...

Страница 412: ...he two screws A securing the left anti tip latch assembly to the drawer Note Hold the left anti tip latch assembly to prevent it from falling off after removing the screws This is the photo of the lef...

Страница 413: ...i tip latch assembly B 2000 sheet high capacity feeder left side cover removal 1 Remove the rear cover See 2000 sheet high capacity feeder rear cover removal on page 4 218 2 Open the media tray assemb...

Страница 414: ...4 194 Service Manual 5062 5 Remove the left side cover by slightly lifting it This is the photo of the 2000 sheet high capacity feeder left side cover...

Страница 415: ...e the slot 2000 sheet high capacity feeder lift drive gear assembly removal 1 Remove the media tray assembly See 2000 sheet high capacity feeder media tray assembly removal on page 4 204 2 Remove the...

Страница 416: ...rvice Manual 5062 3 Disconnect the lift drive motor connector from the controller card assembly 4 Release the lift drive motor cable from the cable guide A 5 Remove the four screws B to remove the bra...

Страница 417: ...e E clip securing the elevator gear C to the frame Note The spring from gear C will pop out when removing the E clip 7 Remove the elevator gear C 8 Remove the E clip securing the elevator gear D to th...

Страница 418: ...vice Manual 5062 10 Remove the E clip securing the elevator gear E to the frame 11 Remove the elevator gear E 12 Remove the E clip securing the elevator gear F to the bracket 13 Remove the elevator ge...

Страница 419: ...Repair information 4 199 5062 14 Remove the bearing G This is the photo of the 2000 sheet high capacity feeder lift motor drive assembly G...

Страница 420: ...4 200 Service Manual 5062 Installation notes Make sure that the bearing is reinstalled as shown in the picture Make sure that the gear is reassembled as shown in the picture...

Страница 421: ...the part number 1 Remove the media tray assembly See 2000 sheet high capacity feeder media tray assembly removal on page 4 204 2 Remove the rear cover See 2000 sheet high capacity feeder rear cover re...

Страница 422: ...4 202 Service Manual 5062 5 Remove the four screws B to remove the bracket 6 Remove the two screws H securing the motor to the bracket B A H...

Страница 423: ...Repair information 4 203 5062 7 Remove the motor from the bracket...

Страница 424: ...ee Optional 2000 sheet high capacity feeder on page 7 21 for the part number 1 Open the media tray assembly until it stops 2 Slightly pull the media tray to the right push the latch on the media tray...

Страница 425: ...media tray assembly out of the drawer 2000 sheet high capacity feeder pass thru sensor removal See Optional 2000 sheet high capacity feeder on page 7 21 for the part number 1 Open the media tray assem...

Страница 426: ...4 206 Service Manual 5062 4 Release the latch B securing the pass thru sensor 5 Remove the pass thru sensor B A...

Страница 427: ...bly removal on page 4 204 2 Remove the jam clearance top cover See 2000 sheet high capacity feeder jam clearance top cover removal on page 4 187 3 Remove the rear cover See 2000 sheet high capacity fe...

Страница 428: ...4 208 Service Manual 5062 6 Disconnect the four pick assembly connectors C from the controller card assembly C...

Страница 429: ...Repair information 4 209 5062 7 Release the pick assembly cables from the cable guide D D...

Страница 430: ...4 210 Service Manual 5062 8 Remove the two screws E securing the cave light to the drawer 9 Lift the lower right side of the pick assembly and pull to remove it E 88A0231...

Страница 431: ...Repair information 4 211 5062 This is the photo of the 2000 sheet high capacity feeder pick assembly...

Страница 432: ...4 212 Service Manual 5062 Installation note 1 Align the upper left part of the pick assembly 2 Align the frame tabs to their corresponding pick arm slots...

Страница 433: ...stallation note Make sure that the pick arm lever A is on top of the actuator lever B If the pick arm is hanging press the actuator lever as shown in the picture Make sure that the pick arm is positio...

Страница 434: ...bly removal See Optional 2000 sheet high capacity feeder on page 7 21 for the part number 1 Remove the media tray assembly See 2000 sheet high capacity feeder media tray assembly removal on page 4 204...

Страница 435: ...Repair information 4 215 5062 4 Press down the black latch A to release the pick tire 5 Remove the pick roll tire 6 Repeat steps 4 5 to remove the pick tire on the other side A...

Страница 436: ...4 216 Service Manual 5062 This is the photo of the 2000 sheet high capacity feeder pick roll assembly...

Страница 437: ...Installation note Be sure that the pick arm lever A is on top of the actuator lever B If the pick arm is hanging press the actuator lever as shown in the picture Be sure that the pick arm is positione...

Страница 438: ...Manual 5062 2000 sheet high capacity feeder rear cover removal 1 Remove the two screws A securing the rear cover to the drawer 2 Position the printer so that the rear cover is over the edge of the ta...

Страница 439: ...Repair information 4 219 5062 3 Release the two latches and remove the rear cover This is the photo of the 2000 sheet high capacity feeder rear cover...

Страница 440: ...et high capacity feeder rear cover removal on page 4 218 2 Remove the right side cover See 2000 sheet high capacity feeder right side cover removal on page 4 221 3 Remove the two screws A securing the...

Страница 441: ...to the left anti tip latch assembly B 2000 sheet high capacity feeder right side cover removal 1 Remove the rear cover See 2000 sheet high capacity feeder rear cover removal on page 4 218 2 Open the m...

Страница 442: ...4 222 Service Manual 5062 4 Pull the upper back portion of the right side cover 5 Lift the right side cover to remove it...

Страница 443: ...Repair information 4 223 5062 This is the photo of the 2000 sheet high capacity feeder right side cover...

Страница 444: ...l 1 Remove the mailbox from the printer 2 Remove the front cover See Finisher or stacker front cover removal on page 4 248 3 Open the access door and press in to release the support pins from each sid...

Страница 445: ...edia bin full actuator removal 1 Remove the front cover See 5 bin mailbox front cover removal on page 4 233 2 Pry the front hinge of the media bin full actuator towards the rear until the front boss i...

Страница 446: ...5 bin mailbox option from the printer 2 Remove the 4th mailbox output bin deflector See 5 bin mailbox output bin deflector removal on page 4 236 3 Disconnect the pass thru cable from the controller c...

Страница 447: ...nformation 4 227 5062 5 bin mailbox assembly spring removal 1 Remove the mailbox option from the printer 2 Open the left access door 3 Using a spring hook or needlenose pliers remove the spring off th...

Страница 448: ...removal 1 Remove the mailbox from the printer 2 Remove the mailbox rear cover See 5 bin mailbox rear cover removal on page 4 239 3 Open the left access door and press in to release the support pins fr...

Страница 449: ...the printer 2 Remove the mailbox front cover See 5 bin mailbox front cover removal on page 4 233 3 Remove the five screws A and then remove the beacon card and covers 5 bin mailbox cave beacon remova...

Страница 450: ...the cable remove the rear cover and disconnect the cable from the printer circuit board See 5 bin mailbox rear cover removal on page 4 239 5 bin mailbox controller card removal 1 Remove the mailbox fr...

Страница 451: ...late removal on page 4 232 3 Remove the four screws A securing the diverter plate 4 Remove the screw B of the deflector gate solenoid you need to remove 5 Carefully unroute the deflector gate solenoid...

Страница 452: ...ront cover See 5 bin mailbox front cover removal on page 4 233 3 Remove the printer circuit board See 5 bin mailbox controller card removal on page 4 230 4 Remove four screws A and remove the feed mot...

Страница 453: ...rmation 4 233 5062 5 bin mailbox front cover removal 1 Remove the mailbox from the printer 2 Remove two screws A from the bottom 3 From the left side use a flat blade screwdriver to pry up and disenga...

Страница 454: ...t side to disengage the tabs and then remove the cover 5 Disconnect the cable from the beacon card Note If you are replacing the cover FRU then remove the bin full beacon card See 5 bin mailbox bin fu...

Страница 455: ...from the printer 2 Remove the rear cover See 5 bin mailbox rear cover removal on page 4 239 3 Press the tabs to release the cable and push the cable through the frame 4 Disconnect the cable A from th...

Страница 456: ...the rear cover See 5 bin mailbox rear cover removal on page 4 239 4 Remove the mailbox feed motor with plate assembly See 5 bin mailbox feed motor with plate removal on page 4 232 5 If you are removi...

Страница 457: ...paper bail removal Top bail 1 Remove the mailbox from the printer 2 Remove the top cover See 5 bin mailbox top cover removal on page 4 240 3 From the top cover lift the bail to line up the bail arm w...

Страница 458: ...sors removal 1 Remove the mailbox from the printer 2 Remove the rear cover See 5 bin mailbox rear cover removal on page 4 239 3 Press in the tabs to pop out the sensor you need to replace 4 Disconnect...

Страница 459: ...mailbox front cover See 5 bin mailbox front cover removal on page 4 233 3 Remove the mailbox access door See 5 bin mailbox access door removal on page 4 224 4 Remove one screw A and remove the beacon...

Страница 460: ...ght side to disengage the latches 4 Use the screwdriver to disengage the two latches on the left side and then remove the cover 5 bin mailbox top cover removal 1 Remove the mailbox from the printer 2...

Страница 461: ...information 4 241 5062 3 Remove the two screws A and remove the top cover 4 Remove the rear cover See 5 bin mailbox rear cover removal on page 4 239 5 Remove the two screws B and then lift off the top...

Страница 462: ...Service Manual 5062 5 bin mailbox tray extension removal 1 Pull out the extension until it stops 2 Push to release the two tabs A on the bottom of the extension and then pull the extension out to remo...

Страница 463: ...e Finisher or stacker left access door assembly removal on page 4 250 3 Remove the screw A and remove the beacon card Finisher or stacker bin full spring removal See Finisher assembly on page 7 23 for...

Страница 464: ...4 244 Service Manual 5062 3 Using a spring hook remove the spring...

Страница 465: ...utput bin LED and LED lens removal on page A 264 3 Press the tabs on the bin media present to remove the sensor from the cover 4 Disconnect the cable from the beacon card Finisher or stacker controlle...

Страница 466: ...e three screws A securing the stapler stacker controller card assembly 5 Remove the stapler stacker controller card assembly Installation note Be sure to place the black plastic under the controller c...

Страница 467: ...inisher assembly on page 7 23 for the part number 1 Remove the option from the printer 2 Open the option left access door 3 Using a screwdriver force the rear hinge A out of the slot by pushing the do...

Страница 468: ...Manual 5062 Finisher or stacker front cover removal See Finisher assembly on page 7 23 for the part number 1 Remove the option from the printer 2 Remove the two screws A on the inside of the exit bin...

Страница 469: ...he left cover Finisher or stacker LED sensor cover removal 1 Remove the option from the printer 2 Remove the standard output bin LED lens See Finisher or stacker standard output bin LED and LED lens r...

Страница 470: ...e the option from the printer 2 Open the left access door 3 Using a screwdriver force the rear hinge A out of the slot to lower the door all the way and then pry the rear hinge out by pushing the door...

Страница 471: ...n lens E and remove the door assembly Finisher or stacker media stack flap and media stack flap actuator removal See Finisher assembly continued on page 7 25 for the part number 1 Remove the option fr...

Страница 472: ...nstallation note Use a flat blade screwdriver to bend the locking tab back into place after you position the actuator Finisher or stacker option cable removal 1 Remove the option from the printer 2 Re...

Страница 473: ...62 4 Disconnect the cable A and press the latch to disconnect the cable B from the controller card 5 Route the cables through option 6 Press the tabs to disconnect the option connector and route the c...

Страница 474: ...d right tabs and pry up the center tab Finisher or stacker output bin LED and LED lens removal See Finisher assembly on page 7 23 for the part number 1 Remove the option from the printer 2 Remove the...

Страница 475: ...ly removal on page 4 255 3 Remove the E clip A and remove the gear Finisher or stacker paddle drive motor assembly removal See Finisher assembly continued on page 7 25 for the part number 1 Remove the...

Страница 476: ...ice Manual 5062 5 Remove the three screws A securing the two paddle drive motor assemblies 6 Remove the paddle drive motor assembly Installation note Be sure to line up the locator B when you install...

Страница 477: ...er rear cover removal See Finisher assembly on page 7 23 for the part number 1 Remove the option from the printer 2 Remove the four screws A from the bottom of the option 3 Using a flat blade screwdri...

Страница 478: ...on the right side of the cover to disengage the tabs and remove the cover Finisher or stacker sensor bin full receive removal See Finisher assembly on page 7 23 for the part number 1 Remove the option...

Страница 479: ...r or stacker sensor bin full send removal See XXXX for the part number 1 Remove the option from the printer 2 Remove the finisher or stacker controller card assembly See Finisher or stacker controller...

Страница 480: ...er bin media present removal See XXXX for the part number 1 Remove the option from the printer 2 Remove two screws A and pull out the sensor cover 3 Press the tabs to remove the sensor from the cover...

Страница 481: ...See Finisher or stacker paddle drive motor assembly removal on page 4 255 3 Disconnect the cable from the sensor 4 Press the tabs to remove the sensor Finisher sensor stapler access door interlock re...

Страница 482: ...removal on page 4 257 3 Remove the finisher front cover See Finisher or stacker front cover removal on page 4 248 4 Open the left access door and pry out the left hinge A to lower the door 5 Push the...

Страница 483: ...or Finisher or stacker sensor tamper HP left and right removal 1 Remove the option from the printer 2 Remove the option top cover See Finisher or stacker top cover removal on page 4 267 3 Disconnect t...

Страница 484: ...er assembly on page 7 23 for the part number 1 Remove the option from the printer 2 Remove two screws A and pull out the sensor cover 3 To remove the LED remove the screw B and then disconnect the cab...

Страница 485: ...d remove the belt from the pulley Finisher or stacker tamper drive motor assembly removal See Finisher assembly continued on page 7 25 for the part number Note The left tamper motor controls the front...

Страница 486: ...ews F from the motor you are removing and remove the motor assembly Finisher or stacker tamper recoil spring removal See Finisher assembly continued on page 7 25 for the part number 1 Remove the optio...

Страница 487: ...e printer 2 Remove the front cover See Finisher or stacker front cover removal on page 4 248 3 Remove the rear cover See Finisher or stacker rear cover removal on page 4 257 4 Remove the screw A on ea...

Страница 488: ...emove the finisher rear cover See Finisher or stacker rear cover removal on page 4 257 3 Remove two screws A to remove rear cable from the stapler unit assembly and then remove the other three cables...

Страница 489: ...U access door removal 1 Remove all output options from the printer 2 Open the access door and press the tabs to disconnect the beacon cable 3 Insert a flat blade screwdriver below the bottom hinge and...

Страница 490: ...1 Remove all output options from the printer 2 Remove the HTU access door See HTU access door removal on page 4 269 3 Remove six screws A and turn over the beacon cover 4 Remove the screw B to remove...

Страница 491: ...the HTU access door See HTU access door removal on page 4 269 3 Remove the screw A from the roller you are replacing and remove the roller HTU bin diverter gate spring removal 1 Remove all output opt...

Страница 492: ...4 272 Service Manual 5062 3 Use a spring hook to remove the spring A...

Страница 493: ...ve the front standard bin cover See HTU front standard bin cover removal on page 4 280 3 Use a spring hook to remove the spring A HTU card bin full receive card and lens removal 1 Remove all output op...

Страница 494: ...4 274 Service Manual 5062 3 Remove the two screws A and then remove the sensor card 4 Disconnect the cable to remove the sensor 5 If you are replacing the lens then remove two screws B to remove it...

Страница 495: ...t options from the printer 2 Remove the HTU controller card See HTU controller card removal on page 4 276 3 Remove the two screws A and then remove the sensor card 4 Disconnect the cable from the sens...

Страница 496: ...oller card removal 1 Remove all output options from the printer 2 Remove the rear standard bin cover See HTU rear standard bin cover removal on page 4 296 3 Disconnect all cables connected to the cont...

Страница 497: ...er 2 Remove the HTU controller card See HTU controller card removal on page 4 276 3 Remove four screws A HTU drive gear spring removal 1 Remove all output options from the printer 2 Remove the control...

Страница 498: ...e Manual 5062 4 Slide the belt off the lowest gear HTU engagement roller removal 1 Remove all output options from the printer 2 Lay the HTU on its back 3 Remove the screw A to remove the roller you ar...

Страница 499: ...HTU upper exit shaft removal on page 4 314 2 Unsnap the left side of the roller from the cover and remove the roller HTU front redrive cover removal 1 Remove all output options from the printer 2 Lay...

Страница 500: ...4 280 Service Manual 5062 HTU front standard bin cover removal 1 Remove all output options from the printer 2 Remove two screws A from the bottom 3 Remove the screw B from the top...

Страница 501: ...move the screw C inside the output bin and remove the cover HTU locking lever removal 1 Remove the front standard bin cover See HTU front standard bin cover removal on page 4 280 2 Remove the three E...

Страница 502: ...se a flat blade screwdriver to slide the lever out 4 Remove the screw B HTU locking lever card removal 1 Remove the locking lever See HTU locking lever removal on page 4 281 2 Disconnect the cable to...

Страница 503: ...guide removal 1 Remove all output options from the printer 2 Remove the upper guide See HTU upper guide removal on page 4 315 3 Remove 13 screws A from the bottom of the transport unit 4 Press the tab...

Страница 504: ...edge of the plate and then slide the plate to the rear to remove it HTU option hook removal 1 Remove all output options from the printer Front hook a Remove the front standard bin cover See HTU front...

Страница 505: ...mation 4 285 5062 b Remove one screw A and then remove the hook Installation note From the back of the hook turn the spring arm 1 2 turn counterclockwise and then hold the arm in place while you insta...

Страница 506: ...rd bin cover See HTU rear standard bin cover removal on page 4 296 b Remove the screw A and then remove the hook Installation note From the back of the hook turn the spring arm 1 2 turn counterclockwi...

Страница 507: ...5062 HTU option roller removal 1 Remove all output options from the printer Front roller a Remove the front standard bin cover See HTU front standard bin cover removal on page 4 280 b Remove the scre...

Страница 508: ...4 288 Service Manual 5062 Rear roller a Remove the rear standard bin cover See HTU rear standard bin cover removal on page 4 296 b Remove the screw A to remove the roller...

Страница 509: ...then pull back to remove it Installation note If you are replacing the output bin FRU then remove the wire stop See HTU output bin wire stop removal on page 4 291 HTU output bin extension removal 1 R...

Страница 510: ...bin cover See HTU rear standard bin cover removal on page 4 296 2 Disconnect the output bin solenoid cable A Note Tie a string onto the cable so you can route the new cable through the HTU 3 Remove th...

Страница 511: ...on 4 291 5062 5 Remove the two screws D and remove the solenoid HTU output bin wire stop removal 1 Remove the output option from the HTU 2 Rotate the extension cover down 3 Pull out the sides of the s...

Страница 512: ...tion solenoid removal 1 Remove the rear standard bin cover See HTU rear standard bin cover removal on page 4 296 2 Disconnect the output bin solenoid cable A Note Tie a string to the cable so you can...

Страница 513: ...move the two screws D and then remove the solenoid HTU output sensor removal 1 Remove the right inner cover See HTU right inner cover removal on page 4 300 2 Release the tabs that hold the sensor in p...

Страница 514: ...tions from the printer 2 Push up the tabs to release the latches and rotate the cover up to remove it HTU rear redrive cover removal 1 Remove all output options from the printer 2 Remove the access do...

Страница 515: ...Repair information 4 295 5062 4 Remove the screw B from the rear 5 Pull out the side to release the tabs Installation note Use a screwdriver to push the tabs back into the slots...

Страница 516: ...4 296 Service Manual 5062 HTU rear standard bin cover removal 1 Remove all output options from the printer 2 Remove two screws A from the bottom 3 Remove the screw B inside the output bin...

Страница 517: ...Repair information 4 297 5062 4 Remove the screw C from the left side...

Страница 518: ...tput option connector bracket E and then lift off the rear standard bin cover 7 Disconnect the cable F and press the tab to disconnect the cable G from the controller card Note If you are replacing th...

Страница 519: ...pair information 4 299 5062 HTU right bottom cover removal 1 Remove all output options from the printer 2 Remove three screws A from the inside 3 Remove two screws B from the bottom and remove the cov...

Страница 520: ...ter 2 Remove the output bin See HTU output bin removal on page 4 289 3 Remove the front standard bin cover See HTU front standard bin cover removal on page 4 280 4 Remove the two screws A one screw B...

Страница 521: ...Repair information 4 301 5062 6 Remove the two screws D one screw E and disconnect the cable F...

Страница 522: ...4 302 Service Manual 5062 7 Remove the right lower cover Note Observe the routing of cable through the side frame...

Страница 523: ...Repair information 4 303 5062 8 Remove the two screws H 9 Remove the two screws I and two screws J...

Страница 524: ...ss door interlock removal 1 Remove all output options from the printer 2 Remove the front redrive cover See HTU front redrive cover removal on page 4 279 3 Press the outer tabs A to remove the sensor...

Страница 525: ...2 Remove the rear standard bin cover See HTU rear standard bin cover removal on page 4 296 3 Disconnect the sensor cable A from the controller card 4 Remove the output bin See HTU output bin removal o...

Страница 526: ...input removal 1 Remove all output options from the printer 2 Remove the HTU lower redrive guide See HTU lower redrive guide removal on page 4 283 3 Press the tabs to release the sensor and then disco...

Страница 527: ...put option position removal 1 Remove all output options from the printer 2 Remove the rear standard bin cover See HTU rear standard bin cover removal on page 4 296 3 Press the tabs to pull out the sen...

Страница 528: ...3 Press the tabs to release the sensor and then disconnect the cable to remove the sensor HTU sensor cable bin full send and receive removal 1 Remove all output options from the printer 2 Remove both...

Страница 529: ...topper diverter removal 1 Remove the front standard bin cover See HTU front standard bin cover removal on page 4 280 2 Remove the solenoid plunger and spring from the stopper diverter and then slide t...

Страница 530: ...See HTU rear redrive cover removal on page 4 294 3 Remove one of the gears A to remove the belt you are replacing Note Remove the center belt to access the other two belts HTU to printer cable remova...

Страница 531: ...nector HTU top redrive cover removal 1 Remove all output options from the printer 2 Remove the front redrive cover See HTU front redrive cover removal on page 4 279 3 Remove two screws A 4 Remove the...

Страница 532: ...wo screws B and then remove the cover HTU top right cover removal 1 Remove all output options from the printer 2 Remove the rear standard bin cover See HTU rear standard bin cover removal on page 4 29...

Страница 533: ...B from the rear and then remove the top cover HTU transport gear removal 1 Remove the HTU drive belt See HTU drive belt removal on page 4 277 2 Use a flat screwdriver to remove the gear A 3 Remove the...

Страница 534: ...right inner cover See HTU right inner cover removal on page 4 300 2 Remove the two screws A and then remove the transport motor HTU upper exit shaft removal 1 Remove the right inner cover See HTU rig...

Страница 535: ...exit shaft out of the cover HTU upper guide removal 1 Remove all output options from the printer 2 Remove the top redrive cover See HTU top redrive cover removal on page 4 311 3 Remove the screw A fr...

Страница 536: ...4 316 Service Manual 5062 5 Flex the back of the frame to release the rear edge and then remove the guide...

Страница 537: ...Repair information 4 317 5062...

Страница 538: ...4 318 Service Manual 5062...

Страница 539: ...Connector locations 5 1 5062 5 Connector locations Locations System board cabling reference For more information see the connector diagram for the System board on page 5 2...

Страница 540: ...5 2 Service Manual 5062 Connectors System board...

Страница 541: ...5_UI 18 V15_UI 19 WAKE_L 20 GND 21 PWR_LED2_L 22 PWR_LED1_L 23 B10_ 5V_CTNL 24 PWR_BUTTON_L J3 Processor Fan Cable In FRU 1 5V _DC 2 5V_DC or GND 3 FANSENSE J4 Not used NA NA J5 Not used NA NA J8 Out...

Страница 542: ...15 V45_C_WIND_U 16 M_BLDC_HALL_W 17 V45_C_WIND_V 18 M_BLDC_HALL_V 19 V45_C_WIND_W 20 M_BLDC_HALL_U 21 GND 22 M_BLDC_HOME JCMCY1 C Y Metering Cable 10J0955 C Y Cart Metering 1 VS10_CM_C 2 GND 3 S_CART...

Страница 543: ...ND 12 GND JDUPL1 Duplex Mtr Cable 10J0935 Duplex Motor 1 VS10_DUPLEX_LED 2 S_DUPLEX_ENC 3 GND 4 GND 5 V25_DUPLEX_MOT 6 V25_DUPLEX_MOT JFMUSB OP Panel Cable 10J0971 Panel USB USB NA JFSR1 Fuser Low Vol...

Страница 544: ...TO 27 ITM_SERVO_INTO 28 3 3v_ENG 29 Y_SERVO_INTO 30 M_TX_PWM_OUT 31 Y_TX_PWM_OUT 32 PNR_PWM_OUT 33 C_SERVO_INTO 34 C_TX_PWM_OUT JIOPT1 Input Option Cable 10J0942 Option Bottom 1 TXD1_OPT_OUT 2 GND 3 G...

Страница 545: ...of fan 1 S_LFAN_STALL 2 GND 3 LFAN_OUT 4 V20_LFAN JLVPS1 LVPS Cable Part of LVPS 1 LVPS1_TEMP 2 GND 3 24V_LOW_PWR_OUT 4 LVPS2_TEMP 5 AC_CURRENT 6 5V_RIP_PWR_OUT 7 GND 8 GND 9 5V_ENG_PWR_OUT 10 BR_HEA...

Страница 546: ...Memory Cable Part of unit 1 V_CART_3V 2 XP_DAT_C 3 XP_CLK_C 4 GND JPH1 Printhead Cable Part of printhead Flat NA JPH2 Printhead Cable Part of printhead Flat NA JPK1 Black Memory Cable Part of unit 1...

Страница 547: ...sed NA JTCVR1 Bin Full Sensor Cable 10J0950 Bin Full 1 S_LED5 2 NO NAME 3 GND 4 GND 5 GND 6 GND 7 VS10_BIN_FULL 8 S_BF_IN 9 GND 10 GND 11 S_RD2_SNS 12 VS10_RD2_LED JTLBT1 Not used NA NA JTRAY1 Autocom...

Страница 548: ...TBF1 Waste Toner Full Sensor Cable 10J0967 Waste Toner Full 1 VS_WST_FUL 2 S_WST_FUL 3 GND JXT1 Not used NA NA JXT2 Not used NA NA JYF1 Yellow Fuser BLDC Cable 10J0931 BLDC Fuser 1 Y_BLDC_HOME 2 V45_F...

Страница 549: ...Connector locations 5 11 5062 550 sheet tray option system card J35 J34 J32 J30 J10 J3 JPTS1 J4 J17 J2...

Страница 550: ...V_Switch J3 Pick motor 1 5V_Switch 2 ENCODER 3 GND 4 Motor 5 Motor J4 Paper level sensor 1 5V_Switch 2 P_LEV_SENSOR_1 3 GND 4 5 5V_Switch 6 P_LEV_SENSOR_2 7 GND J10 Feed motor 1 5V_Switch 2 ENCODER 3...

Страница 551: ...D tray 1 TRAY_LIGHTPIPE 2 GND J35 Power IN 1 24V 2 5V 3 Ground JPTS1 Pass thru sensor 1 24V 2 5V 3 5V_Switch 550 sheet tray option system card connectors See 550 sheet tray option system card on page...

Страница 552: ...5 14 Service Manual 5062 2000 sheet high capacity feeder option system card J35 J34 J32 J10 J3 JPTS1 J4 J17 J11 J2 J16...

Страница 553: ...J2 Jam door sensor 1 GND 2 Input 3 5V_Switch J3 Pick motor 1 5V_Switch 2 ENCODER 3 GND 4 Motor 5 Motor J4 Paper level sensor 1 5V_Switch 2 P_LEV_SENSOR_1 3 GND 4 5 5V_Switch 6 P_LEV_SENSOR_2 7 GND J10...

Страница 554: ..._TXD 5 S2 J34 LED tray 1 TRAY_LIGHTPIPE 2 GND J35 Power IN 1 24V 2 5V 3 Ground JPTS1 Pass thru sensor 1 24V 2 5V 3 5V_Switch 2000 sheet high capacity feeder option system card connectors See 2000 shee...

Страница 555: ...Connector locations 5 17 5062 5 bin mailbox printer circuit board...

Страница 556: ...5 18 Service Manual 5062...

Страница 557: ...ly in the area of the On Off switch and the power supply Damaged missing or altered covers especially in the area of the top cover and the power supply cover Possible safety exposure from any non Lexm...

Страница 558: ...ce Manual 5062 Redrive parts packet 1 Using the 739A grease that came with the redrive assembly lubricate the four posts A 2 Install the gears 3 Using the 744 grease lubricate the teeth B of the gears...

Страница 559: ...maintenance 6 3 5062 Fuser drive assembly 1 Using the 739A grease that came with the fuser drive assembly lubricate the post A 2 Install the gear 3 Using the 744 grease lubricate the teeth B of the ge...

Страница 560: ...6 4 Service Manual 5062...

Страница 561: ...clude the rest of the base machine Units FRU Refers to the number of units packaged together and identified by the part number Description Provides more descriptive information to help identify the pa...

Страница 562: ...7 2 Service Manual 5062 Assembly 1 Top right and front covers 1 2 3 4 5 6 7 9 10 11 12 13 14 15 8...

Страница 563: ...removal on page 4 142 8 40X7111 1 1 Front access door and pivot Front access door assembly removal on page 4 2 9 40X7125 1 1 Waste toner left cover with beacon Waste toner left cover removal on page...

Страница 564: ...7 4 Service Manual 5062 Assembly 2 Left and rear covers 1 2 4 5 6 7 8 9 10 11 12 13 14 3...

Страница 565: ...embly removal on page 4 4 7 40X7147 1 1 MPF door assembly including MPF door cover MPF outer plate MPF side restraint Paper guide slide Multipurpose feeder MPF cover removal on page 4 16 8 40X7121 Low...

Страница 566: ...7 6 Service Manual 5062 Assembly 3 Front 1 2 4 5 6 7 8 3 3 3 3...

Страница 567: ...toner sensors 2 Paper auto size sensor Paper path sensors not shown Bin full sensor not shown Waste toner sensor removal on page 4 148 Waste toner full sensor removal on page 4 151 Paper auto size sen...

Страница 568: ...7 8 Service Manual 5062 Assembly 3 1 Front continued 1 2 4 5 1 1 1 3...

Страница 569: ...ry block removal on page 4 42 2 40X7160 1 1 Paper pick mechanism assembly Paper pick mechanism assembly removal on page 4 116 3 40X6104 2 2 Pick tire roll assembly Pick rolls removal on page 4 118 4 4...

Страница 570: ...7 10 Service Manual 5062 Assembly 4 Left 1 2 4 5 6 8 7 3...

Страница 571: ...y removal on page 4 135 4 40X7146 1 1 Staging deflector assembly with sensors Staging deflector assembly removal on page 4 135 5 40X7172 1 1 Fuser MPF autocomp parts packet including Fuser datum rear...

Страница 572: ...7 12 Service Manual 5062 Assembly 4 1 Left continued 1 2 3 4...

Страница 573: ...with sensors removal on page 4 113 2 40X7153 1 1 Left access door pistons parts packet including Piston clip pin Left door spring support Piston housing assembly Door support anchor pin 3 on page 4 7...

Страница 574: ...7 14 Service Manual 5062 Assembly 5 Rear 1 2 3 6 10 8 9 11 4 7 5 12...

Страница 575: ...e assembly MPF drive assembly removal on page 4 102 6 40X7135 1 1 Fuser drive assembly including Gear thrust washer Gear Fuser Dr Compound Fuser drive assembly removal on page 4 61 7 40X7162 1 1 Waste...

Страница 576: ...7 16 Service Manual 5062 Assembly 6 Optional 550 sheet tray 1 2...

Страница 577: ...t tray Index P N Units opt Units FRU Description Removal procedure 6 1 40X6102 1 1 550 sheet drawer assembly 550 sheet drawer assembly removal on page 4 155 2 40x6099 1 1 550 sheet media tray assembly...

Страница 578: ...7 18 Service Manual 5062 Assembly 7 Optional 550 sheet drawer assembly 4 5 3 2 2 1...

Страница 579: ...01 2 2 Anti tip latch assembly 550 sheet tray right anti tip latch assembly removal on page 4 171 and 550 sheet tray left anti tip latch removal on page 4 162 3 40X6274 1 3 550 sheet 2000 sheet input...

Страница 580: ...7 20 Service Manual 5062 Assembly 8 Optional 2000 sheet high capacity feeder 2 3 4 5 6 1 7 9 6 10 8...

Страница 581: ...crank assembly removal on page 4 173 5 40X6276 1 1 2000 sheet high capacity feeder controller card assembly 2000 sheet high capacity feeder controller card assembly removal on page 4 174 6 40X6101 2 2...

Страница 582: ...7 22 Service Manual 5062 Assembly 9 Finisher assembly...

Страница 583: ...stacker bottom cover removal on page 4 245 9 40X4618 1 1 Sensor finisher bin media present Finisher or stacker sensor finisher bin media present removal on page 4 260 10 40X4619 1 1 Output bin extens...

Страница 584: ...7 24 Service Manual 5062 Assembly 9 1 Finisher assembly continued...

Страница 585: ...tamper motor assembly Finisher or stacker tamper drive motor assembly removal on page 4 265 5 40X4624 1 1 Tamper recoil spring Finisher or stacker tamper recoil spring removal on page 4 266 6 40X7247...

Страница 586: ...7 26 Service Manual 5062 Assembly 10 Finisher stapler assembly 1 2...

Страница 587: ...bly Asm Index Part number Units mach Units FRU Description Removal procedure 10 1 40X7230 1 1 Stapler assembly Finisher stapler unit assembly removal on page 4 268 2 40X5909 1 1 Sensor media in staple...

Страница 588: ...7 28 Service Manual 5062 Assembly 11 High capacity output stacker...

Страница 589: ...her or stacker bottom cover removal on page 4 245 9 40X4618 1 1 Sensor finisher bin media present Finisher or stacker sensor finisher bin media present removal on page 4 260 10 40X4619 1 1 Output bin...

Страница 590: ...7 30 Service Manual 5062 Assembly 11 1 High capacity output stacker continued...

Страница 591: ...1 Rear tamper motor assembly Finisher or stacker tamper drive motor assembly removal on page 4 265 5 40X4624 1 1 Tamper recoil spring Finisher or stacker tamper recoil spring removal on page 4 266 6 4...

Страница 592: ...adapter NS 40X5301 1 1 256MB DDR DRAM DIMM NS 40X5302 1 1 512MB DDR DRAM DIMM NS 40X5303 1 1 1GB DDR DRAM DIMM NS 40X5704 1 1 256MB NAND flash card NS 40X5952 1 1 PrintCryptionTM card NS 40X5969 1 1 K...

Страница 593: ...tion table on page 7 34 40X7168 1 Cables parts packet including Paper path MPF sensor Tray 1 machine side Duplex motor Staging motor Thermistor redrive HVPS cable Option bottom Ground Duplex door beac...

Страница 594: ...utoconnect cable Right frame System board connector JITM1 See ITU autoconnect removal on page 4 74 40X7167 10J0930 BLDC K ITU cable EP drive System board connector JKI1 See EP drive assembly removal o...

Страница 595: ...e assembly removal on page 4 104 2 Remove the LVPS exit duct to route the cable through the hole in the lower frame See LVPS exit duct removal on page 4 85 10J0933 Autocomp W2W cable Behind Tray 1 bet...

Страница 596: ...eference edge See Staging paper path reference edge assembly removal on page 4 136 10J0951 Paper path redrive sensor cable Paper path redrive System board connector JRDR1 See Paper path redrive assemb...

Страница 597: ...r removal on page 4 28 10J0960 Front door beacon cable Waste toner left cover See Waste toner left cover removal on page 4 32 40X7171 10J0974 Weather station compensation thermistor On LVPS System boa...

Страница 598: ...reassembly Sizes are as close to actual as possible as long as the printout is not scaled or resized Screw identification table P N Screw type Location Qty 10B1580 6 Panhead Main fan to exit cooling f...

Страница 599: ...d cables to frame 4 LVPS to frame 3 Media tray rails to bottom plate 1 per rail 2 Post to HVPS board and frame plate above it 2 Rear cover to system board cage and frame 2 Rear upper cover to rear cov...

Страница 600: ...tem board to cage 2 88A0233 M3 x 8 Taptite 550 sheet bottom cover to 550 sheet drawer 2 88A0312 M02 9X06 ACR2 Panhead 550 sheet controller card assembly to 550 sheet drive assembly 4 2000 sheet elevat...

Страница 601: ...cover to top cover and left frame 2 Left frame cable cover 1 Logo panel to top cover 3 Lower left cover to frame 2 LVPS exit duct to frame 2 LVPS to frame 2 Media rails left and right to front lower...

Страница 602: ...ex unit to left access door 1 88A0442 M3x5 2 T TITE SEMS 2000 sheet drive assembly to 2000 sheet drawer 3 2000 sheet left side cover to 2000 sheet drawer 7 2000 sheet pick assembly to 2000 sheet drawe...

Страница 603: ...43 5062 1126830 E clip M5 Bellcrank daturn front and rear 2 MPF pivot shaft 2 MPF pulley 1 Spur 17T Helicai gear 2 1126831 E clip M6 MPF redrive gear 2 Screw identification table continued P N Screw t...

Страница 604: ...7 44 Service Manual 5062...

Страница 605: ...s available in various menus While they are as close as possible to what you will see variations in printing may result from individual user printer settings media and printer alignment Print tests Pr...

Страница 606: ...A 2 Service Manual 5062 Print Quality Pages Page 1 total of five...

Страница 607: ...Appendix A Print samples A 3 5062 Print Quality Pages Page 2 total of five...

Страница 608: ...A 4 Service Manual 5062 Print Quality Pages Page 3 total of five...

Страница 609: ...Appendix A Print samples A 5 5062 Print Quality Pages Page 4 total of five...

Страница 610: ...A 6 Service Manual 5062 Registration and alignment Quick Test Page From the Diagnostics menu select REGISTRATION Quick Test...

Страница 611: ...Appendix A Print samples A 7 5062 Printhead mechanical alignment test page From the Diagnostics menu select MISC TESTS Printhead Inst...

Страница 612: ...A 8 Service Manual 5062 Printhead electronic alignment test page Magenta one of two From the Diagnostics menu select Alignment Menu select a color Quick Test...

Страница 613: ...Appendix A Print samples A 9 5062 Printhead electronic alignment test page Magenta two of two...

Страница 614: ...A 10 Service Manual 5062 Printhead linearity test page From the Diagnostics menu select Alignment Menu select a color Linearity Quick Test...

Страница 615: ...ght side cover removal 4 221 500 sheet tray input option diagnostics 2 56 550 sheet drawer assembly removal 4 155 550 sheet media tray assembly removal 4 155 550 sheet tray controller card assembly re...

Страница 616: ...Align Adj 3 28 Black Only Mode 3 26 Color Adjustment 3 27 Color Alignment 3 28 Color Trapping 3 26 Disk Encryption 3 28 Download Emuls 3 27 Energy Conserve 3 27 entering 3 25 Envelope Prompts 3 28 Exi...

Страница 617: ...ompts 3 28 EP drive parts catalog 7 14 EP drive assembly removal 4 54 error codes and messages 2xx paper jams 2 4 2 20 3x 8x attendance messages 2 43 2 49 table 2 2 ESD sensitive parts 4 1 EVENT LOG C...

Страница 618: ...val 4 261 finisher sensor stapler access door interlock removal 4 261 finisher sensor stapler pass thru removal 4 262 finisher sensor stapler pass through removal 4 262 finisher sensor tamper HP left...

Страница 619: ...er cover removal 4 300 HTU sensor access door interlock removal 4 304 HTU sensor empty bin removal 4 305 HTU sensor input removal 4 306 HTU sensor output option position removal 4 307 HTU sensor secon...

Страница 620: ...og 7 4 MPF pick rolls parts catalog 7 4 removal 4 100 MPF ratchet collar removal 4 97 MPF redrive assembly removal 4 102 MPF sensor cover parts catalog 7 4 MPF sensor plate assembly removal 4 104 MPF...

Страница 621: ...capacity feeder controller card assembly 4 174 2000 sheet high capacity feeder drive assembly 4 175 2000 sheet high capacity feeder elevator home sensor 4 179 2000 sheet high capacity feeder jam clear...

Страница 622: ...mper HP left and right 4 263 finisher or stacker standard output bin LED and LED lens 4 264 finisher or stacker tamper drive belt 4 265 finisher or stacker tamper drive motor assembly 4 265 finisher o...

Страница 623: ...bin full spring 4 243 stacker controller card 4 245 stacker feed roller 4 247 stacker front cover 4 248 stacker LED sensor cover 4 249 stacker media stack flap and actuator 4 251 stacker output bin ex...

Страница 624: ...ver removal 4 249 stacker media stack flap and actuator removal 4 251 stacker output bin extension removal 4 254 stacker paddle drive gear removal 4 255 stacker paddle drive motor removal 4 255 stacke...

Страница 625: ...Adjust 3 23 Tray Insert Msg 3 26 troubleshooting map 2 1 U USB HS Test Mode 3 16 W waste toner container removal 4 147 waste toner cover removal 4 32 waste toner full sensor removal 4 151 waste toner...

Страница 626: ...I 12 Service Manual 5062...

Страница 627: ...29 40X4819 Serial interface card 7 32 40X4823 Parallel 1284 B SERI adapter 7 32 40X4826 MarkNet N8120 10 1000 card 7 32 40X4827 MarkNet N8130 10 1000 F adapter 7 32 40X5301 256MB DDR DRAM DIMM 7 32 40...

Страница 628: ...40X7113 Logo panel 7 3 40X7114 Operator panel cover and buttons parts package 7 3 40X7115 OP panel UICC card 7 3 40X7116 OP panel display 7 3 40X7117 Speaker 7 3 40X7118 OP panel bezel 210 7 3 40X711...

Страница 629: ...0X7170 Beacon cables parts packet 7 33 7 37 40X7171 Thermistors parts packet 7 33 7 37 40X7172 Datum bellcrank MPF breakaway ACM bias spring parts pack 7 11 40X7173 Screws and fasteners parts packet 7...

Страница 630: ...I 16 Service Manual 5062...

Отзывы: