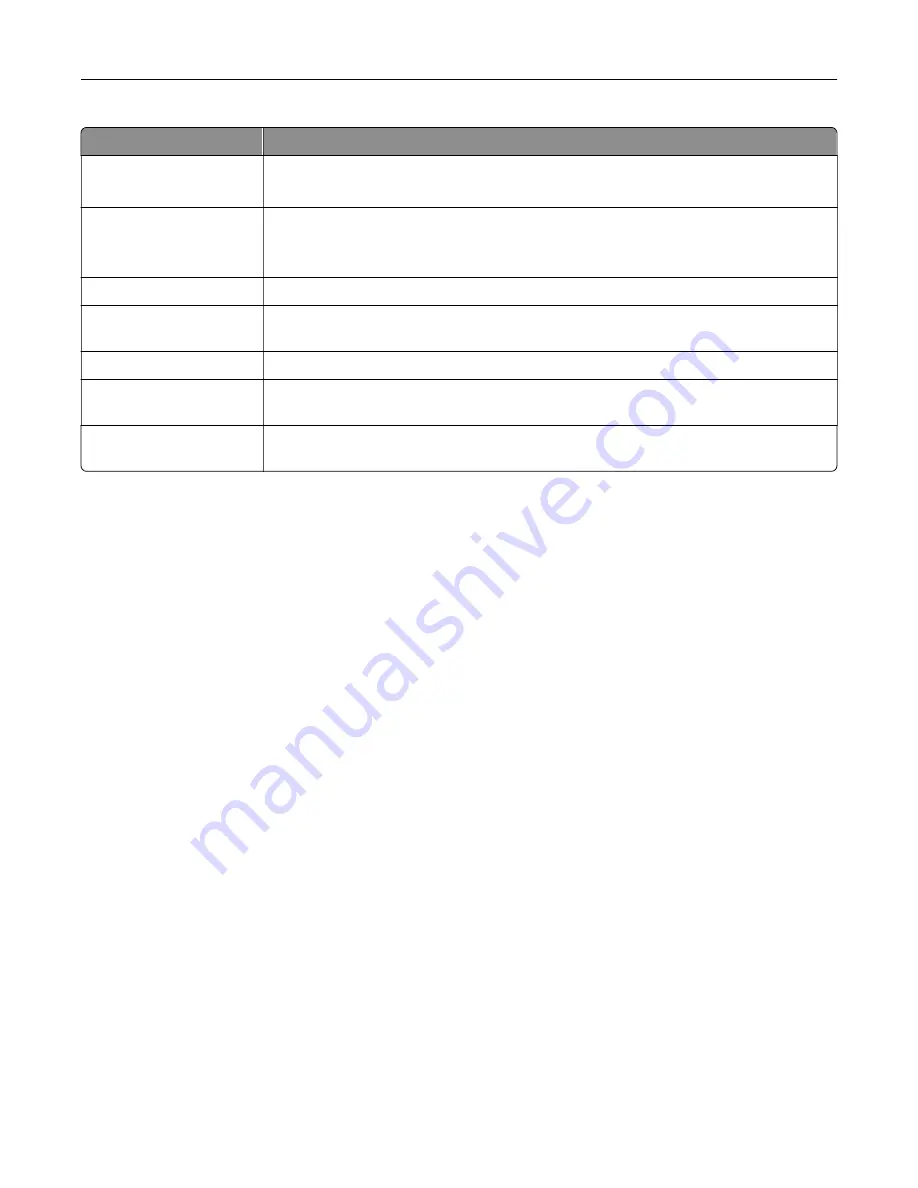
Setting
Description
Max Invalid PIN
Set the limit for entering an invalid PIN.
Note:
When the limit is reached, the print jobs for that user name are deleted.
Confidential Job
Expiration
Set an individual expiration time for each held job before it is automatically deleted from
the printer memory, hard disk, or intelligent storage drive.
Note:
A held job is either Confidential, Repeat, Reserve, or Verify.
Repeat Job Expiration
Set the expiration time for print jobs that you want to repeat.
Verify Job Expiration
Set the expiration time for printing a copy of a job for you to check its quality before
printing the remaining copies.
Reserve Job Expiration
Set the expiration time for jobs that you want to store in the printer for printing later.
Require All Jobs to be
Held
Set the printer to hold all print jobs.
Keep duplicate
documents
Set the printer to keep all documents with the same file name.
Printing confidential and other held jobs
For Windows users
1
With a document open, click
File
>
.
2
Select a printer, and then click
Properties
,
Preferences
,
Options
, or
Setup
.
3
Click
Print and Hold
.
4
Select
Use Print and Hold
, and then assign a user name.
5
Select the print job type (Confidential, Repeat, Reserve, or Verify).
If you select
Confidential
, then secure the print job with a personal identification number (PIN).
6
Click
OK
or
.
7
From the printer home screen, release the print job.
•
For confidential print jobs, touch
Held jobs
> select your user name >
Confidential
> enter the PIN >
select the print job > configure the settings >
.
•
For other print jobs, touch
Held jobs
> select your user name > select the print job > configure the settings
>
.
For Macintosh users
Using AirPrint
1
With a document open, choose
File
>
.
2
Select a printer, and then from the drop-down menu following the Orientation menu, choose
PIN Printing
.
3
Enable
Print with PIN
, and then enter a four
‑
digit PIN.
72
Содержание C4342
Страница 46: ...4 Install the ISP into its housing Set up install and configure 46 ...
Страница 47: ...5 Attach the housing to the controller board shield Set up install and configure 47 ...
Страница 48: ...6 Connect the ISP extended cable to the ISP connector in the controller board Set up install and configure 48 ...
Страница 52: ...Set up install and configure 52 ...
Страница 55: ...Set up install and configure 55 ...
Страница 56: ...3 Install the wireless module into its housing Set up install and configure 56 ...
Страница 57: ...4 Attach the wireless module to the controller board shield Set up install and configure 57 ...
Страница 58: ...5 Connect the wireless assembly to the ISP connector in the controller board Set up install and configure 58 ...
Страница 122: ...Replacing parts and supplies Replacing a toner cartridge 1 Open door B Maintain the printer 122 ...
Страница 123: ...2 Remove the used toner cartridge 3 Unpack the new toner cartridge Maintain the printer 123 ...
Страница 124: ...4 Insert the new toner cartridge 5 Close door B Maintain the printer 124 ...
Страница 125: ...Replacing the black imaging unit 1 Open door B Maintain the printer 125 ...
Страница 127: ...3 Remove the toner cartridges Maintain the printer 127 ...
Страница 128: ...4 Disconnect the imaging kit cable Maintain the printer 128 ...
Страница 132: ...9 Insert the imaging kit Maintain the printer 132 ...
Страница 134: ...Replacing the color imaging kit 1 Open door B Maintain the printer 134 ...
Страница 136: ...3 Remove the toner cartridges Maintain the printer 136 ...
Страница 137: ...4 Disconnect the imaging kit cable Maintain the printer 137 ...
Страница 138: ...5 Remove the used imaging kit Maintain the printer 138 ...
Страница 141: ...8 Insert the black imaging unit into the new imaging kit Maintain the printer 141 ...
Страница 142: ...9 Insert the new imaging kit Maintain the printer 142 ...
Страница 144: ...Replacing the waste toner bottle 1 Open door B Maintain the printer 144 ...
Страница 153: ...2 Remove the used separator bracket 3 Unpack the new separator bracket Maintain the printer 153 ...
Страница 200: ...Jam locations 1 Standard bin 2 Door A 3 Trays 4 Multipurpose feeder Troubleshoot a problem 200 ...
Страница 203: ...2 Remove the jammed paper Note Make sure that all paper fragments are removed 3 Open door A1 Troubleshoot a problem 203 ...


