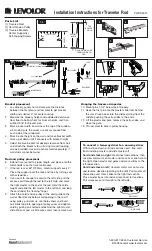
Installation Instructions for Traverse Rod
TOP
BRACKET
HOLE
DRAPERY
LENGTH
PLEAT TO PLEAT
DESIRED DISTANCE
FROM FLOOR TO
HEM
L
E
N
G
T
H
1-4
Bracket placement
1.
Lay drapery panels flat and measure the distance
between the first pleat and last pleat to get bracket
width and subtract 5" for center overlap.
2.
Measure the drapery height and add desired distance
from floor to bottom hem for bracket height, and then
subtract 3/8" for bracket size.
3.
Mark bracket width on wall near the top of the window-
sill, making sure the marks are evenly spaced from
each side of the windowsill.
4.
Mark bracket height on the wall and move bracket width
mark up or down until it connects with bracket height.
5.
Adjust traverse bracket for desired clearance from wall
and attach the brackets to wall using two self tapping
screws provided. Use wall anchors (sold separately) if
wall studs cannot be found.
Rod and pulley placement
6.
Extend traverse rod to proper length and place onto the
metal holders on the traverse bracket.
7.
If the rod is over 48" (122cm), mount supports every 2'.
Place the support over the rods and lock by turning cam
with screwdriver.
8.
If you want to change the cord to the left side, pull the
excess cord through the rod to the left side, and move
the right master to the end of the rod. Hold the cords
taught and slide the left master to the left end, and loop
the cord under the "locking" finger.
9.
Attach the cord tension pulley or the cord guide to the
wall or floor directly below cord opening in the rod. If
using pulley, pull stem up until holes show and insert
nail. Slide loop into opening of pulley cover and tighten
cord by pulling on knotted end behind the right master
slide. Re-knot and cut off excess cord, then remove nail.
Hanging the traverse draperies
10. Mount pins 1-1/2" below top of drapery.
11. Hook the first pin onto the master slide from behind
the arm. Place hooks into the slides starting from the
middle, pushing the extra slides to the ends.
12. Lift the plastic end gate, remove the extra slides, and
close the gate.
13. Pin last pleat to hole in pulley housing.
9
NAIL
CORD OPENING
PULLEY COVER
CORD
CORD GUIDE
MOVE SLIDES
MOVE SLIDES
RIGHT
LEFT
To convert a two-way draw to a one-way draw
With rod face down, pull rod sections apart, free cord
from underlap master and slide master off.
Cord and stack on right:
Reconnect rod sections, then
unscrew metal arm on master and move over one hole to
the right. Open plastic end gates and move slides to the
left rod section.
Cord and stack on left:
Unscrew metal arm on master
and reverse direction (pointing to the left). Pull master off
rod section and move slides to the right rod section.
Place master back into rod and reconnect rod sections.
Pull all excess cord through to the left side.
Parts List
(1) Traverse Rod
(1) Cord Tension Pulley
(2) Traverse Brackets
Center Support(s)
Self-Tapping Screws
7
LOCKING FINGER
PULL MASTERS TO ENDS OF ROD
PULL CORD DOWN
8
5
6
10
11
12
13
1-800-817-6344 Customer Service
©2003 Levolor www.levolor.com
A Division of
PWDR0021


