Riviera
®
1/2", 1", 1-3/8" Blinds
Installation Instructions
E
NGLISH
Step 6. Install Vogue
®
Valance - Inside mounting
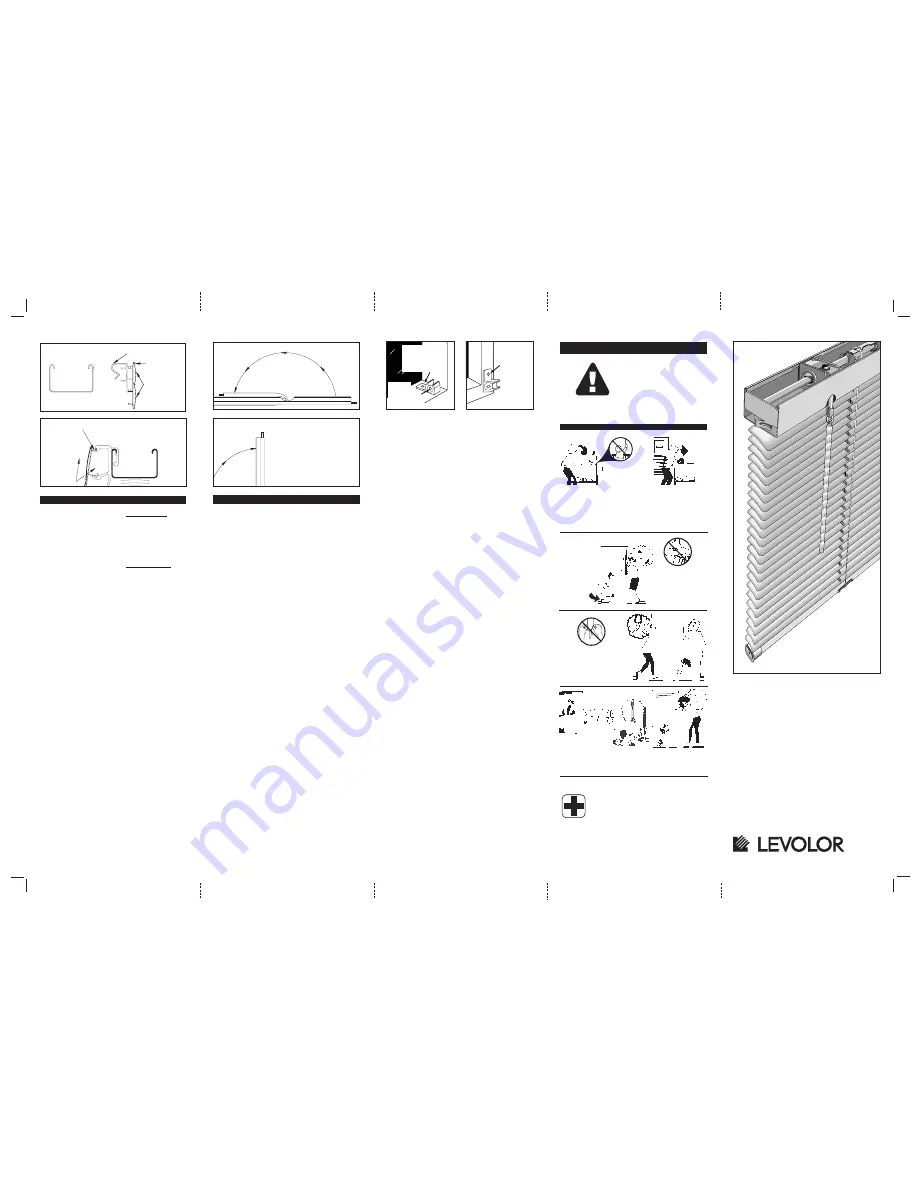
Your Riviera blind includes either a double or single slat valance. The
valance clip attaches to frame as shown (Diagram R). Valance clip is
then attached to headrail (Diagram S). Be sure the valance clips are
spaced evenly along the length of the valance frame. On tight inside
mount applications it may be necessary to attach the valance clips
prior to installing the headrail in the mounting brackets (Diagram S).
Step 6. Install Vogue
®
Valance - Outside mounting
Riviera blinds ordered as an outside mount are supplied with a
valance, 2 corners and 2 return pieces fully assembled. The valance is
shipped flat. To form the corner, hold frame and return firmly and
bend down over table edge to form a 90
o
angle. Corner will lock into
position (Diagram T). Continue as described under Inside Mounting.
Valance returns are designed to cover the size of the installation
bracket. Returns may be trimmed with a scissors, if necessary, to
shorten (Diagram U).
Step 7. Install Hold Down Brackets (Optional)
For an inside mount, attach bracket to bottom surface using rearmost
hole, and attach to side surface using center hole (Diagram W).
For an outside mount, attach bracket to wall or window frame using
rearmost hole only (Diagram X).
Cleaning Instructions
Keep your Riviera blind looking its best by periodically wiping it with
a soft cloth, a dusting mitt, or the round brush attachment from a
vacuum cleaner.
• You can clean the blind hanging in place or you can take it down.
• By tilting the slats down, but not quite closed, you’ll be able to
clean most of the top surface of each slat.
In very dusty environments, you may need to use a sponge or
dampened soft cloth to clean the blind.
• Use warm (not hot) water and a mild detergent. The mild detergent
cannot contain abrasives.
• Rinse the blind with clean water to prevent water spots.
• Place a towel on the floor or window sill to absorb any water that
might drip from the blind.
Please note that certain solutions and equipment are too harsh and
can cause shrinkage and/or color damage to your blind. The Levolor
Forever Never Worry Warranty does not cover damage caused by
cleaning methods that use abrasive solutions.
E
SPAÑOL
Paso 6. Instale la cenefa Vogue - Montaje interior:
Su persiana Riviera incluye una cenefa Vogue de una o dos tablillas.
Las abrazaderas de montaje se ensamblan al marco de la cenefa
(Diagrama R) y se agarran al borde del riel superior (Diagrama S).
Asegurese que las abrazaderas esten colocadas a intervalos
equidistantes a lo largo del marco de la cenefa. En instalaciones con
poco espacio, puede ser necesario primero montar las abrazaderas al
riel superior y, despues, sujetar el marco de la cenefa a las
abrazaderas (Diagrama S).
Paso 6. Instale la cenefa Vogue - Montaje exterior:
Para el montaje exterior, se incluye con la cenefa Vogue dos esquinas
y correspondientes extensiones laterales completamente
ensambladas. La cenefa se envia en forma plana. Para formar las
esquinas, agarre el marco firmemente, ponga subre una mesa y doble
las extensiones a un angulo de 90 (Diagrama T). Las extensiones
laterales estan disenadas para cubrir las mensulas de montaje. Sin
embargo, cualquier exceso en el largo de las extensiones pueden ser
cortadas con tijeras (Diagrama U).
Paso 7. Instalación de los soportes de sujeción (Opcional)
Para el montaje interior, fije el soporte a la superficie inferior utilizando
el agujero más posterior o a una superficie lateral utilizando el agujero
central (Diagrama W).
Para el montaje exterior, fíjelo a la pared o al marco de la ventana utili-
zando el agujero más posterior (Diagrama X).
Instrucciones para la limpieza
Para mantener su persiana Riviera en las mejores condiciones, límpiela
de vez en cuando con un paño suave para quitar el polvo,
con una manopla para el polvo o con una de las escobillas redondas de
su aspiradora.
• Puede limpiar la persiana según cuelga en la ventana o puede quitarla.
• Al inclinar las tablillas hacia abajo, pero sin cerrarlos del todo, podrá
limpiar la mayor parte de la superficie superior de cada tablilla.
En ambientes muy polvorientos, puede que tenga que limpiar la
persiana con una esponja o con un paño suave humedecido.
• Use agua templada (no caliente) y detergentes suaves. El detergente
no debe contener abrasivos.
• Enjuague la persiana con agua limpia para evitar las manchas de agua.
• Coloque una toalla en el suelo o el alféizar de la ventana para
absorber el agua que gotee de la persiana.
Por favor recuerde que ciertas soluciones y utensilios son demasiado
duros y pueden encoger la persiana y/o causar desperfectos en el color.
La Garantía de Levolor "Forever Never Worry" no cubre daños causados
por métodos de limpieza que usen soluciones abrasivas.
Mount to wall or
window frame
using this hole
Monte a la pared
o al marco de una
ventana usando
este agujero
W
R
T
U
S
X
Mount to bottom
surface using this hole
Monte a la superficie
inferior usando
este agujero
Mount to
side surface
using this hole
Monte a la superficie
lateral usando este agujero
© 1996 Levolor Home Fashions
®
A Newell Company
Part No. AL093701
EMERGENCY FIRST AID FOR STRANGULATION
PRIMEROS AUXILIOS DE URGENCIA EN CASOS DE ESTRANGULACION
Move cribs and
furniture away
from cords
Separe las cunas
y los muebles de
los cordones
Keep cords out of the
reach of children
Mantenga los
cordones fuera del
alcance del niño
Loops will appear
when shade is in
raised position
Se forma un lazo
al subir la
cortina plegadiza
Remove
objects below
windows
Remueva
los muebles
y objetos
que están
debajo de
las ventanas
Install a cord tension pulley or cord cleat
Instale una sujetacuerdas o una presilla
para los cordones
Do not tie
cords together
No ate juntos
los cordones
• Remove cord from child’s neck
• Call 911 or Emergency Center
• Clear throat
• Check breathing and heart beat
• Begin CPR
• Quíte el cordon del cuello del niño
• Llame al 911 o al Centro de Urgencias
• Desatore la garganta
• Compruebe la respiración y el latido del corazón
• Inicie la resucitación cardio pulmonar
DANGER
STRANGULATION
HAZARD
PELIGRO
DE ESTRANGULACIÓN
®
Bend Corner 90
o
Doble la Esquina a 90
o
Bracket
M
é
nsula de Montaje
Return
Extensi
ó
n Lateral
Valance
Cenefa
Corner
Esquina
Headrail Profile
Riel Superior
Headrail
Riel Superior
Headrail Profile
Riel Superior
Valance Clip
Abrazadera de Montaje
Valance Clip
Abrazadera de Montaje
Valance Frame
Marco de la Cenefa
Valance Slats
Tablilias de la Cenefa
Valance Slats
Tablilias de la Cenefa
Valance Frame
Marco de la Cenefa
May Shorten
Se Puede Cortar


