background image

5

EN

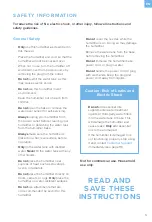
SAFETY INFORMATION

• 

Only

 use this humidifier as described in 

this manual.

• 

Place the humidifier and cord so that the 

humidifier will not be knocked over.

• 

When not in use, turn the humidifier off 

and disconnect from power source by 

removing the plug from the outlet.

• 

Do not

 overfill the water tank, as this 

may cause electric shock.

• 

Do not

 use this humidifier in wet 

environments. 

• 

Keep the humidifier out of reach from 

children.

• 

Do not

 open the base or remove the 

water level sensor for self-servicing. 

• 

Always

 unplug your humidifier from 

the power outlet before cleaning your 

humidifier or detaching the water tank 

from the humidifier base.

• 

Always

 make sure the humidifier is 

placed on a flat, level surface before 

operation.

• 

Only

 fill the water tank with distilled 

water. 

Never

 fill the water tank with any 

other liquids.

• 

Do not

 place the humidifier near 

sources of heat, such as stovetops, 

ovens, or radiators.

• 

Do not

 place the humidifier directly on 

floors, carpets, or rugs. 

Only

 place the 

humidifier on water-resistant surfaces.

• 

Do not

 use attachments that are 

not recommended by Levoit for this 

humidifier.

To reduce the risk of fire, electric shock, or other injury, follow all instructions and 

safety guidelines.

General Safety

Not for commercial use. Household 

use only.

READ AND 

SAVE THESE 

INSTRUCTIONS

• 

Do not

 cover the nozzles while the 

humidifier is on. Doing so may damage 

the humidifier.

• 

Remove the water tank from the base 

before moving the humidifier. 

• 

Do not

 immerse the humidifier base, 

power cord, or plug in water.

• 

Do not

 handle the power cord or plug 

with wet hands. Keep the plug and 

power cord away from liquids.

• 

Do not

 add essential oils, 

supplemental water treatment 

liquids, or third-party water filters 

into the water tank or base. This 

will damage the humidifier and 

cause leaks. 

Only

 add essential 

oils to the aroma pad.

• 

If the humidifier is damaged or is 

not functioning properly, stop using 

it and contact 

Customer Support


immediately (see page 18).

Caution: Risk of Leaks and  

Electric Shock

Содержание LV600HH

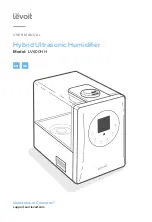
Страница 1: ...Hybrid Ultrasonic Humidifier Model LV600HH Questions or Concerns support eu levoit com USER MANUAL EN DE...

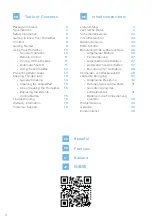
Страница 2: ...6 8 9 10 10 11 11 11 12 13 14 14 15 15 15 16 18 18 Inhaltsverzeichnis Lieferumfang Technische Daten Sicherheitshinweise Ihr Luftbefeuchter Bedienelemente Erste Schritte Benutzung Ihres Luftbefeuchter...

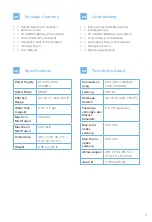
Страница 3: ...7 x 17 8 x 26 7 cm 11 3 x 7 0 x 10 5 in Weight 2 95 kg 6 5 lb Lieferumfang Technische Daten x Hybrid Ultraschallluftbefeuchter x Fernbedienung x 3V CR2025 Batterie vorinstalliert x Aroma Pads 1 vorins...

Страница 4: ...please reach out to us at support eu levoit com We hope you enjoy your new humidifier Share the Levoit Love Find LevoitLifestyle on social media for wellness style inspiration We make every space mind...

Страница 5: ...adiators Do not place the humidifier directly on floors carpets or rugs Only place the humidifier on water resistant surfaces Do not use attachments that are not recommended by Levoit for this humidif...

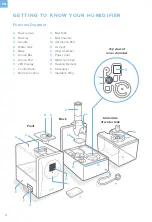
Страница 6: ...LED Display I Control Panel J Remote Control Underside of water tank Top view of inner chamber Front Back K Mist Tube L Mist Channel M Absorption Pad N Air Vent O Inner Chamber P Power Cord Q Water Ta...

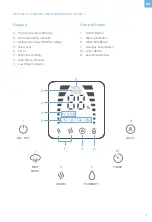
Страница 7: ...Button A High Temperature Warning B Humidity Setting Indicator C Relative Humidity RH Percentage D Mist Level E Timer F Warm Mist Setting G Auto Mode Indicator H Low Water Indicator I N J M K F B C D...

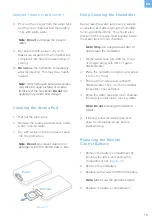
Страница 8: ...e included remote control Note When you first turn on the humidifier the mist level is 2 The humidifier will remember your settings except Timer when turned off and left plugged in Note Once the humid...

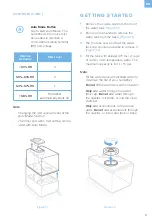
Страница 9: ...e water The maximum capacity is 6 0 L 1 5 gal Note Changing the mist level will cancel the Auto Mode function The timer and warm mist setting can be used with Auto Mode Note Fill the water tank with d...

Страница 10: ...s and appliances to prevent them from getting wet Figure 2 1 Do not place the humidifier directly on floors carpets or rugs Direct the nozzles away from any furniture to prevent your furniture from ge...

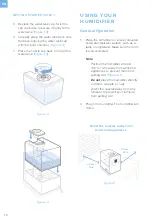
Страница 11: ...any direction Do not attempt to inhale the mist directly from the nozzles Note Remove the plastic tab from the remote control s battery compartment before using Figure 3 1 To replace the battery see...

Страница 12: ...oma box back into the humidifier Fill the water tank with water and place it back on the base see Getting Started page 9 5 Plug in and turn on the humidifier Note Do not add essential oils supplementa...

Страница 13: ...and secure the cap tightly onto the water tank Figure 6 2 Note A small gap between the cap and the tank is normal Before moving the humidifier remove the tank from the base and empty any excess water...

Страница 14: ...and rinse under clean running water Set it aside to air dry 3 Remove the water tank from the base and pour out any water from the inner chamber Fill the tank with 710 mL 3 cups of distilled white vine...

Страница 15: ...emove the aroma pad and rinse under warm running water 3 Dry with a clean cloth and place it back into the aroma box 1 Remove the battery compartment by pinching the tab in and pulling the compartment...

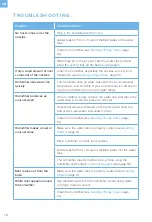
Страница 16: ...an unusual smell If the humidifier is new remove the water cap and place the water tank in a cool dry place for 12 hours If essential oils were diffused on the aroma pad rinse the pad under clean wate...

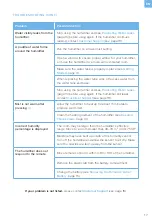
Страница 17: ...Stop using the humidifier and see Preventing Water Leaks page 13 before using again If the humidifier still leaks contact Customer Support see page 18 Mist is not warm after pressing Allow the humidi...

Страница 18: ...m the date of purchase to the end of the warranty period Warranty lengths may vary between product categories Should you encounter any issues or have any questions regarding your new product feel free...

Страница 19: ...com Wir hoffen dass Sie Freude an Ihrem neuen Luftbefeuchter haben Levoit macht das Leben leichter Mehr zum Thema Wellness und n tzliche Anregungen finden Sie in den sozialen Medien auf LevoitLifesty...

Страница 20: ...F llen Sie den Wasserbeh lter nur mit destilliertem Wasser F llen Sie den Wasserbeh lter nie mit irgendwelchen anderen Fl ssigkeiten Befolgen Sie s mtliche Anweisungen und Sicherheitshinweise um das...

Страница 21: ...asserfilter von Drittanbietern in den Wasserbeh lter oder das Unterteil Dies besch digt den Luftbefeuchter und verursacht Leckagen Geben Sie therische le nur auf das Aroma Pad Ist der Luftbefeuchter b...

Страница 22: ...dienfeld J Fernbedienung Unterseite des Wasserbeh lters Draufsicht der Innenkammer Vorderseite R ckseite K Nebelr hre L Nebelkanal M Absorptions Pad N Entl ftungs ffnung O Innere Kammer P Stromkabel Q...

Страница 23: ...odus A Warnung bei hohen Temperaturen B Anzeige f r Feuchtigkeitseinstellungen C Anteil der Relativen Feuchtigkeit RF D Nebelstufe E Timer F Warmnebeleinstellung G Anzeige f r den Automatikmodus H Anz...

Страница 24: ...inweis Beim ersten Anschalten Ihres Luftbefeuchters betr gt die Nebelstufe 2 Der Luftbefeuchter wird Ihre Einstellungen au er Timer beibehalten wenn er ausgeschaltet wird und an die Stromversorgung an...

Страница 25: ...kmodusfunktion ab Die Timer und Warmnebeleinstellung kann mit dem Automatikmodus verwendet werden Hinweis F llen Sie den Wasserbeh lter mit destilliertem Wasser um die Lebenszeit Ihres Luftbefeuchters...

Страница 26: ...er Vorleger Richten Sie die D sen von M beln weg um zu vermeiden dass Ihre M bel nass werden 4 F llen Sie den Beh lter mindestens mit 475 ml 2 Tassen kaltem Wasser oder Wasser mit Raumtemperatur Das m...

Страница 27: ...Richtungen zu verteilen Versuchen Sie nicht den Nebel direkt ber die D sen einzuatmen Hinweis Entfernen Sie die Kunststofflasche vom Batteriefach der Fernbedienung bevor Sie sie benutzen Abbildung 3 1...

Страница 28: ...en Wasserbeh lter mit Wasser und setzen Sie ihn wieder auf das Unterteil siehe Erste Schritte Seite 25 5 Schlie en Sie den Luftbefeuchter an die Stromversorgung an und schalten Sie ihn ein Hinweis Geb...

Страница 29: ...mit dem Wasserbeh lter abschlie t Abbildung 6 2 Hinweis Ein schmaler Abstand zwischen dem Deckel und dem Beh lter ist normal Wenn der Luftbefeuchter bewegt werden soll nehmen Sie zuerst den Wasserbeh...

Страница 30: ...rem laufendem Wasser aus Lassen Sie sie dann an der freien Luft trocknen 3 Entfernen Sie den Wasserbeh lter vom Unterteil und lassen Sie das Restwasser aus der inneren Kammer ab F llen Sie den Beh lte...

Страница 31: ...hen Sie die Aromabox heraus 2 Entfernen Sie das Aroma Pad und sp len Sie es unter warmen laufendem Wasser ab 3 Trocknen Sie es mit einem sauberen Tuch und setzen Sie es wieder in die Aromabox ein LAUF...

Страница 32: ...n Sie sicher dass die Polarit ten stimmen 1 Entfernen Sie das Batteriefach indem Sie auf den Fachverschluss dr cken und den Batterieschlitten herausziehen Abbildung 7 1 2 Entfernen Sie die alte Batter...

Страница 33: ...rd das Wasser im Luftbefeuchter schneller aufgebraucht Der Luftbefeuchter gibt einen ungew hnlichen Geruch ab Wenn der Luftbefeuchter neu ist entfernen Sie den Wasserbeh lterdeckel und lassen Sie den...

Страница 34: ...asserbeh lter richtig positioniert ist siehe Erste Schritte Seite 25 Wischen Sie beim erneuten Einsetzen des Wasserbeh lters Restwasser vom Wasserbeh lter und Unterteil Schalten Sie den Luftbefeuchter...

Страница 35: ...ML SUNG FORTS Problem M gliche Abhilfe Der Luftbefeuchter reagiert nicht auf die Fernbedienung Halten Sie einen Abstand von h chstens 4 8 m 16 ft zwischen Fernbedienung und Luftbefeuchter ein Entferne...

Страница 36: ...al und Herstellungsfehler ab dem Kaufdatum f r einen Mindestzeitraum von zwei Jahren Die Garantiefrist ist von Produkt zu Produkt unterschiedlich Bei Fragen oder Problemen mit Ihrem neuen Produkt hilf...

Страница 37: ...37 Notes Notizen...

Страница 38: ...38 Notes Hinweise...

Страница 39: ...39 Connect with us LevoitLifestyle Verbinden Sie sich mit uns LevoitLifestyle...

Страница 40: ...levoit com AU0519AL M1 1_0419LV600HH_eu...

Отзывы: