Replacing an optional ServeRAID adapter memory module
Use this information to replace an optional ServeRAID adapter memory module.
To replace an optional ServeRAID adapter memory module, complete the following steps.
Step 1.
Read the safety information that begins on “Safety” on page v and “Installation guidelines” on
page 297.
Step 2.
Turn off the server, and disconnect all power cords and external cables.
Step 3.
Remove the top cover (see “Removing the top cover” on page 149).
Step 4.
Locate the ServeRAID adapter onto which you want to install the ServeRAID adapter memory
module. Then remove any parts and disconnect any cables that might impede your access to the
ServeRAID adapter.
Step 5.
Touch the static-protective package that contains the ServeRAID adapter memory module to any
unpainted metal surface on the server. Then remove the ServeRAID adapter memory module
from the package.
Step 6.
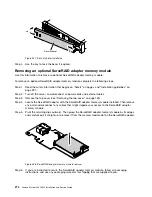
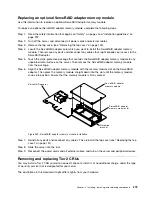
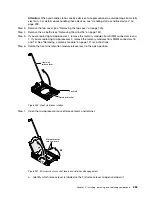
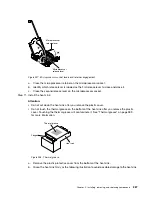
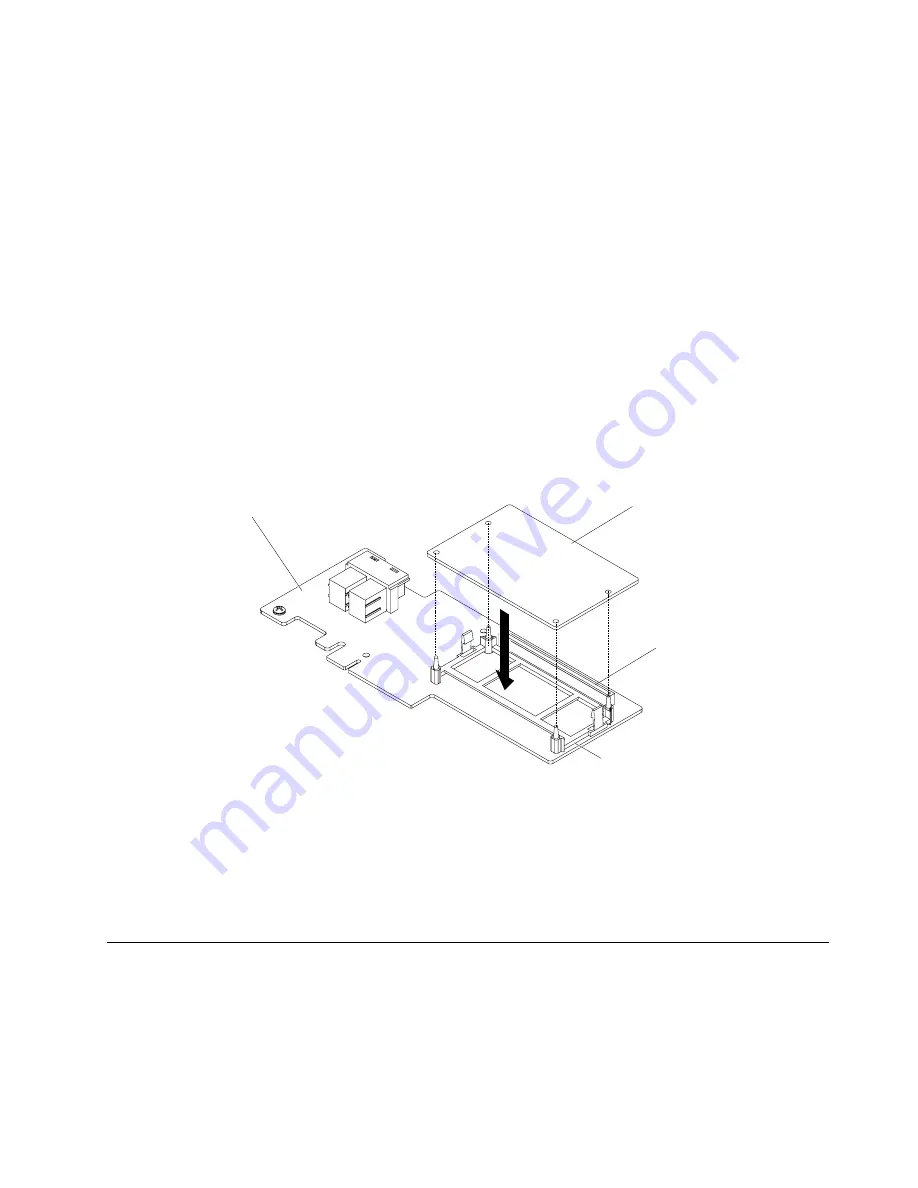
Align the ServeRAID adapter memory module with the memory module slot on the ServeRAID
adapter. Then press the memory module straight down into the slot until the memory module
snaps into position. Ensure that the memory module is firmly seated.
ServeRAID adapter
memory module
ServeRAID adapter
memory module slot
Retention
bracket
ServeRAID adapter
Figure 239. ServeRAID adapter memory module installation
Step 7.
Reinstall any parts and reconnect any cables. Then reinstall the top cover (see “Replacing the top
cover” on page 151).
Step 8.
Slide the server into the rack.
Step 9.
Reconnect the power cords and all external cables, and turn on the server and peripheral devices.
Removing and replacing Tier 2 CRUs
You may install a Tier 2 CRU yourself or request Lenovo to install it, at no additional charge, under the type
of warranty service that is designated for your server.
The illustrations in this document might differ slightly from your hardware.
Installing, removing, and replacing components
275
Содержание x3650 M5
Страница 1: ...Lenovo System x3650 M5 Installation and Service Guide Machine Type 8871 ...
Страница 47: ...Figure 35 System board switches jumpers and buttons Chapter 1 The System x3650 M5 server 35 ...
Страница 60: ...48 Lenovo System x3650 M5 Installation and Service Guide ...
Страница 80: ...68 Lenovo System x3650 M5 Installation and Service Guide ...
Страница 124: ...112 Lenovo System x3650 M5 Installation and Service Guide ...
Страница 146: ...134 Lenovo System x3650 M5 Installation and Service Guide ...
Страница 1322: ...1310 Lenovo System x3650 M5 Installation and Service Guide ...
Страница 1329: ...People s Republic of China Class A electronic emission statement Taiwan Class A compliance statement Appendix E Notices 1317 ...
Страница 1330: ...Taiwan BSMI RoHS declaration 1318 Lenovo System x3650 M5 Installation and Service Guide ...
Страница 1339: ......
Страница 1340: ......

