background image

Setting up your monitor 

This section provides information to help you set up your monitor. 

Connecting and turning on your monitor 

Note: 

Be sure to read the Safety Information located in the Flyer before carrying out this procedure. 

1.  Power off your computer and all attached devices, and unplug the computer power cord. 

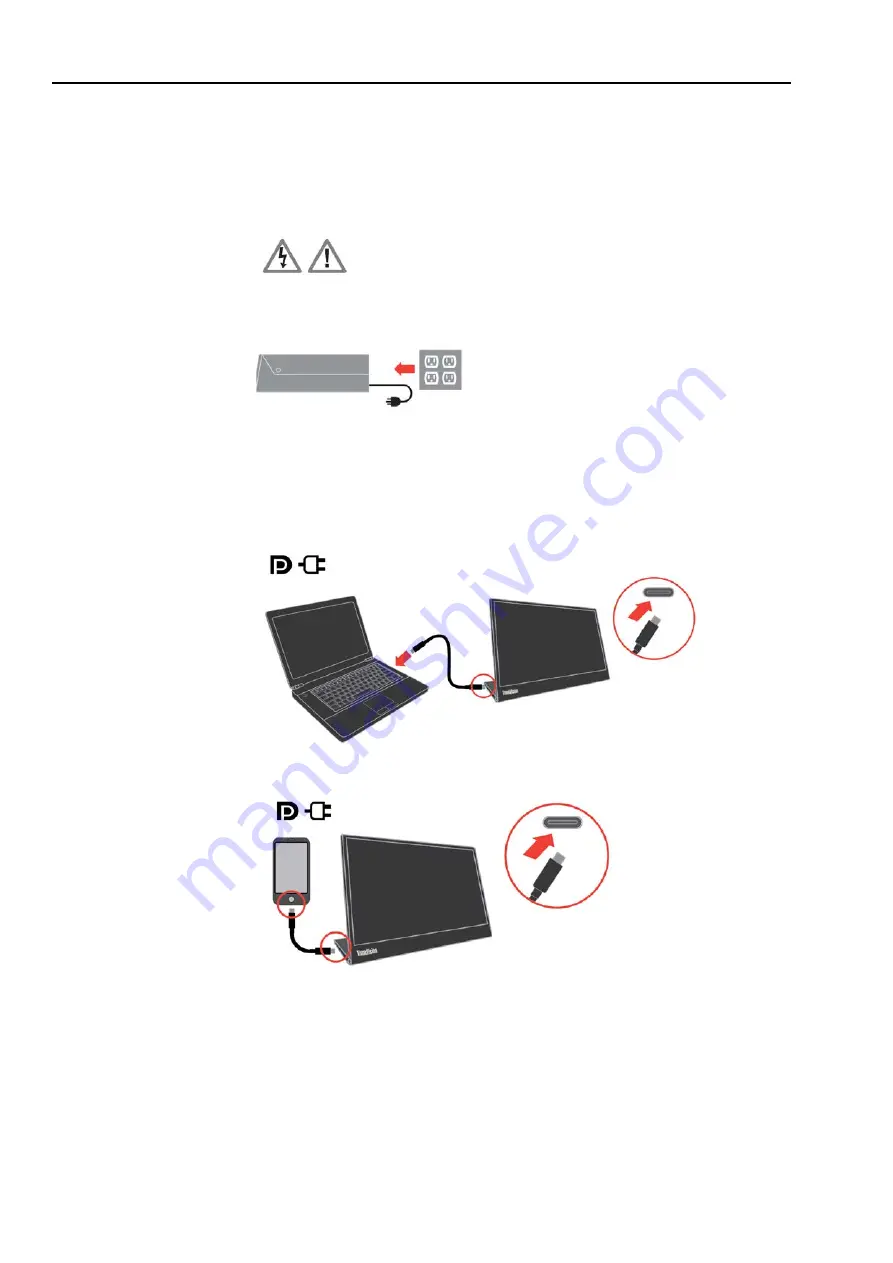
2.  There are 2 kinds of usage for M14; they are normal usage and charging usage. 


Normal usage: 

There are 2 kinds of normal usage for M14; they are notebook and M14, mobile phone 

and M14. 
1)  Connect the USB-C port of notebook and M14 with a USB type-C cable. 

(Electronically marked cable, current rating: 5A) 

2)  Connect the USB-C port of mobile phone and M14 with a USB type-C cable. 

(Electronically marked cable, current rating: 5A) 

NOTE: For normal usage, devices connected to M14 need to support video signal and 

power output. 

When you encounter abnormal display condition, please check your devices to 

see if they support USB-C Alt-mode display and PD2.0 or above. After checking, 

please re-connect and try again. 

1-4 M14 Flat Panel Monitor User’s Guide 

Содержание ThinkVision M14

Страница 1: ...M14 Flat Panel Monitor User s Guide Machine Type 61DD ...

Страница 2: ...overnmental entities as commercial items as defined by 47 C F R 2 101 with limited and restricted rights to use reproduction and disclosure LIMITED AND RESTRICTED RIGHTS NOTICE IF products data computer software or services are delivered pursuant a General Services Administration GSA contract use reproduction or disclosure is subject to restrictions set forth in Contract No GS 35F 05925 Copyright ...

Страница 3: ... 2 4 Usingthedirectaccesscontrols 2 4 UsingtheOn ScreenDisplay OSD controls 2 4 Selectingasupporteddisplaymode 2 4 Understandingpowermanagement 2 5 Caringforyourmonitor 2 6 WallMounting Optional 2 6 Chapter3 Referenceinformation 3 1 Monitor specifications 3 1 Troubleshooting 3 2 Manuallyinstallingthemonitordriver 3 4 Serviceinformation 3 6 AppendixA ServiceandSupport A 1 Registeringyouroption A 1 ...

Страница 4: ...ety information General Safety guidelines For tips to help you use your computer safety go to http www lenovo com safety Before installing this product read the Safety Information Copyright Lenovo 2019 iii ...

Страница 5: ...A for each device Install your monitor near a power outlet that you can easily reach Disconnect the monitor by grasping the plug firmly and pulling it from the outlet Never disconnect the monitor by pulling the cord Do not allow anything to rest on the power cord Do not walk on the cord While using VESA mount application the AC Inlet must face to down side Do not face any other position Maintenanc...

Страница 6: ...ion M14 Flat Panel Monitor For a quick overview please see the Setup Poster that was shipped with your monitor Shipping contents The product package should include the following items Information Flyer Flat Panel Monitor USB Type C Cable Protection bag Clip x 2 Chapter 1 Getting started 1 1 ...

Страница 7: ... below for an example of the tilt range Height Adjustment After using the support located at the bottom of the base you can raise the height of the monitor Cable lock slot Your monitor is equipped with a cable lock slot Please follow the instructions that came with the cable lock to attach it Your monitor supports the following Lenovo lock 4X90H35558 1 2 M14 Flat Panel Monitor User s Guide ...

Страница 8: ...tional Note To attach a VESA mount please see Wall Mounting Optional on page 2 6 Protection Bag The protection bag shipped with the monitor can protect your monitor from damage when shipping or storage Following illustrations show how to use the protection bag Chapter 1 Getting started 1 3 ...

Страница 9: ...s of normal usage for M14 they are notebook and M14 mobile phone and M14 1 Connect the USB C port of notebook and M14 with a USB type C cable Electronically marked cable current rating 5A 2 Connect the USB C port of mobile phone and M14 with a USB type C cable Electronically marked cable current rating 5A NOTE For normal usage devices connected to M14 need to support video signal and power output ...

Страница 10: ...ase refer to the display mode on page 2 4 and power management on page 2 5 3 Power on the monitor 4 To install the monitor driver you must download it from Lenovo website http support lenovo com docs M14 and follow the instructions on page 3 4 Registering your option Thank you for purchasing this Lenovo product Please take a few moments to register your product and provide us with information that...

Страница 11: ...ewing distance that is most comfortable for you Monitor height Position the monitor so your head and neck are in a comfortable and neutral vertical or upright position If your monitor does not have height adjustments you might have to place books or other sturdy objects under the base of the monitor to achieve the desired height A general guideline is to position the monitor such that the top of t...

Страница 12: ...y a static activity it is particularly important to take short breaks from your work Periodically stand up in front of your work area stretch walk for a drink of water or otherwise take a short break from using your computer A short break from work gives your body a welcome change in posture and helps to ensure you remain comfortable and productive while you do work Eye Strain Break Times Computer...

Страница 13: ...ies With assistive technologies users can access information in the way most appropriate to their disability Some of these technologies are already provided in your operating system others can be purchased through vendors or accessed at https lenovo ssbbartgroup com lenovo request_vpat php 2 3 M14 Flat Panel Monitor User s Guide ...

Страница 14: ...etails on how to change display modes The image size position and shape might change when the display mode changes Unlike CRT monitors which require a high refresh rate to minimize flicker LCD or Flat Panel technology is inherently flicker free Note If your system has previously been used with a CRT monitor and is currently configured to a display mode outside the range of this monitor you may nee...

Страница 15: ... implied Power Input and Output Definition M14 can be powered on by devices more than 10W with USB C interfaces that can support 5V 9V 15V and 20V power delivery output The permitted maximum input power of M14 is DC 100W The maximum power delivery output of M14 is 65W and monitor can support 5V 9V 15V and 20V power delivery output If you connect M14 with mobile phones only mobile phones need to su...

Страница 16: ...n area Do Lightly dampen a soft cloth with water and use this to gently wipe the covers and the screen Remove grease or finger marks with a damp cloth and a little mild detergent Wall Mounting Optional Refer to the instructions that come with the VESA compatible base mounting kit 1 Place the monitor face down on a non abrasive surface on stable flat table 2 Use clips to lock the monitor 3 Attach t...

Страница 17: ...or 15V DC 3A or 20V DC 3 25A Max Power consumption Note Power consumption Max Consumption 7 5W without Type C output 80W with Type C output figures are for the monitor only Typical Consumption 6W without Type C output 75W with Type C output Standby Suspend 0 3W Off 0 3W Video input Digital Input signal Type C Horizontal addressability 1920 pixels max Vertical addressability 1080 lines max Clock fr...

Страница 18: ...sing a Windows system restart the system in safe mode then select a supported display mode for your computer If these options do not work contact the Customer Support Centre The image The video signal Be sure the signal cable is firmly Connecting and quality is cable is not plugged into the system and turning on your unacceptable connected with the monitor or system completely monitor monitor on p...

Страница 19: ...ting a supported display mode on page 2 4 Fuzzy lines in text or a blurry image Horizontal or vertical lines through the image Image setup has not been optimized Your system Display Properties setting have not been optimized When working in the native resolution you may find additional improvements by adjusting the Dots Per Inch DPI setting on your system See the Advanced section of your system s ...

Страница 20: ...Advanced Settings icon 8 Click the Monitor tab 9 Click the Properties button 10 Click the Driver tab 11 Click Update Driver then click Browse the computer to find the driver program 12 Select Pick from the list of device driver program on the computer 13 Click the Have Disk button By clicking the Browse button browse and point to the following path X Monitor Drivers Windows 7 Where X indicates the...

Страница 21: ...the Properties button 10 Click the Driver tab 11 Click Update Driver then click Browse the computer to find the driver program 12 Select Let me pick from a list of device drivers on my computer 13 Click the Have Disk button By clicking the Browse button browse and point to the following path X Monitor Drivers Windows 10 where X indicates the folder in which the downloaded driver is located such as...

Страница 22: ...ches or punctures on monitor screens Getting further help If you still can t solve your problem please contact the Customer Support Centre For more information on contacting the Customer Support Centre please see Appendix A Service and Support on page A 1 Service parts The following parts are for use by Lenovo service or Lenovo authorized dealers to support the customer warranty Parts are for serv...

Страница 23: ...tion has been withdrawn from marketing Additional support offerings including step by step installation assistance are available for a nominal fee To assist the technical support representative have available as much of the following information as possible Option name Option number Proof of purchase Computer manufacturer model serial number and manual Exact wording of the error message if any Des...

Страница 24: ...3 825 716 English Hungarian India Primary 1800 419 4666 Tata Secondary 1800 3000 8465 Reliance Email commercialts lenovo com English and Hindi Indonesia 1 803 442 425 62 213 002 1090 Standard Charges Apply English Bahasa Indonesia Ireland Warranty service and support 01 881 1444 English Israel Givat Shmuel Service and Center 972 3 531 3900 Hebrew English Italy Warranty service and support 39 800 8...

Страница 25: ... English Mandarin Bahasa Malaysia Slovakia ThinkStation and ThinkServer 421 2 4954 5555 Slovenia 386 1 2005 60 Slovenian Spain 34 917 147 833 Spanish Sri Lanka 9477 7357 123 Sumathi Information systems English Sweden Warranty service and support 077 117 1040 Swedish Switzerland Warranty service and support 0800 55 54 54 German French Italian Taiwan 0800 000 702 Mandarin Thailand 001 800 4415 734 6...

Страница 26: ...ication Lenovo may make improvements and or changes in the product s and or the program s described in this publication at any time without notice The products described in this document are not intended for use in implantation or other life support applications where malfunction may result in injury or death to persons The information contained in this document does not affect or change Lenovo pr...

Страница 27: ...Law for Promotion of Effective Utilization of Resources Lenovo Japan provides through its PC Collecting and Recycling Services for the collecting reuse and recycling of disused computers and monitors For details visit the Lenovo Web site at www ibm com jp pc service recycle pcrecycle Pursuant to the Law for Promotion of Effective Utilization of Resources the collecting and recycling of home used c...

Страница 28: ...e Lenovo product meets the requirements of the Republic of Turkey Directive on the Restriction of the Use of Certain Hazardous Substances in Electrical and Electronic Equipment EEE Lenovo and the Lenovo logo are trademarks of Lenovo in the United States other countries or both Ukraine RoHS India RoHS RoHS compliant as per E Waste Management Handling Rules 2011 Power cords and power adapters Use on...

Отзывы: