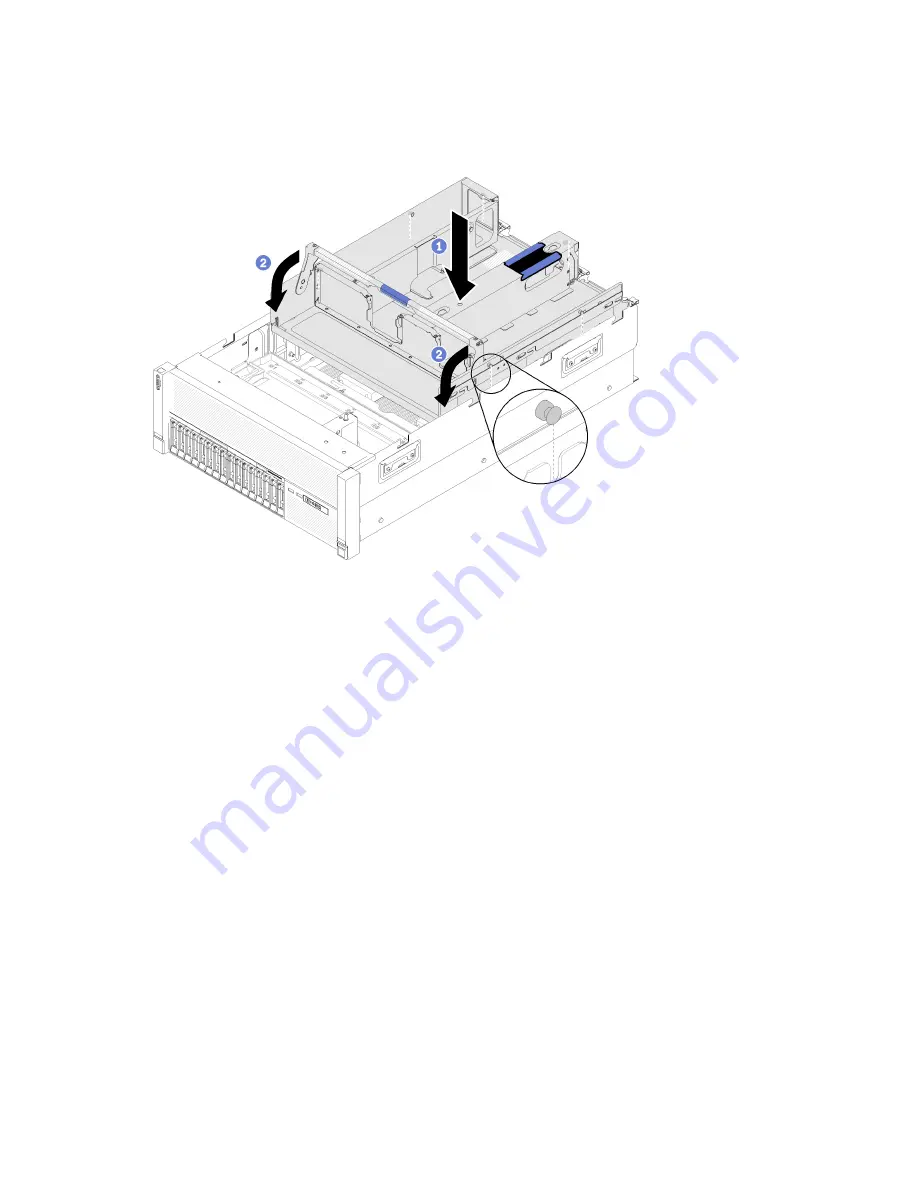
Step 2. Slightly press on the PCIe expansion tray into the server until all the nailheads on the side the rear
of the tray seat into the slots on the top of the chassis.
Step 3. Rotate the handle down. Make sure the PCIe expansion tray is fully seated into the server.
Figure 142. PCIe expansion tray installation
After installing the PCIe expansion tray, complete the following steps:
1. Install the 4U PCIe riser assemblies (see “Install a 4U PCIe riser assembly” on page 153).
2. Install the top cover (see “Install the top cover” on page 148).
3. If the server is installed in a rack, reinstall the server into the rack.
4. Power on the server and any peripheral devices.
4U PCIe riser assembly replacement
Use this procedure to install or remove a 4U PCIe riser assembly.
Remove a 4U PCIe riser assembly
Use this procedure to remove a 4U PCIe riser assembly.
Before removing a 4U PCIe riser assembly:
1. Read the safety information and installation guidelines (see “Safety” on page iii and “Installation
2. Turn off the server and peripheral devices and disconnect the power cords and all external cables (see
“Power off the server” on page 10).
3. If the server is installed in a rack, remove the server from the rack.
4. Remove the top cover (see “Remove the top cover” on page 146).
To remove a 4U PCIe riser assembly, complete the following steps:
152
ThinkSystem SR860 Maintenance Manual
Содержание ThinkSystem SR860
Страница 1: ...ThinkSystem SR860 Maintenance Manual Machine Type 7X69 7X70 ...
Страница 8: ...vi ThinkSystem SR860 Maintenance Manual ...
Страница 63: ...Figure 48 Server components Chapter 2 Server components 55 ...
Страница 200: ...192 ThinkSystem SR860 Maintenance Manual ...
Страница 210: ...202 ThinkSystem SR860 Maintenance Manual ...
Страница 211: ......
Страница 212: ...Part Number SP47A30805 Printed in China 1P P N SP47A30805 1PSP47A30805 ...


