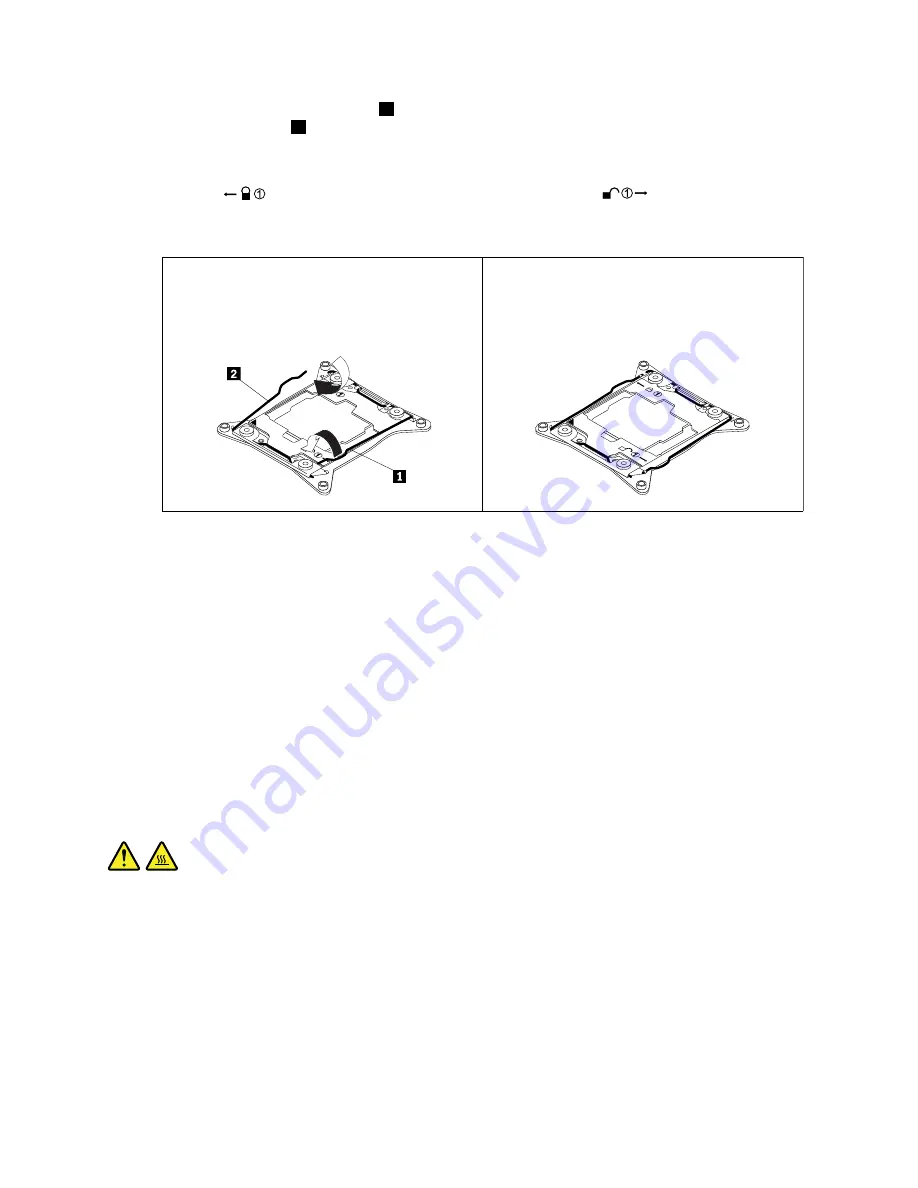
12. Gently press down the small handle
2
and then push the handle inward to secure it. Then gently press
down the small handle
1
and push the handle inward to lock the microprocessor retainer into position.
Ensure that the new microprocessor is secured in the socket.
Note:
There are two marks on the microprocessor retainer. Ensure that you close the small handle
marked with
first and then close the small handle marked with
. Always follow the correct
sequence when you close the small handles.
Figure 178. Securing the microprocessor in the socket
13. Install the new heat sink and fan assembly that comes with the microprocessor option kit. See “Heat
sink and fan assemblies” on page 190.
What to do next:
• To work with another piece of hardware, go to the appropriate section.
• To complete the installation or replacement, go to “Completing the parts replacement” on page 213.
System board
Attention:
Do not open your computer or attempt any repair before reading and understanding the Chapter
1 “Read this first: Important safety information” on page 1.
This section provides instructions on how to replace the system board.
CAUTION:
The heat sink and microprocessor might be very hot. Before you open the computer cover, turn off
the computer and wait several minutes until the computer is cool.
Note:
Each computer has a unique Vital Product Data (VPD) code stored in the nonvolatile memory on the
system board. After you replace the system board, the VPD must be updated. To update the VPD, see
“Updating and recovering the BIOS” on page 70.
To replace the system board, do the following:
1. Prepare your computer. See “Preparing your computer and removing the computer cover” on page 101.
2. Remove the direct cooling air baffle. See “Direct cooling air baffle” on page 105.
3. Lay the computer on its side for easier access to the system board.
.
Installing or replacing hardware
209
Содержание ThinkStation P910
Страница 1: ...P910 Hardware Maintenance Manual Machine Types 30B8 and 30B9 ...
Страница 14: ...8 P910 Hardware Maintenance Manual ...
Страница 18: ...12 P910 Hardware Maintenance Manual ...
Страница 19: ...1 2 Chapter 1 Read this first Important safety information 13 ...
Страница 20: ...1 2 14 P910 Hardware Maintenance Manual ...
Страница 25: ...1 2 Chapter 1 Read this first Important safety information 19 ...
Страница 26: ...1 2 20 P910 Hardware Maintenance Manual ...
Страница 29: ...Chapter 1 Read this first Important safety information 23 ...
Страница 39: ...b f d c e Chapter 2 Product overview 33 ...
Страница 52: ...46 P910 Hardware Maintenance Manual ...
Страница 64: ...58 P910 Hardware Maintenance Manual ...
Страница 84: ...78 P910 Hardware Maintenance Manual ...
Страница 98: ...92 P910 Hardware Maintenance Manual ...
Страница 106: ...100 P910 Hardware Maintenance Manual ...
Страница 224: ...218 P910 Hardware Maintenance Manual ...
Страница 226: ...220 P910 Hardware Maintenance Manual ...
Страница 228: ...222 P910 Hardware Maintenance Manual ...
Страница 236: ...230 P910 Hardware Maintenance Manual ...
Страница 240: ...4 Follow the instructions on the screen 234 P910 Hardware Maintenance Manual ...
Страница 243: ......
Страница 244: ......


