background image

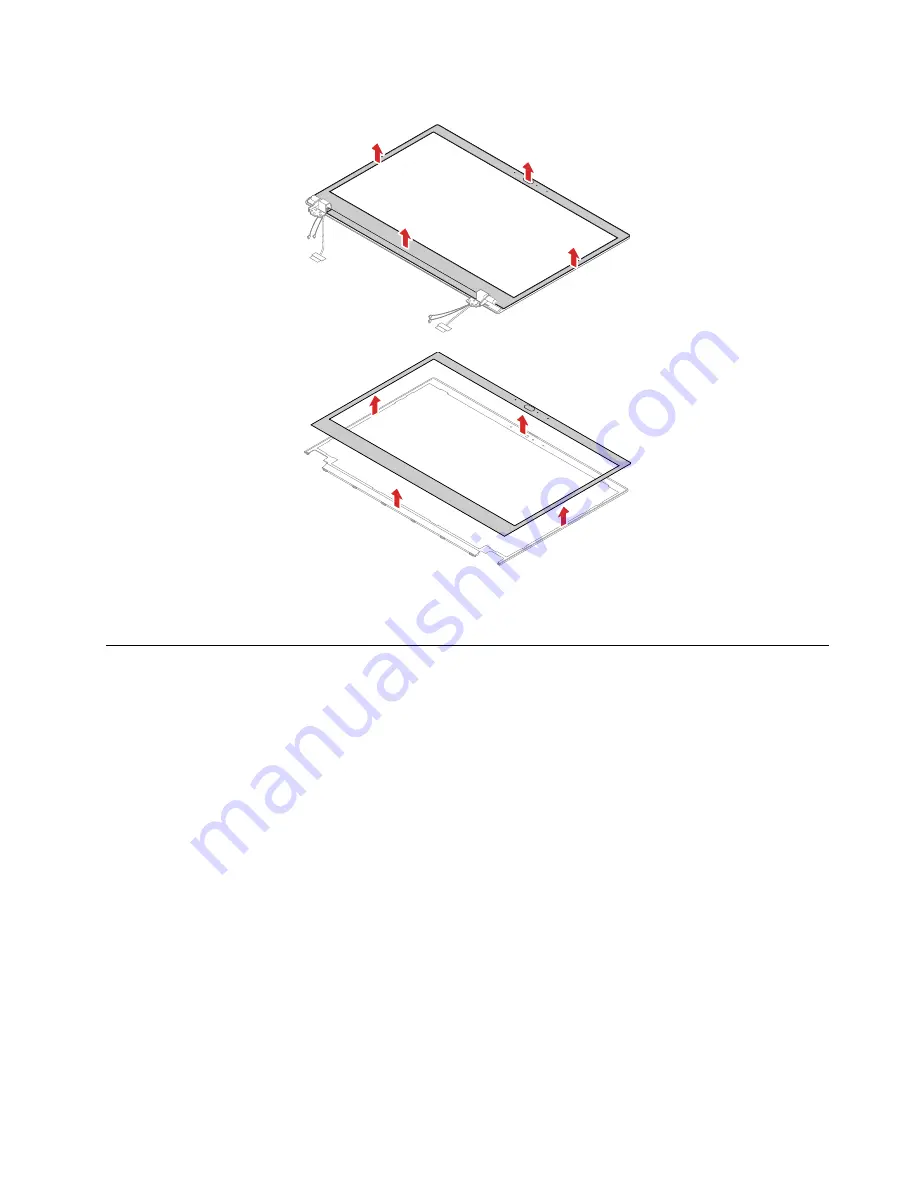
Removal steps of the LCD bezel sheet and LCD bezel

When installing: 

After the LCD bezel sheet is removed, it cannot be used anymore. A new LCD bezel sheet 

is required for replacement.

2020 LCD panel and LCD elastic adhesive tape

For access, remove these FRUs in order:
•  “1020 Base cover assembly and dummy Nano-SIM-card tray” on page 65
•  “2010 LCD bezel sheet and LCD bezel” on page 86

Chapter 8

.

Removing or replacing a FRU

87

Содержание ThinkPad T495

Страница 1: ...T495 Hardware Maintenance Manual ...

Страница 2: ...er Appendix A Notices on page 97 Second Edition August 2020 Copyright Lenovo 2019 2020 LIMITED AND RESTRICTED RIGHTS NOTICE If data or software is delivered pursuant a General Services Administration GSA contract use reproduction or disclosure is subject to restrictions set forth in Contract No GS 35F 05925 ...

Страница 3: ...ting system 31 Resetting your computer 31 Using advanced startup options 31 Recovering your operating system if Windows 10 fails to start 32 Creating and using a recovery USB drive 32 Passwords 33 Power on password 33 Hard disk password 33 Supervisor password 33 How to remove the power on password 34 How to remove the hard disk password 34 Power management 35 Sleep mode 35 Hibernation mode 35 Symp...

Страница 4: ...rint reader cable bracket and board 76 1140 Smart card reader module and cable 77 1150 Trackpad and cable 78 1160 Hall sensor board with cable 79 1170 Power button board with cable power button 80 1180 System board 81 1190 LCD unit 84 1200 Keyboard bezel assembly 86 2010 LCD bezel sheet and LCD bezel 86 2020 LCD panel and LCD elastic adhesive tape 87 2030 Camera microphone module 90 2040 LCD hinge...

Страница 5: ...leshoot problems Important This manual is intended only for trained service technicians who are familiar with ThinkPad products Use this manual along with the advanced diagnostic tests to troubleshoot problems effectively Before servicing a ThinkPad product be sure to read all the information under Chapter 1 Safety information on page 1 and Chapter 2 Important service information on page 21 Copyri...

Страница 6: ...iv T495 Hardware Maintenance Manual ...

Страница 7: ...technicians and the customer s personnel are not in a hazardous position Place removed covers and other parts in a safe place away from all personnel while you are servicing the machine Keep your toolcase away from walk areas so that other people will not trip over it Do not wear loose clothing that can be trapped in the moving parts of a machine Ensure that your sleeves are fastened or rolled up ...

Страница 8: ... An electrical shock can occur only when there is a complete circuit By observing the above rule you may prevent a current from passing through your body When using testers set the controls correctly and use the approved probe leads and accessories for that tester Stand on suitable rubber mats obtained locally if necessary to insulate you from grounds such as metal floor strips and machine frames ...

Страница 9: ...puter Disconnect the power cord 3 Check the power cord for a A third wire ground connector in good condition Use a meter to measure third wire ground continuity for 0 1 ohm or less between the external ground pin and the frame ground b The power cord should be the authorized type specified for your computer Go to https support lenovo com partslookup c Insulation must not be frayed or worn 4 Check ...

Страница 10: ...ce requirement Note The use of a grounding system to guard against ESD damage is desirable but not necessary Attach the ESD ground clip to any frame ground ground braid or green wire ground When working on a double insulated or battery operated system use an ESD common ground or reference point You can use coax or connector outside shells on these systems Use the round ground prong of the ac plug ...

Страница 11: ...DANGER DANGER DANGER DANGER DANGER DANGER Chapter 1 Safety information 5 ...

Страница 12: ...DANGER 6 T495 Hardware Maintenance Manual ...

Страница 13: ...PERIGO Chapter 1 Safety information 7 ...

Страница 14: ...PERIGO PERIGO PERIGO PERIGO 8 T495 Hardware Maintenance Manual ...

Страница 15: ...PERIGO PERIGO PERIGO DANGER DANGER Chapter 1 Safety information 9 ...

Страница 16: ...DANGER DANGER DANGER DANGER DANGER 10 T495 Hardware Maintenance Manual ...

Страница 17: ...DANGER VORSICHT VORSICHT VORSICHT VORSICHT Chapter 1 Safety information 11 ...

Страница 18: ...VORSICHT VORSICHT VORSICHT VORSICHT 12 T495 Hardware Maintenance Manual ...

Страница 19: ...Chapter 1 Safety information 13 ...

Страница 20: ...14 T495 Hardware Maintenance Manual ...

Страница 21: ...Chapter 1 Safety information 15 ...

Страница 22: ...16 T495 Hardware Maintenance Manual ...

Страница 23: ...Chapter 1 Safety information 17 ...

Страница 24: ...18 T495 Hardware Maintenance Manual ...

Страница 25: ...Chapter 1 Safety information 19 ...

Страница 26: ...20 T495 Hardware Maintenance Manual ...

Страница 27: ...d in this manual After a system board is replaced ensure that the latest UEFI BIOS is loaded to the system board before you complete the service action To download and install software fixes drivers and UEFI BIOS go to https support lenovo com and follow the instructions on the screen Use the following strategy to prevent unnecessary expense for replacing and servicing FRUs If you are instructed t...

Страница 28: ...Product definition This topic introduces different model types and how to identify each type Dynamic Configure To Order CTO model This model provides the ability for a customer to configure a Lenovo solution from a Web site and have this configuration sent to fulfillment where it is built and shipped directly to the customer The machine label and eSupport will load these products as the 4 characte...

Страница 29: ...duct do the following 1 Go to https support lenovo com partslookup 2 Type the Machine Type in the corresponding field to get a general FRU list or type the Serial Number for more detailed FRU information Chapter 2 Important service information 23 ...

Страница 30: ...24 T495 Hardware Maintenance Manual ...

Страница 31: ...pect that a FRU is defective clear the error log and run the test again If the error does not recur do not replace the FRU Be careful not to replace a nondefective FRU What to do first When you return a FRU you must include the following information in the parts exchange form or parts return form that you attach to it 1 Name and phone number of service technician 2 Date of service 3 Date on which ...

Страница 32: ...ses 1 Identify the failing symptoms in as much detail as possible 2 Verify the symptoms Try to re create the failure by running the diagnostic test or by repeating the operation Diagnosing problems Many computer problems can be solved without outside assistance If you experience a problem with your computer the first place to start is the troubleshooting information in your computer documentation ...

Страница 33: ... and troubleshooting hints 2 When the ThinkPad logo is displayed repeatedly press and release the F10 key The main screen of the UEFI diagnostic program is displayed 3 Follow the instructions on the screen to use the program The following table displays the main items of the UEFI diagnostic program Depending on the model the items might differ slightly Table 1 Items on the main screen of the UEFI ...

Страница 34: ...Insert the disc into the optical drive 3 Restart the computer 4 When the ThinkPad logo is displayed repeatedly press and release the F12 key When the Boot Menu window opens release the F12 key 5 Use the arrow keys to select ATAPI CDx x 0 1 and then press Enter The diagnostic program launches 6 Follow the instructions on the screen to use the diagnostic program Power system checkout To verify if a ...

Страница 35: ...ry designed for another systems is installed the system will not charge Attention Lenovo has no responsibility for the performance or safety of unauthorized batteries and provides no warranties for failures or damage arising out of their use Move your pointer to the battery status icon in the Windows notification area to check the battery status The battery status icon displays the percentage of b...

Страница 36: ...Ground If the voltage is correct replace the system board If the voltage is not correct replace the coin cell battery If the coin cell battery discharges quickly after replacement replace the system board 30 T495 Hardware Maintenance Manual ...

Страница 37: ...e resetting process you can choose to keep your files or remove them and then reinstall the Windows operating system To reset your computer do the following Note The graphical user interface GUI items of the operating system might change without notice 1 Open the Start menu and then click Settings Update Security Recovery 2 In the Reset this PC section click Get started 3 Follow the instructions o...

Страница 38: ...red on the USB drive To avoid data loss make a backup copy of all the data that you want to keep To create a recovery USB drive do the following Note Ensure that your computer is connected to ac power during the following process 1 Connect a proper USB drive at least 16 GB of storage 2 Type recovery in the search box on the taskbar Then click Create a recovery drive 3 Click Yes in the User Account...

Страница 39: ...heck whether a master hard disk password has been set If a master hard disk password has been set it can be used to access the hard disk drive If no master hard disk password is available neither Lenovo nor Lenovo authorized service technicians provide any services to reset either the user hard disk password or the master hard disk password or to recover data from the hard disk drive The hard disk...

Страница 40: ... exit the ThinkPad Setup program How to remove the hard disk password Attention If User only mode is selected and the user hard disk password has been forgotten and cannot be made available to the service technician neither Lenovo nor Lenovo authorized service technicians provide any services to reset the user hard disk password or to recover data from the hard disk drive The hard disk drive can b...

Страница 41: ...put immediately after it enters sleep mode Wait a few seconds before taking any action to reenter operation mode Hibernation mode In hibernation mode the following occurs The system status RAM VRAM and setup data are stored on the hard disk drive or solid state drive The system is powered off Note If the computer enters the hibernation mode while it is connected to the dock do not disconnect it be...

Страница 42: ...ative descriptions of symptoms If the symptom is not described there go to Intermittent problems on page 41 Note For a device not supported by diagnostic codes in the ThinkPad notebooks see the manual for that device Numeric error codes Table 2 Numeric error codes Symptom or error beeps if any FRU or action in sequence 0177 Bad SVP data stop POST task The checksum of the supervisor password in the...

Страница 43: ... is plugged in Turn off and remove the network card 1 Remove the network card 2 Replace the system board 1820 More than one external fingerprint reader is attached Power off and remove all but the reader that you set up within your main operating system Remove all but the reader that you set up for the authentication 2000 ThinkVantage Active Protection sensor diagnostics failed Have the computer s...

Страница 44: ...ing out of their use Replace the battery Beep errors Lenovo SmartBeep technology enables you to decode beep errors with your smartphone when a black screen occurs with beeps from your computer To decode the beep error with Lenovo SmartBeep technology do the following 1 Go to https support lenovo com smartbeep or scan the following QR Code 2 Download the proper diagnostic app and install it on your...

Страница 45: ...le error 1 Reinstall or replace the memory module 2 Replace the system board service provider only 0283 PCI resource error 1 Remove PCIe devices the M 2 card PCIe card and so on service provider only 2 Replace the system board service provider only 0284 TCG compliant functionality related error might be the BIOS code validation failure Replace the system board service provider only 0285 TCG compli...

Страница 46: ...rvicing has two or less visible defective pixels it should not be considered faulty However if the LCD has three or more visible defective pixels it will be deemed as defective by Lenovo and it should be replaced Notes This policy applies to all ThinkPad Notebooks purchased on 1 January 2008 or later Lenovo will not provide warranty replacement if the LCD is within specifications because we cannot...

Страница 47: ...do not replace any FRUs 3 If any error is detected replace the FRU shown by the FRU code Rerun the test to verify that no more errors exist Undetermined problems If the diagnostic tests did not identify the device that has failed if wrong devices are installed or if the system simply is not operating follow these procedures to isolate the failing FRU do not isolate FRUs that have no defects Verify...

Страница 48: ...b LCD assembly 42 T495 Hardware Maintenance Manual ...

Страница 49: ...r unmute the speakers If you mute the sound and turn off your computer the sound will remain muted when you turn on your computer again To turn on the sound press F1 F2 or F3 Decrease the speaker volume Increase the speaker volume Mute or unmute the microphones Darken the display Brighten the display Manage external displays Enable or disable the built in wireless networking features Open the Sett...

Страница 50: ...p mode To wake up the computer press Fn or the power button Fn B Equal the Break key on a conventional external keyboard Fn K Equal the ScrLK or Scroll Lock key on a conventional external keyboard Fn P Equal the Pause key on a conventional external keyboard Fn S Equal the SysRq key on a conventional external keyboard Fn Left arrow key Equal the Home key Fn Right arrow key Equal the End key 44 T495...

Страница 51: ...ols connectors and indicators This topic introduces the locations of the computer controls connectors and indicators Front 1 Infrared camera 4 Camera 2 ThinkShutter 5 Multi touch screen 3 Microphones for selected models Copyright Lenovo 2019 45 ...

Страница 52: ...ce 2 Fingerprint reader 5 Speakers 3 Trackpad for selected models Left 1 USB C connectors USB 3 1 Gen 2 4 HDMI connector 2 Docking station connector 5 Audio connector 3 USB 3 1 connector Gen 2 6 microSD card slot 46 T495 Hardware Maintenance Manual ...

Страница 53: ... card slot 3 Ethernet connector 2 Always On USB 3 1 connector Gen 1 4 Security lock slot for selected models Bottom 1 Docking station hook holes 3 Emergency reset hole 2 Keyboard drainage hole Chapter 6 Locations 47 ...

Страница 54: ...are Maintenance Manual An electronic version of this manual can be found at https support lenovo com Click Documentation and then follow the on screen instructions to find the manual for your product You might be required to return the defective CRU When return is required 1 return instructions a prepaid shipping label and a container will be included with the replacement CRU and 2 you might be ch...

Страница 55: ...r computer might look different from the illustration above Table 7 Major FRUs and CRUs No FRU description Self service CRU Optional service CRU 1 LCD unit No No 2 Speaker assembly No Yes 3 Power button board with cable No No 4 Power button No No Chapter 6 Locations 49 ...

Страница 56: ...te drive No No 18 M 2 2242 solid state drive Yes No 19 Base cover assembly Yes No 20 Nano SIM card tray Yes No 21 Dummy Nano SIM card tray No No 22 Built in battery No No 23 System board No No 24 Thermal fan assembly No No 25 Memory module Yes No 26 Coin cell battery Yes No 27 Hall sensor board with cable No No 28 Fingerprint reader module No No 29 Fingerprint reader cable No No 30 Trackpad No No ...

Страница 57: ...me with the computer and a user might order it from https pcsupport lenovo com lenovorecovery though additional shipping and handling fees might apply LCD FRUs Table 8 LCD FRUs No FRU description Self service CRU Optional service CRU 1 LCD bezel sheet No No 2 LCD bezel No No 3 LCD panel No No Chapter 6 Locations 51 ...

Страница 58: ...nfrared camera mic combo board No No 8 Microphone rubber No No 9 Aluminum foil for Infrared camera No No 10 LCD elastic adhesive tape No No 11 LCD cover assembly No No 12 Wireless LAN WAN antenna assembly No No 13 Conventional camera LED cable No No 14 LED cable No No 15 Infrared camera LED cable No No 16 LCD cable No No for selected models 52 T495 Hardware Maintenance Manual ...

Страница 59: ... bracket I O bracket M 2 solid state drive bracket Fingerprint reader bracket Mylar film for memory module Mylar film for Wireless Wan card Spec No No Label kit GEO label Spec No No Connector and cable guide This topic provides information to help Lenovo authorized service technicians identify connectors and cables for replacement purpose To view each FRU and the exploded illustration of the compu...

Страница 60: ...he cable to this connector 3 RJ45 board connector internal RJ45 cable Connect one end of the RJ45 cable to the RJ45 board and the other end to this connector 4 Wireless LAN card slot internal No Insert the wireless LAN card into this slot 5 Speaker assembly connector internal Speaker assembly cable The speaker assembly comes with cable Connect the cable to this connector 6 LCD connector internal L...

Страница 61: ...ector 16 Built in battery connector internal Built in battery cable The built in battery comes with cable Connect the cable to this connector 17 Trackpad connector internal Trackpad cable Connect one end of the cable to the trackpad and the other end to this connector 18 Fingerprint reader card connector internal Fingerprint reader cable Connect one end of the cable to the fingerprint reader card ...

Страница 62: ...Looking up FRU information For detailed FRU information including part numbers descriptions and substitution part numbers go to https support lenovo com partslookup 56 T495 Hardware Maintenance Manual ...

Страница 63: ... required to return the defective CRU When return is required 1 return instructions a prepaid shipping label and a container will be included with the replacement CRU and 2 you might be charged for the replacement CRU if Lenovo does not receive the defective CRU within thirty 30 days of your receipt of the replacement CRU See your Lenovo Limited Warranty documentation for full details Service tool...

Страница 64: ...crew It is recommended to use new screws for replacements If you have a torque screwdriver tighten all screws firmly to the torque specified in the screw information table for each step Ensure torque screwdrivers are calibrated correctly following country specifications Retaining serial numbers This topic provides instructions on the following Restoring the serial number of the system unit on page...

Страница 65: ...ance key to the computer 2 When the logo is displayed press Esc The ThinkPad Config Information Update Utility interface is displayed 3 Type 1 under Enter the action desired then press Enter The ThinkPad Serial Number Update Utility for Asset ID screen is displayed 4 Type 1 under Enter the action desired then press Enter Then follow the instructions on the screen to restore the serial number of th...

Страница 66: ...en press Enter The Auto UUID generation utility interface is displayed 6 Type y under Change UUID OK Y N then press Enter A new UUID is created and written If a valid UUID already exists it is not overwritten 60 T495 Hardware Maintenance Manual ...

Страница 67: ...ve the following general guidelines 1 Do not try to service any computer unless you have been trained and certified An untrained person runs the risk of damaging parts 2 Before replacing any FRU review Chapter 7 FRU replacement notices on page 57 3 Begin by removing any FRUs that have to be removed before replacing the failing FRU Any such FRUs are listed at the beginning of each FRU replacement p...

Страница 68: ...e Power submenu is displayed 3 Select Disable built in battery and press Enter 4 Select Yes in the Setup Confirmation window The built in battery is disabled and the computer turns off automatically Wait three to five minutes to let the computer cool Removing the nano SIM card and the nano SIM card tray Some models you are servicing might have a nano SIM card installed If the computer you are serv...

Страница 69: ...a b Step Screw quantity Color Torque 4 M2 1 65 mm flat head nylon coated 2 Silver 0 143 Nm 1 4 kgf cm Chapter 8 Removing or replacing a FRU 63 ...

Страница 70: ...c d 64 T495 Hardware Maintenance Manual ...

Страница 71: ...at the connector is attached firmly 1020 Base cover assembly and dummy Nano SIM card tray Removal steps of the base cover assembly Loosen the screws 1 that secure the base cover assembly Chapter 8 Removing or replacing a FRU 65 ...

Страница 72: ...n of delivery the labels might be slightly different from the ones in the following illustration The new base cover assembly FRU is shipped with a kit containing labels of several kinds Apply those labels when you replace the base cover assembly For the labels that are not shipped with the new base cover assembly peel them from the old base cover assembly and adhere them to the new one 66 T495 Har...

Страница 73: ...repair The M 2 solid state drive is not designed for frequent changes or replacement Before replacing the M 2 solid state drive make a backup copy of all the data that you want to keep Do not apply pressure to the M 2 solid state drive Do not touch the contact edge of the M 2 solid state drive Otherwise the M 2 solid state drive might get damaged Do not make the M 2 solid state drive subject to ph...

Страница 74: ...Screw quantity Color Torque 1 M2 2 5 mm big head nylon coated 1 Black 0 181 Nm 1 85 kgf cm 1040 Memory module For access remove this FRU 1020 Base cover assembly and dummy Nano SIM card tray on page 65 Removal steps of the memory module 68 T495 Hardware Maintenance Manual ...

Страница 75: ...rmly and pivot it downwards until it snaps into place Ensure that the memory module is firmly installed in the slot and does not move easily 1050 Speaker assembly For access remove this FRU 1020 Base cover assembly and dummy Nano SIM card tray on page 65 Removal steps of the speaker assembly Chapter 8 Removing or replacing a FRU 69 ...

Страница 76: ...on page 65 Removal steps of the wireless WAN card Step Screw quantity Color Torque 2 M2 2 5 mm big head nylon coated 1 Black 0 181 Nm 1 85 kgf cm When installing Plug the orange cable into the main connector and the blue cable into the auxiliary connector 1070 Wireless LAN card For access remove this FRU 1020 Base cover assembly and dummy Nano SIM card tray on page 65 70 T495 Hardware Maintenance ...

Страница 77: ...e main connector and the black cable into the auxiliary connector 1080 Coin cell battery For access remove these FRUs in order 1020 Base cover assembly and dummy Nano SIM card tray on page 65 Removal steps of the coin cell battery DANGER Use only the authorized battery specified for your computer Any other battery could ignite or explode Chapter 8 Removing or replacing a FRU 71 ...

Страница 78: ...e replaced unless this diagnostic test shows that the battery is defective The only exception to this is if the battery is physically damaged or a customer is reporting a possible safety issue Note that a physically damaged battery is a non warranty replacement part For access remove this FRU 1020 Base cover assembly and dummy Nano SIM card tray on page 65 Removal steps of the built in battery DAN...

Страница 79: ...5 Removal steps of the thermal fan assembly When installing Ensure that the connector is attached firmly Do not press the top of the fan cover and the fan hub Before you attach the fan assembly to the computer apply thermal grease at an amount of 0 2 grams on the parts marked a as shown in the following illustrations Either too much or too less application of grease can cause a thermal problem due...

Страница 80: ...and board For access remove these FRUs 1020 Base cover assembly and dummy Nano SIM card tray on page 65 1100 Thermal fan assembly on page 73 Removal steps of the RJ45 cable and board 74 T495 Hardware Maintenance Manual ...

Страница 81: ...afer head nylon coated 3 Silver 0 181 Nm 1 85 kgf cm 1120 USB cable and board For access remove these FRUs 1020 Base cover assembly and dummy Nano SIM card tray on page 65 1090 Built in battery on page 72 Chapter 8 Removing or replacing a FRU 75 ...

Страница 82: ... 4 M2 4 mm wafer head nylon coated 2 Silver 0 181 Nm 1 85 kgf cm 1130 Fingerprint reader cable bracket and board For access remove these FRUs 1020 Base cover assembly and dummy Nano SIM card tray on page 65 1090 Built in battery on page 72 76 T495 Hardware Maintenance Manual ...

Страница 83: ...Color Torque 4 M2 2 5 mm wafer head nylon coated 1 Black 0 181 Nm 1 85 kgf cm 1140 Smart card reader module and cable For access remove these FRUs 1020 Base cover assembly and dummy Nano SIM card tray on page 65 1090 Built in battery on page 72 Chapter 8 Removing or replacing a FRU 77 ...

Страница 84: ...Step Screw quantity Color Torque 7 M2 2 5 mm big head nylon coated 2 Black 0 181 Nm 1 85 kgf cm 1150 Trackpad and cable For access remove these FRUs in order 1020 Base cover assembly and dummy Nano SIM card tray on page 65 78 T495 Hardware Maintenance Manual ...

Страница 85: ...quantity Color Torque 4 M2 2 mm wafer head nylon coated 4 Silver 0 181 Nm 1 85 kgf cm 1160 Hall sensor board with cable For access remove these FRUs 1020 Base cover assembly and dummy Nano SIM card tray on page 65 1090 Built in battery on page 72 Chapter 8 Removing or replacing a FRU 79 ...

Страница 86: ...cable 1170 Power button board with cable power button For access remove this FRU 1020 Base cover assembly and dummy Nano SIM card tray on page 65 Removal steps of the power button board with cable power button 80 T495 Hardware Maintenance Manual ...

Страница 87: ...ittle as 6 inches so that it falls flat on a hard bench can subject the accelerometer to as much as 6000 G s of shock Be careful not to drop the system board on a bench top that has a hard surface such as metal wood or composite Avoid rough handling of any kind At every point in the process be sure not to drop or stack the system board If you put a system board down be sure to put it only on a pad...

Страница 88: ... FRU at https support lenovo com partslookup 1020 Base cover assembly and dummy Nano SIM card tray on page 65 1030 M 2 solid state drive on page 67 1040 Memory module on page 68 1060 Wireless WAN card on page 70 1070 Wireless LAN card on page 70 1090 Built in battery on page 72 1100 Thermal fan assembly on page 73 Removal steps of the system board 82 T495 Hardware Maintenance Manual ...

Страница 89: ...1 Nm 1 85 kgf cm 8 M2 2 5 mm big head nylon coated 1 Black 0 181 Nm 1 85 kgf cm Step Screw quantity Color Torque 10 M2 3 mm flat head nylon coated 3 Silver 0 181 Nm 1 85 kgf cm When installing Ensure that the connectors are attached firmly Chapter 8 Removing or replacing a FRU 83 ...

Страница 90: ...e system board is extremely sensitive When you service the system board avoid any kind of rough handling 1190 LCD unit For access remove this FRU 1020 Base cover assembly and dummy Nano SIM card tray on page 65 Removal steps of the LCD unit 84 T495 Hardware Maintenance Manual ...

Страница 91: ...Step Screw quantity Color Torque 5 M2 5 4 mm flat head nylon coated 4 Gray 0 294 Nm 3 kgf cm Chapter 8 Removing or replacing a FRU 85 ...

Страница 92: ...page 67 1040 Memory module on page 68 1050 Speaker assembly on page 69 1060 Wireless WAN card on page 70 1070 Wireless LAN card on page 70 1080 Coin cell battery on page 71 1090 Built in battery on page 72 1100 Thermal fan assembly on page 73 1110 RJ45 cable and board on page 74 1120 USB cable and board on page 75 1130 Fingerprint reader cable bracket and board on page 76 1140 Smart card reader mo...

Страница 93: ... cannot be used anymore A new LCD bezel sheet is required for replacement 2020 LCD panel and LCD elastic adhesive tape For access remove these FRUs in order 1020 Base cover assembly and dummy Nano SIM card tray on page 65 2010 LCD bezel sheet and LCD bezel on page 86 Chapter 8 Removing or replacing a FRU 87 ...

Страница 94: ...Steps of removing the LCD panel and LCD elastic adhesive tape 88 T495 Hardware Maintenance Manual ...

Страница 95: ...Steps of installing the LCD panel and LCD elastic adhesive tape Chapter 8 Removing or replacing a FRU 89 ...

Страница 96: ...hone module For access remove these FRUs in order 1190 LCD unit on page 84 2010 LCD bezel sheet and LCD bezel on page 86 2020 LCD panel and LCD elastic adhesive tape on page 87 Removal steps of the infrared camera microphone module and aluminum foil 90 T495 Hardware Maintenance Manual ...

Страница 97: ...ps of the conventional camera microphone module When installing Ensure that the connector is attached firmly 2040 LCD hinges For access remove these FRUs in order 1190 LCD unit on page 84 2010 LCD bezel sheet and LCD bezel on page 86 Chapter 8 Removing or replacing a FRU 91 ...

Страница 98: ... nylon coated 4 Silver 0 294 Nm 3 kgf cm 2050 Camera LED cable For access remove these FRUs in order 1190 LCD unit on page 84 2010 LCD bezel sheet and LCD bezel on page 86 2020 LCD panel and LCD elastic adhesive tape on page 87 2040 LCD hinges on page 91 92 T495 Hardware Maintenance Manual ...

Страница 99: ...e When installing Ensure that the connector is attached firmly Removal steps of the conventional camera LED cable When installing Ensure that the connector is attached firmly Removal steps of the LED cable Chapter 8 Removing or replacing a FRU 93 ...

Страница 100: ...oval steps of the LCD cable When installing Ensure that the connector is attached firmly 2070 Wireless antenna assembly For access remove these FRUs in order 1190 LCD unit on page 84 2010 LCD bezel sheet and LCD bezel on page 86 2020 LCD panel and LCD elastic adhesive tape on page 87 2040 LCD hinges on page 91 Removal steps of the wireless LAN antenna assembly Release the antenna cables from the c...

Страница 101: ...e damaged by the cable guides or a wire to be broken Removal steps of the wireless LAN WAN antenna assembly Attention When you route the cables ensure that they are not subject to any tension Tension could cause the cables to be damaged by the cable guides or a wire to be broken Chapter 8 Removing or replacing a FRU 95 ...

Страница 102: ...ssembly For access remove these FRUs in order 1190 LCD unit on page 84 2010 LCD bezel sheet and LCD bezel on page 86 2020 LCD panel and LCD elastic adhesive tape on page 87 2030 Camera microphone module on page 90 2040 LCD hinges on page 91 2050 Camera LED cable on page 92 2060 LCD cable on page 94 2070 Wireless antenna assembly on page 94 96 T495 Hardware Maintenance Manual ...

Страница 103: ...e publication Lenovo may make improvements and or changes in the product s and or the program s described in this publication at any time without notice The products described in this document are not intended for use in implantation or other life support applications where malfunction may result in injury or death to persons The information contained in this document does not affect or change Len...

Страница 104: ...marks of Lenovo Microsoft and Windows are trademarks of the Microsoft group of companies Intel is trademark of Intel Corporation or its subsidiaries in the U S and or other countries The terms HDMI and HDMI High Definition Multimedia Interface are trademarks or registered trademarks of HDMI Licensing LLC in the United States and other countries USB C is a trademark of USB Implementers Forum All ot...

Страница 105: ...Announcements EEPROM Electrically Erasable Programmable Read Only Memory EFI Extensible Firmware Interface EPO emergency power off ESD electrostatic discharge EU European Union FCC Federal Communications Commission FRU Field Replaceable Unit GAV General Announce Variant GPU graphics processing unit HDD hard disk drive HDMI high definition multimedia interface ICs integrated circuits ICCID integrat...

Страница 106: ...tor RJ registered jack SATA Serial Advanced Technology Attachment SIM subscriber identity module SVP supervisor password TFTs thin film transistors UEFI Unified Extensible Firmware Interface USB Universal Serial Bus UUID universally unique identifier VGA video graphics array VRAM video random access memory WAN wide area network 100 T495 Hardware Maintenance Manual ...

Страница 107: ......

Страница 108: ...Part Number SP40G76812 Printed in China 1P P N SP40G76812 ...

Страница 109: ... 1PSP40G76812 ...

Отзывы: