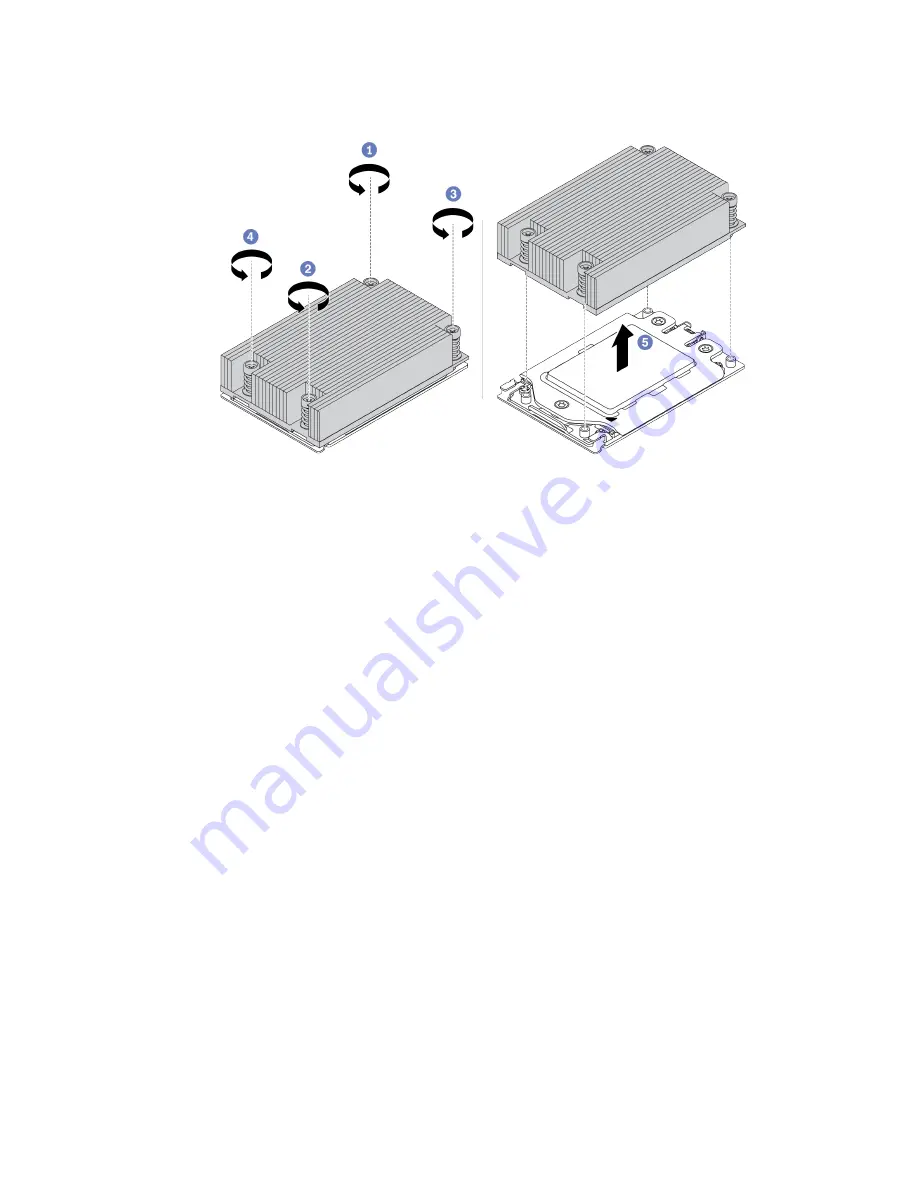
Step 4. Remove the heat sink.
Figure 46. Heat sink removal
a. Use a Torx #T20 screwdriver to loosen all the captive screws in the
removal sequence
shown
on the heat-sink label. After loosening each captive screw, wait for several seconds for the
heat sink to loosen from the processor.
b. Slightly lift the heat sink away from the system.
After you finish
• If you are replacing a heat sink, install a new heat sink. See “Install a standard heat sink” on page 77.
• If you are replacing a processor, remove the processor. See “Remove a processor” on page 75.
Remove a T-shaped heat sink
Use this information to remove a T-shaped heat sink.
About this task
Attention:
• Read “Installation Guidelines” on page 27 to ensure that you work safely.
• Power off the server and disconnect all power cords for this task.
• Prevent exposure to static electricity, which might lead to system halt and loss of data, by keeping static-
sensitive components in their static-protective packages until installation, and handling these devices with
an electrostatic-discharge wrist strap or other grounding system.
Notes:
• It may take some time for the heat sink to cool down after the system has been powered off.
• The heat sink is necessary to maintain proper thermal conditions for the processor. Do not power on the
server with the heat sink removed.
Procedure
74
HR630X V2 User Guide
Содержание HR630X V2
Страница 1: ...HR630X V2 User Guide Machine Types 7D4C ...
Страница 8: ......
Страница 32: ...24 HR630X V2 User Guide ...
Страница 120: ...112 HR630X V2 User Guide ...
Страница 122: ...114 HR630X V2 User Guide ...
Страница 128: ...120 HR630X V2 User Guide ...
Страница 132: ...124 HR630X V2 User Guide ...
Страница 133: ......
Страница 134: ......


