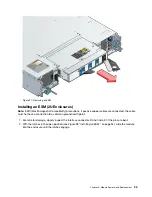
Inserting an ESM (5U Enclosures)
1. Rotate the ESM so that the release latch is at the bottom.
2. Open the release latch and rotate it to its most open position (as shown in “Removing an ESM (5U
3. Slide the ESM into its bay until it goes no further and the handle has started to close.
4. Close the latch until it clicks home. This levers the module home into its connector on the midplane. The
enclosure automatically detects the new unit.
5. Connect the cables to the new module (if necessary, refer to the note you made before you removed the
cables from the defective ESM).
96
Lenovo Storage D1212/D1224/D3284Hardware Installation and Maintenance Guide
Содержание D1212
Страница 6: ...iv Lenovo Storage D1212 D1224 D3284Hardware Installation and Maintenance Guide ...
Страница 20: ...xviii Lenovo Storage D1212 D1224 D3284Hardware Installation and Maintenance Guide ...
Страница 26: ...6 Lenovo Storage D1212 D1224 D3284Hardware Installation and Maintenance Guide ...
Страница 52: ...32 Lenovo Storage D1212 D1224 D3284Hardware Installation and Maintenance Guide ...
Страница 55: ...Figure 37 Unpacking the 2U12 and 2U24 Enclosure Systems Chapter 3 Installation 35 ...
Страница 70: ...50 Lenovo Storage D1212 D1224 D3284Hardware Installation and Maintenance Guide ...
Страница 136: ...116 Lenovo Storage D1212 D1224 D3284Hardware Installation and Maintenance Guide ...
Страница 142: ...122 Lenovo Storage D1212 D1224 D3284Hardware Installation and Maintenance Guide ...
Страница 150: ...Taiwan BSMI RoHS declaration 130 Lenovo Storage D1212 D1224 D3284Hardware Installation and Maintenance Guide ...
Страница 152: ...132 Lenovo Storage D1212 D1224 D3284Hardware Installation and Maintenance Guide ...
Страница 153: ......
Страница 154: ......


