Step 1. Start your Chromebook.
Step 2. Select your local language and keyboard when prompted.
Step 3. Set up connection to your wireless router (or a wireless LAN) that has Internet access.
Note:
This step cannot be skipped. You must have an Internet connection when starting your
Chromebook for the first time.
Step 4. Sign in with your Google Account. If you don’t have a Google Account, select
Create a Google
Account
and follow the on-screen instructions to create one.
You’re now your Chromebook’s owner. To verify this, refer to “Check a Chromebook’s owner” on page 34.
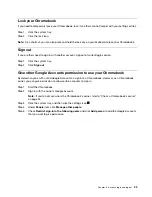
Sign in with another Google account
As the device owner, you may share your Chromebook with other people. They can use their Google
Accounts to sign in and use your Chromebook.
Step 1. Start the Chromebook.
Step 2. On the login screen, click
Add person
.
Step 3. Type the Google Account user name and password to sign in.
Note:
You need to connect the Chromebook to the Internet before you sign in with the Google
account for the first time.
If you cannot sign in with your Google account, your account may be restricted by the Chromebook owner.
For details, refer to “Give other Google Accounts permission to use your Chromebook” on page 33.
Browse as a guest
You may share your Chromebook with people who do not have a Google Account. They can use your
Chromebook with a special guest account.
Note:
Some operations such as installing apps are disabled if you log in as a guest.
Step 1. Start the Chromebook.
Step 2. On the login screen, click
Browse as Guest
.
Note:
If you cannot sign in, guest browsing may be disabled by the Chromebook owner.
Create a supervised account
You may need to create a supervised account for your child to use your Chromebook. As the manager of a
supervised account, you have the ability to review and control their use of the Internet.
Step 1. Start the Chromebook.
Step 2. On the login screen, click the ... icon and then click
Add supervised user
.
Note:
You can only create a supervised account when your Chromebook is connected to the
Internet.
Step 3. Select the manager of the supervised user and provide your password.
Step 4. Create the name and password for the supervised user.
To change restriction settings for the supervised user, go to
32
Lenovo Chromebook S345-14AST User Guide
Содержание Chromebook S345-14AST
Страница 6: ...vi Lenovo Chromebook S345 14AST User Guide ...
Страница 16: ...10 Lenovo Chromebook S345 14AST User Guide ...
Страница 25: ...Chapter 2 Meet your Chromebook 19 ...
Страница 30: ...24 Lenovo Chromebook S345 14AST User Guide ...
Страница 34: ...28 Lenovo Chromebook S345 14AST User Guide ...
Страница 36: ...30 Lenovo Chromebook S345 14AST User Guide ...
Страница 44: ...38 Lenovo Chromebook S345 14AST User Guide ...
Страница 50: ...44 Lenovo Chromebook S345 14AST User Guide ...
Страница 57: ...Appendix A Compliance information 51 ...
Страница 62: ...56 Lenovo Chromebook S345 14AST User Guide ...
Страница 72: ...66 Lenovo Chromebook S345 14AST User Guide ...
Страница 74: ......
Страница 75: ......
Страница 76: ......

