background image

4

Chapter 1. Getting to know your computer

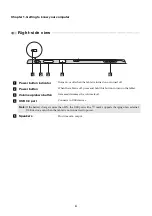
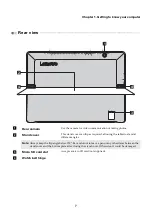
Right-side view

  - - - - - - - - - - - - - - - - - - - - - - - - - - - - - - - - - - - - - - - - - - - - - - - - - - - - - - - - - - - - - - - - - - - - - - - - - - - - -  

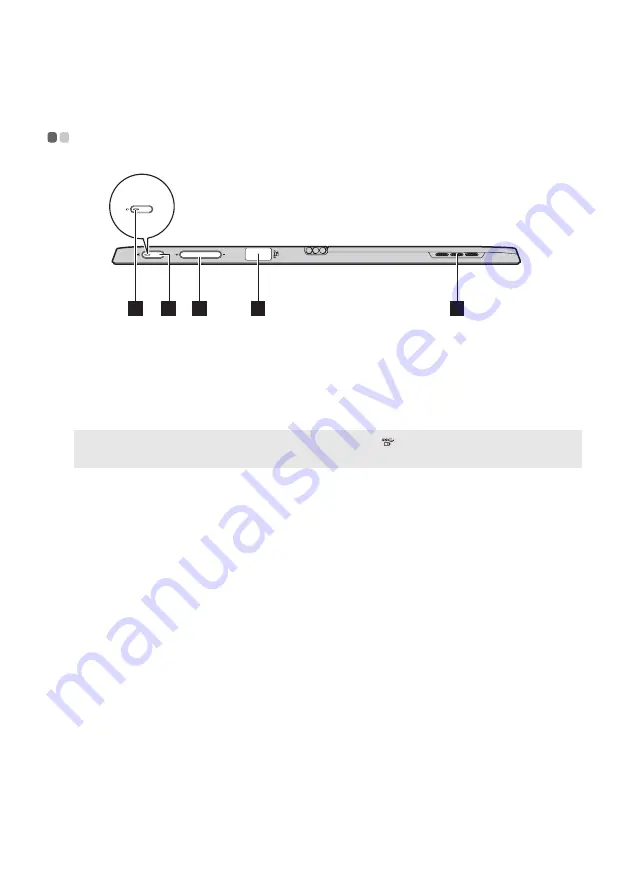
a

Power button indicator 

Turns on or off when the tablet is turned on or turned off.

b

Power button

When the tablet is off, press and hold this button to turn on the tablet. 

c

Volume up/down button

Increases/decreases the volume level. 

d

USB 3.0 port

Connects to USB devices.

Note:

If the battery charge is more than 20%, the USB port with a 

mark supports charging of an external 

USB device, even when the tablet is not connected to power.

e

Speakers

Provide audio output. 

4

3

2

5

1

Содержание 80VV002EUK

Страница 1: ...Lenovo MIIX 720 12IKB User Guide Read the safety notices and important tips in the included manuals before using your computer ...

Страница 2: ...nce To download environmental information go to http www lenovo com ecodeclaration The features described in this guide are common to most models Some features may not be available on your computer or your computer may include features that are not described in this user guide Some instructions in this guide may assume that you are using Windows 10 If you are using another Windows operating system...

Страница 3: ...pen on select models 19 Chapter 2 Starting to use Windows 10 20 Configuring the operating system for the first time 20 Operating system interfaces 20 Putting the computer to sleep or shutting it down 23 Touch screen operation 25 Connecting to a wireless network 28 Get help from Windows 29 Chapter 3 Recovery system 30 Chapter 4 Troubleshooting 32 Frequently asked questions 32 Troubleshooting 33 Tra...

Страница 4: ......

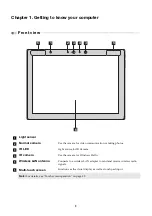
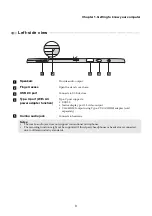
Страница 5: ...otos c IR LED Light source for IR Camera d IR camera Use the camera for Windows Hello e Wireless LAN antenna Connects to a wireless LAN adapter to send and receive wireless radio signals f Multi touch screen Functions as the visual display as well as touch pad input Note For details see Touch screen operation on page 25 6 1 2 4 3 3 5 5 ...

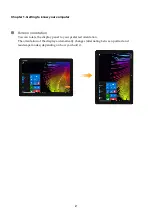
Страница 6: ...w your computer Screen orientation You can rotate the display panel to your preferred orientation The orientation of the display automatically changes alternating between portrait and landscape modes depending on how you hold it ...

Страница 7: ... adapter function Type C port supports USB 3 0 Native display port 1 2 video output VGA HDMI output using Type C VGA HDMI adapter sold separately e Combo audio jack Connects to headsets Notes The combo audio jack does not support conventional microphones The recording function might not be supported if third party headphones or headsets are connected due to different industry standards 3 4 5 1 2 ...

Страница 8: ...e tablet is off press and hold this button to turn on the tablet c Volume up down button Increases decreases the volume level d USB 3 0 port Connects to USB devices Note If the battery charge is more than 20 the USB port with a mark supports charging of an external USB device even when the tablet is not connected to power e Speakers Provide audio output 4 3 2 5 1 ...

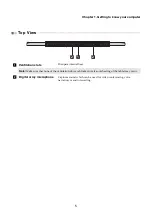
Страница 9: ...ion slots Dissipate internal heat Note Make sure that none of the ventilation slots are blocked or else overheating of the tablet may occur b Digital array microphone Captures sound which can be used for video conferencing voice narration or audio recording 1 2 2 ...

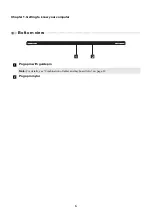
Страница 10: ...6 Chapter 1 Getting to know your computer Bottom view a Pogo pin with guide pin Note For details see Combination of tablet and keyboard folio on page 13 b Pogo pin mylar 1 2 ...

Страница 11: ... can flip as required allowing the tablet to stand at different angles Note Always keep the flip angle below 150 Be careful not to leave a pen or any other items between the stand cover and the bottom plate after closing the stand cover Otherwise it could be damaged c Micro SD card slot Accepts a micro SD card not supplied d Watch belt hinge 4 2 1 3 4 ...

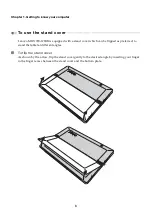
Страница 12: ...s equipped with a stand cover which can be flipped as preferred to stand the tablet at different angles To flip the stand cover As shown by the arrow flip the stand cover gently to the desired angle by inserting your finger in the finger recess between the stand cover and the bottom plate ...

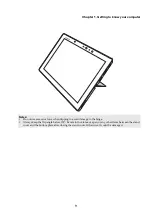
Страница 13: ...t use excessive force when flipping to avoid damage to the hinge Always keep the flip angle below 150 Be careful not to leave a pen or any other items between the stand cover and the bottom plate after closing the stand cover Otherwise it could be damaged ...

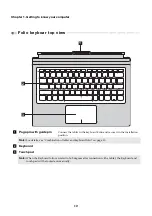
Страница 14: ...t to the keyboard Folio and secure it in the installation position Note For details see Combination of tablet and keyboard folio on page 13 b Keyboard c Touch pad Note When the Keyboard folio is rotated to 360 degrees after connection with a tablet the Keyboard and touch pad will be locked automatically 2 3 1 ...

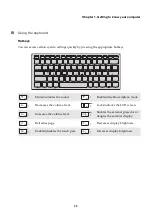
Страница 15: ... the appropriate hotkeys Mutes unmutes the sound Enables disables Airplane mode Decreases the volume level Locks unlocks the LCD screen Increases the volume level Enables the external projector or dangles the external display Refreshes page Decreases display brightness Enables disables the touch pad Increases display brightness ...

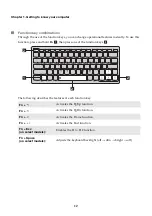
Страница 16: ...ress and hold Fn then press one of the function keys The following describes the features of each function key Fn Activates the PgUp function Fn Activates the PgDn function Fn Activates the Home function Fn Activates the End function Fn Esc on select models Enables the F1 to F12 function Fn Space on select models Adjusts the keyboard backlight off dim bright off a b 1 2 2 2 ...

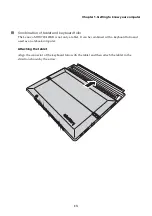
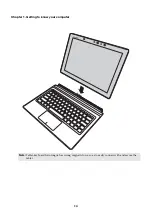
Страница 17: ...board folio The Lenovo MIIX 720 12IKB is not only a tablet It can be combined with a keyboard folio and used as a notebook computer Attaching the tablet Align the connector of the keyboard folio with the tablet and then attach the tablet in the direction shown by the arrow ...

Страница 18: ...14 Chapter 1 Getting to know your computer Note Tablet keyboard folio tongue has strong magnetic force so as to easily connect with and secure the tablet ...

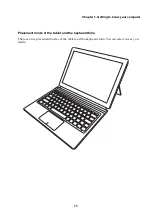
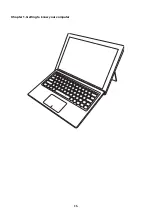
Страница 19: ...Chapter 1 Getting to know your computer 15 Placement mode of the tablet and the keyboard folio There are two placement modes of the tablet and the keyboard folio You can select one as you desire ...

Страница 20: ...16 Chapter 1 Getting to know your computer ...

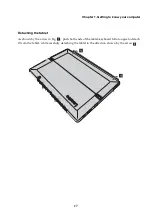
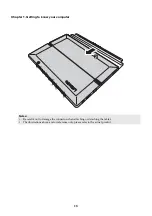
Страница 21: ...your computer 17 Detaching the tablet As shown by the arrow in Fig push both ends of the tablet keyboard folio tongue to detach it from the tablet while carefully detaching the tablet in the direction shown by the arrow a b 1 1 ...

Страница 22: ...hapter 1 Getting to know your computer Notes Be careful not to damage the connector when attaching or detaching the tablet The illustrations above are for reference only please refer to the actual product 2 ...

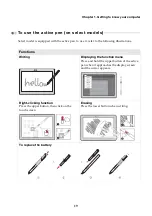
Страница 23: ...refer to the following illustrations Functions Writing Displaying the function menu Press and hold the upper button of the active pen when it approaches the display screen and the cursor appears Right clicking function Press the upper button then click on the touch screen Erasing Press the lower button when writing To replace the battery ...

Страница 24: ...m Creating a user account Operating system interfaces The return of the Start menu Windows 10 comes with a powerful and useful start menu To open the start menu do one of the following Select the Start button in the lower left corner the Start menu is displayed Press the Windows key on the keyboard The power button is on the Start menu select it you can choose to shut down or restart the computer ...

Страница 25: ...displayed From the ACTION CENTER you can examine important notifications from Windows and your apps Moreover you can change common settings quickly Task View in taskbar In Windows 10 you can add a new desktop and switch between different desktops To add a new desktop do the following Select the Task View icon in the taskbar area ...

Страница 26: ...top To switch between desktops select the Task View icon then select your desired desktop Also you can manage apps in the multi tasking view a Select the Task View button to display all apps in use on the screen b Select to enter the apps or close the apps ...

Страница 27: ...t the computer to sleep When the computer is in sleep mode you can quickly wake it to resume use bypassing the startup process To put the computer to sleep do one of the following Press the Power button Select the Start button then select Power Sleep To wake up the computer perform the following Press the Power button Note Put your computer to sleep before you move it Moving your computer while th...

Страница 28: ...u are not going to use your computer for a long time shut it down To shut down the computer do one of the following Select the Start button then select Power Shut down Right click or press the Start button in the lower left corner and select Shut down or sign out Shut down ...

Страница 29: ...en with one or more fingertips to perform a variety of tasks Frequently used gestures Tasks performed Tap Tap once on an item Performs an action such as starting an app opening a link or performing a command Similar to left clicking with a mouse Press and hold Press your finger down and leave it there for a moment Enables you to see detailed information before selecting an action Can also open a m...

Страница 30: ...tate Place two or more fingers on an item and then turn your hand Rotates an object Note Not all items can be rotated depending upon the app Slide Drag your finger across the screen Pans or scrolls through lists and pages Can also move an object or be used to draw or write depending upon the app Similar to pressing and holding to pan and to scrolling with a mouse continued Frequently used gestures...

Страница 31: ...any edge of the screen then swipe inwards toward the center Swiping in from the left edge can Bring in and open an app currently running in the background Swipe from the right edge can open the ACTION CENTER continued Frequently used gestures Tasks performed ...

Страница 32: ...ication area to open the network configuration page Select Settings Network Internet Airplane mode to open the network configuration page Then toggle the airplane mode switch to Off Connecting to a wireless network After wireless has been enabled the computer will scan for available wireless networks and display them in the wireless network list To connect to a wireless network click the network n...

Страница 33: ...ing to use Windows 10 29 Get help from Windows If you have a problem with the operating system see the Windows Get Started app To open it do the following Select the Start button then select Get Started from All apps ...

Страница 34: ...the Power button until the Novo Menu appears on the screen Novo Menu System Recovery Troubleshoot Reset this PC Windows PC settings Windows PC settings Update security Recovery Reset this PC select Start For more instructions see the Windows Help and Support file on your computer When I purchased my computer it included a copy of Windows How can I determine whether the copy of Windows is preinstal...

Страница 35: ... Compact technology enabled computer If the Recovery Partition is deleted or modified you may not be able to restore Windows to the factory status For computer models on which Compact technology is enabled deleting the Recovery Partition may cause Windows to fail to start How can I determine whether the Windows running on my computer is Compact technology enabled Compact technology is normally ena...

Страница 36: ...ardware devices of my computer You can download the latest device drivers from the Lenovo consumer support website How can I contact the customer support center See Chapter 3 Getting help and service in the Lenovo Safety and General Information Guide What is the NOVO Menu The NOVO Menu is ROM based software It displays basic tablet information and provides options for the BIOS setup boot menu and ...

Страница 37: ...oes blank while the computer is on Your power management is enabled Do one of the following to resume from sleep mode Press any key on the keyboard Press the Power button Sleep problems The critical low battery error message appears and the computer immediately turns off The battery power is getting low Connect the AC power adapter to the computer The computer enters sleep mode immediately after P...

Страница 38: ...located on the keyboard to make the screen brighter Press the Power button to confirm if the computer is in sleep mode If the problem persists follow the solution in the next problem The screen is unreadable or distorted The screen is unreadable or distorted Make sure that the screen resolution and color quality are correctly set Incorrect characters appear on the screen Is the operating system or...

Страница 39: ...A startup problem The Microsoft Windows operating system does not start For details see Recovery system on page 30 Recovery System problems Failure to restore system partition to factory default The system partition e g the partition size or the drive capacity of C has been modified Other problems Your computer does not respond To turn off your computer press and hold the Power button for about te...

Страница 40: ...llowing terms are trademarks or registered trademarks of Lenovo in the United States other countries or both Lenovo Microsoft and Windows are trademarks of Microsoft Corporation in the United States other countries or both ...

Страница 41: ...en US Rev AA00 Lenovo China 2016 ...

Отзывы: