background image


Chapter 2.  2-9 

  Caring for your monitor 

Be sure to turn off the power before you perform any maintenance on the monitor.   

Do not:   


Apply water or liquid directly to your monitor. 


Use solvents or abrasives. 


Use flammable cleaning materials to clean your monitor or any other electrical 

equipment. 


Touch the screen area of your monitor with sharp or abrasive items. This 

type of contact may cause permanent damage to your screen. 


Use any cleaner which contains an anti-static solution or similar additives. This 

may harm the coating of the screen area.   

Do: 


Lightly dampen a soft cloth with water and use this to gently wipe the covers and 

the screen.   


Remove grease or finger marks with a damp cloth and a little mild detergent. 


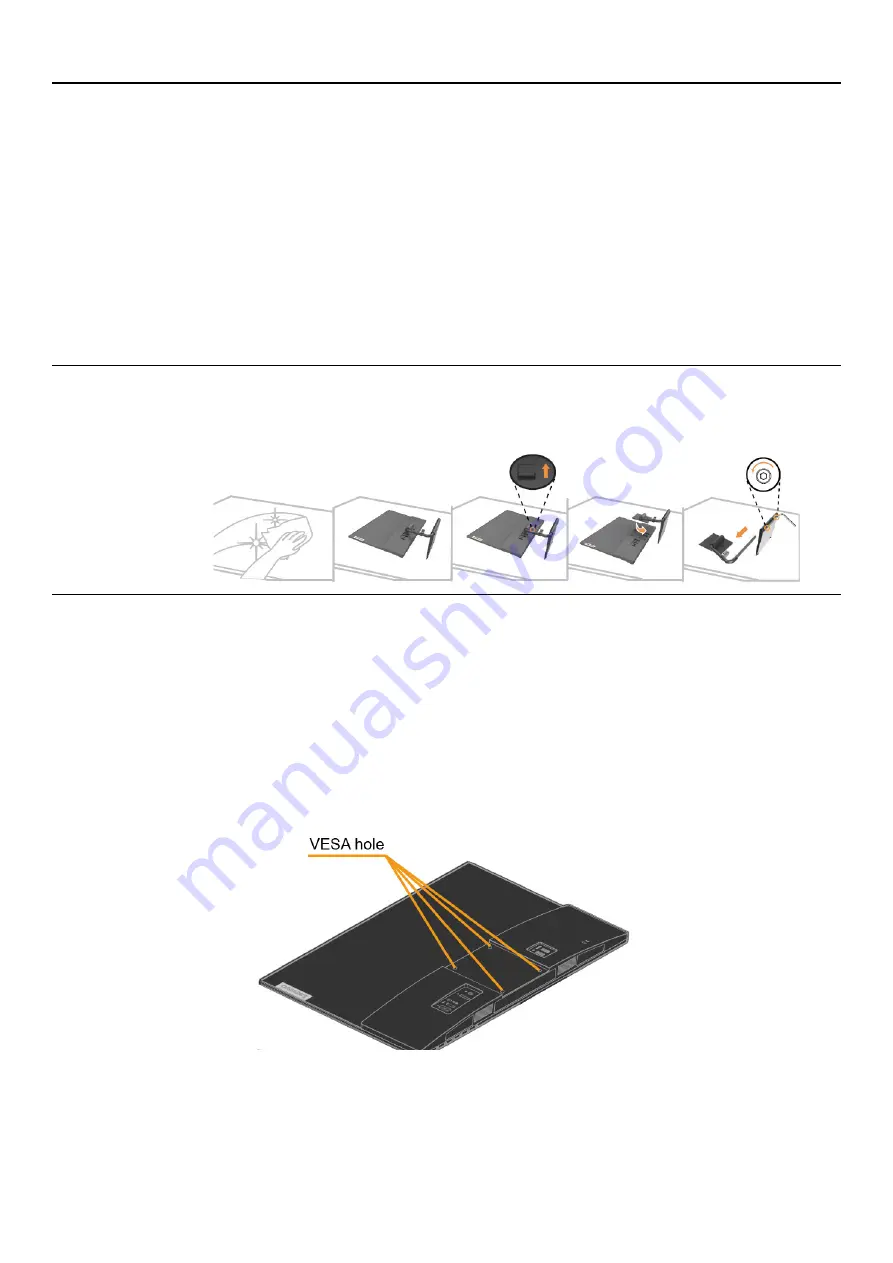
Detaching the monitor stand


Step 1: Place the monitor on a soft and flat surface.   

Step 2: Remove the screws from base before detaching base and stand from the monitor.   


  Wall Mounting (Optional) 

Refer to the instructions that come with the base mounting kit. To convert your LCD display from a 

desk-mounted to a wall-mounted display, do the following:   
Step 1: Verify that the Power button is turned Off, then disconnect the power cord.   
Step 2: Lay the LCD display face down on a towel or blanket.   
Step 3: Remove the base from the monitor, refer to "Detaching the monitor base and stand".   
Step 4: Attach the mounting bracket from the VESA compatible wall mounting kit (100mm x100mm 

distance), VESA Mounting Screw M4 x 10 mm. 

Step 5: Attach the LCD display to the wall, following the instructions in the wall-mounting kit. For use 

only with UL&GS Listed Wall Mount Bracket with minimum weight/load: 8kg 


Содержание 66A8-GAC6-WW

Страница 1: ...Lenovo Q24h 10 User Guide ...

Страница 2: ......

Страница 3: ...se and are sold to governmental entities as commercial items as defined by 48 C F R 2 101 with limited and restricted rights to use reproduction and disclosure LIMITED AND RESTRICTED RIGHTS NOTICE IF products data computer software or services are delivered pursuant a General Services Administration GSA contract use reproduction or disclosure is subject to restrictions set forth in Contract No GS ...

Страница 4: ...our monitor image 2 3 Using the direct access controls 2 3 Using the On Screen Display OSD controls 2 4 Selecting a supported display mode 2 7 Understanding power management 2 8 Caring for your monitor 2 9 Detaching the monitor stand 2 9 Wall Mounting Optional 2 9 Chapter 3 Reference information 3 1 Monitor specifications 3 1 Troubleshooting 3 2 Manually installing the monitor driver 3 4 Service i...

Страница 5: ...t will be attached must also be connected to properly wired and grounded power outlets To isolate the monitor from the electrical supply you must remove the plug from the power outlet The power outlet should be easily accessible To take special precautions to avoid the introduction of hazards when operating installing servicing transporting or storing equipment the necessary instructions shall be ...

Страница 6: ......

Страница 7: ...tional HDMI Cable Optional Monitor stand Monitor base Assembly tool kit Notice for use To setup your monitor please see the illustrations below Note Do not touch the monitor within the screen area The screen area is glass and can be damaged by rough handling or excessive pressure 1 Place your monitor with the screen face down on a soft flat surface 2 Align the stand assembly bracket to the monitor...

Страница 8: ...ion below for an example of the tilt range User controls Your monitor has controls on the front which are used to adjust the display For information on how to use these controls please see Adjusting your monitor image on page 2 3 Cable lock slot Your monitor is equipped with a cable lock slot located on the rear of your monitor Please follow the instructions that came with the cable lock to attach...

Страница 9: ...puter power cord 2 Connect the cables according to below icon indication Note Left USB3 0 output 5Vdc 0 9A Right USB3 0 output 5Vdc 2A Battery Charger 3 Connect one end of the HDMI cable to the HDMI connector on the back of the computer and the other end to the HDMI connector on the monitor Lenovo recommends that customers who require to use the HDMI input on their monitor purchase the Lenovo HDMI...

Страница 10: ...e that excessive and or extreme volume might damage your hearing ability 6 Connect one end of the USB cable to the USB downstream terminal of the monitor and connect the other end of the USB cable to an appropriate USB port on your device Note The USB Battery Charging Specification 1 2 output 5Vdc 1 5A typical 2A max and the other standard USB Output 5Vdc 900mA The USB downstream port does not pro...

Страница 11: ...not lighter than ordinary polyvinyl chloride flexible cord according to IEC 60227 designation H05VV F 3G 0 75mm or H05VVH2 F2 3G 0 75mm shall be used Alternative a flexible cord be of synthetic rubber according to IEC 60245 designation H05RR F 3G 0 75mm2 shall be used Note 1 This monitor supports USB C charging function please be sure to use the standard 135W power adapter with the monitor 2 When ...

Страница 12: ...for purchasing this Lenovo TM product Please take a few moments to register your product and provide us with information that will help Lenovo to better serve you in the future Your feedback is valuable to us in developing products and services that are important to you as well as in developing better ways to communicate with you Register your option on the following Web site http www lenovo com r...

Страница 13: ...n the desk comer or placing the keyboard in an adjustable drawer to create a deeper working surface 1 5 times of screen diagonal Monitor height Position the monitor so your head and neck are in a comfortable and neutral vertical or upright position If your monitor does not have height adjustments you might have to place books or other sturdy objects under the base of the monitor to achieve the des...

Страница 14: ...one posture for an extended period of time Periodically make minor modifications in your posture to help deter any discomforts that might arise Make use of any adjustments that your office furniture or equipment provide to accommodate changes in posture Short periodic breaks help ensure healthy computing Because computing is primarily a static activity it is particularly important to take short br...

Страница 15: ...or 10 seconds to enable or disable the DDC CI function Exit Exit and return to previous level 4 Display Mode Direct access to switch display mode Increase Up Press to move lighting indicator on main menu up from active item to last one Press to increase current values on adjustment bar 5 Brightness Direct access to Brightness adjustment Decrease Down Press to move lighting indicator on main menu d...

Страница 16: ...consumer electronics led by the U S government It was launched in 1992 by EPA and DOE to reduce energy consumption and greenhouse gas emissions Energy Star logo is a symbol of energy conservation and environmental protection It improves the concept of energy efficiency of consumers and manufacturers and effectively guides the market The regulation of Energy Star improves energy efficiency and redu...

Страница 17: ...rmal Extreme Image color setting Custom Red Increases or decreases the saturation of red in the image Green Increases or decreases the saturation of green in the image Blue Increases or decreases the saturation of blue in the image All input ports Preset Mode Adjusts intensity of red green and blue Bluish Neutral Reddish sRGB Low blue light Off On Speaker setting Volume Adjust the volume level All...

Страница 18: ...the length of time the OSD will remain active after the last time a button is pressed All input ports USB Charging Off On All input ports Smart Power Off On Only USB C input port Super USB C Charging Off On Only USB C input port Reset All Settings Resets monitor to the original factory settings Cancel Factory Reset The ENERGY STAR Logo means resets all user settings to default values so that the m...

Страница 19: ...r free Note If your system has previously been used with a CRT monitor and is currently configured to a display mode outside the range of this monitor you may need to re attach the CRT monitor temporarily until you have re configured the system preferably to 2560x1440 at 60Hz which is the Native Resolution Display mode The display modes shown below have been optimized at the factory Table 2 3 Fact...

Страница 20: ...ption Pon 13 94W ETEC 46 67kWh Maximum power consumption with max luminance This document is informational only and reflects laboratory performance Your product may perform differently depending on the software components and peripherals you ordered and shall have no obligation to update such information Accordingly the customer should not rely upon this information in making decisions about elect...

Страница 21: ...ittle mild detergent Detaching the monitor stand Step 1 Place the monitor on a soft and flat surface Step 2 Remove the screws from base before detaching base and stand from the monitor Wall Mounting Optional Refer to the instructions that come with the base mounting kit To convert your LCD display from a desk mounted to a wall mounted display do the following Step 1 Verify that the Power button is...

Страница 22: ......

Страница 23: ...onsumption is tested under OSD default setting Max Consumption Typical Consumption Standby Suspend Off 130 W maximum 18W typical 0 5W 0 3W Video input Digital Interface Horizontal addressability Vertical addressability Clock frequency DP 2560 pixels max 1440 lines max 300 MHz Video input Digital Interface Horizontal addressability Vertical addressability Clock frequency HDMI 2560 pixels max 1440 l...

Страница 24: ...isplay mode for your computer If these options do not work contact the Customer Support Centre Selecting a supported display mode on page 2 7 The image quality is unacceptable The video signal cable is not connected with the monitor or system completely Be sure the signal cable is firmly plugged into the system and monitor Connecting and turning on your monitor on page 1 3 The color settings may b...

Страница 25: ...appear discoloured This is a characteristic of the LCD technology and is not an LCD defect If there are more than five pixels missing contact the Customer Support Centre Appendix A Service and Support on page A 1 Fuzzy lines in text or a blurry image Horizontal or vertical lines through the image Your system Display Properties setting have not been optimized Adjust the resolution settings on your ...

Страница 26: ...lay settings tab 7 Click the Advanced Settings icon 8 Click the Monitor tab 9 Click the Properties button 10 Click the Driver tab 11 Click Update Driver then click Browse the computer to find the driver program 12 Select Pick from the list of device driver program on the computer 13 Click the Have Disk button By clicking the Browse button browse and point to the following path X Monitor Drivers Wi...

Страница 27: ...k the Monitor tab 9 Click the Properties button 10 Click the Driver tab 11 Click Update Driver then click Browse the computer to find the driver program 12 Select Let me pick from a list of device drivers on my computer 13 Click the Have Disk button By clicking the Browse button browse and point to the following path X Monitor Drivers Windows 10 where X indicates the folder in which the downloaded...

Страница 28: ...ations The following are examples of misuse or abuse and not covered by warranty Images burned on to the screen of a CRT monitor Burned image is preventable by utilizing a moving screen saver or power management Physical damage to covers bezel base and cables Scratches or punctures on monitor screens Getting further help If you still can t solve your problem please contact the Customer Support Cen...

Страница 29: ...gh the Customer Support Center will be available until 90 days after the option has been withdrawn from marketing After that time the support is cancelled or made available for a fee at Lenovo s discretion Additional support is also available for a nominal fee Before contacting a Lenovo technical support representative please have the following information available option name and number proof of...

Страница 30: ......

Страница 31: ...tice The products described in this document are not intended for use in implantation or other life support applications where malfunction may result in injury or death to persons The information contained in this document does not affect or change Lenovo product specifications or warranties Nothing in this document shall operate as an express or implied license or indemnity under the intellectual...

Страница 32: ...ed computers and monitors by the manufacturer was begun in October 1 2003 This service is provided free of charge for home used computers sold after October 1 2003 For details visit the Lenovo Web site at www ibm com jp pc service recycle personal Disposing of Lenovo computer components Some Lenovo computer products sold in Japan may have components that contain heavy metals or other environmental...

Отзывы: