background image


Chapter 3.       

 3-4


Manual image setup

If automatic image setup does not establish the image that you prefer, perform manual image 
setup. (For VGA [analog] only)

Note: 

Have your monitor powered on for about 15 minutes, until the monitor warms up.

1. Press 

 to open the OSD menu.

2. Use   or   to select   and press   to access.

3. Use   or   to select Manual and press   to access.

4. Use   or   to select 

Clock

 or 

Phase

 adjustment. 

Clock:

 (pixel frequency) adjusts the number of pixels scanned by one horizontal 

sweep. If the frequency is not correct, the screen shows vertical stripes and the picture 
does not have the correct width.

Phase: 

adjusts the phase of the pixel clock signal. With a wrong phase adjustment, 

the picture has horizontal disturbances in light picture.

5. When the image no longer looks distorted, press Enter to save the adjustments of 

Clock


and 

Phase

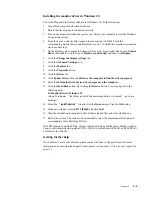
.

6. Press    to leave the OSD menu.

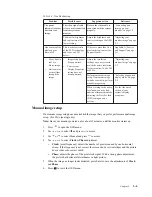
The power 
indicator is amber, 
but there is no 
image.

The video signal cable 
is loose or disconnected 
from the system or 
monitor.

Be sure the video cable is 
connected with the system 
properly.

“Connecting and 
turning on your 
monitor”on page 1-5

The monitor brightness 
and contrast are at the 
lowest setting.

Adjust the brightness and 

contrast setting on the OSD 
menu.

“Adjusting your 
monitor image”on page 
2-3

One or more of the 
pixels appear 
discolored.

This is a characteristic 
of the LCD technology 
and is not an LCD 
defect.

If there are more than five 
pixels missing, contact the 
Support Center.

Appendix A.“Service 
and Support”on page 

A-1

Fuzzy lines in 
text or a 
blurry image.

Horizontal or 
vertical lines 
through the 
image.

Image setup has not 
been optimized.

Your system 

Display Properties 
setting have not 
been optimized.

Adjust the resolution 

settings on your system to 
match the native resolution 
for this monitor: 1440 x 900 
at 60 Hz.

“Adjusting your 
monitor image”on page 
2-3

Perform automatic image 
setup. If automatic image 
setup does not help, perform 
manual image setup. 

“Selecting a supported 
display mode”on page 
2-9

When working in the native 
resolution, you may find 
additional improvements by 
adjusting the Dots Per Inch 
(DPI) setting on your 
system.

See the Advanced 
section of your 
system’s display 
properties.

Table 3-2. 

Troubleshooting

Problem

Possible cause

Suggested action

Reference

Содержание 65C5-KCC1-WW

Страница 1: ...Lenovo L2264A User Guide ...

Страница 2: ...ercial items as defined by 48 C F R 2 101 with limited and restricted rights to use reproduction and disclosure LIMITED AND RESTRICTED RIGHTS NOTICE If products data computer software or services are delivered pursuant a General Services Administration GSA contract use reproduction or disclosure is subject to restrictions set forth in Contract No GS 35F 05925 Product number LI2264d 65C5 KCC1 WW ...

Страница 3: ...Using the direct access controls 2 3 Using the On Screen Display OSD controls 2 4 Selecting a supported display mode 2 9 Understanding power management 2 10 Caring for your monitor 2 11 Detaching the monitor base and stand 2 11 Chapter 3 Reference information 3 1 Monitor specifications 3 1 Troubleshooting 3 3 Manual image setup 3 4 Manually installing the monitor driver 3 5 Installing the monitor ...

Страница 4: ...t will be attached must also be connected to properly wired and grounded power outlets To isolate the monitor from the electrical supply you must remove the plug from the power outlet The power outlet should be easily accessible To take special precautions to avoid the introduction of hazards when operating installing servicing transporting or storing equipment the necessary instructions shall be ...

Страница 5: ...nstructions for the user For quick instruction overview please see the Setup Poster for brief information Shipping contents The product package should include the following items Information Flyer Flat Panel Monitor Adapter Analog Cable for VGA use HDMI Cable Base Stand HDMI For USA Only ...

Страница 6: ... can be damaged by rough handling or excessive pressure 1 Place your monitor with the screen face down on a soft flat surface 2 Align the stand assembly bracket to the monitor 3 Insert the base towards monitor until it locks in place Note To install a VESA mount please see Step 2 Remove the screws from base before detaching base and stand from the monitor on page 2 11 ...

Страница 7: ... overview This section will provide information on adjusting monitor positions setting user controls and using the cable lock slot Types of adjustments Tilt Please see the illustration below for an example of the tilt range ...

Страница 8: ...he panel frame are accesses to various functions For information on how to utilize these keypad controls please see Adjusting your monitor image on page 2 3 Cable lock slot Your monitor is equipped with a cable lock slot located on the rear of your monitor ...

Страница 9: ...ion on page iii before carrying out this procedure 1 Power off your computer and all attached devices then unplug the computer power cord 2 Connect one end of the analog signal cable to the monitor VGA Analog connector and the other end to the computer 3 Connect one end of the HDMI cable to the monitor HDMI port and the other end to the computer if it has HDMI output terminal HDMI ...

Страница 10: ...tified power supply cord has to be used with this equipment The relevant national installation and or equipment regulations shall be considered A certified power supply cord not lighter than ordinary polyvinyl chloride flexible cord according to IEC 60227 designation H05VV F 3G 0 75mm or H05VVH2 F2 3G0 75mm shall be used Alternative a flexible cord be of synthetic rubber according to IEC 60245 des...

Страница 11: ...Chapter 1 1 7 5 Power on the monitor and the computer ...

Страница 12: ... the monitor driver download the driver that corresponds to your monitor model from the Lenovo website http support lenovo com docs LI2264d Refer to the Manually installing the monitor driver on page 3 5 section to install the driver ...

Страница 13: ...ing your monitor Position and adjust your computer monitor for comfortable viewing by considering the following items Viewing distance Optimal viewing distances for monitors range from approximately 510 mm to 760 mm 20 in to 30 in and can vary depending on ambient light and time of day You can achieve different viewing distances by repositioning your monitor or by modifying your posture or chair p...

Страница 14: ...mize the position and orientation of your equipment by following the tips outlined in Arranging your work area on page 2 1 so you can maintain a comfortable and productive posture Also be sure to use the adjustment capabilities of your computer components and office furniture to best suit your preferences now and as your preferences change over time Minor changes in posture can help avoid discomfo...

Страница 15: ... mode DDC CI Press and hold for 10 seconds to enable or disable the DDC CI function Exit Exit and return to previous level 2 Auto Adjustment Optimizes image size position phase and clock For analog VGA source only Decrease Down Left browsing key For decreasing the value on adjustment bar tune in Press to move to previous item 3 NOVO VISION Direct access to NOVO VISION adjustment Low Blue Light Pre...

Страница 16: ...n Use or to make adjustments then press to save 3 Press to move backwards through the sub menus and exit from the OSD 4 Press and hold for 10 seconds to lock the OSD This will prevent accidental adjustments to the OSD Press and hold for 10 seconds to unlock the OSD and allow adjustments to the OSD 5 Enables DDC CI by default Use OSD Exit Key press and hold for 10 seconds to disable enable DDC CI f...

Страница 17: ...me as Analog Contrast Adjusts difference between light and dark areas DCR Enable dynamic contrast ratio OFF ON Game Gaming Mode Switch OFF FPS1 FPS2 RTS Game1 Game2 Bright dim adjust Bright and dim adjust Refresh rate Refresh rate num OFF Top Left Top Right Bottom Left Bottom Right Low Blue Light Enable Low Blue Light Select to enable Low Blue Light Disable Low Blue Light Select to disable Low Blu...

Страница 18: ...Vertical Position Moves image up or down Image Setup Automatic Optimizes image size position phase and clock Manual Manually optimizes image See Manual image setup on page 3 4 Clock Phase Save Table 2 1 OSD functions OSD Icon on Main Menu Submenu Description Controls and Adjustments Analog Controls and Adjustments DVI ...

Страница 19: ...ept video signals through three different connectors Most desktop computers use a D SUB connector Select digital among OSD Controls when you use DVI connector Selects D SUB Analog Selects DVI Digital Scaling Selects type of scaled image Original AR same aspect ratio with input signal Full Screen expand image to full screen Over Drive Respond time enhancement OFF Normal Extreme NOVO VISION Screen p...

Страница 20: ...ttings Custom Horizontal Changes the horizontal position of the OSD Vertical Changes the vertical position of the OSD Save Save the custom position choices Same as Analog Reset Cancel Reset Reset monitor to the original settings Accessibility Changes button repeat rate and menu time out settings Button repeat rate Select or to change Off Default Slow Menu time out Sets the length of time the OSD w...

Страница 21: ...erently flicker free Note If your system has previously been used with a CRT monitor and is currently configured to a display mode outside the range of this monitor you may need to reattach the CRT monitor temporarily until you have re configured the system preferably to 1920 x 1080 at 60 Hz which is a common display mode The display modes shown below have been optimized at the factory Table 2 2 F...

Страница 22: ... of each working day or whenever you expect to leave it unused for long periods during the day Table 2 3 Power indicator State Power Indicator Screen Restoring Operation Compliance On White Normal Standby Suspend Amber Blank Press a key or move the mouse There may be a slight delay before the image reappears Note Standby also occurs if there is no image output to the monitor ENERGY STAR Off Off Bl...

Страница 23: ...brasive items This type of contact may cause permanent damage to your screen Use any cleaner which contains an anti static solution or similar additives This may harm the coating of the screen area Do Lightly dampen a soft cloth with water and use this to gently wipe the covers and the screen Remove grease or finger marks with a damp cloth and a little mild detergent Detaching the monitor base and...

Страница 24: ...ange 5 20 VESA mount Supported 100 mm x 100 mm 3 94 in x 3 94 in Image Viewable image size Maximum height Maximum width Pixel pitch 546 1 mm 21 5 in 476 1 mm 18 7 in 267 8 mm 10 5 in 0 24795 mm 0 01 in AC DC adapter Model Rating DELTA ELECTRONICS INC ADP 30AD B FSP GROUP INC FSP030 FCVL1 for USA Input Delta 100 240V 1 2A FSP 100 240V 0 8A Output Delta 19V 1 58A FSP 20V 1 5A Power consumption Note ...

Страница 25: ...cy HDMI VESA TMDS Panel Link 1920 pixels max 1080 lines max 170 MHz Communications VESA DDC CI Supported display modes Horizontal frequency Vertical frequency 30 KHz 83 KHz 48 Hz 76 Hz Native Resolution 1920 x 1080 at 60 Hz Temperature Operating Storage Shipping 0 to 40 C 32 to 104 F 20 to 60 C 4 to 140 F 20 to 60 C 4 to 140 F Humidity Operating Storage Shipping 10 to 80 non condensing 5 to 95 non...

Страница 26: ... cable is not connected with the monitor or system completely Be sure the signal cable is firmly plugged into the system and monitor Connecting and turning on your monitor on page 1 5 The color settings may be incorrect Select another color setting from the OSD menu Adjusting your monitor image on page 2 3 The automatic image setup function was not performed Perform automatic image setup Adjusting...

Страница 27: ...with the system properly Connecting and turning on your monitor on page 1 5 The monitor brightness and contrast are at the lowest setting Adjust the brightness and contrast setting on the OSD menu Adjusting your monitor image on page 2 3 One or more of the pixels appear discolored This is a characteristic of the LCD technology and is not an LCD defect If there are more than five pixels missing con...

Страница 28: ...nd Sound icon and then click the Display icon 6 Click the Change the display settings tab 7 Click the Advanced Settings icon 8 Click the Monitor tab 9 Click the Properties button 10 Click the Driver tab 11 Click Update Driver then click Browse the computer to find the driver program 12 Select Pick from the list of device driver program on the computer 13 Click the Hard Disk button By clicking the ...

Страница 29: ...e computer to find the driver program 12 Select Pick from the list of device driver program on the computer 13 Click the Hard Disk button By clicking the Browse button browse and point to the following path X Monitor Drivers Windows 10 where X indicates Āthe folder in which the downloaded driver is locatedā such as a desktop 14 Select the Ālenli2264d infā file and click the Open button Click the O...

Страница 30: ...lation and configuration support through the Customer Support Center will be available until 90 days after the option has been withdrawn from marketing After that time the support is cancelled or made available for a fee at Lenovo s discretion Additional support is also available for a nominal fee Before contacting a Lenovo technical support representative please have the following information ava...

Страница 31: ...n new editions of the publication Lenovo may make improvements and or changes in the product s and or the program s described in this publication at any time without notice The products described in this document are not intended for use in implantation or other life support applications where malfunction may result in injury or death to persons The information contained in this document does not ...

Страница 32: ...r the collecting reuse and recycling of disused computers and monitors For details visit the Lenovo Web site at http www lenovo com recycling japan Pursuant to the Law for Promotion of Effective Utilization of Resources the collecting and recycling of home used computers and monitors by the manufacturer was begun on October 1 2003 This service is provided free of charge for home used computers sol...

Страница 33: ...Appendix B B 3 Power cords and power adapters Use only the power cords and power adapters supplied by the product manufacturer Do not use the ac power cord for other devices ...

Отзывы: